Easy Crochet Tiny Going Viral Keychain Amigurumi Pattern
There’s something almost magical about watching a strand of yarn transform into a tiny, squishy character in your hands. Stitch by stitch, loop by loop, you’re not just making a craft you’re creating a little pocket-sized friend with personality. That’s the beauty of crochet amigurumi: it combines creativity, comfort, and pure cuteness into one satisfying project. And when that project is small enough to hang on your keys, your bag, or your favorite zipper pull, it becomes the kind of handmade treasure you want to take everywhere.
This Easy Crochet Tiny Going Viral Keychain Amigurumi Pattern is inspired by those trending mini plush keychains you see all over social media tiny, round, and ridiculously adorable. It’s designed to be eye-catching even from far away, with a simple rounded body, big kawaii-style eyes, and a sweet embroidered smile. The shape is minimal and modern, so it works with many color palettes: pastel, bold, monochrome, or even variegated. It’s the kind of piece that makes people say, “Omg, where did you get that?!”
One of the best things about this project is that it’s friendly for both beginners and experienced crocheters. If you’re new to amigurumi, you’ll practice foundational techniques like the magic ring, increasing in the round, and simple shaping. If you’re more advanced, you can have fun playing with facial expressions, color-blocking, and small accessories like mini bows, hats, or scarves. It’s quick, fun, and gives you a lot of creative freedom without being overwhelming.
Crocheting these tiny keychain amigurumi pieces is also incredibly calming. The repetitive rounds, the gentle squeeze of the stuffed shape, and the quiet focus of counting stitches can feel like a mini meditation session. And when you finally weave in the last tail, attach the keyring, and hold up your finished piece, there’s a real sense of accomplishment. This project is perfect for slow crafting, cozy evenings, and thoughtful gifting whether you’re making one special keychain or a whole batch to share with friends, customers, or followers.

3. Materials & Tools
Here’s everything you’ll need to make your tiny viral keychain amigurumi:
Yarn
Yarn Type:
100% cotton or cotton-blend yarn works beautifully for keychains because it’s durable and holds shape well.
Soft acrylic yarn is also fine and can give a slightly fluffier, plush look.
Weight:
DK / Light Worsted (Category 3) or Worsted (Category 4) yarn.
The pattern below is written with worsted weight in mind, but you can scale the size up or down by changing the yarn weight and hook size.
Colors:
Main Color (MC): for the body (1 small ball or leftover scrap).
Accent Color (optional): for blush, accessories, or little details like stripes, tiny “collar,” etc.
Black / Dark Yarn or Embroidery Thread: for the mouth and optional eyebrows or eyelashes.
Hook
Recommended Hook Size:
2.5 mm to 3.0 mm hook with worsted yarn for tight, sturdy stitches.
Use a smaller hook than your yarn label suggests—that’s key for neat amigurumi.
Stuffing
Polyester fiberfill or other clean, fluffy stuffing.
You only need a small handful for one tiny keychain.
Safety Eyes
6 mm or 8 mm safety eyes (or you can embroider eyes with black yarn if you prefer a no-plastic or baby-safe option).
Notions
Tapestry (yarn) needle – for sewing in ends and embroidering facial details.
Scissors – sharp enough for clean cuts.
Stitch marker – a locking stitch marker, safety pin, or contrasting scrap yarn to mark the first stitch of each round.
Keychain hardware – a metal keyring with a short chain and jump ring is ideal.
Choosing Yarn Texture, Weight & Color
For a crisp, defined look, choose smooth cotton or mercerized cotton yarn; it makes the stitches pop in photos.
For a soft, squishy, plush vibe, choose a soft acrylic or cotton-acrylic blend.
Lighter colors (pastels, creams, soft yellows, mint, baby pink) make the facial features stand out and look extra kawaii.
Darker colors work too, but you may want to use larger eyes or brighter accents so the face doesn’t disappear.
If you’re a total beginner, avoid fuzzy or eyelash yarn; it’s cute but makes it harder to see your stitches.
4. Step-by-Step Crochet Instructions
This Easy Crochet Tiny Going Viral Keychain Amigurumi Pattern is worked in one main piece from the top down: head → neck → body → base. You can add optional tiny details afterward.
Pattern Notes
Skill Level: Easy / Confident Beginner
Terms: US crochet terms
Worked In: Continuous rounds (spirals). Do not join at the end of each round unless noted.
Use a stitch marker in the first stitch of every round so you don’t lose your place.
Abbreviations (US Terms)
mr – magic ring (magic circle)
sc – single crochet
inc – increase (2 sc in the same stitch)
dec – decrease (sc2tog; you can also use invisible dec)
sl st – slip stitch
ch – chain
st / sts – stitch / stitches
FO – fasten off
4.1 Making the Head
Using your main color (MC):
Round 1:
Make a magic ring, work 6 sc into the ring. Pull the tail tight.
(6 sts)
Round 2:
Inc in each st around (2 sc in each stitch).
(12 sts)
Round 3:
(1 sc, inc) repeat around.
(18 sts)
Round 4:
(2 sc, inc) repeat around.
(24 sts)
Rounds 5–7 (3 rounds):
Sc in each st around.
(24 sts per round)
You’ve now formed a neat round head.
Expert Shaping Tip:
Keep your tension even—if you find gaps between stitches, hold the yarn a tad firmer or drop to a smaller hook size.
After Round 5, you can gently cup the piece in your palm to help it curve into a ball shape instead of a flat disc.
4.2 Adding the Face & Forming the Neck / Upper Body
This is a good moment to place the eyes and embroider the basic face before the opening gets too small.
Placing the Safety Eyes:
Insert safety eyes between Rounds 5 and 6, about 4–5 stitches apart.
Try different positions before snapping the backs on—close together = cuter, wide apart = more “chibi” style.
Once you’re happy with placement, attach the backs securely.
Embroidering the Mouth (Optional Now or Later):
With a small piece of black yarn or embroidery thread, bring your needle out under one eye.
Make a gentle “V” or “U” shape across 2–3 stitches for a kawaii smile.
Secure the ends inside and trim neatly.
Round 8 (Start shaping neck):
(2 sc, dec) repeat around.
(18 sts)
Round 9 (Neck):
(1 sc, dec) repeat around.
(12 sts)
Now the head narrows slightly into a tiny neck, which makes your amigurumi look more character-like instead of just a ball.
Stuffing Tip:
Begin stuffing the head firmly after Round 9.
Use small pinches of fiberfill; push them in gently with the blunt end of your hook or a chopstick.
Aim for a smooth, round shape—no hard lumps or visible gaps.
4.3 Building the Main Body
Round 10:
(1 sc, inc) repeat around.
(18 sts)
Round 11:
(2 sc, inc) repeat around.
(24 sts)
Rounds 12–14 (3 rounds):
Sc in each st around.
(24 sts per round)
This creates a cute, slightly chubby body that’s still in proportion with the head.
🪄 Balancing Tip:
As you crochet Rounds 12–14, continue to add stuffing gradually, focusing on the neck area so it doesn’t collapse.
The body should feel firm but still gently squishy when you squeeze it.
4.4 Shaping the Base
Now we’ll narrow down the body to close the bottom and give your tiny amigurumi a stable base.
Round 15:
(2 sc, dec) repeat around.
(18 sts)
Round 16:
(1 sc, dec) repeat around.
(12 sts)
Pause here and finish stuffing the body. Make sure:
The overall shape is nicely rounded.
The piece can sit upright in your hand; adjust the stuffing if it’s leaning too much to one side.
Round 17:
Dec in each st around (6 dec total).
(6 sts)
Cut the yarn, leaving a long tail for closing the base. Thread the tail on a tapestry needle and:
Weave through the front loops of the remaining 6 stitches.
Pull tight like a drawstring to close the hole.
Secure with a small knot and hide the remaining tail inside the body.
Base Shaping Tip:
Gently flatten the bottom by pressing it slightly against a flat surface while the stuffing is still shiftable. This helps your tiny amigurumi stand or sit nicely when not hanging on keys.
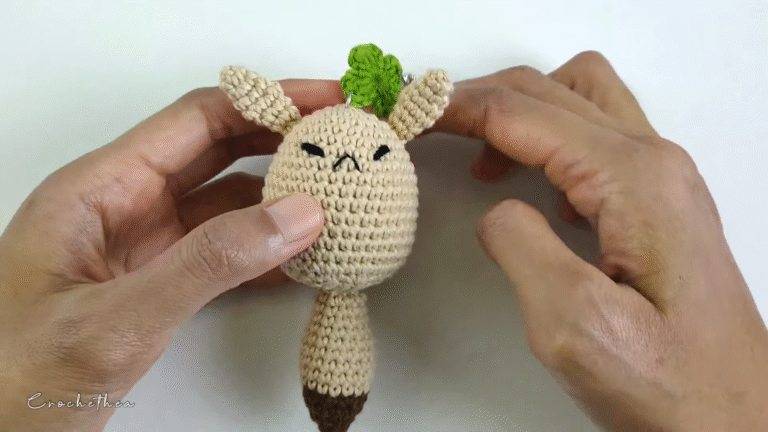
4.5 Creating a Tail or Tiny Limbs (Optional)
You can absolutely leave your little character as a simple blob-style amigurumi—it’s super trendy and minimal. But if you want extra character:
Option A: Tiny Tail
Attach yarn at the back near the base.
Ch 4, then sl st back into the same st.
FO and weave in end.
This creates a little nub tail that looks cute on animal-themed versions.
Option B: Tiny Feet (Simple Version)
Instead of crocheting separate legs, you can embroider small ovals or stitch on tiny felt circles at the base front to suggest feet. It’s easy, flat, and doesn’t require extra shaping.
4.6 Assembly, Keychain Positioning & Yarn Loop
Now let’s turn your mini amigurumi into a usable keychain.
A. Adding a Yarn Loop (Recommended)
Cut a 15–20 cm strand of your main or contrast yarn.
Insert your hook at the very top center of the head (between the eyes).
Pull the string through to create a loop.
Tie the ends together inside the head securely, or:
Ch 8–10, then sl st back into the same top stitch to form a firm crochet loop.
Weave in any visible ends.
This loop gives your keyring hardware something strong and neat to grab onto.
B. Attaching the Keychain Hardware
Open the jump ring with small pliers.
Slip it through the yarn loop at the top of the amigurumi.
Attach it to the keychain ring or chain and close the jump ring tightly.
Now you’ve got a tiny going-viral style amigurumi that’s actually ready to hang on your keys or bag!
4.7 Final Touches & Accessories
To really give your Easy Crochet Tiny Going Viral Keychain Amigurumi Pattern that Instagram-ready finish:
Blush Cheeks:
Use a little pink yarn or embroidery thread to make small straight stitches on each side of the mouth.
Or lightly dab fabric-safe blush or pink eyeshadow (for display pieces only).
Eyebrows / Eyelashes:
Add tiny stitched lines above the eyes for extra expression. Upward = happy, slanted = cheeky.
Mini Bow or Scarf:
Bow: Ch 6, sl st in first ch to form a loop. Wrap yarn around the center several times, tie off, and sew to the side of the head.
Scarf: Ch 18–22, sl st across one side (optional for texture), and tie around the neck.
Each tiny detail helps your amigurumi stand out in photos and in person.
5. Customization Ideas
Once you’ve made one, you’ll want to make a dozen. Here are some fun ways to customize your tiny keychain:
Alternative Color Schemes:
Pastel rainbow set (mint, baby pink, lilac, butter yellow, sky blue).
Moody dark tones (forest green, navy, burgundy) with bright eyes.
Monochrome (all white with black details, or all beige with brown accents).
Different Yarn Types:
Use velvet or chenille yarn (with a smaller stitch count) for a chubbier, plushy look.
Try sparkle yarn or metallic thread held together with regular yarn for a magical, fantasy vibe.
Themed Versions:
Holiday: red + green for Christmas, orange + black for Halloween, pastel eggshell tones for Easter.
Rainbow: change color every few rounds to create horizontal stripes on the body.
Fantasy: add a tiny felt horn for a unicorn, small felt ears for a cat, or tiny wings cut from felt for a fairy version.
Add-On Props:
Tiny crochet heart sewn to the front.
Mini flower crown (sew small lazy-daisy embroidery flowers around the head).
Little “name tag” charm attached next to the keyring.
These variations make your tiny going viral keychain amigurumi uniquely yours and perfect for collections or market stalls.
6. Advanced Tips & Troubleshooting
Even though this is an easy pattern, these expert tips will help you get professional-looking results:
Invisible Decreases:
Instead of a regular dec, insert your hook into the front loop only of the next stitch, then front loop of the following stitch, yarn over, pull through both loops, yarn over, pull through two. This reduces gaps and keeps the rounds smooth.
Keep Even Tension:
Hold your yarn consistently and try not to loosen up when you get tired. Uneven tension can cause bumpy sides and visible stuffing.
Prevent Twisting Rounds:
Always move your stitch marker up to the first stitch of each new round. If your seam slants heavily, don’t worry—it’s normal with spirals and won’t show much on tiny pieces.
Fixing Uneven Shapes:
If your piece bulges weirdly, you might have miscounted a stitch. You can often “cheat” by adding or skipping a single sc in the next round to get back on track.
Avoid Overstuffing:
Too much stuffing can stretch your stitches and make holes. Add small pieces at a time and stop when the shape feels firm but not rock hard.
Joining Parts Seamlessly:
For tails, bows, or tiny felt details, use whipstitch with matching yarn and keep stitches small. Pull gently to avoid dents in the body.
Reading Pattern Abbreviations:
Example: (2 sc, inc) x 6 means: work 2 single crochets, then 1 increase, and repeat that little sequence six times total around the round.
Counting Without Stress:
If counting every stitch exhausts you, count in small groups: 6, 12, 18, 24. Use your stitch marker and occasionally recount your total stitches at the end of each round.
Neat Color Changes (If Using Stripes):
Always change color in the last yarn-over of the last stitch of the old color. This keeps the transition cleaner.
Eye Safety:
Once safety eyes are attached, they are hard to remove. Always test placement first by poking them in without the backs, adjust until you’re happy, then snap on the backs securely.
7. Care Instructions
To keep your crochet tiny keychain amigurumi looking cute and fresh:
Gentle Hand Wash:
If it gets dirty, swish it gently in cool or lukewarm water with a drop of mild detergent.
Mild Detergent Only:
Avoid bleach or harsh cleaners that can fade yarn or damage fibers.
Rinse and Gently Squeeze:
Rinse well, then press out water by squeezing softly or pressing between two towels—don’t twist or wring.
Air Dry Flat:
Lay it on a clean towel, reshape it, and let it dry naturally. Avoid dryers, as heat can warp safety eyes or keychain hardware.
Avoid Direct Sunlight:
Long-term exposure to bright sun can fade colors, especially pastel cotton.
Safe Storage:
For gifting or display stock, store in a clean, dry box or bag, away from dust, pets, and moisture.
8. Benefits of Making This Tiny Keychain Amigurumi
Working on this Easy Crochet Tiny Going Viral Keychain Amigurumi Pattern is more than just following stitches it’s a self-care ritual:
Relaxation & Mindfulness:
The repetitive motion of single crochet encourages you to slow down, breathe, and focus on each stitch. It’s a gentle, creative form of mindfulness.
Stress Relief Through Crafting:
Turning a small ball of yarn into a cute character can be surprisingly therapeutic, especially on stressful days.
Sense of Accomplishment & Joy:
Because these keychains work up quickly, you get that satisfying “I finished something!” feeling in a short time.
Eco-Friendly, Sustainable Gifting:
Handmade gifts encourage slow fashion and conscious consumption. You can use up scrap yarns instead of buying new items.
Emotional Connection Through Handmade Art:
A tiny crochet keychain might be small, but it can carry big feelings—memories of who made it, when, and why. It’s a little token of love that travels everywhere.
9. Photography & Social Media Tips
If you want your tiny going viral keychain amigurumi to actually go viral on social media, presentation matters:
Use Natural Daylight:
Take photos near a window with soft, indirect light. Avoid harsh overhead lights that create strong shadows.
Add Props:
Surround your keychain with balls of yarn, your crochet hook, a basket, or a cute notebook to tell a story in the picture.
Soft Backgrounds:
Use neutral backdrops like white, beige, wood, or light-colored fabric so the colors of your amigurumi pop.
Close-Up Shots:
Zoom in on the face, the texture of the stitches, or tiny accessories. People love seeing the detail in handmade items.
Show Scale:
Take a picture of the keychain in your hand, next to keys, or clipped onto a bag so viewers understand how tiny and adorable it is.
Consistent Aesthetic:
If you’re posting multiple photos, use similar lighting and editing so your feed feels cohesive and professional.
10. Conclusion
Crocheting this Easy Crochet Tiny Going Viral Keychain Amigurumi Pattern is such a joyful little journey from the first magic ring to the final tug of the keyring. In just a short time, you turn a bit of yarn into something with personality, charm, and a whole lot of heart. Every stitch holds a moment of your focus, your mood, and your creativity.
Whether you make it as a gift, a market item, a desk buddy, or a treat just for yourself, this tiny amigurumi keychain will bring smiles wherever it goes. So grab your yarn, pick your favorite colors, and start hooking—one round at a time. You might be surprised how quickly your tiny handmade friend becomes the star of your keys, your feed, and maybe even your next viral post.