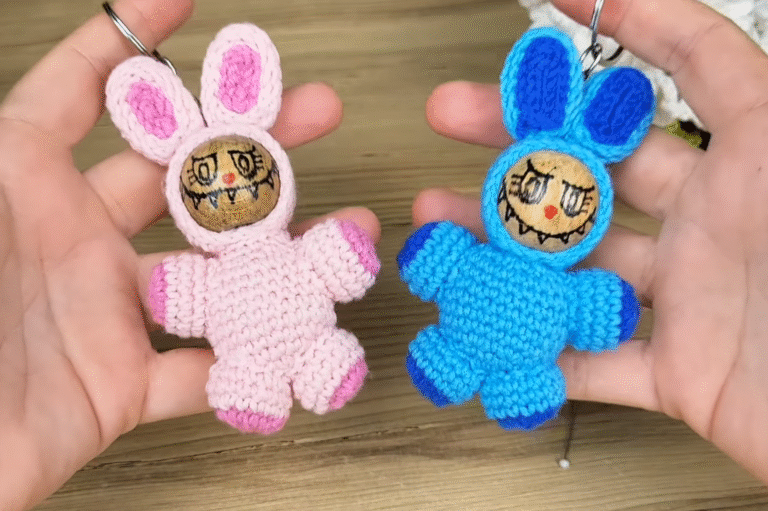
DIY Crochet Cute Doll Keychain Amigurumi Pattern
There’s something heartwarming about creating tiny handmade characters, and this Crochet Cute Doll Keychain Amigurumi perfectly captures that feeling. This little doll is adorable, soft, and full of personality with a small rounded body, tiny limbs, and a sweet little face that’s sure to make anyone smile.
The finished doll is lightweight and compact, designed to hang from a keyring or bag, making it both practical and cute. It has that timeless amigurumi charm soft shapes, gentle colors, and expressive details. You can customize her with different hairstyles, dress colors, or even tiny accessories like a bow or scarf. The result is a piece that feels personal, meaningful, and irresistibly delightful.
This pattern is suitable for anyone whether you’re a beginner looking for your first amigurumi project or an experienced crocheter who enjoys quick, satisfying makes. It’s also a wonderful stash-buster for leftover yarn. Perfect as a handmade gift, collectible, or cute accessory, this mini doll is small enough to finish in an afternoon but lovely enough to cherish for years.

Materials Needed
You only need a few simple supplies to create your own mini doll keychain:
Yarn: Cotton or acrylic yarn in 2–4 colors (skin tone, hair, clothing, accessories); light (DK) or sport weight recommended.
Crochet Hook: 2.0 mm–2.5 mm, depending on your yarn weight.
Stuffing: Polyester fiberfill or any soft stuffing for shaping the doll.
Safety Eyes: 6 mm or 8 mm (or use embroidery thread for stitched eyes).
Tapestry Needle: For sewing parts together and weaving in ends.
Scissors: To trim yarn.
Stitch Markers: Optional but helpful when working in continuous rounds.
Keyring or Lobster Clasp: To attach your finished doll.
Optional: Tiny ribbons, lace, or felt for accessories.
When choosing yarn, cotton works beautifully for its stitch definition and durability especially for small items that will be handled often. Acrylic yarn is another good option if you prefer a softer, fluffier look.
For colors, try pastels for a soft, sweet look or bright tones for a playful design. You can even match the doll’s outfit to a season think red and green for Christmas, or lavender and white for spring. The versatility of this pattern lets you make endless variations!
Level of Difficulty
This pattern is beginner to intermediate-friendly, depending on how detailed you make your doll. The basic body uses simple stitches like chain (ch) and single crochet (sc), along with increases (inc) and decreases (dec) to shape the head and body. You’ll also work in the round using a magic ring.
It’s a great practice project for anyone wanting to learn amigurumi construction and shaping. Even if you’re new to crocheting dolls, don’t worry the tutorial breaks everything into small, easy-to-follow steps. With patience and steady hands, you’ll see your cute little character come to life before your eyes.
Step-by-Step Overview
1. Starting the Head
Begin with a magic ring and work in single crochets to form the head. You’ll gradually increase the number of stitches to create a rounded ball shape. This part forms the doll’s face and top of the head.
Tip: Keep your tension even too tight and the stuffing won’t fit smoothly; too loose and you’ll have visible holes. Insert the safety eyes once your head is about halfway done, before closing the bottom. Adjust the placement to match the expression you want: closer for a cute baby-like look, or wider apart for a gentle, calm appearance.
2. Crocheting the Body
Once the head is complete, you’ll move on to the body section. It’s usually worked in continuous rounds, shaping from wider at the top to narrower at the bottom. The goal is a soft, oval torso that balances well under the head.
At this stage, lightly stuff the head and body not too much, just enough to hold the shape. Overstuffing can stretch the stitches or distort the form, so add small amounts gradually as you go.
3. Making the Arms and Legs
The arms and legs are crocheted separately as small tubes or ovals. They’re simple to make just a few rounds each and you can vary their length depending on your preferred doll proportion.
Once finished, attach the limbs carefully using your tapestry needle. It helps to pin them in place first to check symmetry. This small detail makes a big difference in how balanced and neat your doll looks.
4. Adding the Hair
One of the most enjoyable parts of this project is giving your doll a hairstyle. You can crochet a small cap in the yarn color of your choice and attach strands of yarn for hair, or simply embroider lines for a minimalist look.
If you decide to add strands, cut equal lengths of yarn and loop them through the cap using a hook. Then trim or style them into pigtails, buns, or short curls. A few light stitches can secure the hair in place.
5. Dressing the Doll
You can either crochet a separate mini dress or work the clothing directly onto the body. Many crafters prefer crocheting it as part of the body simply switch yarn colors mid-round to form a shirt or dress section.
Add small decorative details like a ribbon belt, a tiny bow, or even a crocheted flower to make the outfit special. This is where you can really personalize your doll’s personality from cute and playful to elegant and simple.
6. Assembling and Joining
Once all parts are made, it’s time to sew everything together. Start by securely attaching the head to the body using a tapestry needle and matching yarn. Then sew on the arms and legs, making sure they align evenly on both sides.
If your doll looks slightly off-balance, gently reshape it by hand. Amigurumi is quite forgiving a little stretching or adjusting can make everything fall into place.
7. Adding Details and Finishing Touches
Finally, bring your doll to life with facial features and accessories. Embroider a tiny smile, blush with pink thread or soft fabric paint, and attach your keyring securely through the top of the head or a loop of yarn.
For a polished finish, check all seams, trim loose threads, and lightly roll the doll between your hands to smooth the stuffing. This small step helps even out any bumps and gives a more professional look.
Special Features of This Pattern
This Crochet Cute Doll Keychain Amigurumi stands out for its balance of simplicity and charm. It’s a fun, creative project that feels achievable even for new crocheters.
Beginner-friendly structure: Each part is small and repetitive, helping you practice basic shapes and joining.
Fast to make: You can finish a doll in a single evening.
Portable project: Perfect for travel or cozy weekend crafting.
Minimal sewing: Only a few pieces to attach.
Highly customizable: Change colors, hairstyles, or accessories to make it uniquely yours.
Perfect gift size: Small enough for keychains or bag charms.
Whether you make one or a whole collection, this pattern gives every crocheter the joy of creativity and self-expression.
Tips for Best Results
A few thoughtful habits can make your finished doll look professional and adorable:
Use a tight gauge to prevent stuffing from showing through.
Count stitches carefully to keep both sides even.
Use safety eyes early before closing the head for better placement.
Stuff gradually and evenly for smooth shaping.
Weave in ends securely to avoid unraveling over time.
Pin pieces before sewing to check symmetry.
Keep limbs proportional too long or too short changes the look.
Adjust hook size if stitches feel too loose or stiff.
Try embroidery for personality simple eyes and a smile go a long way.
Have fun experimenting! The small size makes it perfect for testing ideas.
How to Use or Gift Your Crochet Cute Doll Keychain Amigurumi
Your finished mini doll can be used in so many delightful ways.
Keychain charm: Attach it to your keys or bag it’s lightweight, durable, and adorable.
Desk or car buddy: Brighten up your workspace or dashboard.
Gift idea: Perfect for birthdays, Valentine’s Day, or as a small handmade token of love.
Party favors or teacher gifts: Create matching sets in different colors for friends or coworkers.
For gifting, wrap it in a small kraft box or muslin bag with a tag that says “Made with Love.” It adds that personal handmade touch that everyone appreciates.
Customization Ideas
This project shines when you add your own creative spin. You can easily personalize your doll with different themes, outfits, and accessories.
Color Variations: Try neutral tones for minimalist dolls, bright rainbow shades for kids, or soft pastel hues for a dreamy look.
Yarn Choices:
Cotton for a clean, crisp finish.
Acrylic for a softer, fluffier look.
Velvet or chenille yarn for a plush, huggable texture.
Size Adjustments: Use thicker yarn and a larger hook for a bigger doll, or finer yarn for a mini charm.
Add-ons: Tiny bows, flower crowns, hats, or scarves can add so much personality. You can even embroider tiny initials or symbols for a custom touch.
You could also theme your dolls a schoolgirl doll with a backpack, a holiday doll with a Santa hat, or even a friendship set where each doll matches a person you care about.
Conclusion
The Crochet Cute Doll Keychain Amigurumi is one of those delightful little projects that instantly lift your mood. It’s quick to make, endlessly customizable, and filled with charm from head to toe. Whether you keep it for yourself or gift it to someone special, it’s sure to bring a smile wherever it goes.
Once you finish your own Crochet Cute Doll Keychain Amigurumi, you’ll see how much character a few stitches, some yarn, and a touch of imagination can create. Every tiny handmade doll becomes a one-of-a-kind keepsake and that’s the true joy of crochet.