Beautiful Crochet Balloon Motif Design & Pattern Making
There’s something wonderfully magical about the act of crocheting how a strand of yarn can transform into a delightful object that carries emotion, care, and character. The simple rhythm of looping yarn through a hook becomes an artistic language of its own, one where our imaginations shape tangible pieces. With every stitch, we create warmth, beauty, and a little bit of ourselves. Handmade crochet items hold a special charm because they’re crafted not just with skill but with love.
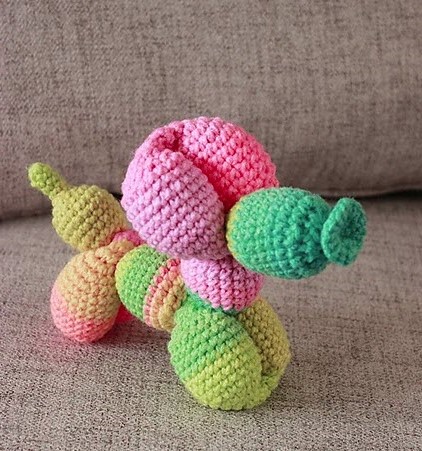
Today’s project celebrates that magic through a captivating Crochet Balloon Motif Design. Inspired by the joyous feeling of floating balloons, this motif features a soft rounded shape that evokes playfulness and celebration. It is eye-catching, fun, and adorable perfect for festive decorating, nursery styling, or simply brightening up any space. Whether used alone or as part of a garland, each balloon motif brings a dose of cheer.
One of the most appealing aspects of this crochet balloon design is its accessibility. It’s an excellent project for beginners who want to explore basic shaping techniques. At the same time, experienced crocheters can experiment with texture, detailing, and decorative variations to make each balloon uniquely their own. The project is forgiving, fast to complete, and flexible making it a great creative break or weekend craft.
Beyond being cute and customizable, crocheting this motif offers a calm, mindful experience. The soothing repetition of stitches provides gentle relaxation, while the shaping process gives a sense of progress and accomplishment. Watching your balloon take form from a small circle into a round decorative piece can be deeply satisfying. Whether made as a thoughtful handmade gift or a cheerful keepsake, the crochet balloon motif is perfect for slow crafting, mindful making, and sharing joy with others.

3. Materials & Tools
To begin your crochet balloon motif design, gather the following supplies:
Materials List
Yarn: Light worsted weight (Category 3 or 4 recommended)
Hook Size: 3.0 mm – 4.0 mm depending on yarn thickness
Stuffing: Poly-fiber filling for shape
Safety Eyes: Optional for character style
Tapestry Needle: For weaving in ends and stitching details
Scissors: Sharp for clean cutting
Stitch Markers: To mark round beginnings
Optional: Embroidery thread for details
Choosing Yarn
Select smooth, soft yarn for the best definition. Cotton yarn holds shape well and provides crisp stitch definition, while acrylic yarn gives a plush, lightweight feel. Mix and match bright colors to mimic real balloons primary or pastel palettes look especially charming.
4. Step-by-Step Crochet Instructions
NOTE: This is a reference-based tutorial inspired by techniques from the provided source, but written uniquely.
1) Making the Balloon Head / Upper Shape
Begin by creating a magic ring.
Work 6 single crochets (sc) into the ring.
Close tightly.
Round 2: Increase in each stitch → 12 stitches.
Round 3: 1 sc + 1 inc around → 18 stitches.
Round 4: 2 sc + 1 inc → 24 stitches.
Continue increasing until you reach the desired balloon width (around 30–36 stitches).
Tip: Use stitch markers to keep track of round beginnings.
2) Forming the Neck and Upper Body
Once the top sphere is formed, crochet several rounds without increasing to shape depth. The stitch count remains consistent this cylinder forms the main balloon body.
You may work about 6–10 rounds depending on how round or elongated you want your balloon.
3) Building and Shaping the Main Body
Now start decreasing to shape the base.
Round: 3 sc + 1 dec around.
Round: 2 sc + 1 dec around.
Add light stuffing as you go.
Continue decreasing until 12 stitches remain.
Expert Tip: Add stuffing gradually; overstuffing can distort shape, while under-stuffing may look hollow.
4) Creating the Tie / Balloon Base
To imitate the knotted base:
After reaching ~12 stitches, work 2–3 rounds without decreasing.
Shape into a narrow neck.
Fasten off, leaving a tail.
With a needle, cinch bottom slightly if desired.
Alternatively, create a tiny crocheted coil and attach for extra detail.
5) Optional Details
If making a balloon character:
Add safety eyes between rounds 5 and 6.
Embroider smile or cheeks.
If making multiple motifs for garland:
Leave a long tail to string pieces together.
6) Assembly & Positioning
Once stitched:
Gently mold balloon with hands.
Shape into smooth round form.
Hide remaining yarn tails using tapestry needle.
7) Final Touches
Add bows, glitter yarn, or decorative thread.
Add tag with name or date for memorability.
5. Customization Ideas
Crochet balloon motifs offer boundless creativity:
Color Variations
Pastel rainbow balloons
Bold carnival reds and blues
Neon festival themes
Holiday Themes
Christmas balloons (green + red)
Valentine (pink + heart embroidery)
Halloween (orange + spooky face)
Alternative Yarn
Velvet yarn for plush feel
Gradient yarn for magical transition shades
Add-on Accessories
Tiny ribbon bows
Mini hats
Sparkly thread outlines
Pom-poms
Embroidered names
Make a balloon family—each with different expressions and hats!
6. Advanced Tips & Troubleshooting
Invisible Decreases
Use front-loop-only decreases to avoid bumps.
Even Stitch Tension
Relax your hands; adjust wrist movement to stay consistent.
Prevent Twisting
Use stitch markers and check alignment every round.
Fix Uneven Shapes
Stuff evenly; add extra where needed.
Stuffing Balance
Use small pieces of fiber; avoid clumps.
Seamless Joining
Use invisible whip stitch when attaching parts.
Use Proper Hooks
Too large → gaps.
Too small → stiff stitches.
Read Abbreviations
sc, inc, dec = single crochet, increase, decrease.
Avoid Over-Stuffing Neck
Keep lower section slimmer to resemble tied balloon.
Color Switching
Change yarn in final pull-through for neat transitions.
7. Care Instructions
To preserve your crochet balloon motif:
Hand wash gently
Use mild detergent
Rinse with cool water
Air dry flat
Avoid direct prolonged sunlight
Store in breathable container
For gifting, consider adding lavender sachet for fragrance + protection.
8. Display & Gift Ideas
These crochet balloons are beautiful keepsakes with countless uses!
Nursery and kids’ room décor
Garlands and banners
Birthday or holiday ornaments
Desk friends
Baby shower gifts
Party favors
Photo props
Hang from shelves or mirrors
Gift toppers
Mix multiple balloons into a bouquet—attach to sticks for a realistic look!
9. Benefits of Making Crochet Balloon Motifs
Crocheting is more than a hobby—it nourishes your heart and mind:
Encourages relaxation and mindfulness
Provides creative outlet
Helps reduce stress
Fosters sense of accomplishment
Makes meaningful gifts
Eco-friendly alternative to disposable décor
Brings joy through handmade art
Encourages skill improvement and patience
Crafting is self-care, gifted through handmade warmth.
10. Photography & Social Media Tips
Make your balloon motifs shine online!
Shoot in natural daylight
Use neutral or pastel backdrops
Add props: yarn balls, hooks, flowers
Use close-ups for stitch texture
Style multiple balloons together
Hang balloons and capture vertical shots
Add name tags for Pinterest
Share on Instagram, Etsy, and Pinterest
Play with angles for personality!
11. Conclusion
Creating a Crochet Balloon Motif Design is a deeply satisfying journey that begins with simple stitches and ends with something charming and unforgettable. The project is playful, soothing, and perfect for both beginners and seasoned crocheters. Whether you craft a single balloon or stitch an entire festive garland, each creation carries personality, story, and sentiment. These soft balloons never deflate—they remain as cheerful reminders of the joy found in handmade art.
So pick up your yarn, choose your colors, and take the first stitch. With every loop and pull, you’re weaving joy, creativity, and love into a tiny treasure that lights up any space and brings smiles to anyone who sees it.