Sweetest Little Crochet Crocs Keychain Charm Pattern
Do you want a charming and unique handmade item that grabs everyone’s attention at first sight? This sweet Crochet Crocs Keychain shoe is a small, playful, and stylish keychain design that’s not only beautiful but also surprisingly quick to make.
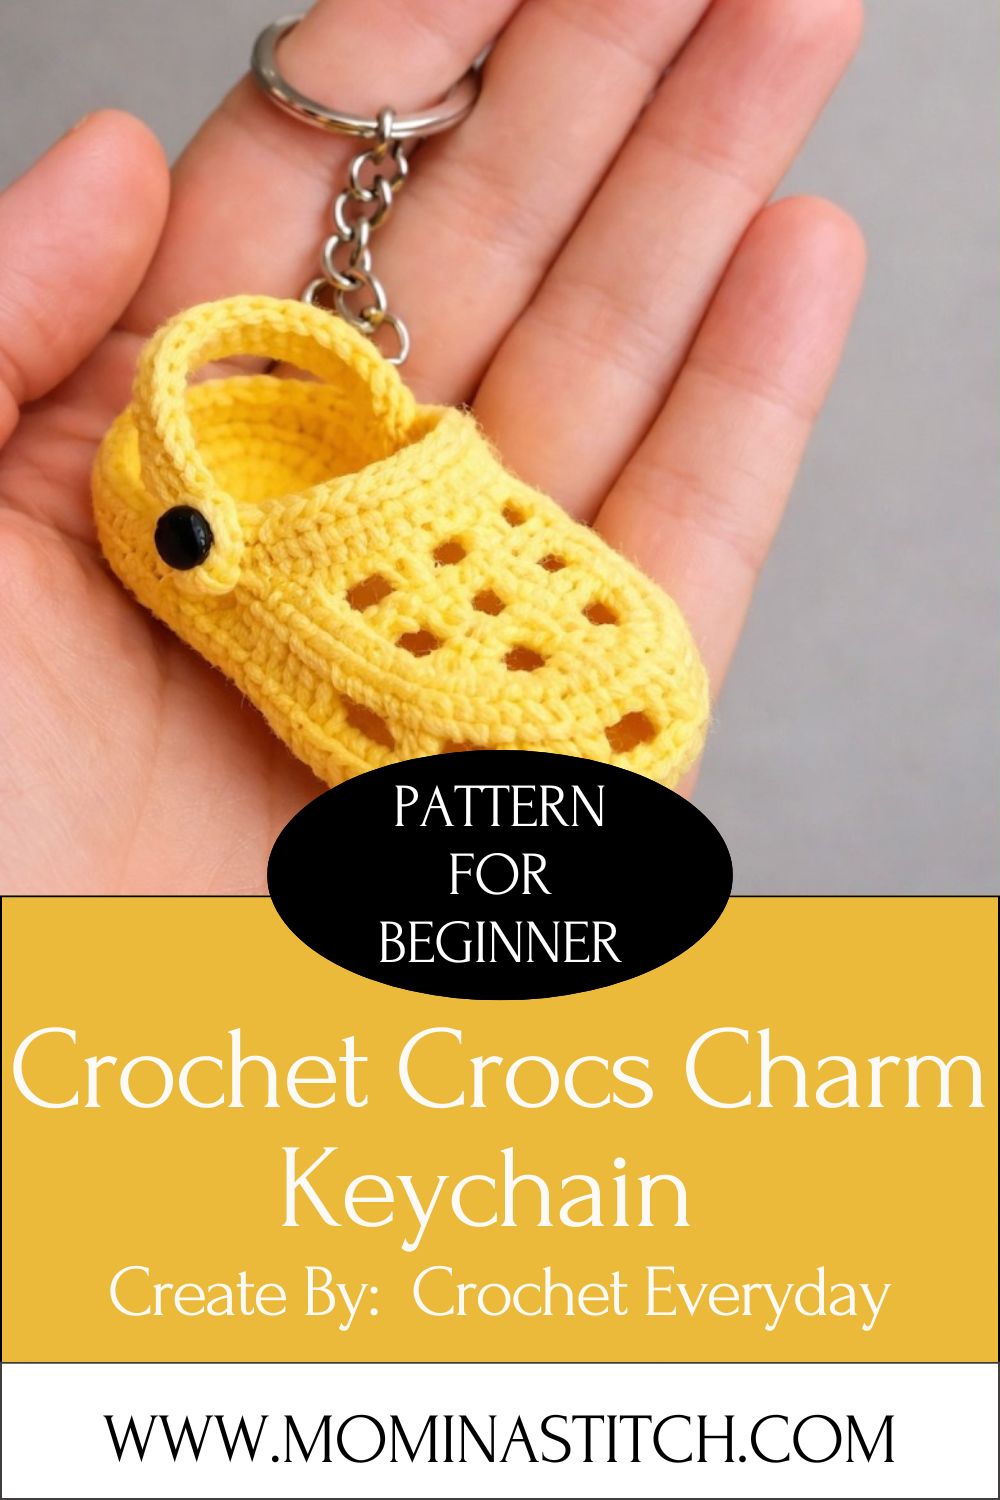
The classic foam clog became a fashion icon for one simple reason. It is comfy, playful, and a little bit bold. That same energy makes it perfect amigurumi material.
This crochet clog charm shrinks that fun shape into a pocket-sized buddy. You get the rounded toe, the open back, and that signature chunky look. Trust me, people will ask where you bought it. Then you get to say you made it yourself.
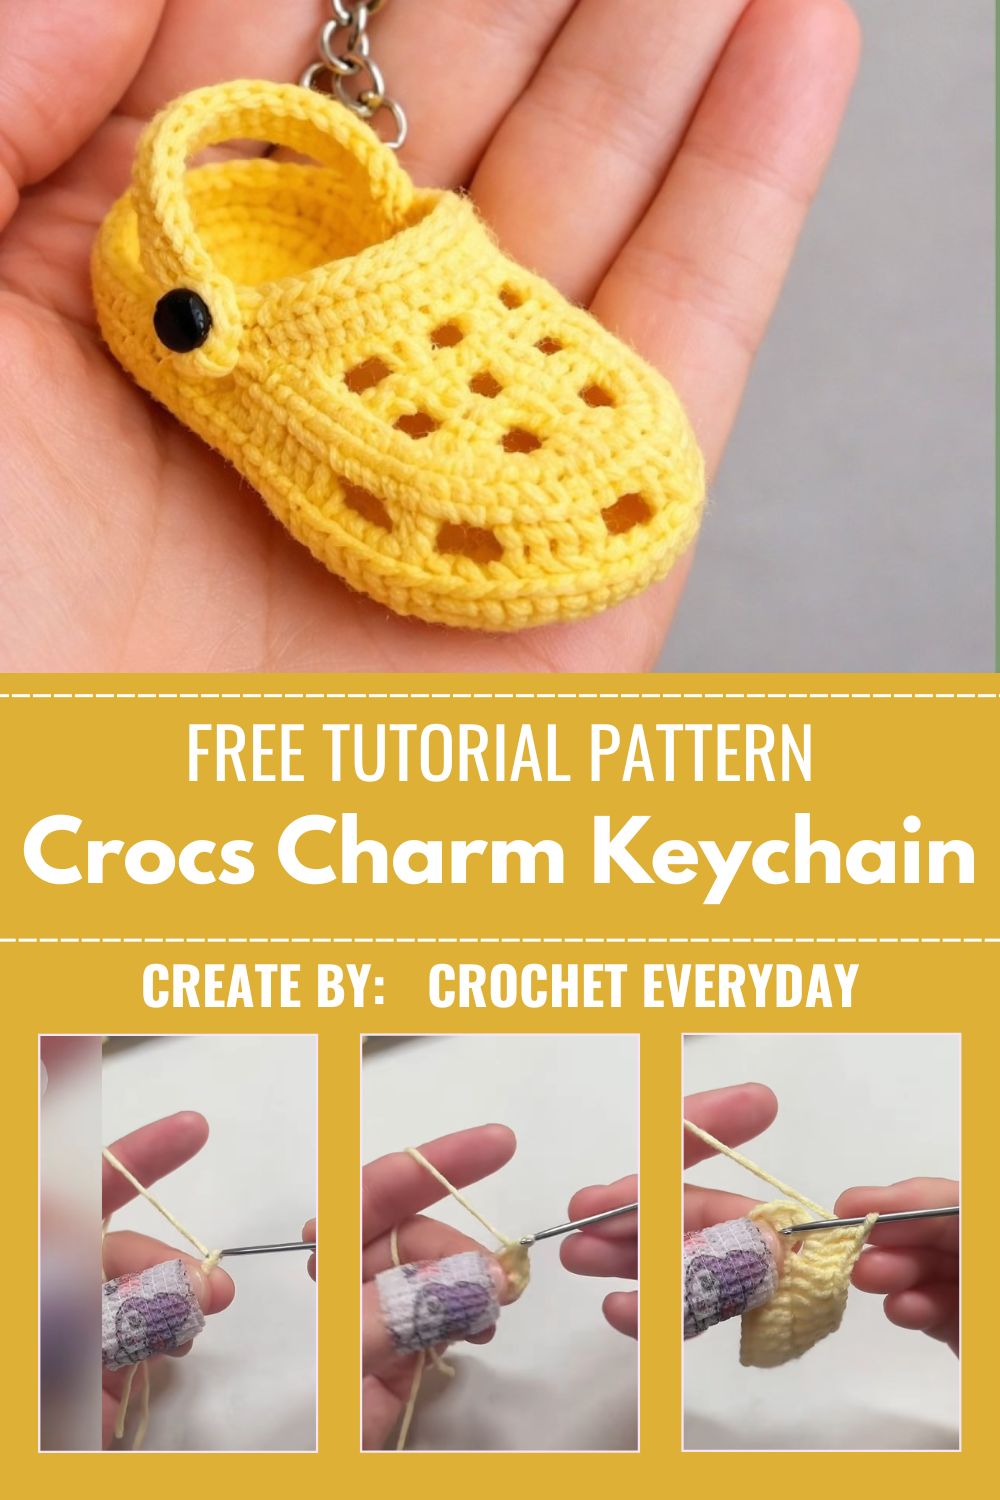
It works as a backpack tag, a zipper pull, or a keyring for your house keys. You can also clip it to a water bottle or a pencil case. Honestly, it suits almost anything.
Project Overview
This pattern makes one mini clog shoe charm worked mostly in the round. You crochet the sole first, build up the body, then add a strap across the top. After that, you attach safety eyes and a keychain ring.
The whole thing finishes around two inches long. That tiny size makes it a fast, low-stress project. It is great for using up leftover yarn scraps too.
Here is what makes it beginner-friendly:
- Small piece count, so assembly stays simple
- Basic stitches only, with no fancy stitch work
- Quick rounds that build momentum fast
- Easy to customize with any color you love
Skill Level
This Crochet Crocs Keychain project sits at an easy beginner level and works well for crocheters who know basic amigurumi stitches and can crochet neatly in continuous rounds without losing their place.
If you have made one amigurumi ball before, you are ready. The shaping is gentle and forgiving.
Materials And Supplies
Gather everything before you start. It keeps the flow smooth and stops mid-round panic. Here is your full list.
Yarn Colors
- Main color (the clog body): one bright shade like red, mint, lilac, or yellow
- Sole color (optional): white or cream for a cute two-tone look
- Worsted-weight cotton yarn works best for a crisp shape
You only need small amounts. This is a perfect scrap buster.
Crochet Hook
- A 3.0 mm or 3.5 mm crochet hook
- Go one size smaller than your yarn label suggests
- Smaller hooks create tight stitches and hide the stuffing
Other Supplies
- Safety eyes: 6 mm pair, plus a tiny bit of black yarn for the smile
- Fiberfill stuffing: just a pinch for a soft, firm body
- Yarn needle: for sewing and weaving in ends
- Sharp scissors: for clean cuts
- Stitch marker: to track the start of each round
- Keychain ring or lobster clasp: plus a small jump ring if needed
That is everything. Now, let us get into the fun part.
Crochet Techniques Used
You only need a handful of skills here. None of them is scary. Here is a quick refresher.
- Magic ring: starts your rounds with no gap in the center
- Single crochet (sc): the main stitch for the whole charm
- Increase (inc): two single crochets in one stitch to grow the shape
- Decrease (dec): an invisible decrease to close gaps neatly
- Sewing parts together: attaching the strap and securing the ring
Keep a stitch marker handy. It saves you from miscounting on those round edges.
Step-by-Step Crochet Pattern
Read each section once before you hook. Then work slowly and enjoy the rhythm.
Abbreviations: sc = single crochet, inc = increase, dec = decrease, st = stitch, MR = magic ring.
Making The Sole And Body
Start with your sole color, or just use the main color throughout.
- Round 1: Make a magic ring with 6 sc. (6)
- Round 2: Inc in every st around. (12)
- Round 3: [Sc 1, inc] repeat around. (18)
- Round 4: [Sc 2, inc] repeat around. (24)
- Round 5: Sc in each st around. (24)
This oval base forms the bottom of the shoe. Switch to your main color now if you want a contrast sole.
- Round 6: Working in back loops only, sc around. (24)
- Rounds 7 to 8: Sc in each st around. (24)
Those back loop stitches create a clean ridge. It looks just like the foam edge of a real clog. Pretty neat, right?
Shaping The Toe And Opening
Now you shape the rounded front and the open heel. This part gives the charm its character.
- Round 9: Sc 10, then [dec] three times, sc 8. (21)
- Round 10: Sc 9, then [dec] twice, sc 8. (19)
- Round 11: Sc across the front 12 stitches only. Leave the back open.
Stop here and stuff the toe lightly. Use small pinches of fiberfill. You want it firm but not bursting.
Do not overstuff. A squishy charm feels nicer in the hand than a hard one.
Adding The Strap
The strap is what makes this read as a clog and not a slipper. It is the signature detail.
- Chain 10 with your main color.
- Sc in the second chain from the hook.
- Sc across all remaining chains.
- Fasten off and leave a long tail for sewing.
Set the strap aside for assembly. You will pin it across the back opening soon.
Facial Details
A face turns a plain shoe into a charm with personality. This is the cutest step, low-key.
- Place the two 6 mm safety eyes on the front toe section.
- Set them about four stitches apart, near round 8.
- Lock the backings on firmly before you finish stuffing.
Then add a small smile with black yarn. Stitch a simple curved line between the eyes. A tiny pink blush on each cheek looks adorable, too.
Assembly Process
Here is where the pieces come together. Take your time and pin first.
- Pin the strap across the open heel, arching it like a real shoe strap.
- Sew each end of the strap to the side edges of the opening.
- Weave the tail through to hide it inside the body.
- Finish stuffing through any small gap, then close neatly.
Make sure the strap sits snug. A loose strap flops around and loses the clog shape.
Finishing Touches
Almost done. These final steps make it feel polished.
- Weave in every loose end with your yarn needle.
- Attach a jump ring through the top of the strap.
- Clip your keychain ring or lobster clasp to that jump ring.
- Give the whole charm a gentle squeeze to even out the stuffing.
And that is it. Your sweet clog charm is ready to clip onto anything.
Helpful Beginner Tips
A few small habits make amigurumi so much easier. Keep these in mind as you go.
Keep Your Stitches Tight
Tight stitches are the secret to clean amigurumi. Loose stitches let the stuffing peek through gaps. So choose a smaller hook and pull each loop snug. Your charm will look crisp and professional.
Use A Stitch Marker
Continuous rounds blur together fast. Drop a stitch marker into the first stitch of each round. Move it up as you go. This one habit prevents most counting mistakes.
Stuff It The Right Way
Add stuffing in small bits, not one big lump. Push it into the toe with the back of your hook. Keep checking the shape as you fill. You want firm corners with no lumpy bumps.
Design Customization Ideas
This is where you make it truly yours. The base pattern is just a starting point.
- Play with colors: Try pastel mint, hot pink, or a galaxy purple. Mix two shades for a sporty look.
- Add cute accessories: Glue or sew tiny shoe charms onto the strap. Little flowers and stars work great.
- Try a mini size: Use thinner yarn and a 2.0 mm hook. You get a teeny version for earrings.
- Make a matching pair: Crochet two and clip them together for a fun double charm.
Honestly, the customization options are endless. Each color combo feels like a brand new charm.
Frequently Asked Questions
Here are the questions crocheters ask most about this little project.
What Is The Best Yarn For Amigurumi?
Worsted-weight cotton yarn is the top pick for amigurumi. It holds stitch shape well and resists fuzz. Cotton also shows off the clog detail clearly. Acrylic works too if you want softer charms.
How Do I Make My Crochet Crocs Keychain Firm?
Firmness comes from two things. First, work tight stitches with a small hook. Second, stuff in small layered pinches. Together they create a solid, squish-free shape that keeps its form for years.
How Long Does This Crochet Crocs Keychain Project Take?
Most beginners finish this charm in one to two hours. Experienced crocheters knock it out in under an hour. The tiny size makes it a perfect single-sitting project.
Final Thoughts
You just learned how to make the sweetest little Crochet Crocs Keychain charm from scratch. Pretty rewarding, right? This project proves that small things can bring big joy.
So grab your leftover yarn and pick a fun color. Start with one charm, then make a whole collection. Clip them to bags, gift them to friends, or sell them at your next craft fair.
Now it is your turn to hook. Try this pattern today, then share your finished clog charm with your crochet community.