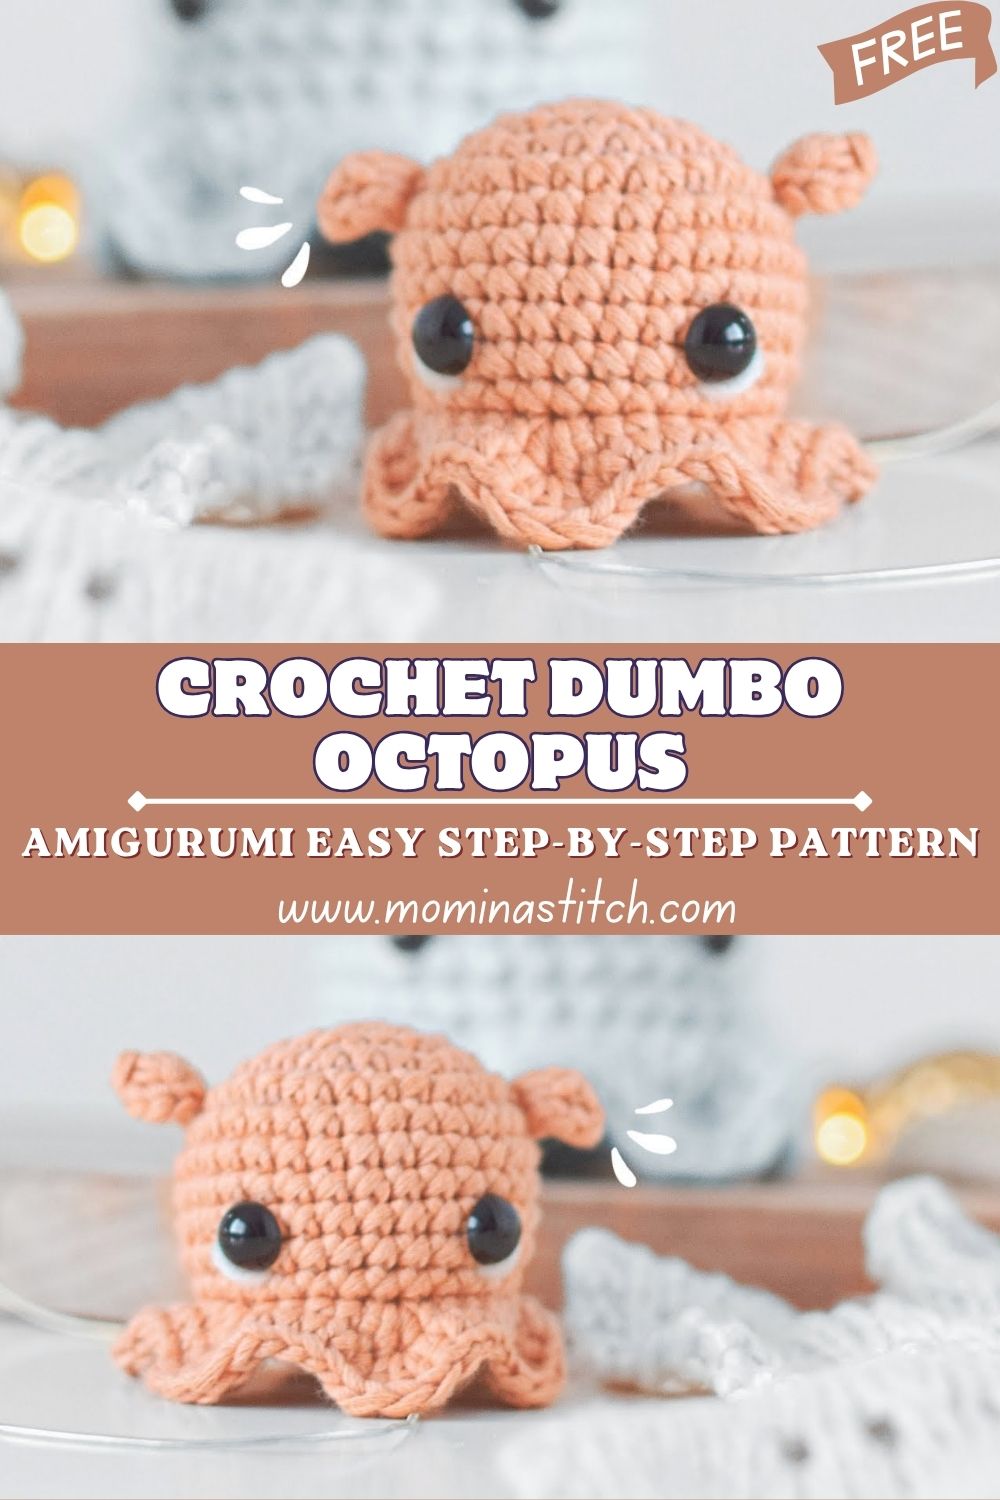
Awesome Crochet Dumbo Octopus Amigurumi Easy Step-by-Step Pattern
A small ball of yarn and a hook can easily turn into a cute octopus with floppy wings and a round, soft head. This easy Crochet Dumbo Octopus Amigurumi is especially fun for beginners and gives you good practice in making clean, even, and beautiful stitches. Along with this, you also learn how to give the amigurumi octopus a uniform, balanced and attractive shape.
Sea-themed amigurumi is a hit because it combines simple shapes with cute and playful details. The Dumbo octopus stands out with its side pins that look like little ears. This little detail makes the finished toy cute and lively, even if the embroidery is simple. Crochet slows down your pace in a relaxing way. You count the stitches, repeat the same rounds, and slowly watch a character emerge. You can decorate this octopus on a shelf, hang it on a bag, or give it as a gift to someone who loves sea creatures. The video tutorial makes it easy to understand each step so you can complete the task without getting confused.
Needed Materials
- Yarn: smooth worsted or DK yarn (or plush yarn for a chunkier look)
- Hook: size matched to your yarn, often 2.5–4.0 mm for tight amigurumi fabric
- Needle: yarn/tapestry needle for sewing and weaving ends
- Stuffing: polyester fiberfill or similar stuffing
- Accessories: stitch marker, safety eyes or black yarn for embroidered eyes, scissors, optional keychain hardware
Method
Step 1: Build the head and body in continuous rounds
Start with a magic ring and crochet in a spiral to form a neat dome. Keep your tension firm so stuffing won’t peek through. Follow the video for the exact increases and decreases to keep the sphere smooth.
Step 2: Shape the “Dumbo” fins (ears)
Crochet two matching fins and keep the stitch counts identical. A small mismatch shows quickly once you attach them. The video demonstrates where to place them so they sit level on both sides.
Step 3: Create the tentacles
Work the tentacles as separate pieces or as attached curls, depending on the pattern style shown in the tutorial. Use steady tension so each tentacle curls the same way. Check the video for the curl technique and spacing.
Step 4: Assemble with careful placement
Pin the fins and tentacles before you sew. This step controls the character’s “face” and posture. The video tutorial gives a clear view of how the maker positions each part.
Step 5: Add the face details and finish
Attach safety eyes early if you use them, before you close the body. If you embroider eyes, stitch slowly and keep both eyes aligned. Tie off securely, weave in ends, and shape the stuffing with your fingers.
Design Highlights
- Octopus shape: round head with balanced tentacle placement
- Soft texture: tight stitches create a smooth surface that holds shape
- Colors: works in solids, pastels, ocean tones, or bold two-color combos
- Cute features: Dumbo-style side fins, small face details, and a squat “plush” body
Uses & Benefits
- Keychain: make a mini version and add hardware at the top
- Gift: quick handmade present with a strong “wow” factor
- Decor: shelf buddy, desk mascot, or nursery accent
- Collectible: build a set in different colors and sizes
A Dumbo octopus amigurumi also helps you practice core skills: counting spirals, invisible decreases, and clean sewing. In addition, each finished piece teaches you more than a practice swatch ever will.
Time & Skill Level
- Skill level: beginner to confident beginner
- Time needed: about 1–3 hours for a small version, longer with plush yarn
- Techniques used: magic ring, single crochet, increase, decrease, sewing parts
- Focus points: even tension and symmetrical placement
Yarn & Tools Guide
- Choose yarn with good stitch definition if you want crisp shaping
- Pick plush/velvet yarn for a pillowy toy, but expect harder stitch visibility
- Use a smaller hook than the label suggests to keep the fabric tight
- Add a stitch marker because spiral rounds drift without one
- Try curved embroidery scissors for cleaner trimming near sewn areas
Final Look
The finished Dumbo octopus sits like a tiny sea creature that just popped up to say hello. In addition, the fins frame the head and give it a signature silhouette, while the tentacles add texture at the base. As a result, you can keep it simple or add tiny accents without changing the pattern structure.
Usage Ideas
- Clip it to a backpack zipper pull
- Place it on a nightstand as a soft decor piece
- Use it as a “pocket pal” stress companion
- Add it to a gift box as a topper
- Create a small ocean-themed display with shells and driftwood
Common Mistakes
- Loose stitches: stuffing shows through gaps. Use a smaller hook and tighten the tension.
- Skipping stitch counts: the sphere turns lumpy. Count each round and mark your first stitch.
- Uneven tentacles: the base looks tilted. Make each tentacle the same length and curl.
- Fins placed too high or low: the face looks off-center. Pin first, then sew.
- Overstuffing: the shape bulges and seams strain. Add stuffing in small pinches and sculpt gently.
Most problems come from rushing the assembly. Slow sewing gives the octopus its personality.
Care Instructions
- Spot clean with mild soap and cool water.
- Then, pat dry with a towel and allow it to air dry fully.
- However, avoid hot water if you use plush yarn, as it can mat.
- In addition, keep it away from rough Velcro surfaces to prevent snagging.
- Finally, store it out of direct sunlight to reduce color fade.
Customization Ideas
- Make tiny blush cheeks with pink embroidery thread
- Add speckle dots on the head using surface slip stitches
- Switch to two-tone yarn for a gradient ocean look
- Sew a tiny bow tie or a mini scarf
- Change the face from sleepy eyes to a wide-eyed expression
- Add weighted beads in a pouch at the base for a paperweight feel
Safety Tips
- Use embroidered eyes for toddlers instead of safety eyes
- Secure knots inside the body and weave ends deeply
- Skip small accessories (bows, beads) for young children
- Check seams after stuffing to avoid gaps
- Use non-shedding yarn if the toy will get heavy handling
hy It’s Trending
Dumbo octopus amigurumi keeps showing up in crochet feeds because it looks special without demanding complex shaping. In addition, the fins create instant character, so even a simple stitch pattern feels elevated. As a result, makers also enjoy finishing one quickly and starting another in a new color.
- The design suits mini plushies and larger cuddle versions
- The round body makes it beginner-friendly, yet the fins add flair
- The project photographs well, which boosts shares and pattern saves
FAQs for ( Crochet Dumbo Octopus Amigurumi)
1) What size hook should I use for a Dumbo octopus amigurumi?
Use a hook that creates tight fabric with your yarn. In addition, most makers size down 0.5–1.5 mm from the yarn label recommendation to prevent gaps.
2) Do I need safety eyes for this pattern?
No. You can embroider eyes with black yarn or thread. Embroidery also improves safety for babies and toddlers.
3) Why do my tentacles curl unevenly?
Your tension likely changes between pieces, or you missed stitches in the curl section. Keep the same hook grip, count carefully, and make each tentacle with the same stitch count.
4) How do I keep the head perfectly round?
Increase evenly, then work a short section of straight rounds before decreasing. Stuff gradually and shape as you go so the fiberfill fills the dome and sides evenly.
5) Can I use plush/velvet yarn for this Dumbo octopus?
Yes, and it gives a soft, squishy finish. However, use a larger hook only if needed, and rely on touch to find stitches since plush yarn hides stitch definition.
Conclusion
A Crochet Dumbo Octopus Amigurumi brings a playful sea-creature vibe to your workspace, shelf, or gift pile. In addition, you can keep the pattern simple and still get a strong result because the fins deliver that signature Dumbo look. Then, work with tight stitches, count your rounds, and pin pieces before sewing. As a result, you’ll finish with a tidy, rounded octopus that feels handmade in the best way. Finally, for stitch counts and assembly angles.