
Fabulous Crochet Gentleman Banana Keychain Amigurumi Plush Idea Pattern
Meet your next pocket-sized obsession: a crochet gentleman banana keychain with charm and style. This easy banana amigurumi pattern turns yarn into a smile-worthy buddy. Make a DIY banana keychain that doubles as a crochet banana plush for everyday fun.
This project is tiny, fast, and full of personality, making it perfect for practicing amigurumi shapes. You’ll create a cute amigurumi fruit that works as a bag charm or zipper pull. The steps read like a friendly crochet keychain tutorial, so it’s a solid beginner crochet pattern too. Add a bow tie, and you’ve got a thoughtful, handmade gift idea in a mini banana plush size.
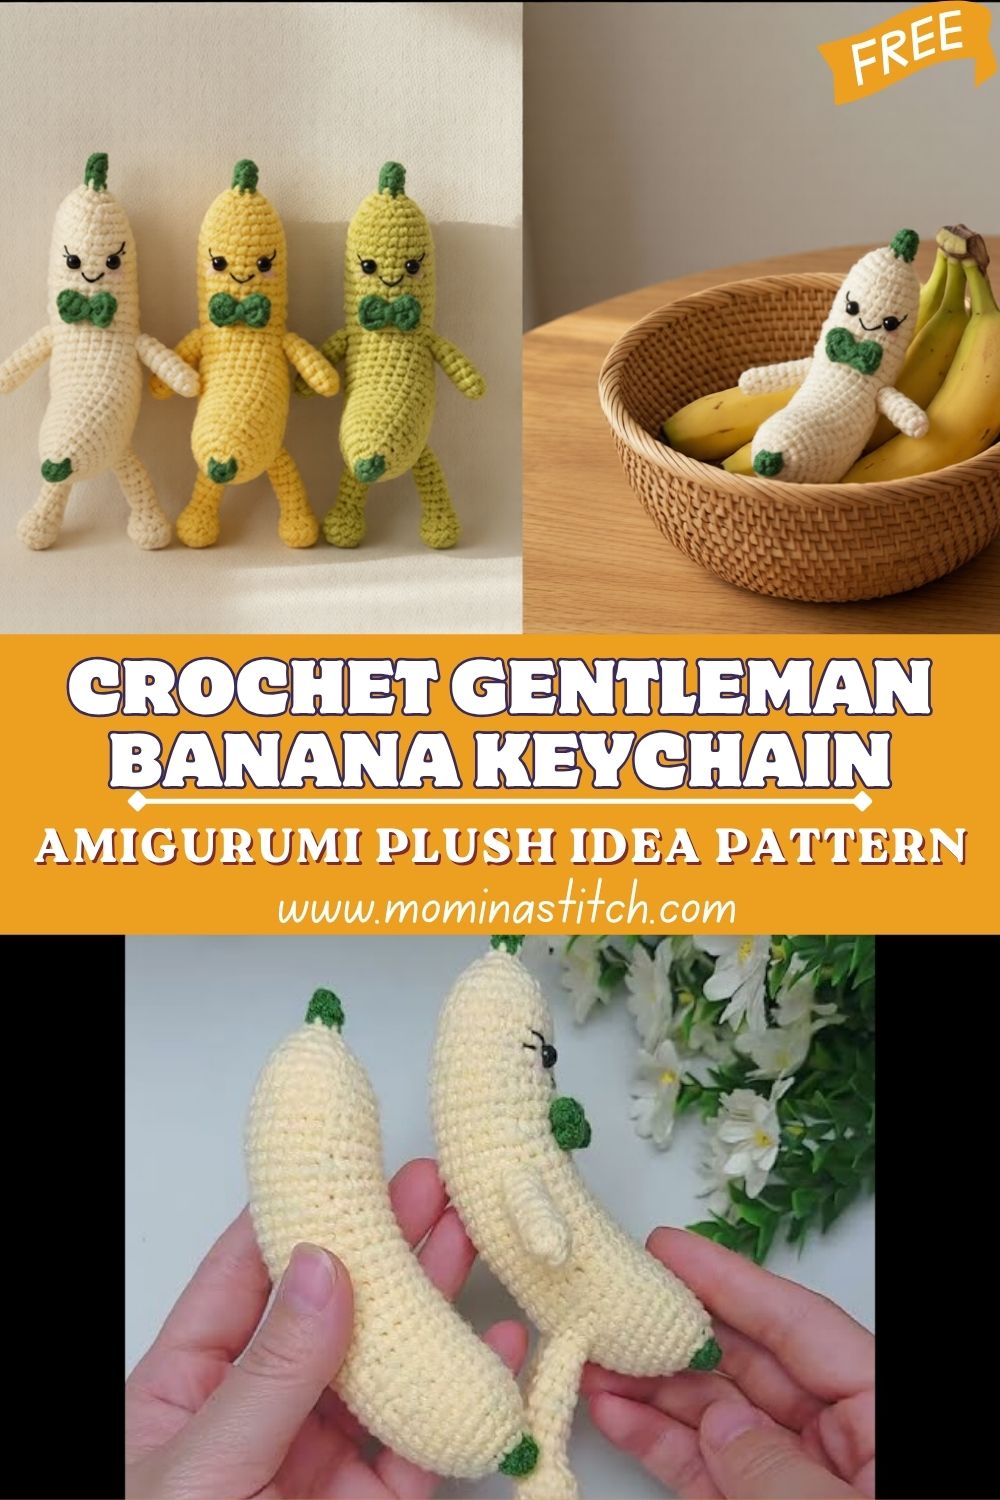
If you love quick crochet projects with big personality, this gentleman banana is for you. In this post, you’ll learn how to crochet a small banana amigurumi, add cute gentleman details, arms, legs, a bow tie, and turn it into a sturdy keychain.
The instructions are written for beginners who know basic stitches, but it also keeps intermediate crocheters happy with clean shaping, a gentle curve, and neat finishing tips.
By the end, you’ll have a durable little plush that’s fun to gift, easy to customize, and adorable on keys, backpacks, pencil cases, or handbags.
Materials Needed
Yarn (DK or worsted weight works best):
- Yellow (main banana)
- Cream or light yellow (inner peel/stripes—optional)
- Brown (tips of banana)
- Black (mouth/eyebrows—embroidery)
- Any color for bow tie (red/blue/black look great)
Tools & Notions:
- Crochet hook: 2.5–3.5 mm (choose based on yarn; go slightly smaller for tight stitches)
- Fiberfill stuffing
- Safety eyes: 6–8 mm (or embroider eyes for young children)
- Yarn needle (tapestry needle)
- Scissors
- Stitch marker
- Keychain ring (split ring) or lobster clasp keychain hardware
- Optional: pink blush (fabric blush, pastel, or embroidered cheeks), small felt pieces
Crochet Abbreviations
- MR = Magic Ring
- ch = chain
- sc = single crochet
- inc = increase (2 sc in the same stitch)
- dec = decrease (invisible decrease recommended)
- sl st = slip stitch
- st(s) = stitch(es)
Finished Size
Approximately 9–12 cm (3.5–4.7 in) tall, depending on yarn, hook size, and how firmly you stuff.
Step by Step Pattern (Overview)
You will crochet:
- Banana body (main piece)
- Top stem (small piece)
- Two arms
- Two legs
- Bow tie
Then you’ll add the face, assemble everything, and attach the keychain ring securely.
Notes before you start:
- Work in continuous rounds unless stated otherwise.
- Use a stitch marker to mark the first stitch of each round.
- For a smooth look, use invisible decreases.
- Stuff firmly,y but do not overstuff—especially near the top where you attach the keychain.
Detailed Pattern
Banana Body Pattern
Color: Yellow (switch to brown for tips as instructed)
Bottom Tip
R1: With brown, MR 6 sc (6)
R2: inc around (12)
R3: (sc, inc) around (18)
R4: In BLO (optional to create a neat edge), sc around (18)
Switch to yellow.
Main Body (Shape + Gentle Curve)
R5: sc around (18)
R6: (2 sc, inc) around (24)
R7–R9: sc around (24)
To create a gentle banana curve, we’ll use a little “short shaping” by placing a few increases on one side and a few decreases on the opposite side. This bends the tube slightly without complex rows.
R10 (curve round):
- sc 6, inc, sc 5, dec, sc 10 (24)
R11: sc around (24)
R12 (curve round):
- sc 6, inc, sc 5, dec, sc 10 (24)
R13–R15: sc around (24)
Optional Peel Stripes (Beginner-Friendly Option)
If you want that banana peel look, you can surface-crochet or embroider thin lines later with cream yarn. (Details in Customization Ideas.)
Start Narrowing Toward the Top
R16: (2 sc, dec) around (18)
R17: sc around (18)
R18: (sc, dec) around (12)
Start stuffing firmly here. Keep the curve facing the “front” (where the face will be). Add stuffing in small pieces so it stays smooth.
R19: sc around (12)
R20: (sc, dec) around (8)
R21: sc around (8)
Top Opening (for Stem Attachment)
Do not fasten off yet if you prefer to sew the stem directly with the tail later, but it’s easiest to fasten off and leave a long tail.
Fasten off, leave a long yarn tail for sewing. Finish stuffing. Shape the body gently with your hands so it keeps a banana curve.
Top Stem
Color: Brown (or dark brown)
R1: MR 6 sc (6)
R2: sc around (6)
R3: (sc, inc) around (9)
R4: sc around (9)
R5: (2 sc, dec) around (6)
Fasten off, leave a long tail for sewing.
Attach: Sew the stem centered at the top of the banana (the small opening). If the top looks too open, lightly pinch the banana top closed while sewing so the stem sits snugly.
Arms Pattern (Make 2)
Color: Yellow
R1: MR 5 sc (5)
R2–R4: sc around (5)
R5: sl st around if you want a flatter end (optional), then fasten off.
Leave a tail for sewing.
Placement: Sew arms on the sides around Rounds 11–13, slightly forward so they look like they’re posing.
Legs Pattern (Make 2)
Color: Yellow (optional tiny black/brown shoes)
R1: MR 6 sc (6)
R2: sc around (6)
R3: (sc, dec) around (4)
Lightly stuff (optional; you can also leave unstuffed for a slimmer look).
Fasten off, leave a tail for sewing.
Placement: Sew legs near the bottom around Rounds 4–6, spaced evenly so the banana can “sit” visually.
Bow Tie Pattern
Color: Any contrast color (red, blue, black)
Make the bow (flat piece):
Ch 9
Row 1: Starting in 2nd ch from hook, sc 8 (8)
Row 2–4: ch 1, turn, sc 8 (8)
Fasten off, leave a long tail.
Shape it into a bow:
- Fold the rectangle slightly like an accordion (pinch the center).
- Wrap the long tail around the center 4–6 times to create the bow-tie middle.
- Knot gently on the back, leaving the end for sewing.
Attach: Sew the bow tie to the front of the banana at Rounds 14–16 (adjust as needed based on where you place the face).
Face Details
You can use safety eyes or embroider.
Eyes (Safety Eyes Option)
- Place eyes between Rounds 12 and 13, about 5–6 stitches apart (adjust to your banana’s width).
- Insert washers securely from inside before the stuffing is too tight.
Smile (Embroidery)
- Use black yarn or embroidery thread.
- Stitch a small curved smile centered below the eyes between Rounds 14–15.
- Optional: add tiny eyebrows one round above the eyes for extra “gentleman” attitude.
Optional Blush
- Add blush dots with pink yarn (two small stitches), pastel, or fabric blush on the cheeks.
Assembly Instructions (Step by Step)
- Finish stuffing the banana body and shape it into a gentle curve.
- Securely attach the top stem with tight stitches.
- Install safety eyes (if using) and adjust placement before locking washers.
- Embroider the smile and any extra details (eyebrows, blush).
- Sew arms to the sides around R11–R13. Make sure both arms match height.
- Sew legs near the bottom (R4–R6). Check from the front so they look even.
- Sew the bow tie centered on the front, under the face.
- Weave in all ends neatly inside the body and trim.
Keychain Attachment (Secure Method)
A keychain needs strong reinforcement so it doesn’t tear through stitches.
Option A: Sew-in loop (recommended)
- Cut a strong thread, embroidery floss, or thin nylon cord (about 15–20 cm).
- Thread it through the top of the banana, next to the stem, making multiple stitches.
- Loop it through the keychain ring and tie a tight double knot.
- Pull the knot slightly inside the plush if possible, then stitch through a few more times to lock it.
Option B: Crochet hanging loop
- Join yarn at the top near the stem.
- ch 12–18 (depending on ring size), sl st back into the same spot.
- Reinforce by sewing the loop base with a yarn tail so it can handle pulling.
Customization Ideas
- Different banana shades: Use pale yellow and add darker yellow stripes for a realistic peel.
- Cute amigurumi fruit set: Make a “gentleman” apple, strawberry, or avocado to match.
- Face styles: sleepy eyes, wink, embroidered lashes, tiny mustache, or rosy cheeks.
- Accessories: mini top hat, tiny scarf, monocle (with embroidery thread), or little buttons.
- Size change: Use thicker yarn + bigger hook for a larger crochet banana plush, or thinner yarn for a mini banana plush keychain.
Common Mistakes (and How to Fix Them)
- Holes between stitches: Use a smaller hook and keep tension snug; amigurumi should be tight.
- Lumpy stuffing: Add the stuffing in small pieces, pushing it evenly with a hook end or a chopstick.
- Crooked face: Mark the “front” of the banana early; place eyes first, then smile.
- Arms/legs uneven: Pin pieces first (or use stitch markers) before sewing.
- Keychain loop ripping out: Reinforce with strong thread and stitch through multiple times to secure.
- Wrong stitch counts: Count every round; if you’re off by 1–2 stitches, fix it immediately before continuing.
Pro Tips (Extra Neat Results)
- Use invisible decreases for smoother shaping.
- If your banana won’t curve nicely, slightly understuff the inner curve side, then shape it gently with your fingers.
- For clean sewing, use the “whip stitch” through stitch tops only—this hides seams.
- Before attaching limbs, take a photo of placement—small changes make a big difference in personality.
- To make it extra durable, mix a few strands of sewing thread with yarn when attaching the keychain loop.
Conclusion
This little gentleman banana is cheerful, quick, and full of character, exactly the kind of crochet project that makes people smile the moment they see it. Whether you keep it on your keys or give it as a gift, it’s a tiny reminder that handmade things feel special.


