Crochet Bunny Earbuds Case Amigurumi Pattern Pouch With Floppy Cute Ears
A sweet bunny-shaped pouch can make everyday essentials feel extra special. This crochet bunny pouch stays soft and squishy, yet works perfectly as an amigurumi earbuds case for daily use.
Green yarn, long upright ears, and a simple stitched face add instant charm to a crochet AirPods holder. This cute, handmade pouch looks decorative on a desk and keeps earbuds tucked away safely.
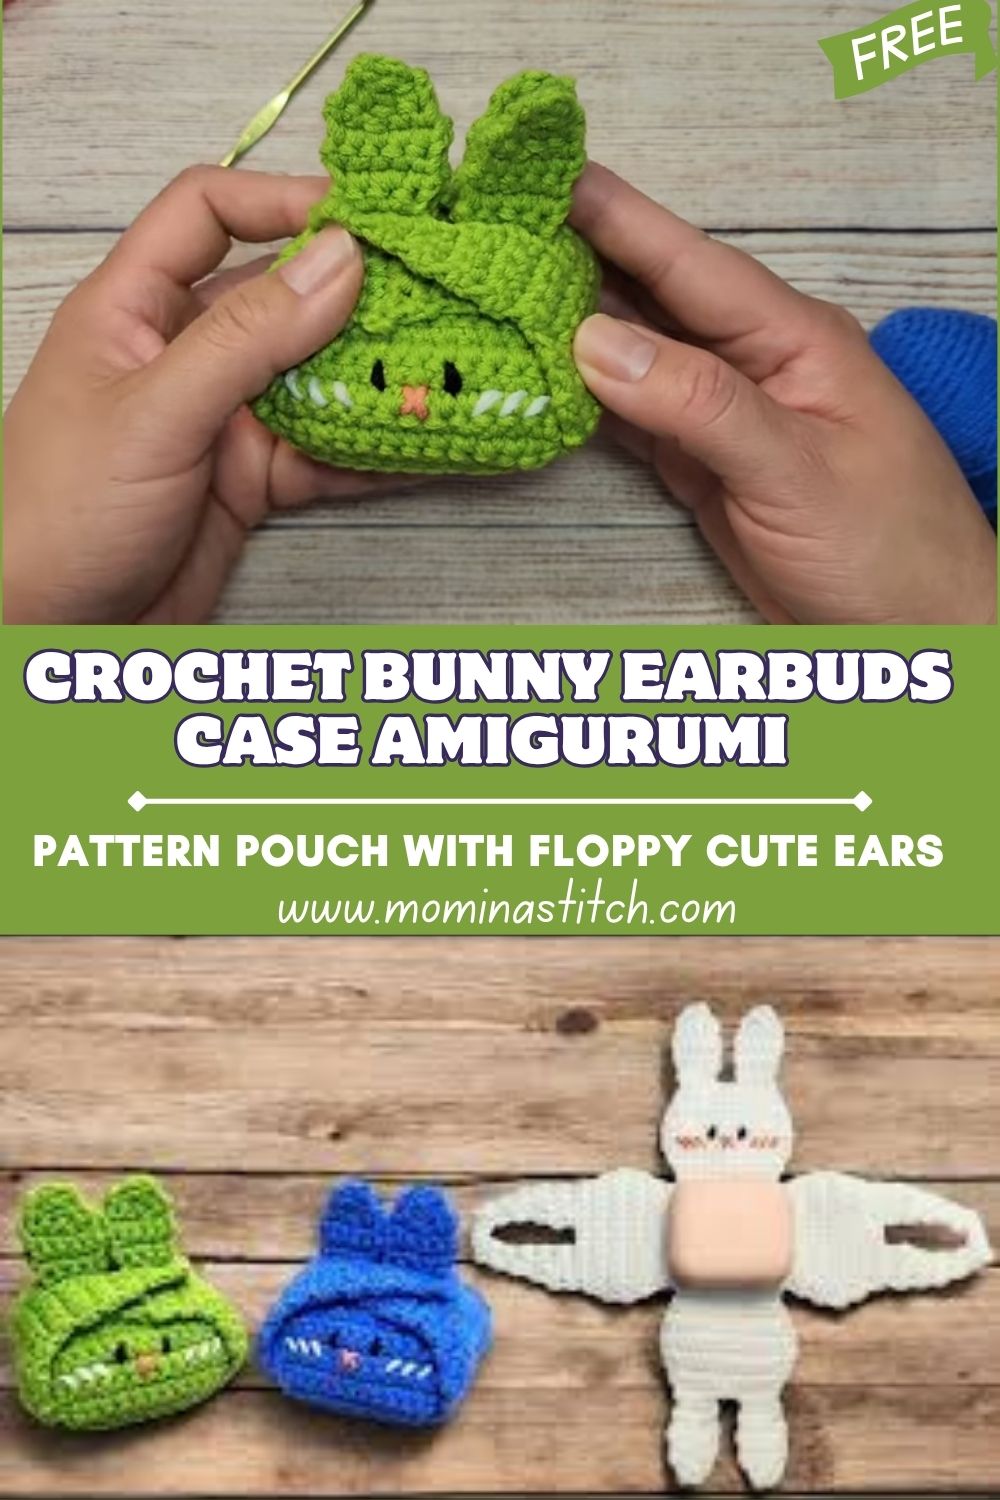
A Crochet Bunny Earbuds Case Amigurumi Pattern is such a satisfying make because it is both useful and adorable. The pouch forms a soft 3D structure that gently cushions earbuds, while still feeling sturdy enough to hold its shape. The green color gives it a fresh, playful look, but any shade can work beautifully.
The design details are what make it extra lovable. Tall amigurumi-style ears sit atop like a headband, the front flap wraps across the opening like a little hug, and the face is minimal yet expressive. This crochet bunny pouch is also gift-perfect for teens, coworkers, or anyone who loves cute organization, and it is quick enough to make as a last-minute handmade surprise.
Materials Needed
- Yarn (medium weight or cotton yarn): Worsted weight (Category 4) or smooth cotton
- Main color: Green, about 25 to 40 g (roughly 55 to 90 m, depending on yarn)
- Small amounts for face details:
- White yarn: 1 to 2 g
- Black yarn: 1 g
- Pink/peach yarn: 1 g
- Crochet hook: 3.5 mm to 4.0 mm (choose a slightly smaller hook than the yarn label for a firmer fabric)
- Yarn needle: 1
- Stitch markers: 1 to 2
- Scissors: 1
- Closure option: 1 small button (10 to 14 mm), 1 snap, or crocheted loop
- Optional: A small piece of felt/lining fabric or light interfacing (about 8 x 10 cm) for extra structure
Abbreviations
- MR: Magic ring (adjustable loop to start crocheting in a circle)
- ch: Chain
- sc: Single crochet
- inc: Increase (2 sc into the same stitch)
- dec: Decrease (single crochet two stitches together)
- sl st: Slip stitch (join or move without adding height)
- st: Stitch
- rnd: Round (working in a circle)
Skill Level
Beginner to Easy Intermediate.
Comfort with single crochet in the round helps a lot, plus a little patience for shaping and sewing on the ears. Embroidery is simple and beginner-friendly.
Finished Size
Approx. 7 to 9 cm wide and 7 to 10 cm tall (not including ears).
Size can vary depending on yarn, hook, and how snug the flap is made.
Time Required
Total: 2 to 3.5 hours
- Base + body: 60 to 90 minutes
- Flap + back support: 30 to 50 minutes
- Ears + face + assembly: 45 to 80 minutes
Important Notes Before Starting
- A firm tension makes a better amigurumi earbuds case, so the pouch does not stretch too much with use.
- Check earbud size early, especially after a few body rounds, so the pouch does not end up too tight.
- The flap should reach the front comfortably without pulling. Adjust the number of rows on the flap as needed.
- Using a stitch marker is strongly recommended because continuous rounds can be hard to track.
- Ears look best when attached symmetrically, so take a moment to pin placement before sewing.
Step-by-Step Pattern
Base and Bottom Panel
A round or oval base works well, and both feel beginner-friendly. A round base gives a cute “chubby” look, while a small oval can sit a bit flatter in a bag.
Option A: Round base (simple and classic)
- Start with MR.
- Work sc into the ring to form a small circle.
- Continue increasing each round evenly to create a flat circle.
- Stop increasing once the circle is roughly the size of the bottom of the earbud case, usually around 6 to 7 cm across.
Option B: Oval base (slightly longer shape)
- Start with a short ch (about 6-8 chains).
- Work around both sides of the chain to make an oval.
- Increase at each end to keep the oval flat.
- Build until the oval fits the earbuds’ bottom footprint.
Tip: The base should be just a touch wider than the earbud case so it slides in without forcing.
Pouch Body (3D Amigurumi Structure)
Once the base is the right size, the walls are built by turning the flat base into a little bowl.
- Work one rnd in sc through the back loop only to create a neat “corner” edge. This helps the body stand up.
- Continue in continuous rounds of sc to build height.
- Add small shaping so the pouch has space inside:
- Keep most rounds even for a smooth cylinder.
- Add a few gentle increases early on for a rounded belly.
- Add a couple of decreases near the top only if the opening looks too wide.
Fit check moment: After a few rounds of height adjustment, slide the earbuds in and make sure the sides aren’t too tight. The earbuds should fit snugly but be easy to remove.
Stop when the pouch height covers the earbuds with a little room for the flap to overlap.
Front Flap
The flap is what gives this bunny case its wrap-style look.
- Choose a section of stitches at the front of the pouch as the flap base.
- Work in rows back and forth:
- Start with sc rows for a firm, tidy flap.
- Shape the flap into a rounded or tapered end by decreasing at the edges over the last few rows.
- Test the length by folding the flap down. Aim for it to reach the front with a slight overlap.
A slightly rounded flap end looks extra cute and matches the soft amigurumi vibe.
Back Support Section
This part helps the pouch keep its shape and gives the flap something stable to fold over.
- Add a short band or raised panel at the back top edge.
- This can be done by crocheting a few rows across the back stitches only, or by adding a simple sc edging around the top opening.
- For extra structure, optional lining or interfacing can be placed inside later.
This little support area makes the crochet AirPods holder feel more “pouch-like” and less floppy.
Bunny Ears
Make two long ears. They should be slim and upright, with a soft curve.
- Start each ear with a small, rounded tip (MR or a tiny circle).
- Work sc in the round, increasing slightly to form a narrow oval tube.
- Continue even rounds to create length.
- Shape the base with a few decreases so it sits neatly on the head area.
Optional stuffing: Add a tiny amount of stuffing only to the bottom half. This helps the ear stand while keeping the tip soft. Another option is to leave them unstuffed for a gentle flop.
Finish with a long tail for sewing.
Face Details
Keep the face simple and sweet. A minimal face suits a tiny pouch and stays readable.
- Eyes: Use black yarn to embroider two small vertical stitches. Place them evenly spaced on the front, below where the ears will sit.
- Nose: Use pink or peach yarn to make a tiny triangle or a small stitch at the center.
- White cheek/smile detail: Add a small white stitch detail under the nose, like a soft little mouth line or tiny cheeks.
Placement tip: Set the face slightly above the center of the pouch front so it shows clearly even when the flap is closed.
Closure Option
Choose one simple closure that matches the look and keeps earbuds secure.
- Loop + button: Crochet a small chain loop on the flap tip, then sew a button onto the pouch front.
- Hidden snap: Sew a small snap inside the flap and a matching part on the pouch front.
- Fold-over hold: Make the flap slightly snug so it naturally stays closed, best for gentle everyday use.
Assembly Instructions
- Attach ears securely on top: Pin ears in place first, then sew through the ear base and into multiple stitches on the pouch top for strength.
- Join flap neatly: Sew or crochet the flap base to the upper back area so it folds forward cleanly.
- Shape the pouch properly: Lightly press and shape the sides with your hands. A firm fabric will “train” into a pouch shape.
- Ensure earbuds fit comfortably: Insert the earbuds, close the flap, and check that the closure sits comfortably without strain.
Finishing Touches
- Weave in ends neatly on the inside so nothing catches on the earbud case.
- Adjust the ears so they sit evenly and look balanced.
- Optional extras:
- Add a tiny blush with pink yarn or a soft dab of fabric-safe blush.
- Attach a keychain ring at the back so the pouch clips to a bag.
- Crochet a short strap for wrist carrying.
Beginner Tips
- Count stitches at the end of each round to keep the pouch smooth and even.
- Use a stitch marker in the first stitch of the round to avoid losing track.
- Keep tension steady. Tight, even stitches make the amigurumi earbuds case feel more secure.
- Check fit early and often. The easiest time to adjust the size is before the pouch gets too tall.
- For embroidery, lightly mark placement with a removable marker or pins before stitching the face.
- Sew the ears with strong seams, passing the thread through the base multiple times for durability.
Common Mistakes to Avoid
- Making the pouch too tight so the earbuds get stuck or the fabric stretches out quickly.
- Uneven stitches caused by changing hook grip or tension midway.
- Flap too short, so it barely reaches, or too long, so it bunches at the front.
- The face is placed too low, which can get covered by the flap or look off-center.
- Loose ear attachment, which can wobble or pull out with daily use.
- Skipping fit checks until the end, which can lead to sizing surprises.
Customization Ideas
- Try different colors: pastel mint, soft beige, white, or bright spring green.
- Change facial expressions: sleepy eyes, tiny smile, or rosy cheeks for extra personality.
- Add a charm or strap: a small flower, heart charm, or a short chain strap for clipping.
- Resize for different earbuds: slightly enlarge the base and add a few more body rounds for larger charging cases.
Conclusion
This Crochet Bunny Earbuds Case Amigurumi Pattern brings together the best parts of crochet: a quick, cozy project that turns into something genuinely useful. The little ears and sweet face make it feel like a tiny amigurumi friend, while the flap closure keeps earbuds safe and easy to grab.
Give the green bunny a try, then experiment with colors and expressions until the pouch feels like your own. A handmade crochet bunny pouch like this is the kind of small project that makes everyday life feel softer and more cheerful.