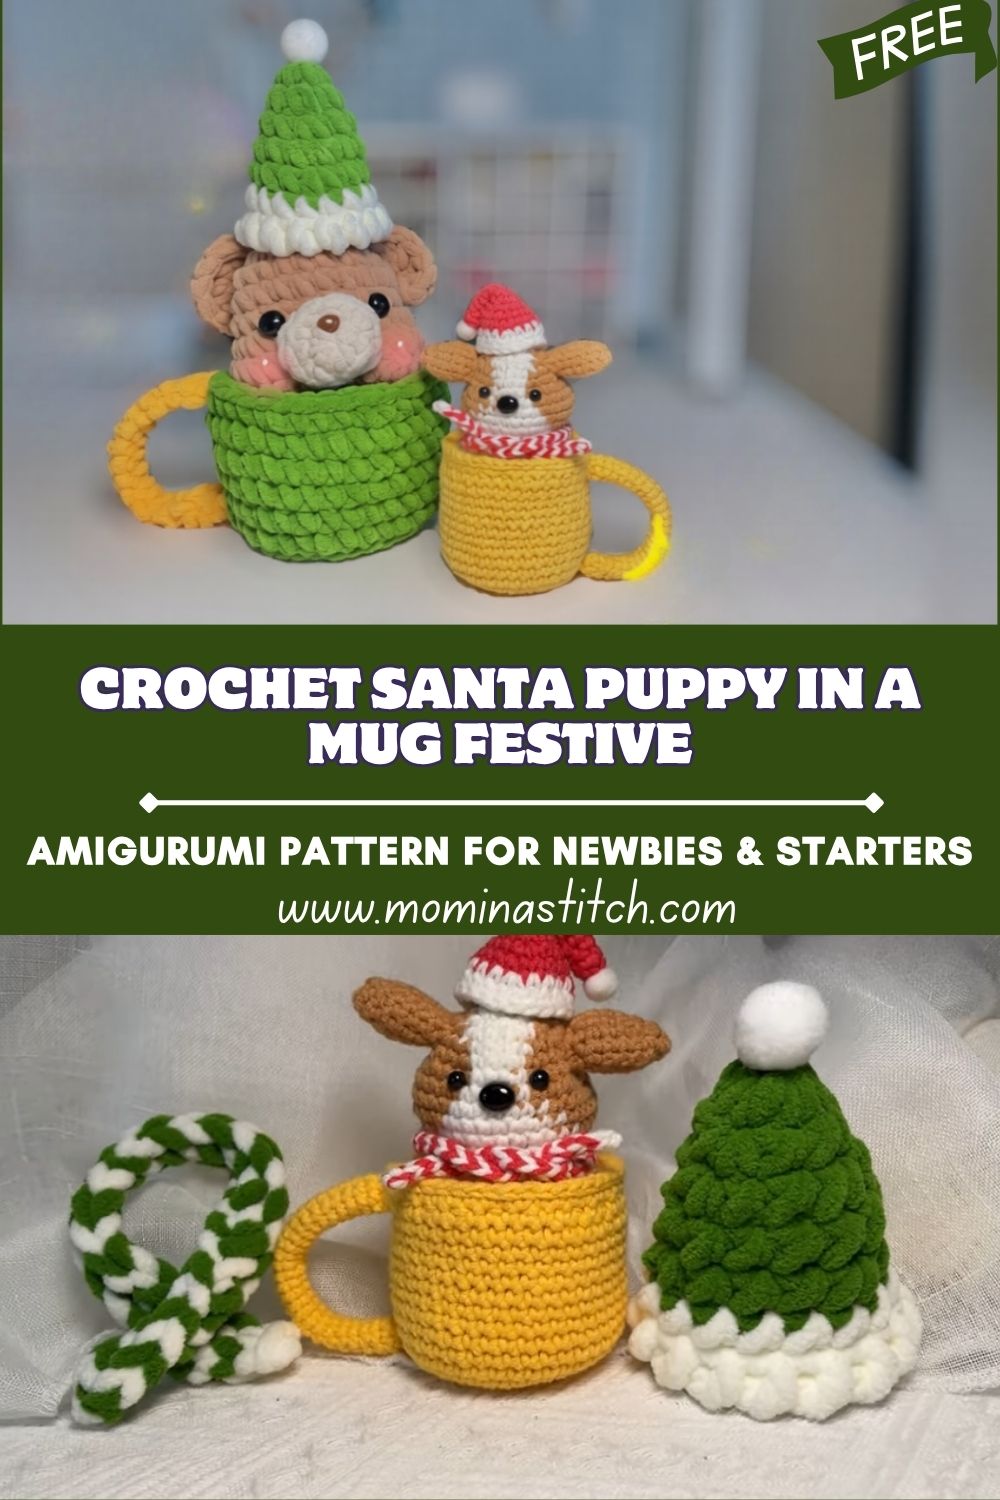
Crochet Santa Puppy in a Mug Festive Amigurumi Pattern for Newbies & Starters
Festive crochet projects have a way of making a home feel extra warm and lived-in. First, there’s the comfort of soft yarn and familiar stitches, and next, there’s the joy of seeing a tiny holiday character come to life right in the hands.
Next, this Crochet mini Santa hat & Scarf amigurumi brings the coziest holiday vibes in the cutest way. A sweet little puppy sits snugly inside a crochet mug, then finishes the look with a mini Santa hat and a tiny scarf. As a result, it’s beginner-friendly, giftable, and almost impossible not to smile at.
Christmas-themed crochet items are popular because they feel meaningful and nostalgic. Next, they make thoughtful gifts, sweet stocking stuffers, and charming decorations that can be brought out year after year. Meanwhile, the small size of most holiday amigurumi makes them quick enough to finish even during a busy season.
What makes this project unique is the scene-like design: a puppy tucked inside a bright mug, topped off with a mini Santa hat and a crochet scarf pattern. After that, the whole piece feels like a tiny winter story, cozy, cheerful, and perfectly displayable. Finally, the shapes are simple enough for beginners, while the color choices and accessories make it fun to customize.
Materials Needed
- Yarn (medium-weight / worsted size 4 OR plush yarn):
- Brown (puppy): 25–40 g
- White (muzzle, hat trim, pom-pom): 10–15 g
- Red (Santa hat, optional mug stripe): 15–25 g
- Yellow (mug or accent): 15–25 g
- Green (scarf or mug detail): 10–20 g
- Crochet hook: 3.5 mm–5.0 mm (use the smaller end for tighter stitches)
- Safety eyes: 8–12 mm
- Stuffing (polyfill): 20–35 g
- Stitch markers: 1–2
- Yarn needle: 1 tapestry needle
- Scissors: 1 pair
- Optional decorative elements: mini pom-poms, embroidery thread, tiny bow, or felt heart
Skill Level: Beginner / Easy
Making Time (Overview): Approximately 2–4 hours
Step-by-Step Instructions
Body (Puppy Base)
- Start with the head:
First, use brown yarn to crochet a rounded head in continuous rounds. Next, place a stitch marker at the start of the round to keep counting simple. Meanwhile, keep stitches tight so stuffing will not show through later. - Form the body:
After that, either continue crocheting straight down into a compact body (for a low-sew look) or make a small separate body piece if preferred. Next, aim for a soft oval shape so the puppy sits nicely inside the mug without wobbling. - Stuff and shape:
Then, begin stuffing before the opening gets too small. After that, push stuffing into the cheeks and lower body first, and later fill the center until the shape looks smooth. Finally, close the opening neatly and weave in the end.
Making time for puppy base: 45–75 minutes
Additional Parts
Ears
- Crochet two floppy ears:
First, crochet two small ear shapes in brown, keeping them slightly longer than they are wide for that floppy puppy look. Next, flatten them gently so they drape naturally. - Attach symmetrically:
After that, pin the ears to the top sides of the head before stitching. Then, sew with small, hidden stitches so the ears sit evenly.
Making time for ears: 15–25 minutes
Arms & Legs
- Create small, rounded limbs:
First, crochet two tiny arms and two small legs as simple tubes or rounded nubs. Next, lightly stuff them so they stay soft and squishy instead of stiff. - Pose for a sitting look:
After that, attach the legs slightly forward so the puppy appears to be sitting. Then attach the arms a little higher, as if the puppy is resting on the mug’s rim.
Making time for arms & legs: 20–35 minutes
Tail
- Crochet a short tail:
First, crochet a tiny tapered tail in brown. Next, add just a pinch of stuffing, if desired, or leave it unstuffed for a softer finish. - Attach at the back:
Finally, sew it onto the puppy’s owner’s back so it peeks out cutely.
Making time for tail: 5–10 minutes
Mug (Main Accessory)
- Crochet a cylindrical mug base:
First, choose a bright yarn color, such as yellow, for a cheerful mug. Next, crochet a flat circular base, then build up in rounds to form a cylinder. Meanwhile, occasionally slide the puppy inside to check the fit. - Add a handle:
After that, crochet a small curved strap for the handle. Then, stitch it to the side at two points so it feels sturdy. - Ensure a snug fit:
Finally, the puppy should sit comfortably without disappearing inside. If the mug feels too wide, reduce the circumference by using fewer increase rounds; if it feels too tight, add one extra increase round before building the sides.
Making time for mug: 35–60 minutes
Santa Hat & Scarf
Mini Santa Hat
- Crochet the hat (red + white):
First, start the hat in red and crochet a small cone shape by gradually decreasing. Next, add a white trim band at the opening. - Add the pom-pom:
After that, finish with a fluffy white pom-pom at the tip. Then, stitch the hat onto the puppy’s head lightly so it stays in place but still looks soft.
Making time for hat: 15–25 minutes
Mini Scarf
- Crochet a tiny scarf:
Next, crochet a short strip in green (or red/white stripes for extra festive flair). Then, wrap it around the puppy’s neck and stitch it down with one or two small tacks so it doesn’t slide.
Making a scarf: 10–20 minutes
Face & Assembly
- Insert safety eyes evenly:
First, place the eyes on the head before final stuffing. Next, count stitches between them so they’re evenly spaced. After that, double-check the expression; slightly close to the y,w, which often looks extra sweet, and secure the backs firmly. - Embroider the nose and mouth:
Then, embroider a small nose (black or dark brown) on the muzzle area, shaping it like a tiny rounded triangle or oval. Next, add a short mouth line for a gentle, friendly look. - Assemble all parts carefully:
After that, attach the ears first, then the arms and legs, and finally the tail. Meanwhile, keep checking symmetry by looking from the front and top. - Place the puppy inside the mug securely:
Finally, stitch the puppy to the inside base of the mug with a few hidden stitches. As a result, the puppy stays in place even if the decoration gets moved around.
Beginner-friendly assembly tips
- First, pin pieces with stitch markers or scraps of yarn before sewing.
- Next, sew using short stitches and pull snugly without puckering.
- After that, weave ends through several stitches, change direction once, and trim.
- Finally, secure anything wearable (scarf and scarf) with a couple of hidden tacks.
Special Features
- Texture: soft and cozy plush texture, especially if plush yarn is used
- Expression: cute festive puppy face with simple, beginner-friendly details
- Theme: Christmas-inspired design featuring a mug, Santa, and scarf
Sizing Tips
Changing yarn and hook size will change both the puppy and mug proportions. First, plush yarn with a larger hook creates a bigger, squishier puppy, so the mug must also be crocheted wider and taller. Next, worsted-weight yarn with a smaller hook makes a smaller puppy with clearer stitches, so that it stays compact.
Meanwhile, the best approach is to treat the mug like a “custom fit” piece. After that, test-fit the puppy as the mug grows, adjusting the circumference early rather than forcing the puppy in at the end.
Finishing Tips
- First, keep stitches even and tight to avoid gaps.
- Next, shape gently as you stuff, especially around the puppy’s cheeks and body.
- After that, secure all attachments properly, including the mug handle and hat pom-pom.
- Finally, hide the yarn ends neatly by weaving them in and trimming them only when fully buried.
Common Mistakes to Avoid
- Loose stitches causing gaps? Use a smaller hook or slightly tighten the tension.
- Uneven stuffing: add small amounts, then smooth the surface often before adding more.
- Misaligned facial features: place eyes first, then embroider the nose centered between them.
- Incorrect mug sizing: test-fit the puppy during mug rounds, not after finishing the mug.
Variations & Customization Ideas
- Change mug colors:
- Classic holiday: red mug with white rim
- Cozy winter: cream mug with green handle
- Pastel Christmas: mint mug with pink accents
- Try different scarf styles:
- Scarfed scarf
- Tiny infinity scarf
- Scarf with fringes (made from a few short yarn strands)
- Swap the character inside the mug:
- Kitten, bear, bunny, or a tiny penguin
- Add extra festive decorations:
- Embroidered snowflakes on the mug
- A tiny gift box attached to the side
- A jingle-bell charm (for decor use only)
Tutor Suggestions for ( Crochet Santa Puppy in a Mug )
- First, follow stitch counts carefully, especially during increases and decreases.
- Next, maintain consistent tension so the fabric looks smooth and holds stuffing well.
- After that, assemble slowly and neatly, because careful placement makes a big difference.
- Finally, practice small parts like the hat cone or mug handle on scrap yarn if they feel new.
Conclusion
This Crochet Santa Mug Puppy amigurumi is a cozy little holiday project that feels cheerful from the first stitch to the final pom-pom. Next, the puppy-and-mug idea makes it stand out as a decoration, while the mini SantScarf & Scarf amigurumi details bring the Christmas spirit most sweetly. Finally, experimenting with colors, mug designs, and tiny accessories can turn this pattern into a whole festive collection that’s perfect for gifting or decorating.