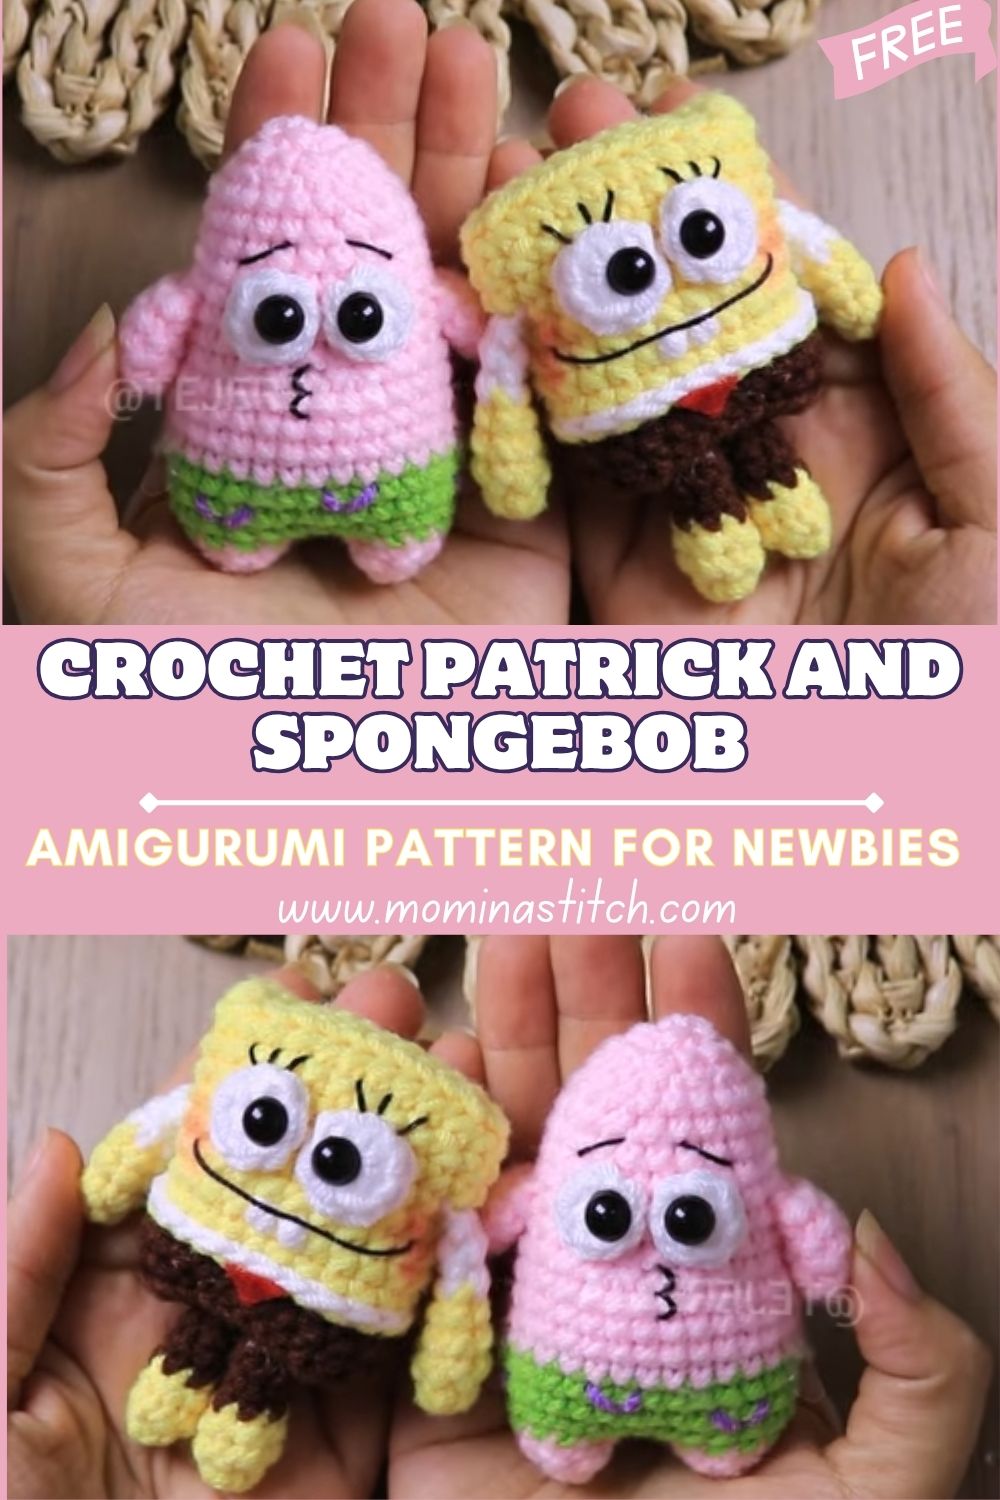
Crochet Patrick and SpongeBob Amigurumi Pattern for Newbies
Cartoon-inspired crochet projects always bring a little extra nostalgia to the yarn basket. First, the bright colors feel cheerful on the hook, and next, the familiar shapes make every round more exciting than the last.
Even better, Crochet Patrick and SpongeBob amigurumi are perfect beginner makes because the shapes stay simple and the details are added step-by-step. After that first tiny smile is stitched on, the whole project suddenly feels like magic cute, cozy, and totally handmade.
Cartoon characters like Patrick and SpongeBob are especially popular because they translate beautifully into crochet. Meanwhile, their bold colors and simple outlines make them instantly recognizable even in mini form. As a result, beginners can focus on learning the basics without getting overwhelmed by complicated shaping.
This crochet cartoon amigurumi pattern is designed to build confidence. First, it practices easy shaping; next, it introduces clean color changes; after that, it develops assembly skills like placing eyes evenly and sewing parts neatly. Finally, the finished duo can become a keychain set, a playful gift, or a growing collectible for a cartoon-themed shelf.
Materials Needed (Exact Measurements)
- Yarn (DK/light worsted #3 or worsted #4)
- Yellow (SpongeBob main): 25–35 g
- Pink (Patrick main): 20–30 g
- Brown (pants): 10–15 g
- Green (shorts): 10–15 g
- White (shirt/eyes): 10 g
- Black (details): 5 g
- Optional small bits of red/blue for tiny accents: scraps
- Crochet hook: 2.5 mm to 3.5 mm (choose smaller than yarn label for tighter stitches)
- Safety eyes: 6–10 mm (8 mm works great for palm-sized dolls)
- Stuffing: polyfill, about 20–30 g total
- Stitch markers: 1–2
- Yarn needle: blunt tip for sewing
- Scissors
- Optional: keychain ring or clip + strong thread/yarn for hanging loop
Skill Level
Beginner (Easy) to Easy-Intermediate — basic stitches plus simple shaping and assembly.
Making Time (Overview)
About 2–3 hours total for both characters, depending on experience and how detailed the faces are.
Step-by-Step Instructions
Before Starting: Helpful Notes
- Work in continuous rounds unless stated otherwise.
- Use tight tension to prevent stuffing from showing through.
- Common stitches:
- sc = single crochet
- inc = 2 sc in the same stitch
- dec = invisible decrease (recommended for amigurumi)
- Mark the first stitch of each round with a stitch marker.
SpongeBob Body (Main Shape)
1. Start with a base (yellow)
A cube look is easiest when the body starts as a flat square panel and is built upward.
- Ch 11.
- Row 1: sc in 2nd ch from hook and across (10 sc). Turn.
- Rows 2–10: sc across (10 sc). Turn.
Next, this square becomes the base of a soft cube.
2. Build the body into a square shape
- Single crochet evenly around the square, placing 3 sc in each corner to help it turn smoothly.
- After that, continue crocheting in rounds to build height. Keep rounds even until the “walls” look tall enough for a mini plush cube (about 10–12 rounds, depending on yarn and hook).
Meanwhile, check the shape: if the sides flare, reduce corner stitches slightly; if the sides pull inward, add one extra stitch at corners.
3. Stuff and close
- Add stuffing gradually, pressing it into corners to keep the cube shape crisp.
- Next, flatten the opening and single crochet through both layers to close, or decrease around until small enough to sew shut.
Making time (SpongeBob body): about 35–45 minutes.
Patrick Body (Main Shape)
1. Start with a round base (pink)
- Magic ring with 6 sc.
- Round 2: inc around (12).
- Round 3: (sc, inc) around (18).
- Round 4: (2 sc, inc) around (24).
First, this creates a stable base; next, it sets up the classic “starfish” body.
2. Shape the body (cone-like)
- Rounds 5–8: sc around (24).
- Round 9: (2 sc, dec) around (18).
- Rounds 10–12: sc around (18).
- Round 13: (sc, dec) around (12).
- Rounds 14–15: sc around (12).
After that, Patrick should look softly tapered on top.
3. Stuff and close
- Stuff firmly but not stiff, keeping the base rounded.
- Next, decrease to close: (dec) around until closed, then sew the final hole shut.
Making time (Patrick body): about 30–40 minutes.
Additional Parts
Arms & Legs (both characters)
Keep these simple cylinders so assembly feels stress-free.
Arms (make 4 total)
- Magic ring 6 sc
- Next, sc around for 4–6 rounds
- After that, lightly stuff (optional) and fasten off with a long sewing tail
Legs (make 4 total)
- Magic ring 6 sc
- Next, sc around for 5–7 rounds
- Then fasten off; stuff lightly if desired
Making time (arms & legs): about 25–35 minutes.
Clothing Details
SpongeBob: pants + shirt band
- First, decide where the “waistline” sits on the yellow body (usually the lower third).
- Next, attach brown yarn and crochet a round/row “band” around the body for pants.
- After that, add a thin white strip above the brown for the shirt.
Tip: For cleaner color changes, finish the last stitch of the old color with the new color (pull through with the new yarn on the final yarn-over).
Patrick: green shorts
- First, mark the lower section of Patrick’s body.
- Next, attach green yarn and crochet a simple band around.
- After that, add a few small stitches in a contrasting color (scrap yarn) to suggest the shorts pattern.
Making time (clothing details): about 20–30 minutes.
Face & Assembly
1. Attach safety eyes
- For SpongeBob, place eyes higher on the face, spaced evenly.
- For Patrick, place eyes slightly wider for a goofy, friendly look.
Beginner tip: Before locking safety eyes, pin features first. Next, step back and check symmetry. After that, adjust until both faces feel “alive.”
2. Embroider expressions
- Use black yarn (or embroidery floss) for smiles and tiny details.
- Add small cheek dots or dimples if desired.
- SpongeBob can have a small stitched nose (a tiny nub or a short embroidered line).
- Patrick can have a simple curved smile or a slightly crooked grin for personality.
3. Sew arms and legs neatly
- First, pin all limbs into place.
- Next, stitch them on using small whip stitches.
- Meanwhile, keep the thread tension even so limbs sit snugly without puckering.
4. Final shaping
- Add or remove a pinch of stuffing if needed.
- After that, massage the plush lightly to smooth lumps.
- Finally, weave in ends neatly inside the body.
Making time (face & assembly): about 30–45 minutes.
Special Features
- Texture: Soft, plush, and slightly structured so the shapes hold well.
- Expression: Fun, cartoon-like faces that can be customized from sweet to silly.
- Design: Recognizable mini versions with clear colors and simple outfit details.
Sizing Tips
Yarn and hook size change everything. First, thicker yarn makes larger plushies quickly; next, thinner yarn makes tiny, detailed dolls. Meanwhile, choosing a smaller hook than recommended tightens stitches and reduces gaps. For keychains, a 2.5–3.0 mm hook with DK yarn creates a sturdy mini size; for shelf plushies, a 3.5 mm hook with worsted makes them more huggable.
Finishing Tips
- First, keep stitches tight and even to avoid visible stuffing.
- Next, secure small parts firmly, especially arms and legs.
- After that, hide yarn ends by weaving through several stitches inside the body.
- Finally, maintain facial symmetry by pinning eyes and mouth before sewing.
Common Mistakes to Avoid
- Uneven color changes: Carry yarn neatly or cut and reattach to keep bands crisp.
- Misaligned eyes: Always measure spacing or count stitches across the face.
- Loose stitches and gaps: Use a smaller hook and keep tension steady.
- Uneven stuffing: Add stuffing in small layers and shape as the body fills.
Variations & Customization Ideas
- First, create mini keychain versions by using thinner yarn and smaller hooks.
- Next, try pastel shades for a soft, dreamy cartoon look.
- After that, add accessories like tiny hats, a little snack prop, or a mini backpack.
- Finally, expand into a full cartoon collection with more sea-themed friends and simple background props.
Tutor Suggestions
- First, maintain consistent tension from start to finish for a polished look.
- Next, take extra care with facial details, because small changes create big personality.
- After that, practice color changes on a small swatch before starting the outfits.
- Finally, stay patient amigurumi improves quickly with every finished plush.
Conclusion for ( Crochet Patrick and SpongeBob Amigurumi )
Crocheting a tiny cartoon duo is a joyful way to practice the basics while ending with something truly display-worthy. First, the simple shapes keep the project comfortable for beginners; next, the colors and faces add instant charm. After that, a little assembly brings everything together into collectible mini plushies that feel special because they are handmade. Finally, experiment with yarn shades, try different expressions, and enjoy turning simple stitches into Crocheted Patrick and SpongeBob amigurumi that look ready for adventure.