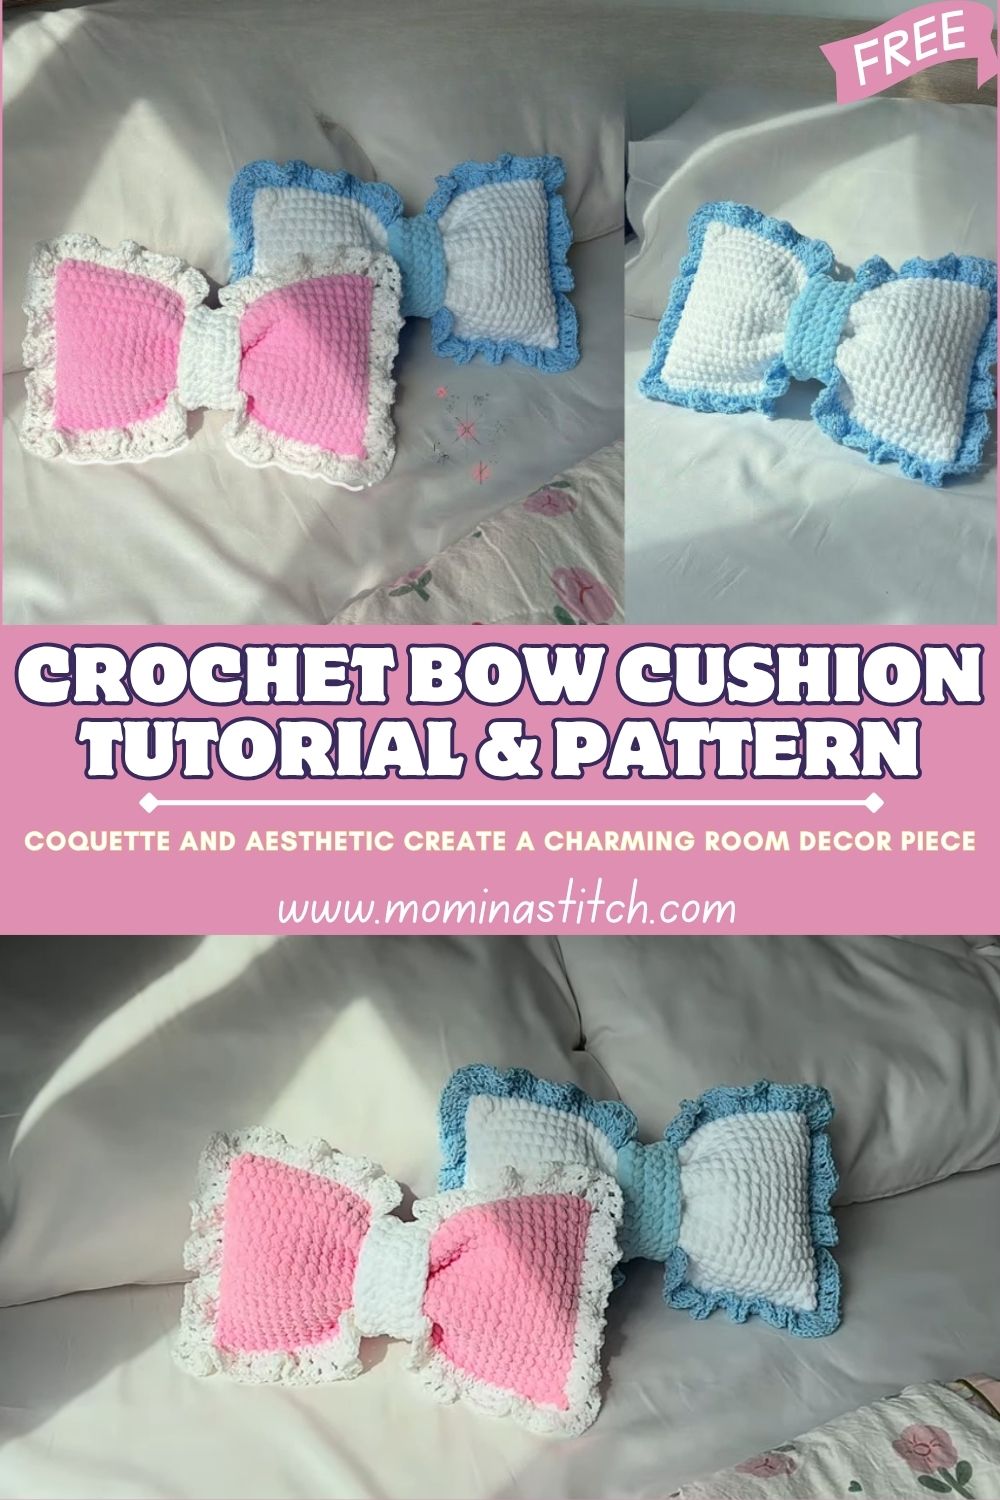
Crochet Bow Cushion Tutorial & Pattern Coquette and Aesthetic Room Decor Piece
A soft crochet bow cushion instantly makes a room feel sweeter and more put-together, even when the rest of the decor stays simple. Because the shape is playful and the texture is cozy, this crochet bow pillow works beautifully on a bed, in a reading chair, or on a nursery shelf.
This amigurumi bow pillow tutorial keeps everything beginner-friendly, so there is no complicated shaping to stress over. First, the pillow is made as a squishy round; next, the bow is crocheted separately; and finally, everything is stitched together into a neat, giftable finish.
Crochet bow cushions are trending because they blend “cute” and “cozy” in one piece. Meanwhile, bows fit many decor styles, from soft pastel bedrooms and playful kids’ rooms to modern spaces that need one warm accent. After that, the bow becomes an instant focal point, so the pillow looks special without needing complicated colorwork.
This crochet bow pillow pattern is suitable for beginners because it uses basic stitches and simple construction. First, the pillow body is a repeatable round shape; next, the bow is a straightforward rectangle that gets cinched; and finally, the assembly is mostly careful stitching. As a result, it is a quick weekend project, a charming handmade gift, and a satisfying way to practice neat edges and balanced stuffing.
Items Required
- Yarn (choose one option for the whole project):
- Option A (smooth, defined stitches): Soft cotton or cotton-blend, worsted weight (Category 4)
- Pillow color: 120–160 g
- Bow color (same or contrasting): 60–90 g
- Optional accent/embroidery color: 5–10 g
- Option B (extra plush look): Velvet/plush yarn, bulky (Category 5)
- Pillow color: 180–260 g
- Bow color: 120–180 g
- Option A (smooth, defined stitches): Soft cotton or cotton-blend, worsted weight (Category 4)
- Crochet hook size:
- Worsted cotton: 4.0 mm
- Plush yarn: 5.5–6.0 mm (or the size that creates a firm fabric)
- Safety eyes (optional): 10–12 mm (1 pair)
- Stuffing: polyfill, 250–400 g (depends on size and yarn)
- Yarn needle: 1 tapestry needle
- Stitch marker: 1 removable marker (or a scrap strand)
Skill Level:
Beginner
Making Time (Overview):
Total estimated time: 3.5–5 hours (plush yarn is often faster to fill coverage, while cotton is faster to stitch neatly).
Step-by-Step Instructions
Stitches & Notes (Quick Guide):
- ch = chain
- sc = single crochet
- inc = 2 sc in the same stitch
- dec = single crochet decrease (invisible decrease recommended)
- First, crochet with a slightly tight tension; next, use a stitch marker to track rounds.
Body (Main Shape)
1) Create the pillow’s body (round base first) (60–90 minutes)
This pillow is made of two matching circles, then joined and stuffed.
Circle Panel (make 2):
- Round 1: Magic ring, 6 sc (6)
- Round 2: inc x6 (12)
- Round 3: (sc, inc) x6 (18)
- Round 4: (2 sc, inc) x6 (24)
- Round 5: (3 sc, inc) x6 (30)
- Round 6: (4 sc, inc) x6 (36)
- Round 7: (5 sc, inc) x6 (42)
- Round 8: (6 sc, inc) x6 (48)
- Round 9: (7 sc, inc) x6 (54)
- Round 10: (8 sc, inc) x6 (60)
Next, stop here for a medium cushion. Meanwhile, for a larger pillow, continue with one or two more rounds of increases using the same pattern (add 1 more sc between increases each round).
Optional shaping for a “puffier” look:
- After finishing the last increase round, work 1 plain round of sc on each panel.
Later, this helps the edge look cleaner when the panels are joined.
2) Crochet the bow shape (separate piece) (50–70 minutes)
The bow is made in the shape of a rectangle, then cinched in the middle.
Bow Rectangle:
- First, chain 31 (or adjust the width to 25 for small, 35 for larger).
- Next, sc in the 2nd chain from the hook and across = 30 sc.
- Then, ch 1, turn.
- After that, sc across for 16–20 rows (more rows = a taller bow).
- Finally, fasten off, leaving a long tail.
From the bow:
6. Fold the rectangle so the short ends meet.
- Next, sew the short ends together to create a tube.
- Then turn the seam to the back center.
Create the “pinch” in the middle:
9. Pinch the center of the tube into two pleats (like an accordion fold).
- Next, wrap a long yarn tail around the center 8–12 times.
- After that, pull snugly, knot securely, and hide the tail inside the wraps.
Meanwhile, if the bow looks floppy, add two extra wrap rounds, because tighter wrapping gives a crisp “bow” silhouette.
3) Attach the bow to the pillow (center join) (25–40 minutes)
Making time (Body + bow attachment total): 2.5–3.5 hours
- First, place one pillow panel flat and find the center.
- Next, position the bow so the center wrap sits exactly in the middle.
- Then, stitch the back of the bow to the panel using small, even stitches.
- After that, stitch around the center wrap again for extra security.
- Finally, weave the ends deep into the panel so the bow cannot loosen.
Later, the pillow is assembled around the bow, so the center becomes the main decorative focus.
Additional Parts
Tail or Ribbons (Optional) (20–35 minutes)
These ribbon tails add a “gift bow” vibe.
Make 2 ribbon tails (flat pieces):
- First, chain 18–24 (length choice).
- Next, sc in the 2nd chain from the hook and across.
- Then, ch 1, turn, and sc across for 4–6 rows.
- After that, fasten off, leaving a tail to sew.
- Finally, cut a tiny V-shaped notch at the end using yarn shaping only: stitch a few decreases at the end corners, or fold and sew a simple V-pinch.
Attach tails:
6. Next, slide one tail under the bow’s center wrap on each side.
- Then stitch them down so theysitt at a slight angle
Meanwhile, tails look best when they peek out under the bow rather than sitting fully outside it.
Assembly (join pillow sides + stuffing) (45–70 minutes)
- First, place the two circle panels wrong sides together (or keep right sides out if preferred).
- Next, attach yarn at any point on the edge.
- Then, sc through both layers around the edge to join.
- After that, stop when about 1/3 of the edge remains open.
- Next, stuff the pillow gradually, smoothing lumps as it fills.
- Finally, continue crocheting closed, then fasten off and weave in ends.
Tip: For a cleaner seam, join with slip stitches instead of sc. Meanwhile, sc joining creates a cute decorative ridge that frames the pillow.
Face & Assembly (Optional Cute Details)
Add eyes or a simple embroidered face (10–20 minutes)
If a playful look is desired, aplacethe face oatthe benter oof the bow r slightly above it.
- Safety eyes option:
- First, insert 10–12 mm safety eyes into the bow center wrap area (before final stitching).
- Next, secure the backs firmly.
- Embroidered face option:
- First, stitch two small eyes using black yarn or embroidery thread.
- Next, add a tiny curved smile.
- After that, add blush dots with pink yarn if desired.
Beginner-friendly tips for neat face placement:
- First, place pins where the eyes should go; next, step back and check symmetry.
- After that, stitch slowly using small passes, because tiny stitches look cleaner.
- Finally, knot and hide the thread ends inside the bow wrap so the front stays tidy.
Special Features
- Texture: soft, squishy pillow body with a structured, beautifully cinched crochet bow
- Expression: optional sweet face or decorative “button” stitches on the bow center
- Size: ideal for couch styling, bedroom decor, or a cozy reading nook accent
Sizing Tips
First, yarn weight changes everything. Worsted cotton makes a firmer cushion with crisp stitch definition, while plush yarn makes a puffier pillow with a velvety finish. Next, hook size controls density: a slightly smaller hook creates tighter stitches and cleaner shaping. Finally, for a larger cushion, add more increase rounds to the circle panels and extend the bow rectangle width to match.
Quick size guide (approximate):
- Worsted + 4.0 mm: 10–12 in (25–30 cm)
- Plush + 5.5–6.0 mm: 12–15 in (30–38 cm)
Finishing Tips
- Neat stitching: first, count rounds; next, keep increases evenly spaced.
- Secure knots: after sewing, knot twice, then weave through several stitches.
- Balanced stuffing: stuff in small handfuls, smoothing as you go for an even shape.
- Clean finish: finally, hide tails toward the center of the pillow so they never poke out.
Common Mistakes to Avoid
- Loose stitches: stuffing can show, so tighten tension or use a smaller hook.
- Overstuffing: the pillow can stretch and distort, so stop when it feels plush but still squeezable.
- Inconsistent bow shape: uneven rows can twist the bow, so count rows carefully.
- Skipping stitch markers: the circles can drift off-count, so mark round starts for accuracy.
Meanwhile, if the bow looks “too flat,” add extra middle wraps, because the center cinch creates dimension.
Variations & Customization Ideas
- Color swaps: pastel bow on a cream pillow, or a bold red bow on a neutral base.
- Coquette edging: add a simple scallop or picot edge around the pillow seam.
- Textured bow: Use puff stitches or bobbles on the bow rectangle for extra charm.
- Different sizes: make a mini cushion for a chair, or scale up for a statement floor pillow.
- Seasonal themes: later, try holiday colors, or add small appliqués like hearts or stars.
Tutor Suggestions
- First, start with a smooth yarn if learning, because stitches are easier to see and count.
- Next, keep the bow symmetrical by blocking the rectangle lightly before cinching.
- Meanwhile, use pins generously during assembly, because pinned pieces sew straighter.
- After that, treat the seam as decoration, because even joining stitches makes the whole pillow look professional.
- Finally, confidence comes quickly with pillows, since the shapes are forgiving and the results feel instantly cozy.
Conclusion for ( Crochet Bow Cushion Tutorial )
A crochet bow cushion is one of those projects that feels cute from the very first rows and finishes with a big decor payoff. First, the round pillow panels create a soft base; next, the bow adds that charming centerpiece; finally, the stuffing brings everything to life. After that, experimenting with colors, textures, and optional ribbon tails becomes the fun part, so each crochet bow pillow can match a different room mood while staying beginner-friendly and totally giftable.