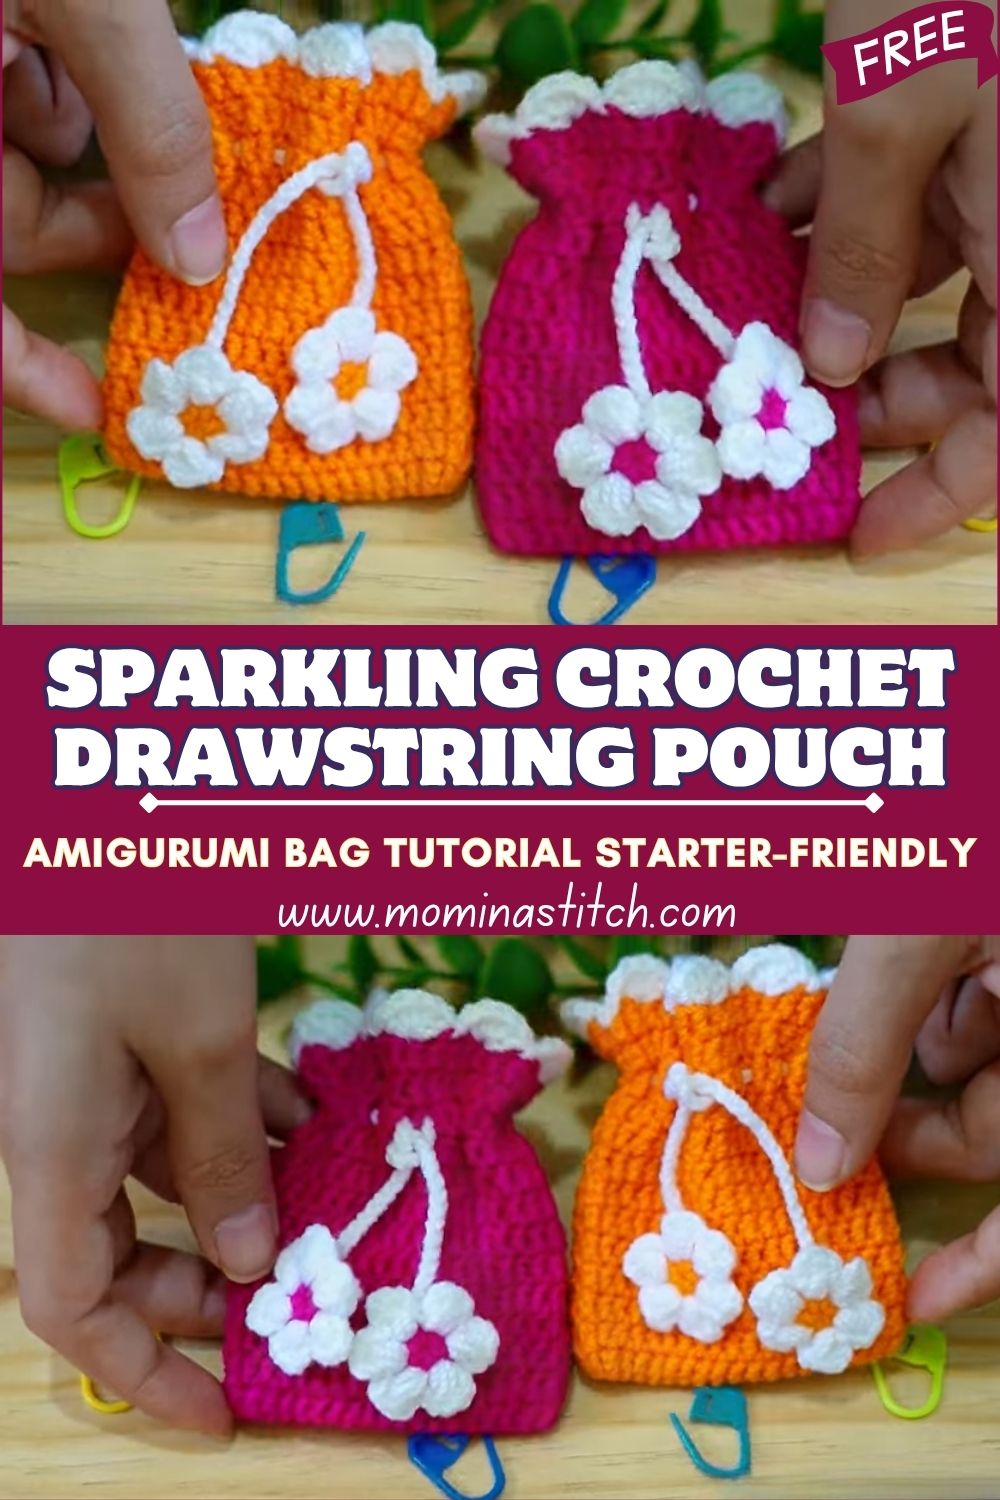
Sparkling Crochet Drawstring Pouch Amigurumi Bag Tutorial Step-by-Step Starter-friendly
A tiny bag can be surprisingly useful, especially when it’s soft, sturdy, and completely handmade. This amigurumi pouch is a crochet drawstring pouch that serves as a sweet little storage piece for coins, earbuds, stitch markers, or lip balm.
Even better, this mini crochet bag pattern includes a simple floral detail that makes the finished pouch look extra special. First-time amigurumi makers can follow along easily, and after that, the pattern becomes a relaxing repeat.
Meanwhile, crochet pouches and mini bags have been trending because they fit modern life perfectly. They are quick to make, easy to personalize, and ideal for organizing tiny essentials inside bigger bags. Additionally, they make thoughtful gifts because they feel handmade and meaningful without requiring weeks of crafting time.
Best of all, the stitches stay basic single crochet, increases, slip stitches, and chains—so the maker can focus on rhythm and neatness instead of complicated techniques. As a result, this project is functional, stylish, quick, and giftable, all at once.
Important Notes Before Starting
- First, choose cotton yarn if possible, because it helps the pouch hold its shape and look crisp.
- Next, use a stitch marker every round, because continuous rounds can be confusing without a clear start point.
- Meanwhile, keep stitches snug but not tight, since drawstring pouches look best with even tension.
- After that, count rounds often, because small projects change size quickly if a round is missed.
- Finally, weave in ends securely, because drawstrings and flower attachments get tugged during use.
Skill Level
This pattern is beginner/easy. It uses simple stitches in repeated rounds, and it includes clear steps for shaping and finishing. Although working in the round may feel new at first, the pouch grows quickly, so confidence builds fast.
Materials Needed
- Yarn (main color): Cotton yarn, worsted weight (Category 4), about 50–70 g (approx. 85–120 m / 93–131 yd)
- Yarn (accent colors): Small amounts of cotton yarn in 2–3 colors, about 10–15 g each (flowers, edging, drawstring)
- Crochet hook: 3.5 mm or 4.0 mm (choose 3.5 mm for a tighter fabric, 4.0 mm for a slightly bigger pouch)
- Yarn needle: 1 (for weaving ends and attaching flowers)
- Stitch marker: 1 (or a scrap piece of yarn)
- Drawstring:
- Either a purchased cord (2–3 mm thick), 70–90 cm long, or
- Crocheted cord made from yarn (instructions below)
- Optional accessories: 2 small beads (8–12 mm), charms, tassels, or a tiny wooden button for extra decoration
Abbreviations
- ch = chain
- sl st = slip stitch
- sc = single crochet
- inc = increase (2 sc in the same stitch)
- dec = decrease (single crochet 2 stitches together)
- st(s) = stitch(es)
- rnd = round
- BLO = back loop only (optional texture step)
Making Time (Overview)
Total estimated time: 1.5 to 3 hours, depending on experience and the level of detail in the flower decorations.
Step-by-Step Instructions
Pouch Base (Bottom Shape) — Making time: 15–25 minutes
This base is worked in a flat circle first. After that, one “turning” round helps the sides stand up neatly.
Step 1: Start the center
- Make a magic ring, then crochet 6 sc into the ring.
- Pull tight to close the center.
- Place a stitch marker in the first stitch.
Step 2: Increase to widen the circle
Next, increase evenly to keep the base flat.
- Rnd 2: inc in each st around = 12 sts
- Rnd 3: (sc 1, inc) around = 18 sts
- Rnd 4: (sc 2, inc) around = 24 sts
- Rnd 5: (sc 3, inc) around = 30 sts
- Rnd 6: (sc 4, inc) around = 36 sts
After that, stop and check the shape. If the circle cups upward, loosen tension or switch up a hook size. If it ripples, reduce increases by spreading them out more.
Step 3: Create a clean edge for the side wall
Now the pouch needs a defined corner.
- Rnd 7 (turning rnd): sc around in BLO (optional but recommended) = 36 sts
This BLO round creates a crisp fold line, so the body naturally rises.
Pouch Body — Making time: 30–55 minutes
The body is worked in continuous rounds. A gentle texture is added using a simple repeat that stays beginner-friendly.
Round setup: keep the stitch marker moving to the first stitch of each round.
Step 1: Build the height
- Rnd 8–10: sc around = 36 sts
Step 2: Add an easy textured band (optional but pretty)
Next, add texture with a simple pattern that still looks “amigurumi neat.”
- Rnd 11: (sc 2, ch 1, skip 1) around
- Rnd 12: sc in each sc and sc in each ch-1 space around
- Rnd 13: sc around
After that, repeat Rnds 11–13 one more time for a second textured band, or skip ahead if a smoother pouch is preferred.
Step 3: Continue straight to the top
- Work sc around until the pouch measures about 9–11 cm / 3.5–4.25 in from the base fold line.
Later, the top edge will shrink slightly when the drawstring is pulled, so a little height helps.
Top Edge & Drawstring Holes — Making time: 10–20 minutes
Now the drawstring channel is formed with evenly spaced gaps.
Step 1: Prepare a neat top round
- Work 1 round sc around to even everything out.
Step 2: Create the holes
Next, make holes that are easy to thread but still sturdy.
- Hole rnd: (sc 4, ch 2, skip 2) around
If the stitch count doesn’t line up perfectly, adjust the spacing near the end by working sc 3 or sc 5 before a ch-2 gap. The goal is consistent holes, not perfect math.
Step 3: Strengthen the edge
After that, lock the shape in place.
- Final rnd: sc around, placing 2 sc into each ch-2 space.
Finally, fasten off and weave in the end neatly.
Drawstring Cord — Making time: 10–20 minutes
A cord can be crocheted for a fully handmade look.
Option A: Simple crocheted cord
- Ch 80–100 (long enough to go around and tie a bow).
- Sl st into the 2nd ch from hook and sl st across.
- Fasten off, leaving tails to help with threading if desired.
Option B: Twisted yarn cord (fast method)
- Cut 3 strands, each about 120 cm long.
- Fold in half, twist tightly, then fold again so it twists back on itself.
- Knot the ends.
Next, thread the cord through the holes using a yarn needle or safety pin.
Additional Parts (Decorative Flowers) — Making time: 15–35 minutes
These tiny flowers are quick and cheerful. Make 2 flowers for the drawstring ends.
Small 5-petal flower (simple and cute)
- Make a magic ring.
- Into the ring, repeat (ch 2, sl st) 5 times.
- Pull the ring tight, then sl st to the first petal base.
- Fasten off, leaving a tail for sewing.
After that, make a tiny center knot or add a bead if desired.
Attach to the drawstring ends
Next, knot the drawstring ends first to prevent fraying.
After that, sew each flower onto an end using the yarn tail.
Finally, add a bead above the flower for extra weight (optional).
Accessories / Details — Making time: 10–25 minutes
This is where the pouch starts to look extra polished.
Color contrast edging (easy upgrade):
- Join an accent yarn at the top edge.
- Work sl st or sc around for one clean round.
- Fasten off and weave in ends.
Optional decorative touches:
- Add a tiny charm to the drawstring bow
- Sew a small label tag inside
- Stitch a simple satin-stitch dot pattern on the body
- Add a mini tassel instead of flowers
Face & Assembly (Final Construction) — Making time: 10–20 minutes
This project doesn’t require a face; however, assembly still matters for a professional finish.
1) Shape and check the pouch
First, turn the pouch right side out if needed. Next, flatten the base gently so it sits nicely.
2) Insert the drawstring
After that, thread the cord through the holes, going in and out all the way around. Later, pull both ends to gather the top evenly.
3) Attach flowers securely
Next, reinforce each flower with several passes of yarn through the stitches. Finally, knot firmly and hide the knot inside a petal or under the bead.
Beginner-friendly tips for neat assembly:
- Use a yarn needle to weave ends back and forth at least 3 times
- Pull knots tight, then “bury” them inside the stitches
- Test the drawstring by opening and closing the pouch a few times before trimming tails
Special Features
- Textured stitch pattern: adds interest while keeping stitches simple
- Cute floral drawstring detail: a sweet finishing touch that feels handmade
- Compact and functional size: perfect for small essentials
- Stylish handmade look: clean edges, sturdy cotton fabric, and customizable colors
Sizing Tips
Yarn thickness and hook size quickly affect the final pouch size.
- Thicker yarn or a larger hook: the pouch becomes taller and wider, and the gaps may appear larger.
- Thinner yarn or smaller hook: the pouch becomes tighter and smaller, and stitches look more defined.
For a coin-pouch style, choose a 3.0–3.5 mm hook and cotton. For a mini gift bag style, choose a 4.0–4.5 mm hook and add a few extra body rounds.
Finishing Tips
- First, align the last rounds so the drawstring holes look level all the way around.
- Next, use consistent tension on the final round, because it frames the whole pouch.
- Meanwhile, weave in the ends in multiple directions to prevent them from loosening later.
- After that, block lightly if needed: a gentle steam hover or a damp shape-and-dry helps cotton look crisp.
- Finally, test durability by tugging the drawstring and flowers to ensure everything is secure.
Common Mistakes to Avoid
- Loose stitches: contents may peek through; therefore, size down a hook if needed.
- Uneven rounds: the pouch can twist; instead, keep a stitch marker and count rounds.
- Incorrect drawstring spacing: holes can bunch; consequently, adjust with sc 3 or sc 5 before gaps near the end.
- Weak attachments: Flowers can fall off, so sew with multiple passes and strong knots.
- Skipping stitch markers: the start of the round gets lost, so increases and holes may shift.
Variations & Customization Ideas
- Different color combinations: pastel flowers on a neutral pouch, or bold contrast for a modern look
- Add beads or charms: beads on the cord ends add weight so the drawstring hangs nicely
- Adjust pouch size:
- For a wider base, continue increasing rounds to 42 or 48 sts
- For a taller pouch, simply add more straight sc rounds
- Use it in different ways: gift bag for jewelry, coin pouch, headphone holder, travel pill pouch, or small notions bag
Tutor Suggestions (Friendly Guidance)
- First, practice single-crochet circles on scrap yarn because the base sets the overall pouch shape.
- Next, keep the fabric firm, like a soft basket, since drawstring pouches work best when they hold their shape.
- Meanwhile, choose light-colored yarn for the first attempt, because stitches are easier to see.
- After that, slow down on the drawstring-hole round, because consistent spacing keeps the top edge looking tidy.
- Finally, celebrate the small wins—once the base is flat and the sides stand up cleanly, the rest flows beautifully.
Conclusion FOR ( Crochet Drawstring Pouch Amigurumi )
A small drawstring pouch is one of those projects that feels relaxing from the very first round and extra satisfying when the drawstring pulls the top closed perfectly. After that final tug and bow, the pouch instantly becomes useful enough for gifting, yet sturdy enough for everyday storage. Next time, try new colors, switch up the flower style, or add beads and charms, because tiny handmade details make every mini bag feel one-of-a-kind.