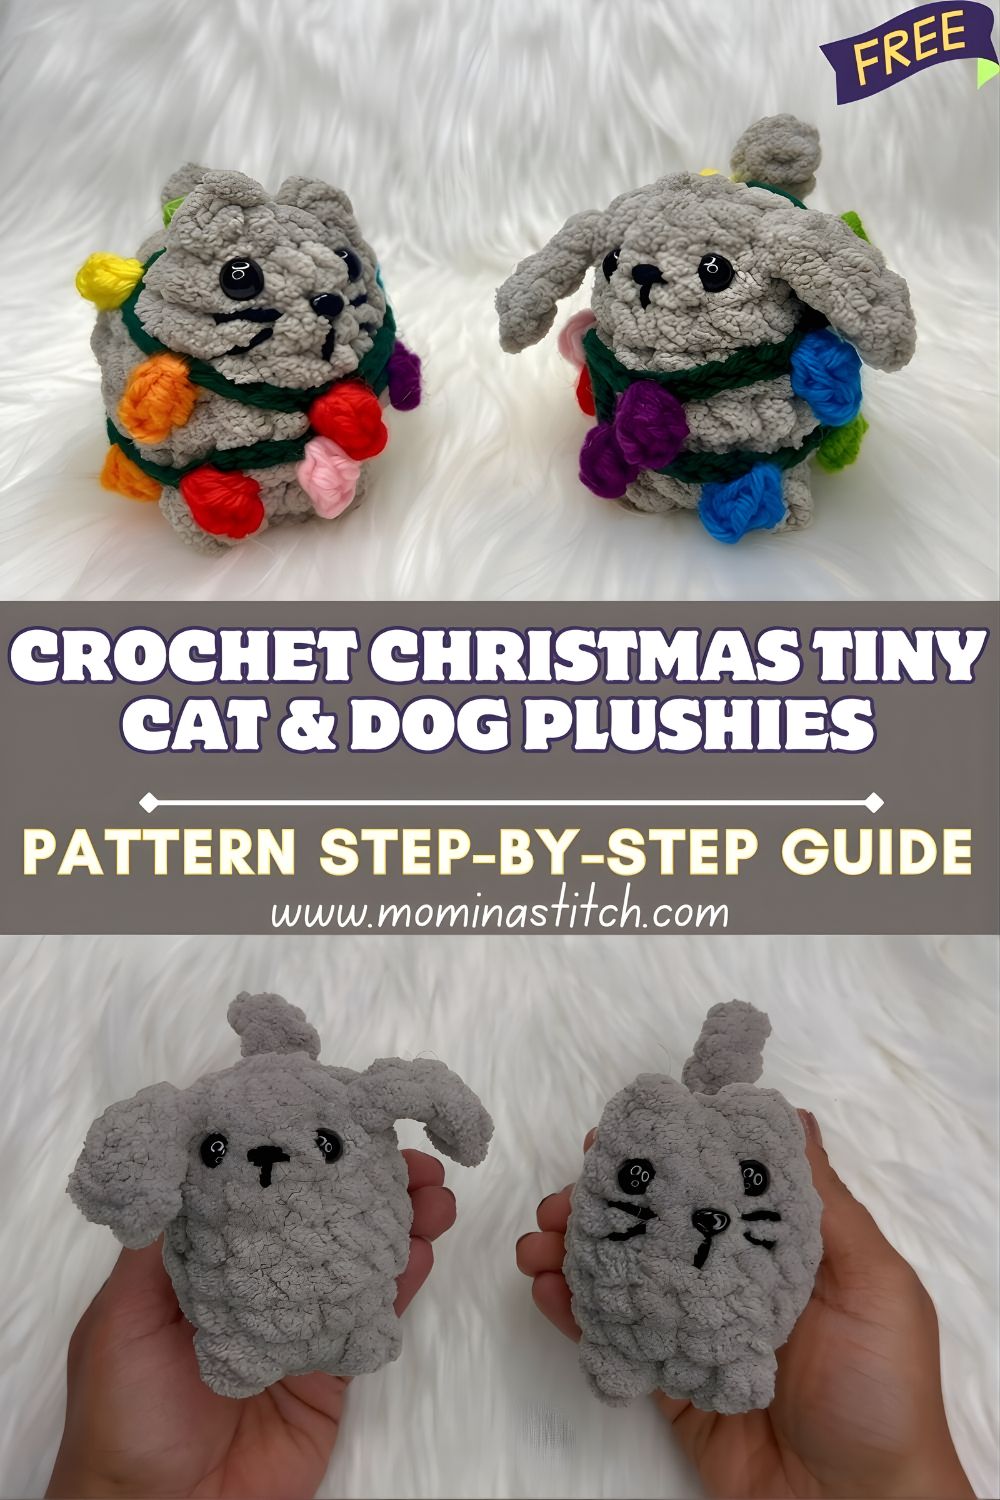
Crochet Christmas Tiny Cat & Dog Plushies Pattern Step-by-Step Guide
If your holiday crafting list needs something small, sweet, and instantly festive, these Crochet Christmas Plushies are perfect. You’ll make a Crochet Christmas Tiny Cat and Crochet Christmas Tiny Dog from soft plush yarn—then finish them with colorful crocheted Christmas lights wrapped around their cuddly little bodies.
Amigurumi is simply the art of crocheting small stuffed toys. Most amigurumi are worked in continuous rounds, shaped with basic increases and decreases, then gently stuffed to create that signature squishy, rounded look.
Christmas crochet plushies are especially popular because they’re quick to make, endlessly giftable, and look adorable everywhere on a bookshelf, tucked into a stocking, tied onto a present, or sitting beside your keyboard as a tiny festive companion. A Crochet Christmas Tiny Cat & Dog set is also a crowd-pleaser: it feels personal (pet lovers instantly connect), and the mini size means you can make more than one without it turning into a month-long project.
What makes this design stand out is the combination of plush/chenille yarn texture (soft and cozy), a compact, chubby shape, and the star of the show: colorful crochet Christmas lights spiraled around each body like a little holiday garland. The cat gets perky ears and optional whisker stitches; the dog gets sweet, floppy ears and a simple muzzle shape. This is best suited for advanced beginners to intermediate crocheters—especially if you’ve worked in the round before and don’t mind a little sewing for the finishing details.
Materials Needed
- Soft plush/chenille yarn for bodies (beige, cream, gray, light brown—choose two shades if you want a cat + dog contrast)
- Green yarn (smooth worsted or DK works well) for the Christmas light strand
- Assorted bright yarn colors for bulbs: red, blue, yellow, orange, pink, purple (scraps are perfect)
- Crochet hook suitable for plush yarn
- Common range: 4.0–6.0 mm (use slightly smaller than the yarn label to reduce gaps)
- Safety eyes (6–10 mm depending on size)
- Black embroidery thread or thin black yarn (nose, Mouth, details)
- Stitch marker
- Yarn needle
- Fiberfill stuffing
- Scissors
Crochet Abbreviations
- MR – Magic Ring
- sc – Single Crochet
- inc – Increase (2 sc in same stitch)
- dec – Decrease (sc2tog; invisible decrease recommended)
- sl st – Slip Stitch
- ch – Chain
- hdc – Half Double Crochet
Pattern Overview
This project includes two mini plushies:
- A Crochet Christmas Tiny Cat
- A Crochet Christmas Tiny Dog
Both use a similar rounded body base and are worked in spiral rounds for a smooth finish. The difference is in the ears, subtle face shaping, and expression details: the cat looks perkier with pointed ears and optional whiskers, while the dog looks softer with floppy ears and a gentle muzzle. The Christmas light garland is crocheted separately, then wrapped around each finished plushie and secured so it looks decorative without adding bulk.
Step-by-Step Crochet Pattern (Free)
Sizing Notes
This pattern is written to create palm-sized plushies. Plush yarn varies widely, so focus on shape and proportions—you can scale by adjusting yarn/hook size.
A) Tiny Cat Body and Head (One Piece)
Work in your chosen color. Use a stitch marker and crochet in continuous rounds.
R1: 6 sc in MR (6)
R2: inc around (12)
R3: (sc, inc) around (18)
R4: (2 sc, inc) around (24)
R5: (3 sc, inc) around (30)
R6–R8: sc around (30)
Now make it chubby through the middle.
R9: (4 sc, inc) around (36)
R10–R12: sc around (36)
Begin closing.
R13: (4 sc, dec) around (30)
R14: (3 sc, dec) around (24)
R15: (2 sc, dec) around (18)
Start stuffing. Shape as you go—round at the top, slightly flatter at the base.
R16: (sc, dec) around (12)
Stuff a bit more (firm but squishy—don’t stretch stitches).
R17: dec around (6)
FO, weave in and close.
Cat-shaping tip: Once closed, gently press the bottom onto a table to create a stable “sitting” base while keeping the top rounded.
B) Tiny Dog Body and Head (One Piece)
Work in your chosen dog’s body color. Follow the same body for a matching set, then add a subtle muzzle later.
R1: 6 sc in MR (6)
R2: inc around (12)
R3: (sc, inc) around (18)
R4: (2 sc, inc) around (24)
R5: (3 sc, inc) around (30)
R6–R8: sc around (30)
R9: (4 sc, inc) around (36)
R10–R12: sc around (36)
R13: (4 sc, dec) around (30)
R14: (3 sc, dec) around (24)
R15: (2 sc, dec) around (18)
Start stuffing and keep the front slightly fuller—this helps the dog face look softer.
R16: (sc, dec) around (12)
R17: dec around (6)
FO, close, weave in.
Dog difference: The dog gets floppy ears and a small muzzle/face detail so it reads as “puppy” rather than “bear.”
C) Cat Ears (Make 2)
Use the cat’s body color.
R1: 4 sc in MR (4)
R2: (sc, inc) around (6)
R3: sc around (6)
FO, leave a long tail.
Pin the ears on top of the head, evenly spaced and slightly forward (this instantly makes the face cuter). Sew securely.
D) Dog Ears (Make 2)
Use the dog’s body color. These are short, soft, and floppy.
R1: 5 sc in MR (5)
R2: inc around (10)
R3–R4: sc around (10)
Flatten and sc through both layers across the top edge to close (about 4–5 sc).
FO, leave a long tail.
Attach ears slightly to the sides of the head, a bit lower than cat ears. Angle them forward for an extra sweet puppy look.
E) Small Limbs (Paws & Feet)
These plushies look best with simple, rounded limbs that don’t compete with the Christmas lights.
Tiny Front Paws (Make 2 per plush)
R1: 6 sc in MR (6)
R2: sc around (6)
Lightly stuff or leave unstuffed. Flatten and close with a few sc through both layers.
FO, leave a tail to sew.
Small Back Feet / Base Bumps (Optional, Make 2 per plush)
If you want extra stability, add two small “feet” near the bottom front.
R1: 6 sc in MR (6)
R2: (sc, inc) around (9)
R3: sc around (9)
Lightly stuff, flatten, and close.
FO, leave tail.
Facial Features and Finishing
Eye Placement (Both Plushies)
- Place safety eyes between roughly the “upper middle rounds” of the body—typically around R7–R9, depending on yarn thickness.
- Aim for symmetrical spacing: start by pinning, then step back and look from the front.
- For extra charm, place eyes slightly closer together and a touch lower.
ENoseideredNosee + Mouth
Use black embroidery thread or thin yarn.
- Cat nose: a tiny triangle or small stitched “V” on the center front.
- Cat mouth: a short line down, then two small curves.
- Optional whiskers: 2–3 short lines on each side.
- Dog nose: slightly larger oval/triangle.
- Dog mouth: a simple curved smile.
Optional Dog Muzzle (Small Add-On)
In a lighter shade (cream/beige) if you want contrast.
R1: 6 sc in MR (6)
R2: (sc, inc) around (9)
R3: sc around (9)
FO, leave tail. Lightly stuff and sew centered under the eyes. This instantly reads “dog.”
Finishing tip: After embroidery, gently squish and shape the face so the features sit smoothly and evenly.
Christmas Light Garland (The Festive Feature)
This is the detail that turns a tiny plush into a true Christmas decoration.
1) Crochet the Green Light Strand
Use smooth green yarn (not plush) so the bulbs stand out.
- Ch 30–45 (length depends on how many wraps you want; start shorter for tiny plushies).
- Optional: sl st back along the chain to make it slightly thicker and cord-like.
2) Make Mini Bulbs Along the Strand (No-Fuss Method)
You’ll attach bulbs as you go—perfect for using yarn scraps.
Pick a bulb color (red/blue/yellow, etc.), attach it to the strand with a secure knot, and leave a d tail to weave later.
Bulb stitch (worked into one chain space on the strand):
- (sl st, ch 1, 2 hdc in same chain, ch 1, sl st in same chain)
This creates a tiny “bulb” bump with a little height.
Then continue along the strand:
- Skip 2–4 chains (spacing), and repeat with a new color.
Make 6–10 bulbs, depending on your strand length and how tightly you want it wrapped.
3) Wrap the Garland Around the Plushies
- Start at the back so your join is hidden.
- Spiral the strand around the body 2–3 times, angling slightly upward like real tangled Christmas lights.
- Adjust bulb placement so bulbs land on the front and sides (where they’re visible).
4) Secure Without Bulk
- Use a few tiny stitches with matching green yarn to tack the strand down in 2–3 places.
- Avoid stitching through bulbs—tack between bulbs so the strand looks natural and slightly loose.
Style idea: Wrap the cat a little tighter and neater, and wrap the dog slightly “messier” for a playful, puppy-got-into-the-lights vibe.
Assembly Instructions (Order Matters)
- Make the body/head and close neatly.
- Attach ears first
- Cat: top, slightly forward
- Dog: sides, slightly lower, angled forward
- Add facial details
- Insert eyes before final shaping. Nose needed; embroider Nose and Mouth.
- Sew on paws/feet
- Front paws near the lower front; optional back feet for stability.
- Stuff check
- Firm but not tight. Press base gently to help it sit.
- Wrap and position the Christmas light garland
- Tack it down subtly.
- Final balance test
- Set the plush on a flat surface and adjust limb placement if it tilts.
Beginner-Friendly Tips
- Use a smaller hook with plush yarn to prevent gaps and stuffing show-through.
- Mark the first stitch of every round—spiral rounds creep quickly.
- Stuff slowly and shape as you go; plush yarn hides lumps until the end.
- Pin parts before sewing (especially the ears) to keep the face symmetrical.
- Keep bulbs tiny: oversized bulbs can overwhelm the plush and make wrapping bulky.
Customization Ideas
- Body colors: gray tabby cat, white kitten, caramel puppy, or a classic black cat with bright bulbs.
- Bulb palettes: traditional red/green/yellow, icy pastels, or modern “all-white lights.”
- Accessories: mini Santa hat, bow, scarf, tiny bell collar, or a little crocheted tag with a name initial.
- Turn them into ornaments: stitch a hanging loop at the top (use strong yarn, not chenille).
- Keychains/stocking stuffers: scale down with thinner yarn and smaller eyes.
- Make a full set by adding a tiny bunny, bear, or reindeer friend with matching lights.
Conclusion
These Crochet Christmas Plushies—a Crochet Christmas Tiny Cat and Crochet Christmas Tiny Dog—are the kind of holiday project that feels instantly joyful: soft plush yarn, sweet expressions, and colorful crochet lights that make them look like they just got caught “helping” decorate the tree. Try the free pattern, make the lights your own, and enjoy creating handmade gifts and décor that feel personal, cozy, and full of Christmas spirit.