Sophisticated Crochet Frog Amigurumi Pattern With Big Eyes and Legs Long Legs
Meet my little Crochet Frog Amigurumi, a quick crochet frog pattern that creates a cute frog amigurumi with big eyes, a smiling face, and long dangly legs. It is designed as a cozy beginner crochet toy you can finish in one sitting.
Because it is small and light, it also makes a great keychain, desk toy, or tiny handmade gift. Grab your green yarn, and let’s crochet a happy frog friend step by step.
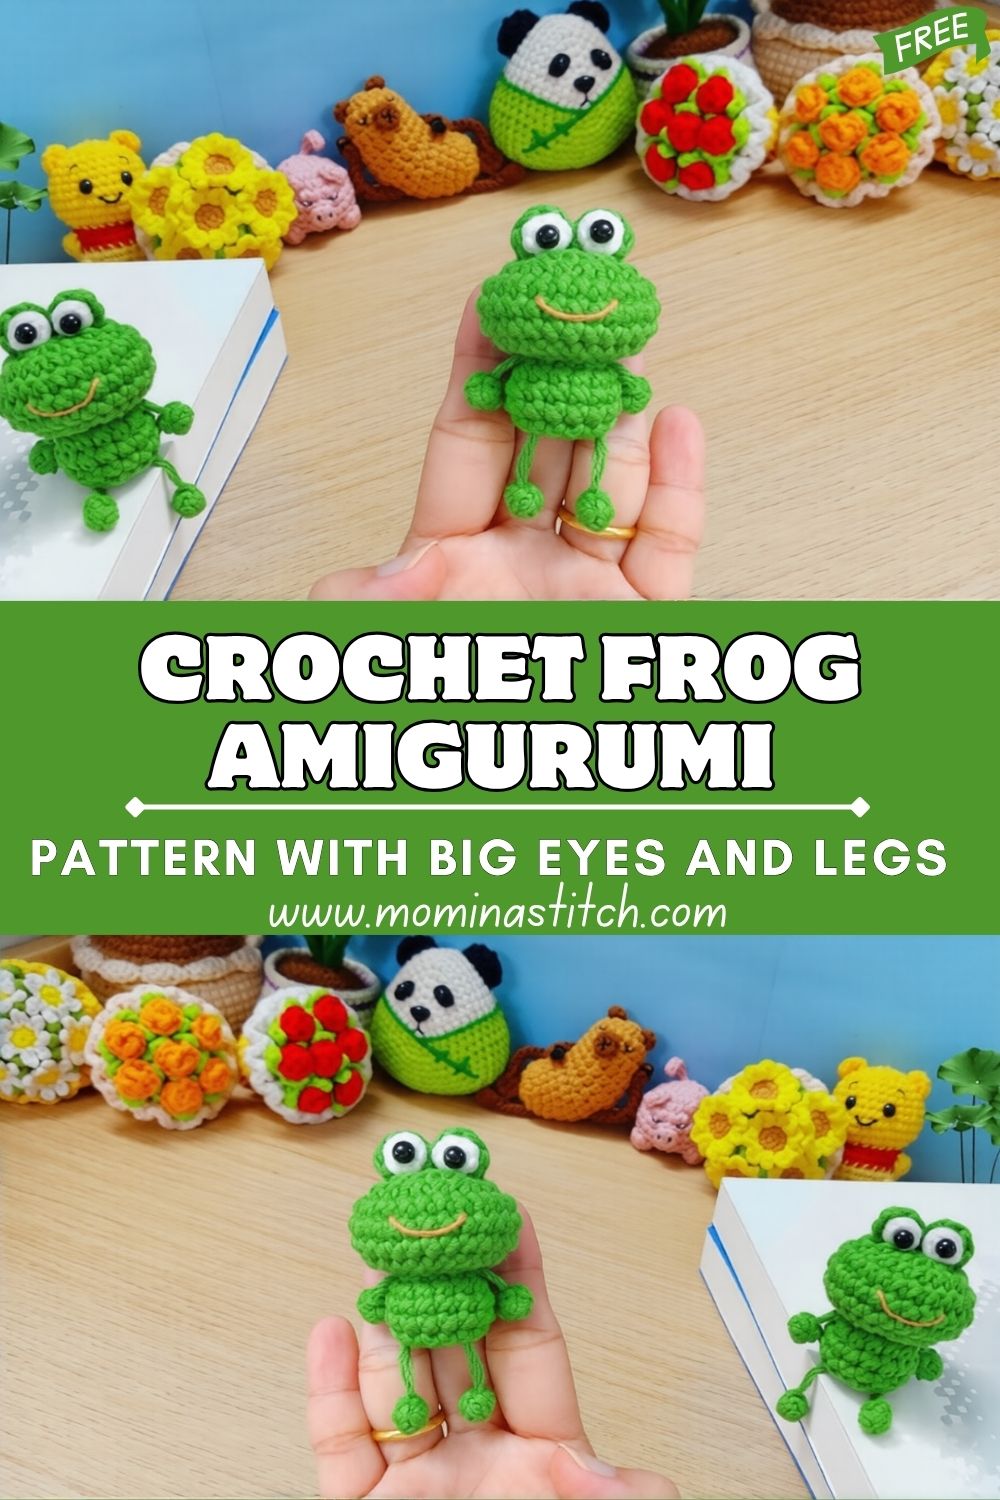
This Crochet Frog Amigurumi is one of those projects that looks extra adorable without needing complicated shaping. The body is a simple round ball, the arms are tiny and quick, and the legs are thin and floppy so they naturally hang down in the cutest way. Add big round eyes on top and a small embroidered smile, and it suddenly has so much personality.
First, you will crochet in continuous rounds using basic stitches. Next, you will make two raised eyes, then small arms, and then those long chain-based legs with little feet. After that, it is just assembly and a few face details. If you can do single crochet, increases, and decreases, you can absolutely make this frog in one cozy crafting session.
Materials Needed
- Green yarn (cotton or plush): 25 to 35 g of DK cotton or 20 to 30 g of plush/velvet yarn
- Black yarn for smile: 1 to 2 m (a small strand is enough)
- Crochet hook: 2.75 mm (for DK cotton) or 4.0 mm (for plush yarn)
- Safety eyes: 10 mm to 12 mm (big size for a cute look)
- Stuffing: about 10 to 15 g polyester fiberfill
- Stitch marker: 1
- Tapestry needle: 1
- Scissors: 1 pair
Abbreviations (US Terms)
- MR = magic ring
- sc = single crochet
- inc = increase (2 sc in the same stitch)
- dec = decrease (single crochet decrease)
- sl st = slip stitch
- ch = chain
- rep = repeat
- FO = fasten off
Skill Level
Beginner. This frog uses basic amigurumi skills such as single crochet, increases, and decreases, worked in continuous rounds. If you have made a simple ball shape before, this will feel very comfortable.
Finished Size
Approx. 3.5 to 5 in (9 to 13 cm) tall from top of eyes to bottom of feet, depending on yarn and hook. The body itself is usually about 2 to 2.5 in (5 to 6.5 cm) wide. Chunkier yarn and a larger hook will make a bigger, squishier frog.
Time Planning at a Glance
Total time: 1.5 to 2.5 hours (depending on experience and yarn)
- Body: 35 to 50 minutes
- Eyes: 15 to 25 minutes
- Legs: 20 to 35 minutes
- Assembly and face: 20 to 30 minutes
Important Notes Before Starting (Beginner Tips)
- Count your stitches every round. A small amigurumi shows bumps quickly if one stitch is missed.
- Use a stitch marker to track your first stitch since we work in continuous rounds.
- Keep tension snug. Tight stitches help prevent stuffing from showing through.
- Stuff slowly and gently. Add a little at a time so the body stays round, not lumpy.
- Eye placement matters. Put the eyes on top and slightly forward to keep that cute “wide-eyed” frog look.
Crochet Pattern
A. Body (Round Mini Frog Body)
Work in continuous rounds. Move the stitch marker to the first stitch of each round.
- Round 1: MR, 6 sc in MR (6)
- Round 2: inc in each st around (12)
- Round 3: (sc, inc) rep around (18)
- Round 4: (2 sc, inc) rep around (24)
- Round 5: (3 sc, inc) rep around (30)
First, we build a wider circle to create that chubby round body. Next, we hold the size steady for a few rounds so it looks like a neat little ball.
- Rounds 6 to 8: sc in each st around (30)
Then, we start decreasing to close the shape. This creates that simple amigurumi ball form.
- Round 9: (3 sc, dec) rep around (24)
- Round 10: (2 sc, dec) rep around (18)
- Round 11: (sc, dec) rep around (12)
- Stuff the body firmly but softly. Add more stuffing around the sides to keep it round.
- Round 12: dec around (6)
- FO and close the hole. Weave in the end.
B. Eyes (Two Raised Round Eyes)
Make 2. These will sit on top of the body like little round bumps.
- Round 1: MR, 6 sc in MR (6)
- Round 2: inc in each st around (12)
- Round 3: sc in each st around (12)
- FO with a long tail for sewing.
Safety eyes option: Insert a 10 to 12 mm safety eye through the center of each eye piece. If your eye piece is too small for the post, you can place the safety eye through a stitch slightly off-center and it will still look cute and rounded.
Embroidered option: If making for a child under 3, skip safety eyes and embroider circles with black yarn instead.
C. Arms (Tiny Arms)
Make 2.
- Round 1: MR, 6 sc (6)
- Round 2: sc in each st around (6)
- Round 3: sc in each st around (6)
- FO with a tail for sewing.
These arms are intentionally small so the frog keeps a mini, simple look.D. Legs (Long Dangly Legs With Small Feet)
Make 2. These are chain-based so they stay thin, flexible, and naturally hanging.
Leg strand
- Ch 18 to 26 (choose length depending on the look you want)
- Starting in the second ch from hook, sl st in each ch back down to the start.
- You now have a thin cord-like leg.
Foot (Small Rounded End)
- At the end of the leg, ch 1, then work (sc, ch 1, sc) into the same end stitch to form a tiny bump.
- Sl st to secure.
- FO leaving a long tail for sewing.
How to keep them floppy:
- Use sl st back along the chain instead of single crochet.
- Do not over-tighten your chain. A relaxed chain makes a softer hanging leg.
- If using plush yarn, keep your hook size comfortable so the cord does not become stiff.
E. Face Details (Smile and Optional Blush)
- Thread a tapestry needle with black yarn.
- Place a simple curved smile centered on the front of the body.
- Make 2 to 3 small stitches to shape the curve, then knot inside the body.
Optional blush: Use pink embroidery thread or a tiny dab of blush powder on the cheeks. Keep it light for a soft look.
Assembly Instructions (Put It All Together)
- Attach eyes on top of the head:
- First, pin both eyes on the top front of the body.
- Keep them evenly spaced, about 4 to 6 stitches apart depending on your body size.
- Next, sew around the edge of each eye using the long tail.
- Place safety eyes if not already:
- If you did not attach eyes earlier, insert them now through the eye pieces and body.
- Add washers inside and press firmly.
- Attach arms at the sides:
- Pin arms about halfway down the body.
- Sew them on with small neat stitches.
- Attach long legs at the bottom:
- Position both legs on the lower front area so they hang forward.
- Sew the top of each leg securely into the body.
- Finally, check that both legs are the same length and centered.
- Balance placement evenly:
- Set the frog on a table and adjust until it looks symmetrical.
Finishing Touches
- Adjust stuffing: Add a pinch more if it feels flat, or remove a little if it feels stretched.
- Shape the body: Roll it gently between your hands to round it out.
- Check symmetry: Make sure eyes line up and legs hang evenly.
- Weave in all ends securely, especially where the legs attach.
Beginner Tips (Extra Helpful!)
- Use a smaller hook than the yarn label suggests to keep stitches tight for amigurumi.
- Invisible decrease makes the body smoother, but a normal dec is fine for beginners.
- Pin everything first before sewing. This saves so much time later.
- Stuff more around the edges than the center for a rounder shape.
- Take a quick photo before final sewing. Photos make it easier to spot uneven eyes.
Common Mistakes to Avoid
- Loose stitches: Stuffing may peek through, especially with bright green yarn.
- Uneven eyes: One eye slightly higher can change the whole expression. Measure and pin first.
- Overstuffing: The frog can become egg-shaped and the stitches may stretch.
- Wrong leg length: Too short and you lose the cute dangly look, too long and it looks unbalanced.
- Weak leg attachment: Sew legs in firmly since they get tugged the most.
Variations to Personalize Your Frog
- Keychain version: Add a small keyring loop at the top between the eyes. You can stitch a short chain and slip it through a ring.
- Different colors: Try pastel mint, deep forest green, or even a silly neon frog.
- Add accessories: A tiny scarf, a mini bow, or a little flower on the head looks adorable.
- Make it bigger: Use chunky yarn and a larger hook, then slightly lengthen the legs for the same dangly style.
- Change the face: Add sleepy eyelids, a wider smile, or embroidered freckles.
Conclusion
This mini Crochet Frog Amigurumi is the kind of project that feels relaxing from start to finish. First you make a simple round body, next you add those big happy eyes, then those long floppy legs bring the whole frog to life. If you are new to amigurumi, this is a gentle and rewarding way to practice the basics and end up with a tiny friend you can display, gift, or turn into a keychain.