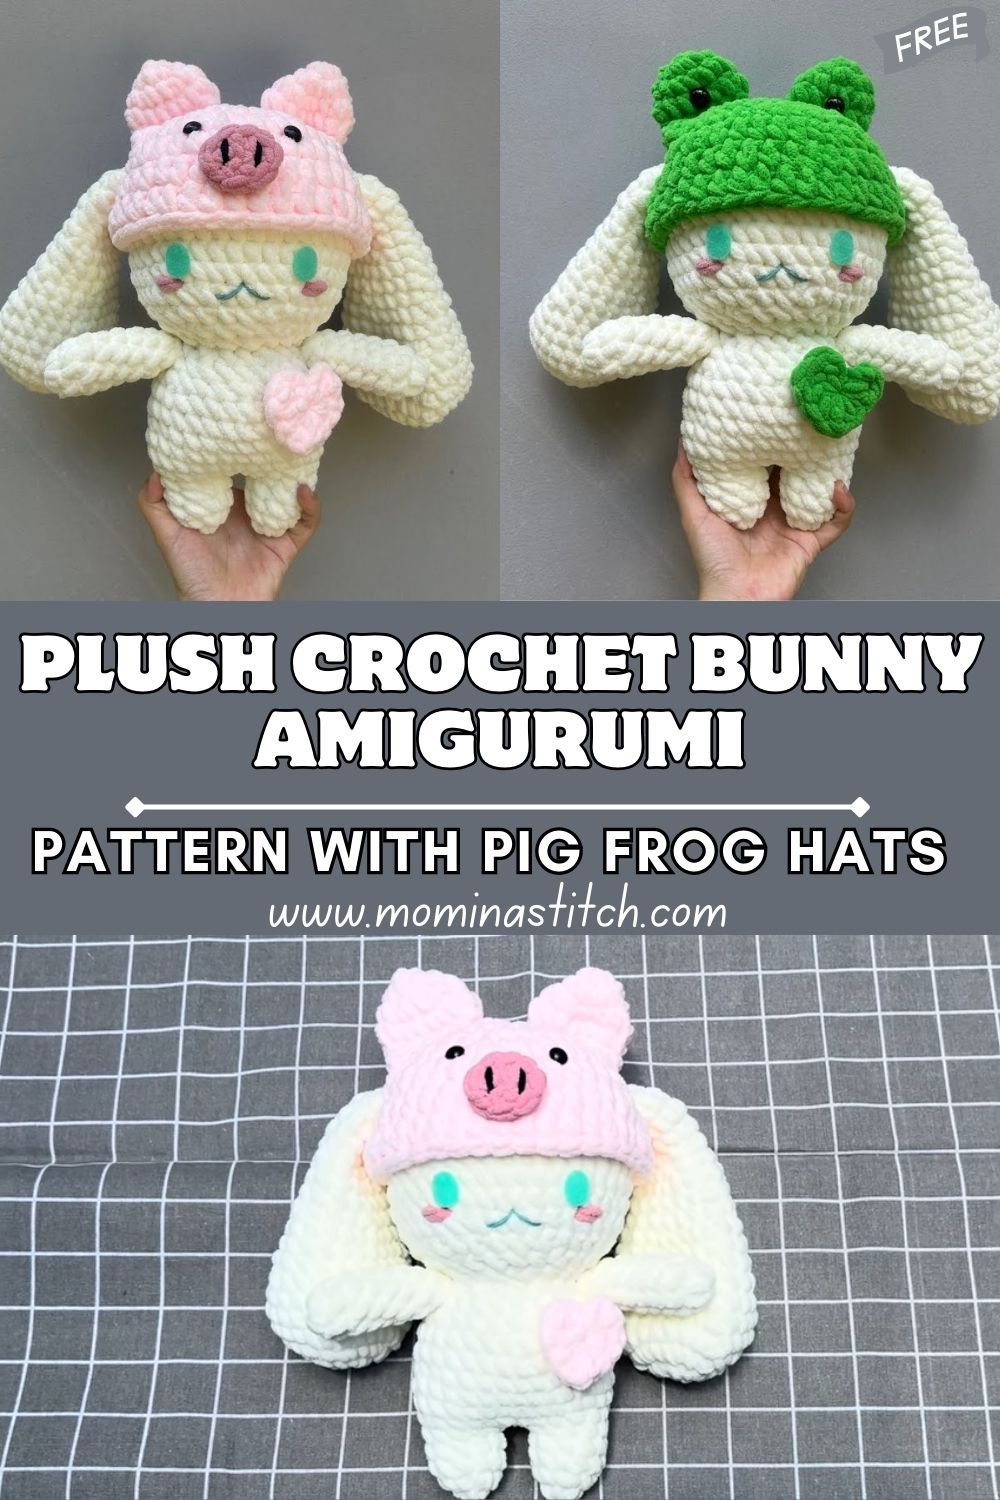
Plush Crochet Bunny Amigurumi Pattern With Pig Frog Hats
If you love Crochet Bunny Amigurumi Pattern and soft, cuddly makes, this bunny plush toy is about to become your new favourite project. We’re crocheting a sleepy, cream-colored bunny with long floppy ears, tiny limbs, and the cutest embroidered face.
To make it extra adorable, the bunny wears removable animal-themed hats: a pastel pink pig hat with ears and a snout, and a bright green frog hat with raised eyes. It’s cosy, kawaii, and perfect for plush yarn lovers.
This crochet amigurumi bunny plush is designed to be extra soft and huggable, especially when made with chenille, velvet, or plush yarn. The bunny has a round head, a simple body, short little arms and legs, and long floppy ears that frame the face. Instead of hard features, we’ll use embroidered sleepy eyes, a tiny nose, and soft blush cheeks for that gentle “sleepy kawaii” look.
There are two fun variations included:
- The pig hat version uses sweet pastel pink, with two small pig ears and a cute pig snout stitched right on top.
- The frog hat version is bright green and features raised frog-eye bumps that sit atop the Hat for a playful, cartoon look.
Finished Toy Description
Picture a soft cream/ivory bunny with a perfectly round head and gentle plush texture. Its long, floppy ears drape down the sides, making it look extra cuddly from the front. The face is calm and sweet: sleepy embroidered eyes, a tiny stitched nose/mouth detail, and blush cheeks that give it a warm, pastel glow. The bunny’s short arms and legs are small and rounded, adding to the “tiny and cute” proportions.
Now for the accessories:
- The pink pig hat sits snugly on the bunny’s head, with two little pig ears and a soft, rounded pig snout centred on top.
- The green frog hat is bright and playful, featuring two raised frog eyes perched on the crown.
- Optional: add a small heart applique on the body for an extra “gift plush” feel.
Overall style: plush, pastel, cuddly, and very kawaii amigurumi.
Materials Needed
- Plush/chenille/velvet yarn
- Cream/ivory (main bunny)
- Pink (pig hat)
- Green (frog hat)
- Black (optional, for tiny embroidered details)
- Pastel blush pink (or embroidery thread for cheeks)
- Optional accent colours (white for highlights, red/pink for heart)
- Crochet hook: 4.0 mm or 4.5 mm (adjust to your yarn)
- Stuffing: polyester fiberfill
- Yarn needle (tapestry needle)
- Stitch marker
- Scissors
- Embroidery thread (black + pink) for sleepy eyes and blush
- Felt or yarn for facial details (optional)
- Optional safety eyes (if making an alternate face version; not recommended for babies)
- Optional applique materials: small felt heart, or matching yarn for crocheted heart
Crochet Abbreviations
- MR = magic ring
- sc = single crochet
- inc = increase (2 sc in one stitch)
- dec = decrease (single crochet decrease / invisible decrease)
- sl st = slip stitch
- ch = chain
- hdc = half double crochet
- dc = double crochet
- BLO = back loop only
- FLO = front loop only
- rep = repeat
- st = stitch
- rnd = round
Important Notes Before Starting
- Work in continuous rounds unless noted—do not join.
- Use a stitch marker to mark the first stitch of each round.
- Keep stitches tight so stuffing doesn’t show through plush yarn.
- Stuff gradually as you go; don’t over-stuff the head.
- Make ears symmetrical (count rows and pin before sewing).
- Place facial features neatly and centred. This makes the plush look professional.
- Finished size changes with yarn/hook; adjust the hook for a tighter fabric.
- Hats should fit snugly but comfortably, not squeezing the head or sliding off.
Crochet Pattern (Step-by-Step)
Pattern Notes:
- Written in US terms.
- For plush yarn, count stitches by feeling the “V” shape with your fingers.
- Use invisible decreases for a smoother look.
Head (Cream)
Rnd 1: MR, 6 sc (6)
Rnd 2: inc x6 (12)
Rnd 3: (sc, inc) rep x6 (18)
Rnd 4: (2 sc, inc) rep x6 (24)
Rnd 5: (3 sc, inc) rep x6 (30)
Rnd 6: (4 sc, inc) rep x6 (36)
Rnd 7: (5 sc, inc) rep x6 (42)
Rnd 8–12: sc around (42) — 5 rounds
Rnd 13: (5 sc, dec) rep x6 (36)
Rnd 14: (4 sc, dec) rep x6 (30)
Rnd 15: (3 sc, dec) rep x6 (24)
Rnd 16: (2 sc, dec) rep x6 (18)
Start stuffing firmly but softly.
Rnd 17: (sc, dec) rep x6 (12)
Rnd 18: dec x6 (6)
Fasten off, close the hole, and weave in the end.
Body (Cream)
Rnd 1: MR, 6 sc (6)
Rnd 2: inc x6 (12)
Rnd 3: (sc, inc) rep x6 (18)
Rnd 4: (2 sc, inc) rep x6 (24)
Rnd 5: (3 sc, inc) rep x6 (30)
Rnd 6–9: sc around (30) — 4 rounds
Rnd 10: (3 sc, dec) rep x6 (24)
Rnd 11: sc around (24)
Rnd 12: (2 sc, dec) rep x6 (18)
Stuff the body. Keep it squishy, not hard.
Rnd 13: sc around (18)
Fasten off with a long tail for sewing to the head.
Arms (Make 2, Cream)
Rnd 1: MR, 6 sc (6)
Rnd 2: (sc, inc) rep x3 (9)
Rnd 3–5: sc around (9) — 3 rounds
Lightly stuff the hand only.
Rnd 6: (sc, dec) rep x3 (6)
Fasten off, leave a long tail for sewing.
Legs (Make 2, Cream)
Rnd 1: MR, 6 sc (6)
Rnd 2: inc x6 (12)
Rnd 3: sc around (12)
Rnd 4: (2 sc, dec) rep x3 (9)
Stuff the foot lightly.
Rnd 5–6: sc around (9) — 2 rounds
Fasten off, leave a long tail.
Long Bunny Ears (Make 2, Cream)
Rnd 1: MR, 6 sc (6)
Rnd 2: (sc, inc) rep x3 (9)
Rnd 3: sc around (9)
Rnd 4: (2 sc, inc) rep x3 (12)
Rnd 5–10: sc around (12) — 6 rounds
Rnd 11: (2 sc, dec) rep x3 (9)
Rnd 12–15: sc around (9) — 4 rounds
Do not stuff (keeps them floppy).
Flatten the opening and sc through both layers: 4 sc to close.
Fasten off, leave a long tail for sewing.
Pig Hat Set
Pig Hat (Pink)
Designed to fit the head (42-st head circumference).
Rnd 1: MR, 6 sc (6)
Rnd 2: inc x6 (12)
Rnd 3: (sc, inc) rep x6 (18)
Rnd 4: (2 sc, inc) rep x6 (24)
Rnd 5: (3 sc, inc) rep x6 (30)
Rnd 6: (4 sc, inc) rep x6 (36)
Rnd 7: (5 sc, inc) rep x6 (42)
Rnd 8–10: sc around (42) — 3 rounds
Rnd 11: sc around (42), sl st to finish edge neatly.
Fasten off, weave in the end.
Pig Hat Ears (Make 2, Pink)
Rnd 1: MR, 6 sc (6)
Rnd 2: sc around (6)
Rnd 3: (sc, inc) rep x3 (9)
Rnd 4: sc around (9)
Flatten, sc through both layers: 4 sc.
Fasten off, leave tails for sewing.
Pig Hat Snout (Pink)
Rnd 1: MR, 6 sc (6)
Rnd 2: inc x6 (12)
Rnd 3: sc around (12)
Stuff lightly.
Rnd 4: (2 sc, dec) rep x3 (9)
Fasten off, close lightly (leave it softly rounded), leave tail.
Optional nostrils: embroider two tiny vertical stitches on the snout using slightly darker pink or embroidery thread.
Frog Hat Set
Frog Hat (Green)
Rnd 1: MR, 6 sc (6)
Rnd 2: inc x6 (12)
Rnd 3: (sc, inc) rep x6 (18)
Rnd 4: (2 sc, inc) rep x6 (24)
Rnd 5: (3 sc, inc) rep x6 (30)
Rnd 6: (4 sc, inc) rep x6 (36)
Rnd 7: (5 sc, inc) rep x6 (42)
Rnd 8–10: sc around (42) — 3 rounds
Rnd 11: sc around (42), sl st to finish.
Fasten off, weave in the end.
Frog Hat Eye Bumps (Make 2, Green)
Rnd 1: MR, 6 sc (6)
Rnd 2: inc x6 (12)
Rnd 3: sc around (12)
Stuff lightly so they stay rounded.
Fasten off, leave a long tail.
Optional eye highlights:
- Sew a tiny white felt dot, or embroider a small stitch on each bump.
Heart Applique (Optional)
Use pink or red plush yarn (or smooth cotton for definition).
Rnd 1: MR, ch 2, 3 dc into ring, 3 hdc into ring, ch 1, 1 dc into ring, ch 1,
3 hdc into ring, 3 dc into ring, ch 2, sl st into ring.
Tighten the MR to form a heart. Fasten off, leave a tail for sewing.
(If plush yarn makes the heart look puffy, switch to smooth DK cotton for a crisp heart shape.)
Skill Level
The bunny body is simple (mostly single crochet with increases/decreases), but plush yarn can be harder to count, and the hats include small parts (ears/eyes/snout) that require neat sewing. If you’ve made one basic amigurumi before—or you’re patient and use a stitch marker—you’ll do great.
Assembly Instructions (Step-by-Step)
1) Embroider the Face (Before Sewing Head to Body)
- Find the centre of the head.
- Embroider sleepy eyes: two gentle curved lines, spaced evenly (about 5–7 sts apart).
- Add a tiny nose/mouth detail under the eyes (a simple “Y” or small “V” shape).
- Add blush cheeks:
- Use pink embroidery thread, lightly brushed pastel chalk, or blush powder.
- Keep cheeks symmetrical and low on the face.
2) Attach Head to Body
- Pin the head to the body so the face looks forward and is centred.
- Sew around the neck opening using a whip stitch or mattress stitch.
- Add a bit more stuffing into the neck area if needed while closing.
3) Attach Arms
- Place arms on the sides of the body, just below the head seam.
- Pin evenly (on the same row on both sides).
- Sew each arm securely with a few passes.
4) Attach Legs
- Place the legs at the lower front of the body so the bunny can sit.
- Pin first, check symmetry from the front view.
- Sew firmly and weave in ends.
5) Sew on the Long Floppy Ears
- Place the ears on the top sides of the head (not too high; floppy looks cuter).
- Pin and check from the front: ears should frame the face evenly.
- Sew along the closed edge of each ear.
6) Assemble the Pig Hat
- Sew the snout onto the top front-centre of the hat crown.
- Sew the pig ears near the top on either side of the snout.
- Try the Hat on the bunny’s head and adjust placement if needed (pin before final stitches).
7) Assemble the Frog Hat
- Sew the eye bumps on top of the Hat, spaced evenly.
- Optional: add small highlight dots.
- Try on the bunny and ensure it sits level.
8) Attach the Optional Heart Applique
- Centre the heart on the bunny body (slightly upper-middle looks sweetest).
- Stitch around the edges neatly so it lies flat.
Hats Tip: Keep hats removable, or add a few discreet stitches at the back for added security.
Finishing Touches
- Gently shape the head and body by pressing and rolling the stuffing into place.
- Adjust ear placement so both ears droop evenly.
- Refine the embroidered sleepy eyes, adding one extra stitch if needed to match the curves.
- Add blush gradually—step back and check symmetry often.
- Make the plush sit nicely by flattening the base slightly with your hands.
- Close neatly, secure knots well, and weave ends deeply into the plush fabric.
Customisation Ideas
- Make more animal hats: bear, cat, duck, cow, lamb, panda, chick.
- Change bunnycolour: beige, white, light grey, pastel pink, lavender.
- Add accessories: mini bow, scarf, flower crown, tiny charm, bell (for older kids).
- Resize by using thinner yarn for a smaller bunny or jumbo chenille for a big plush.
- Create seasonal versions:
- Holiday hat colours, heart for Valentine’s, spring pastel hats, and birthday party hats.
- Make hats mix-and-match: add a small chin strap (chain + sl st) if desired.
Common Mistakes to Avoid
- Loose stitches: stuffing will show through—size down your hook if needed.
- Uneven stuffing: a lumpy head/body can happen if you stuff too late or in big chunks.
- Crooked ears: always pin and check from the front before sewing.
- Misplaced facial embroidery: mark with pins first; small changes make a big difference.
- Hats too loose/tight: match hat stitch count to the head (42-st round here).
- Uneven limbs: count rows carefully and attach at the same height on both sides.
- Poor symmetry: keep checking the front view as you pin pieces.
Care Instructions
- Spot clean with mild soap and cool water.
- For deeper cleaning: hand-wash gently, squeeze (don’t wring), and air-dry fully.
- Keep plushies away from high heat (chenille yarn can melt or flatten).
- If using safety eyes, supervise children; embroidered faces are best for little ones.
Conclusion FOR ( Crochet Bunny Amigurumi Pattern )
This sleepy amigurumi bunny plush with its pink pig hat and green frog hat is the kind of crochet project that instantly makes people smile. It’s soft, beginner-friendly, and full of personality, plus you can switch hats (and add that sweet heart applique) to create your own signature look.
If you make your bunny, try customising the colours or designing a new animal hat once you’ve made one; it’s hard to stop. Happy crocheting, and may your plushie shelf get even cuter!