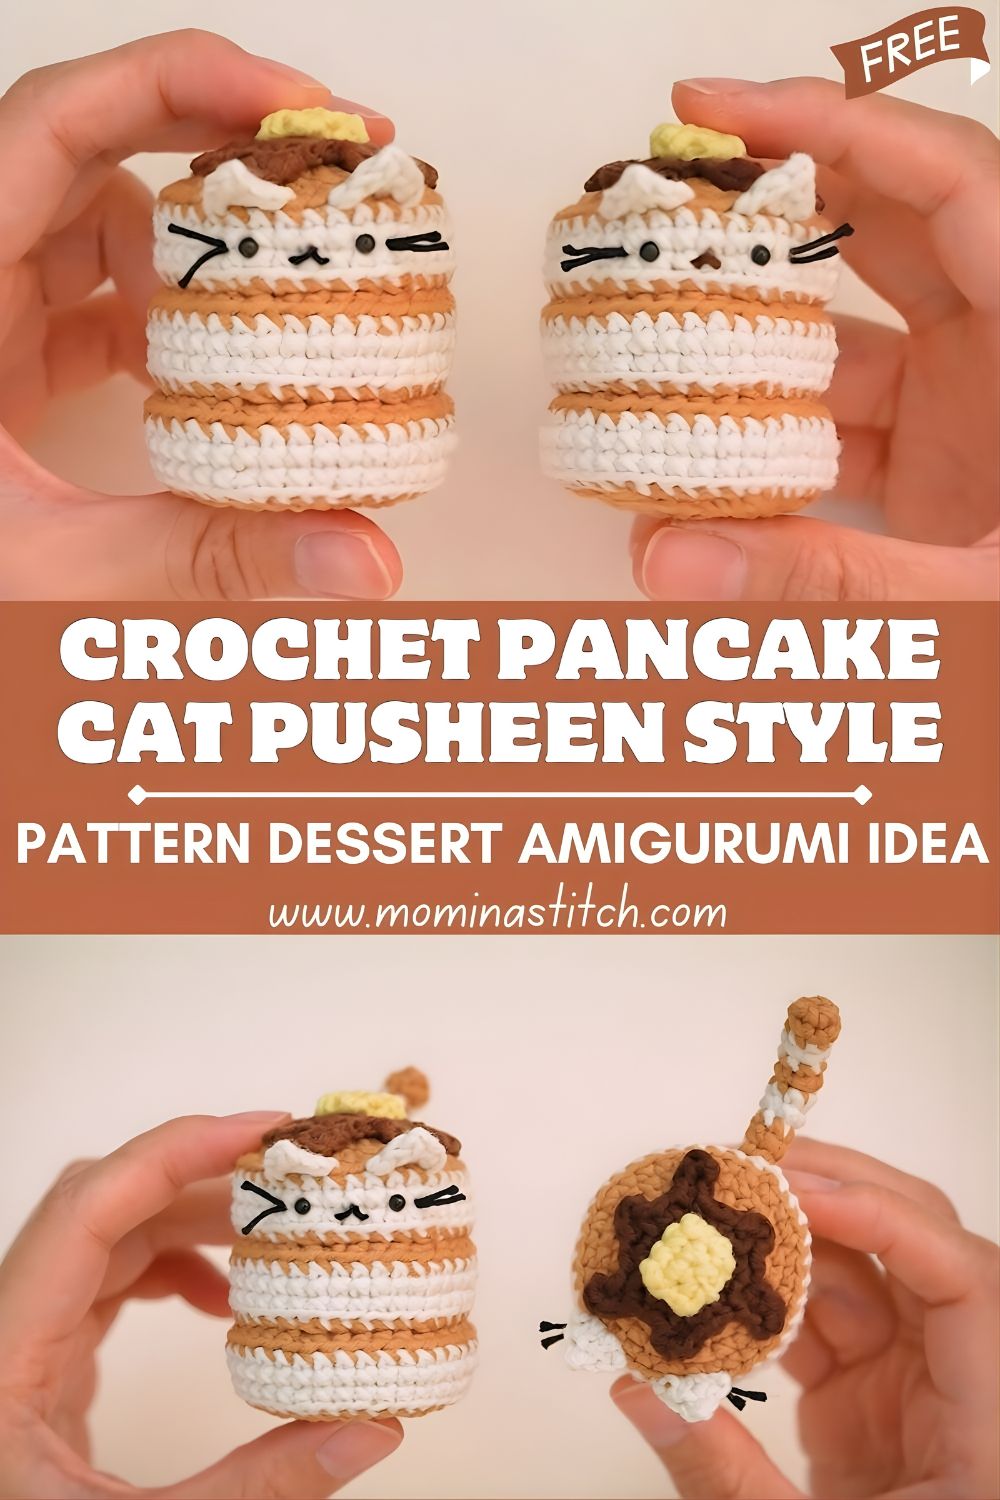
Crochet Pancake Cat Pusheen Style Pattern Dessert Amigurumi Idea
This pancake pusheen crochet pattern shows you how to make a squishy, stacked crochet dessert cat amigurumi with butter and syrup details. If you’ve been searching for a Crochet Pancake Cat Pusheen idea that’s beginner-friendly and irresistibly cute, this is it.
A plush cat that looks like a warm stack of pancakes? Yes, please. This crochet pancake plush tutorial walks you through a round, chubby Pusheen-style kitty complete with a sweet little face, tiny ears, and a butter-and-syrup topping that makes it look straight off a brunch plate.
This cute crochet cat plush style is trending because it checks all the boxes that crochet fans love: quick amigurumi shaping, cosy “food plush” aesthetics, and endless customisation. It’s also inspired by the kind of beginner-friendly video tutorials many makers enjoy (like those from creators such as AnDesign_Craft), where you can watch a simple shape become an adorable character.
4. What is a Pancake Pusheen Cat?
A Pancake Pusheen Cat is a dessert-themed amigurumi cat designed to resemble:
- A stacked pancake body (round, slightly tall, and “layered”)
- A butter topping (a tiny yellow square/cube on top)
- Syrup drips (embroidered or surface-crocheted lines that look like syrup running down)
- A cute cat face (wide-set eyes, small mouth, whiskers, and a soft expression)
Picture a chubby little cat who decided to cosplay as breakfast: the body reads as pancakes, but the ears, tail, and face make it unmistakably a kitty.
5. Materials Needed
To make this beginner amigurumi cat pattern, gather:
- 4-ply cotton yarn (or similar weight) in:
- Cream/light beige (pancake base)
- Golden brown (toasted pancake layer)
- Yellow (butter)
- Optional: darker brown (syrup embroidery)
- Crochet hook: 2.5–3.0 mm (choose what gives tight stitches)
- Fiberfill stuffing
- Safety eyes (6–8 mm) or small beads
- Yarn needle (tapestry needle)
- Scissors
- Optional: stitch marker, blush/paint for cheeks
6. Crochet Abbreviations (US Terms)
You’ll see these throughout the pattern:
- MR = magic ring
- sc = single crochet
- inc = increase (2 sc in the same stitch)
- dec = decrease (single crochet two together / invisible decrease)
- sl st = slip stitch
- ch = chain
- hdc = half double crochet
- dc = double crochet
- st = stitch
7. Skill Level
Beginner to intermediate.
If you can crochet in the round with sc, inc, and dec, you can make this. The “intermediate” part is simply the shaping details (placing eyes neatly, sewing ears, and making syrup drips look intentional).
8. Finished Size & Design Description
- Finished size: about 3.5–5 in (9–13 cm) tall, depending on yarn/hook/tension
- Look: round and stacked like pancakes, with a soft dome top
- Texture: dense (amigurumi-tight), soft and squishy when stuffed
- Style: Pusheen-inspired proportions—short, chubby, and extra cute
9. STEP-BY-STEP PATTERN (DETAILED)
Notes before you start
- Work in continuous rounds unless stated otherwise.
- Use a stitch marker to mark the first stitch of each round.
- Stuff as you go for the neatest shape.
- Numbers in parentheses show stitch count at the end of the round.
A. Body (Pancake Layers + Cat Shape)
This body is essentially a rounded cylinder, but we’ll add subtle shaping and colour changes to create a “stacked pancake” effect.
Round 1
- MR, 6 sc into MR (6)
- inc x6 (12)
- (sc, inc) x6 (18)
- (2 sc, inc) x6 (24)
- (3 sc, inc) x6 (30)
- (4 sc, inc) x6 (36)
- (5 sc, inc) x6 (42)
- (6 sc, inc) x6 (48)
Tip: If you want a smaller plush, stop increasing at 42 stitches instead of 48. The pattern still works—just keep counts consistent.
Rounds 9–12 (create the first “pancake height”)
- sc around for 4 rounds (48)
Colour Change (to golden brown “toasted layer”)
At the last stitch of Round 12, switch to golden brown.
Rounds 13–14 (toasted band)
- sc around (48) for 2 rounds
Colour Change (back to cream)
Switch back to cream/light beige.
Rounds 15–18 (second pancake layer height)
- sc around for 4 rounds (48)
Optional shaping for extra “squish”
If you want the body to look slightly domed and chubby:
- Round 19: (7 sc, dec) x6 (42)
- Round 20: sc around (42)
If you prefer a straighter pancake stack, just scroll around for Rounds 19–20 instead.
Begin closing (bottom)
Keep decreasing to close the base. Start stuffing firmly now.
- Round 21: (5 sc, dec) x6 (36)
- Round 22: (4 sc, dec) x6 (30)
- Round 23: (3 sc, dec) x6 (24)
- Round 24: (2 sc, dec) x6 (18)
- Round 25: (sc, dec) x6 (12)
- Round 26: dec x6 (6)
Fasten off, weave tail through the last 6 stitches, pull tight to close. Weave in ends.
You now have the main pancake-cat body.
B. Head / Face Section (Placement + Details)
This design uses the same body as the head—very Pusheen-like—so the “face section” is about placement and a tiny bit of shaping through embroidery.
Safety eye placement
- Place eyes between Rounds 12–14 (the one near the toasted band is adorable).
- Space them about 6–8 stitches apart (adjust to taste).
- Before fully securing, look from the front to ensure the face is centred.
Nose + mouth embroidery
Using pink or brown thread/yarn:
- Nose: a small horizontal stitch (or tiny triangle) centred between the eyes
- Mouth: a small “W” or a simple curved line under the nose
Whiskers
Using brown or the same yarn as the toasted band:
- Add 2–3 short whisker lines on each side of the face.
Visual goal: a calm, sweet expression—tiny features on a big, chubby “pancake” face.
C. Ears (Make 2)
Small triangle ears keep the pancake illusion while still reading “cat.”
Ear (work in a small flat triangle)
- ch 2
- Row 1: 2 sc in 2nd ch from hook (2)
- Row 2: ch 1, turn, inc in each st (4)
- Row 3: ch 1, turn, (sc, inc, sc) (5)
- Row 4: ch 1, turn, sc across (5)
Fasten off with a long tail for sewing.
Sewing placement:
- Sew ears on the top, spaced evenly left and right.
- Angle them slightly outward for extra cuteness.
D. Tail
A tiny tail adds character without distracting from the pancake theme.
- MR, 6 sc (6)
- (sc, inc) x3 (9)
3–6. sc around (9) for 4 rounds - (sc, dec) x3 (6)
Lightly stuff (optional), fold tthe op flat, and sew to the back of the body.
Optional stripes: Use golden brown to add a couple of sewn lines for subtle “tabby” vibes.
E. Pancake Toppings
Butter (small yellow cube)
- MR, 4 sc (4)
- inc x4 (8)
3–4. sc around (8) - dec x4 (4)
Stuff lightly, close, fasten off.
Sew butter slightly off-centre on top (looks more natural).
Syrup drips (easy embroidery method)
Using brown yarn/thread:
- Start near the butter and stitch a few curved drip lines going down the side.
- Vary the drip lengths (some short, one longer) for a realistic syrup look.
- Add a small “puddle line” around the butter base if you like.
Alternative: surface crochet with sl st to create raised syrup lines.
F. Assembly
- Make sure body is firmly stuffed (not rock-hard, but rounded and stable).
- Sew on the ears securely (knot and weave the ends inside).
- Attach the tail at the back, low-mid height.
- Sew on butter on top.
- Add syrup drips.
- Confirm facial alignment, add cheeks if desired.
10. Beginner Tips
- Use a stitch marker every round—amigurumi spirals are easy to lose.
- Stuff gradually: a little at a time gives a smoother shape.
- Keep tension even so the pancake surface looks clean (no “holes”).
- If gaps appear, go down a hook size.
11. Common Mistakes to Avoid
- Overstuffing: can stretch stitches and distort the “pancake stack.”
- Eyes too high/too close together: the face can look surprised rather than sweet.
- Loose tension: stuffing may show through (especially with cotton).
- Messy colour changes: switch colours on the last yarn-over of the final stitch for a crisp band.
12Customizationon Ideas
Make your crochet dessert cat amigurumi unique:
- Add a strawberry (tiny red sphere with green top)
- Make chocolate syrup (dark brown drips)
- Add whipped cream (white spiral or ruffle)
- Change panflavoursavors: matcha, ube, chocolate, or pumpkin
- Turn it into a keychain version (crochet smaller + add a keyring loop)
13. CareHands should be washed
- d wash only in cool water with gentle soap.
- Press in a towel—don’t wring or twist.
- Air-dry fully, then reshape the pancake stack while damp.
- Avoid heavy heat (cotton can handle some, but stuffing won’t love it).
14. FAQs
1) Is this a true pancake pusheen crochet pattern or fan art?
It’s an original, dessert-cat-inspired plush tutorial with a chubby “Pusheen-style” vibe (round body, tiny features), not a licensed character pattern.
2) What yarn works best for a cute crochet cat plush like this?
4-ply cotton gives great stitch definition and a clean pancake look. You can use acrylic too—just keep tension tight.
3) I’m new—can I really make this beginner amigurumi cat pattern?
Yes. If you can do sc, inc, and dec, you can finish it. The rest is slow, careful assembly and simple embroidery.
4) How do I make the pancake layers look more “stacked”?
Use clear colour bands (cream + golden brown) and add a slight shaping round (the optional decrease section) so it looks gently squished and layered.
5) Can I make it bigger?
Absolutely—use thicker yarn and a larger hook, or increase the base to 54–60 stitches before working even rounds.
6) Safety eyes or embroidered eyes—what’s better?
Safety eyes look polished, but for baby-safe toys, use embroidered eyes instead (and secure all ends inside).
15. Conclusion
This pancake kitty is the kind of project that makes crochet feel magical—just simple rounds turning into a brunch-themed buddy. Use this pancake cat plush crochet idea as your base, then add your own toppings and colours to create the sweetest little crochet pancake plush tutorial.
It also makes a perfect handmade gift: birthdays, kawaii lovers, craft fair tables, or anyone who believes pancakes belong in the “cute” category.