Crochet Pastel BMO Backpack Pattern Retro Game Console Bag
If you’ve been dreaming of a cute, wearable character bag, this Crochet Pastel BMO Backpack is the project for you. It’s playful, trendy, and surprisingly practical, like carrying a tiny retro game console on your back. This beginner-friendly crochet backpack pattern walks you through the body, screen panel, straps, and all the fun BMO-style details.
This crochet backpack pattern creates a pastel mini backpack inspired by a retro game console/BMO-style character design: a square-ish bag body, a contrasting “screen” panel on the front, and embroidered facial features plus cute little buttons. Crochet lovers adore character backpacks because they’re equal parts functional and collectible. You get a real bag you can use, but it also feels like a plush you can wear.
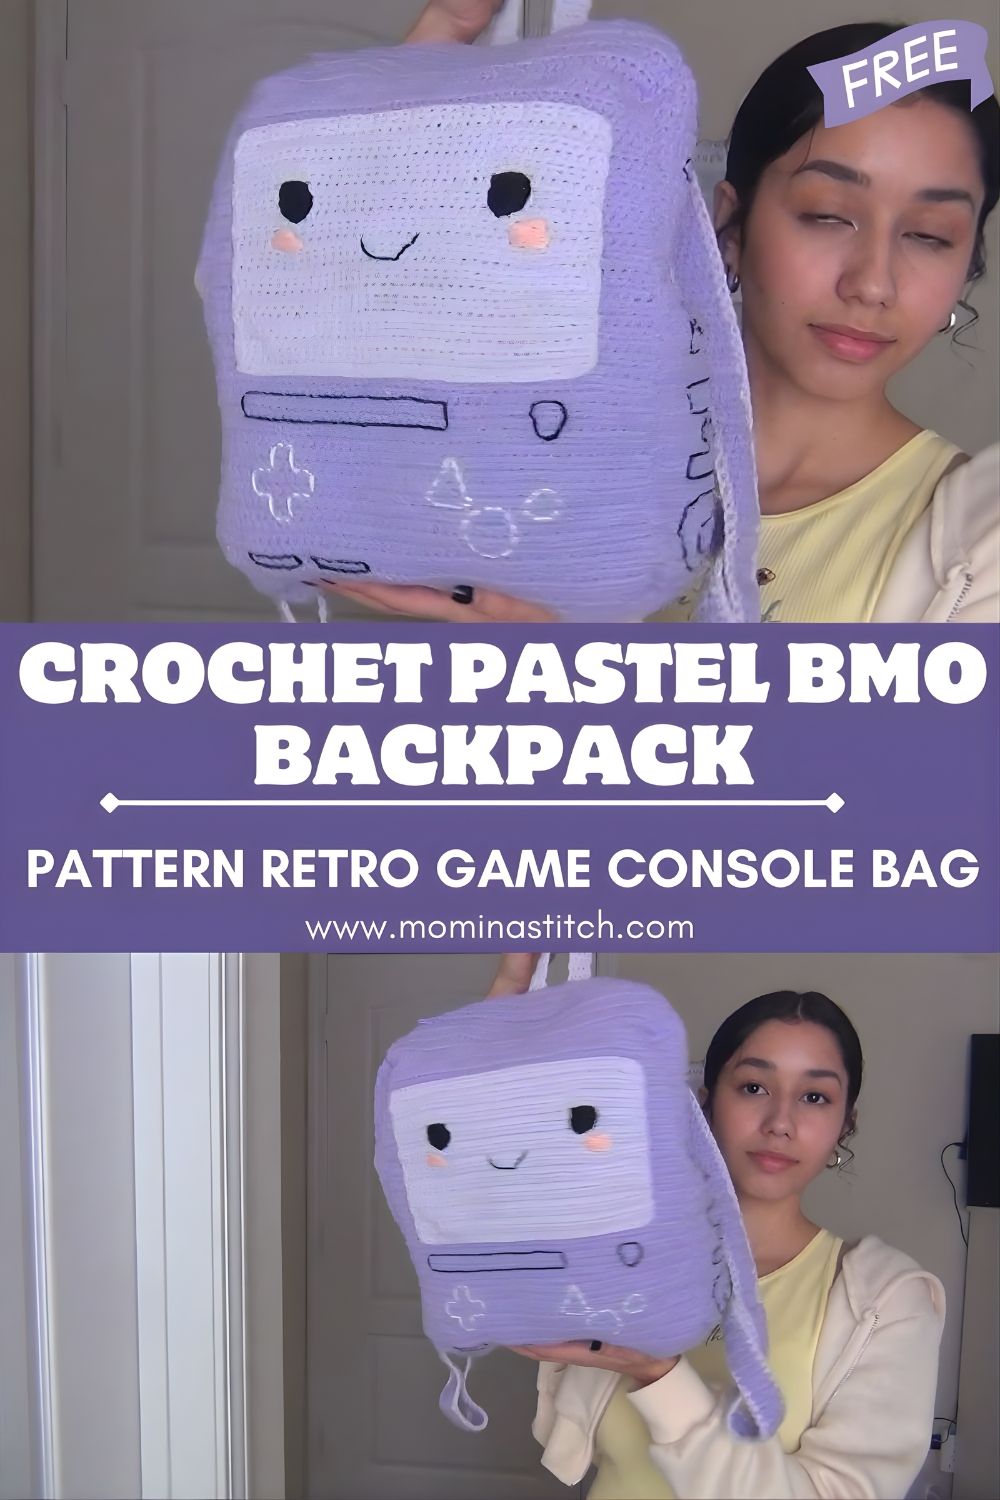
The pastel color palette (like pastel purple with a bright white screen) gives the backpack a modern, soft aesthetic while still keeping that classic BMO vibe. This pattern is best for intermediate beginners: you’ll use single crochet, increases/decreases, and simple panel construction. It’s a great stepping stone if you’ve made amigurumi before and want to try a structured DIY crochet backpack next.
Materials Needed
- Pastel purple yarn (medium/worsted weight #4 recommended)
- White yarn (for the screen/front panel)
- Black yarn (face details + outlines)
- Optional accent colors: pink (blush), teal/mint (buttons), gray (speaker details)
- Crochet hook: 4.0 mm–5.0 mm (use 4.0 mm for tighter stitches)
- Yarn needle (tapestry needle)
- Stitch markers
- Polyester stuffing (optional, for extra structure at the corners/front)
- Zipper or lining fabric (optional but recommended for durability)
- Safety eyes or embroidery thread (embroidery is best for a flat “screen” look)
- Scissors
- Optional: magnetic snap/button for closure, D-rings for straps
Crochet Abbreviations
- MR – Magic Ring
- sc – single crochet
- inc – increase
- dec – decrease
- sl st – slip stitch
- ch – chain
- hdc – half double crochet
Finished Size
Approximately 10–12 in (25–30 cm) tall, 8–10 in (20–25 cm) wide, and 3–4 in (7–10 cm) deep, depending on yarn, hook, and how tightly you crochet.
Step-by-Step Crochet Pattern
Notes Before You Start
- This backpack is made from two square panels (front + back) plus a side/bottom gusset strip to create depth.
- Work in tight single crochet for a bag that holds its shape.
- Stitch counts can vary slightly if you adjust size—what matters most is that your front and back panels match.
BACKPACK BODY
1) Front Panel (Pastel Purple) – Square Base
Start with a flat square. You’ll crochet in rounds, turning a circle into a square using corner increases.
- Round 1: MR, 6 sc (6)
- Round 2: inc in each stitch (12)
- Round 3: (sc, inc) repeat around (18)
- Round 4: (2 sc, inc) repeat around (24)
- Round 5: (3 sc, inc) repeat around (30)
Turn it into a square: From here, stop increasing evenly. Instead, place 4 corners evenly spaced.
- On each corner, work (sc, ch 1, sc) into the same stitch to form a crisp corner.
- Work sc across the sides between corners.
- Round 6: sc to first corner placement, (sc, ch 1, sc) in corner st, sc across side; repeat for all 4 corners
- Rounds 7–14: Repeat Round 6 (keep corners stacked: always work (sc, ch 1, sc) into each ch-1 corner space)
Fasten off and weave in ends.
2) Back Panel (Pastel Purple) – Make 1
Repeat the Front Panel instructions exactly so both panels match.
3) Side + Bottom Gusset Strip (Pastel Purple)
This is the strip that wraps around the sides and bottom to give your backpack depth.
- Row 1: ch 13 (or your desired depth + 1)
- Row 2: sc in 2nd ch from hook and across (12)
- Rows 3–70 (approx): ch 1, turn, sc across (12)
Sizing tip: Wrap the strip around 3 sides of one square panel (one side + bottom + other side). Stop when it fits smoothly without stretching. Fasten off, leave a long tail for sewing.
FRONT PANEL (BMO Screen) – White Rectangle
Make a separate white panel to applique onto the front.
- Row 1: ch 17
- Row 2: sc in 2nd ch from hook and across (16)
- Rows 3–13: ch 1, turn, sc across (16)
Fasten off, leave a long tail for sewing.
Optional black outline: Surface crochet around the screen with black yarn or stitch a simple backstitch border.
FACE DETAILS (Embroidered on the White Screen)
Use black yarn or embroidery floss for clean lines.
- Eyes: Stitch two small vertical ovals or short satin stitches, spaced evenly.
- Mouth: A simple curved line (backstitch) centered under the eyes.
- Blush cheeks (optional): With pink yarn/floss, stitch two tiny horizontal lines or small circles beneath each eye.
Placement tip: Pin your white screen onto the front panel first, then mark face placement so it’s centered.
DECORATIVE BUTTONS (Console Controls)
Place these below (or beside) the screen on the front panel.
Option A: Quick Embroidered Buttons (Beginner-friendly)
- Use black yarn to stitch a plus sign for a D-pad.
- Use colored yarn (mint/teal) to stitch 2–3 small circles for buttons.
Option B: Crocheted Buttons (Poppable and cute)
Small button (make 3–4):
- Round 1: MR, 6 sc (6)
- Round 2: inc x6 (12)
sl st, fasten off. Lightly stuff or leave flat. Sew on.
D-pad (simple):
- Ch 7, sc in 2nd ch from hook and across (6).
- Make 2 strips, sew in a plus sign.
BACKPACK STRAPS (Make 2)
You can make them adjustable-looking by sewing them lower on the bag and angling slightly inward at the top.
- Row 1: ch 6
- Row 2: sc in 2nd ch from hook and across (5)
- Rows 3–70 (or desired length): ch 1, turn, sc across (5)
Strap sizing:
- Child: ~18–22 in (45–55 cm)
- Teen/Adult mini backpack: ~22–28 in (55–70 cm)
Fasten off, leave long tails for sewing.
Optional comfort upgrade: Single crochet a second strap layer, or sew webbing behind for strength.
TOP HANDLE
- Row 1: ch 9
- Row 2: sc in 2nd ch from hook and across (8)
- Rows 3–6: ch 1, turn, sc across (8)
Fasten off, leave tails.
Assembly Instructions
1) Attach Screen + Face + Buttons
- Pin the white screen panel centered on the front purple panel.
- Sew around it with whip stitch (or mattress stitch for a neater edge).
- Embroider the eyes, mouth, and blush onto the screen.
- Sew on or embroider the console buttons under/around the screen.
2) Build the Backpack Shape
- Pin the gusset strip around the sides and bottom edge of the front panel (right sides facing out).
- Sew the gusset to the front panel using whip stitch through both loops.
- Repeat to attach the back panel to the other side of the gusset, forming a boxy backpack body.
3) Top Opening + Closure
Choose one:
- Crochet 1–2 rounds of sc around the top opening for a clean rim.
- Hand-sew a zipper to the inside top edge.
- If you’re adding lining, sewthe zipper to the lining first, then attach the lining to the bag.
- Sew a magnetic snap inside, or add a flap if you want extra security.
4) Attach Straps + Handle
- Sew the top handle centered at the top back edge.
- Sew the straps to the upper back area (about 1–2 inches below the top rim).
- Sew the strap bottoms to the lower back corners. Reinforce with extra stitching (bags get tugged!).
5) Optional Structure
- For a sturdier bag, insert a plastic canvas rectangle in the back panel or bottom (between crochet and lining).
- Lightly stuff corners if you want a plushy, rounded look.
Helpful Crochet Tips
- Keep stitches tight: Use a smaller hook (4.0 mm) and firm tension to prevent gaps.
- Use stitch markers for corners: Your square panels look cleaner when corners stack perfectly.
- Line the bag if you can: Lining prevents stretching and keeps small items from poking through stitches.
- Block panels lightly: A quick steam block (carefully!) helps squares lay flat before assembly.
- Reinforce straps: Sew straps with multiple passes and consider adding a fabric backing for durability.
Uses of This Crochet Backpack
- An everyday mini backpack for phone, keys, and small essentials
- A cute anime/cartoon fan accessory with retro character vibes
- A thoughtful, handmade gift for gamers and crochet lovers
- A fun cosplay accessory or convention bag
- A collectible addition to your DIY crochet bag lineup
Conclusion
This pastel BMO-style backpack is one of those projects that makes people stop and smile—because it’s functional and full of personality. If you’re an intermediate beginner, you’ll learn great bag-making skills here: building square panels, adding a gusset, sewing clean edges, and attaching straps that can handle real wear. Don’t be afraid to customize the colors (mint, pastel pink, sky blue) or change the face expression to make it truly yours. Once you make one, you’ll want a matching set.