Cute No Sew Crochet Hamster Pattern For Mini Beginner
If you’re looking for a crochet hamster pattern that’s quick, adorable, and simple, you’re in the right place. This no-sew amigurumi hamster is a cute crochet hamster perfect for beginners who want a fast win and an irresistibly squishy finish.
This project is a tiny, rounded mini hamster crochet amigurumi with sweet little ears and a simple face, exactly the kind of design that looks “kawaii” and collectible, but is still easy enough for newer crocheters. Hamsters are a favorite amigurumi theme because their shape is naturally simple (basically a soft oval), and small details like ears and a tiny nose instantly make them recognizable.
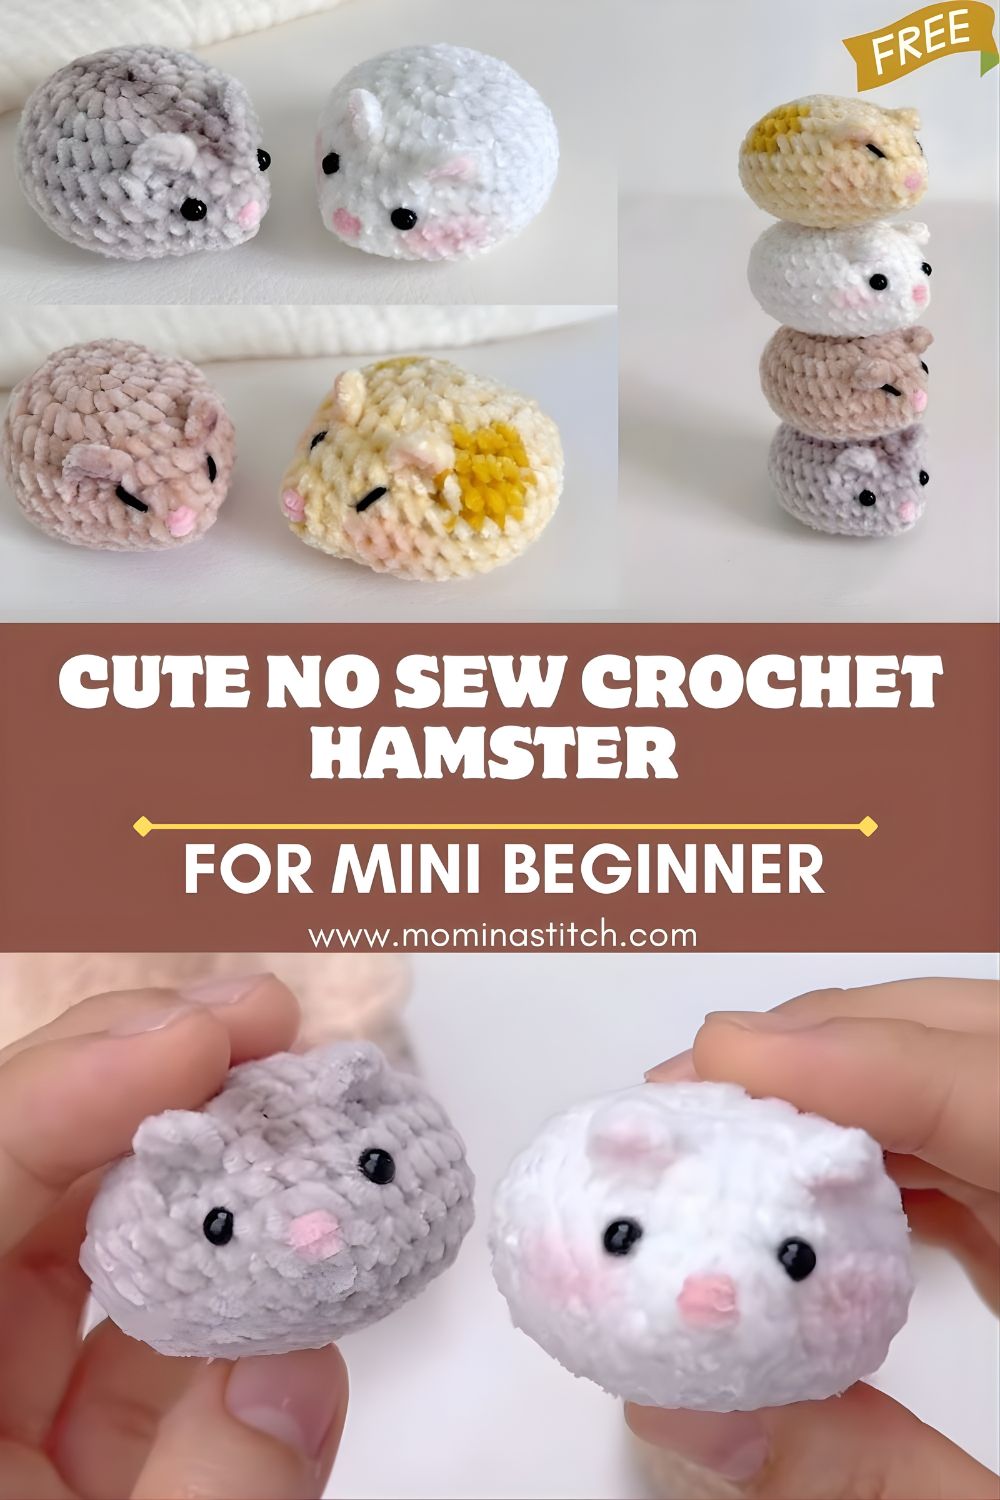
What makes this crochet hamster tutorial extra beginner-friendly is that it’s designed as a no-sew amigurumi hamster: you’ll crochet the ears into the body as you go (or attach with minimal joining), keeping finishing stress low. This makes it great for quick toys, desk buddies, last-minute gifts, and even small keychain plushies (with a few simple modifications).
Make one in classic golden hamster colors, or experiment with white, gray, or “panda” markings—the pattern stays the same, and color does all the storytelling.
Materials Needed
Here’s what you’ll need to make your cute crochet hamster:
- Yarn (recommended):
- Worsted / Aran weight (size 4) acrylic or cotton for a slightly firm plush
- Optional: plush/chenille yarn for an extra cuddly mini hamster (note: harder for beginners)
- Crochet hook:
- 2.5–3.5 mm for worsted yarn (pick a smaller hook than the label suggests for tight stitches)
- If using plush yarn: 4.0–5.0 mm (adjust to keep stitches tight)
- Safety eyes:
- 6 mm (typical for mini amigurumi) or 8 mm for a more “baby” look
- Alternatively: black yarn for embroidered eyes (kid-safe)
- Stuffing: polyester fiberfill
- Yarn needle: for weaving ends and optional facial embroidery
- Stitch marker: to track rounds
- Scissors
- Optional:
- Keychain hardware (jump ring + lobster clasp)
- Pink embroidery floss for cheeks/nose detail
Crochet Abbreviations (US Terms)
- MR = Magic Ring (Magic Circle)
- sc = Single crochet
- inc = Increase (2 sc in the same stitch)
- dec = Decrease (single crochet 2 stitches together; use invisible decrease for amigurumi)
- sl st = Slip stitch
- ch = Chain
- st(s) = Stitch(es)
- FLO = Front loop only (if used for shaping)
- BLO = Back loop only (if used for shaping)
Crochet Hamster Pattern (Step-by-Step)
Skill level: Beginner
Finished size: Depends on yarn/hook; approx. palm-sized with worsted yarn
Notes: Work in continuous rounds unless stated. Use a stitch marker in the first stitch of each round.
Body (No-Sew Style)
Round 1: MR, 6 sc (6)
Round 2: inc around (12)
Round 3: (sc, inc) around (18)
Round 4: (2 sc, inc) around (24)
Round 5: (3 sc, inc) around (30)
Rounds 6–9: sc around (30)
These even rounds build the hamster’s chubby “capsule” shape.
Round 10: (3 sc, dec) around (24)
Round 11: (2 sc, dec) around (18)
Add Eyes (before closing)
Place safety eyes between Rounds 7–8, about 6–7 stitches apart (adjust to your taste).
Tip: Do a quick “face check” by holding the eyes in place before locking the backs.
Stuffing
Start stuffing firmly after Round 11. Keep the shape rounded—stuff more toward the bottom so the hamster sits nicely.
Round 12: (sc, dec) around (12)
Add a bit more stuffing to finish shaping.
Round 13: dec around (6)
Fasten off, close the hole by weaving through the front loops of the remaining stitches and pulling tight. Weave in the end.
Ears (Small, Cute, and Minimal Sewing)
This design is intended to be no-sew or low-sew. Choose one method:
Option A: Crochet-On Ears (No-Sew Technique)
With yarn in the main body color, insert your hook on the top side of the hamster (roughly above the eyes, spaced evenly).
For each ear:
- Attach yarn with a sl st
- ch 2
- Work 2 dc (or 3 hdc) into the same spot
- ch 2, sl st into the same spot
Fasten off and weave in ends.
Repeat for the second ear.
(If you prefer only single crochet stitches: ch 1, 3 sc in same stitch, ch 1, sl st in same stitch.)
Option B: Tiny Ears (Quick Sew – Still Beginner-Friendly)
Make 2:
- MR, 6 sc
- sl st to join, fasten off, leaving a short tail
Sew each ear to the top sides of the body with just a few stitches.
Face Details: Nose + Optional Mouth
Embroider the Nose
Using pink yarn or embroidery floss:
- Make a small horizontal stitch (or tiny triangle) centered below and between the eyes.
- Optional: add a tiny “Y” mouth with one short vertical stitch and two small angled stitches.
Optional Cheeks
Add two tiny pink stitches on each side below the eyes for extra “kawaii” vibes.
Finishing Steps
- Check that the hamster is evenly stuffed and round.
- Weave in all ends securely (especially if it will be handled by kids).
- Shape gently with your hands to smooth lumps.
Optional Keychain Conversion
- Before fully closing (Round 13), insert a loop of strong yarn ora keychain tab at the top.
- Close the body around it and knot securely inside.
Special Notes (Beginner Tips)
- Keep stitches tight: Amigurumi looks best when dense, so stuffing doesn’t show. Use a smaller hook if needed.
- Use a stitch marker: Continuous rounds are easy to lose without marking. Round 1 of each round.
- Invisible decrease: Use invisible dec for a smoother finish (recommended for amigurumi).
- Color changes: If you want a white belly:
- Change yarn on the last yarn-over of the final stitch before the new color begins.
- Carry yarn inside only if the color change area is small; otherwise, cut and weave ends cleanly.
Customization Ideas (Make It Your Own!)
Try these cute variations using the same crochet hamster pattern:
- Golden hamster: tan body + white belly + brown nose
- White hamster: all white with pink nose and ears
- Gray dwarf hamster: gray top + white belly
- Panda hamster: white body with small black patches around the eyes
- Tiny “chubby cheeks” style: embroider blush circles and use slightly larger eyes
You can also make it bigger by using thicker yarn (chunky/chenille) and a matching hook—no pattern changes necessary.
FAQs (Crochet Hamster Tutorial)
1) Is this crochet hamster patterbeginner-friendlyly?
Yes. This no-sew amigurumi hamster uses basic amigurumi shaping (increases, decreases, and single crochet) and simple facial embroidery.
2) What yarn is best for a mini hamster crochet?
Worsted-weight acrylic or cotton is easiest for beginners. Chenille yarn makes a super soft plush, but it can hide stitches, so it’s better if you’re already comfortable counting rounds.
3) Can I make this cute crochet hamster bigger?
Yes—use thicker yarn and a larger hook. You can also add a couple of extra “sc around” rounds in the middle to make the body longer.
4) Where should I place the safety eyes?
A common placement is between Rounds 7–8, about 6–7 stitches apart. Adjust to your preferred expression (closer = cuter, wider = more surprised).
5) Can I sell finished hamsters made from this pattern?
If you’re following a specific creator’s tutorial, check their video description/pattern policy. In general, many designers allow selling finished items with credit, but you should confirm permissions from the original maker.
Conclusion
This cute crochet hamster pattern is the perfect tiny project when you want something fast, beginner-friendly, and guaranteed to make people smile. Try this mini hamster crochet today, experiment with colors, and turn it into a pocket toy, gift topper, or keychain plush. If you make one, share your color combo—it’s amazing how different each little hamster can look!