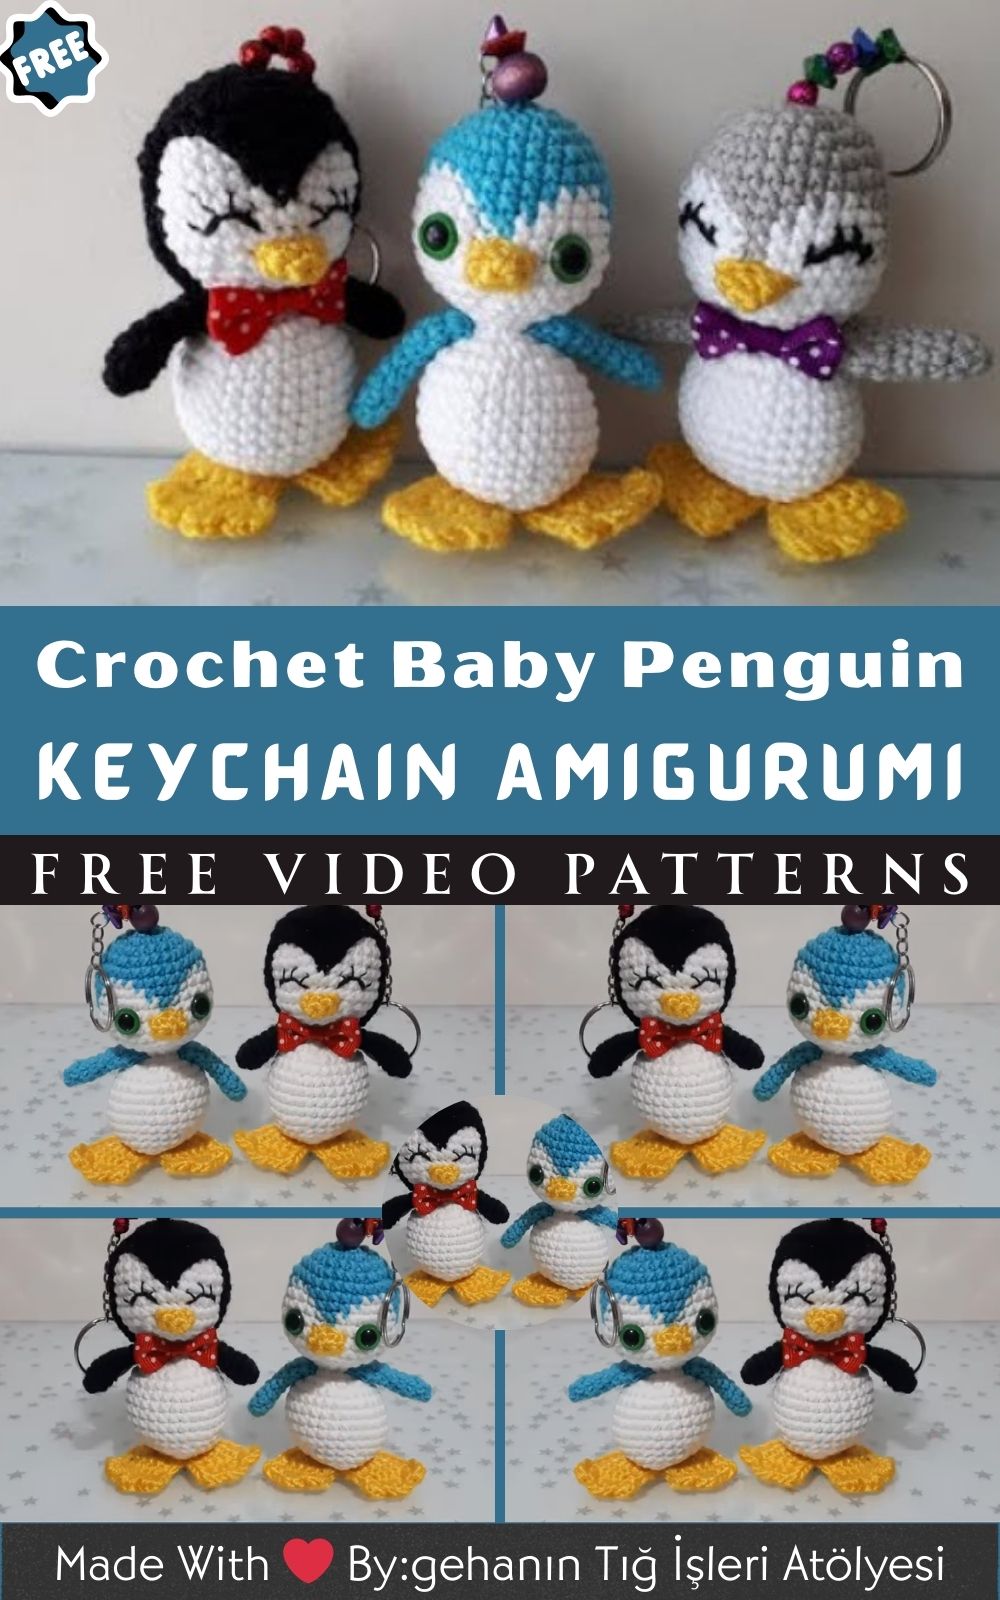
Lovely Crochet Baby Penguin Keychain Amigurumi Pattern
Create the Lovely Crochet Baby Penguin Keychain Amigurumi Pattern, your quick, adorable make for gifting or selling. This beginner-friendly, step-by-step design uses minimal yarn, works up fast, and delivers irresistibly cute results. Create a pocket-sized penguin charm that’s perfect for bags, keys, and handmade market booths.
Looking for a tiny make with maximum cuteness? The Lovely Crochet Baby Penguin Keychain Amigurumi Pattern delivers quick, charming results with beginner-friendly steps and minimal sewing. This pocket-size penguin works up fast with scrap yarn, looks adorable in cotton or plush fibers, and can be customized with colors, safety eyes, or embroidered features.
Clear instructions guide you from beak to flippers, creating a sturdy, lightweight keychain ready for everyday use on bags and keys. Perfect for last-minute gifts or market stock, this amigurumi is a satisfying, under-an-hour project that still feels special. Soft, squishy, and travel-ready, your baby penguin adds handmade warmth wherever it goes. Ideal for makers who want cute finishes without the fuss.
uses:
- Sweet gift or stocking stuffer for birthdays, baby showers, and holidays
- Bag charm or backpack keychain for kids, teens, and travelers
- Quick craft-fair bestseller or Etsy listing that uses leftover yarn
Lovely Crochet Baby Penguin Keychain Amigurumi Pattern
Looking for a tiny crochet project with maximum adorable factor? Then you’ll love this Lovely Crochet Baby Penguin Keychain Amigurumi Pattern. Moreover, it’s beginner-friendly, scrap-yarn friendly, and wonderfully fast to finish. In addition, the penguin works up small enough for keys, backpacks, and gift toppers, yet it still looks polished and sturdy. Therefore, whether you’re making last-minute presents or stocking a craft fair, this pattern keeps your hands happy and your results super cute.
Finished Size, Skill Level, and Time
- Finished size: approximately 7–8 cm (2.75–3.25 in) tall, 5–6 cm (2–2.4 in) wide
- Skill level: Beginner (comfortable with magic ring, single crochet, increases/decreases)
- Total making time: about 1.5–2.5 hours, depending on speed
Abbreviations (US Terms)
- MR: magic ring
- ch: chain
- sc: single crochet
- inc: increase (2 sc in the same stitch)
- dec: invisible decrease (single crochet two stitches together using front loops only)
- sl st: slip stitch
- BLO: back loop only
- FLO: front loop only
- st(s): stitch(es)
Additionally, work in continuous rounds unless noted; therefore, always use a stitch marker to mark the first stitch of each round. Moreover, keep your tension snug so stuffing doesn’t show.
Materials and Tools for (Crochet Penguin Keychain Amigurumi)
- Yarn: DK (Category 3) cotton or acrylic
- Main color (MC): Charcoal, black, or deep navy — 25 m (27 yd), about 10 g
- Contrast color (CC1): White (belly patch) — 15 m (16 yd), about 6 g
- Accent color (CC2): Yellow or orange (beak and feet) — 8 m (9 yd), about 4 g
- Hook: 2.75 mm (US C-2). Alternatively, use 3.0 mm for a slightly larger penguin.
- Safety eyes: 6 mm round black (1 pair). Alternatively, embroider eyes for baby-safe makes.
- Fiberfill stuffing: 8–10 g
- Tapestry needle: size 16–18 for sewing parts and weaving ends
- Stitch marker: 1
- Scissors: 1 pair
- Keychain hardware: 25–30 mm split key ring with 25–35 mm chain (or a lobster clasp)
- Optional: A tiny bell or charm; a touch of blush; sewing thread and needle for extra-secure keychain attachment
Gauge (Helpful, Not Critical)
- Approximate gauge: 7 sc x 7 rounds ≈ 2.5 cm (1 in) with 2.75 mm hook in the round
- Consequently, if your penguin is coming out larger or looser, switch to a smaller hook; if it’s too tight to work comfortably, switch up one size.
Step-by-Step Instructions for (Crochet Penguin Keychain Amigurumi)
Note: For a smooth, professional look, use invisible decreases and keep stitches snug. Furthermore, add times per step to help you plan your session.
- Body (Head + Body as One Piece) — 30–40 minutes
- Yarn: MC (charcoal/black)
- Work in continuous rounds.
Round 1: MR, 6 sc (6)
Round 2: inc around (12)
Round 3: (sc, inc) x 6 (18)
Round 4: (2 sc, inc) x 6 (24)
Round 5: (3 sc, inc) x 6 (30)
Round 6: (4 sc, inc) x 6 (36)
Next, shape the head dome:
Round 7: sc around (36)
Round 8: sc around (36)
Insert safety eyes after Round 8:
- Placement: between Rounds 8 and 9, 6–7 stitches apart across the front. Additionally, test withthe belly patch held in place later to ensure a balanced look. Then, snap washers on securely.
Build gentle body height:
Round 9: sc around (36)
Round 10: sc around (36)
Begin decreasing to round the body:
Round 11: (4 sc, dec) x 6 (30)
Round 12: (3 sc, dec) x 6 (24)
Round 13: (2 sc, dec) x 6 (18)
Begin stuffing firmly but evenly:
- Add a small amount of fiberfill now; moreover, press it gently to avoid lumps.
Round 14: (sc, dec) x 6 (12)
Round 15: dec around (6)
Finally, fasten off and close:
- Cut yarn, leaving a short tail. Then, weave the tail through the front loops of the remaining 6 stitches and pull tight to close. Additionally, weave in the end securely.
- Belly Patch (White Oval) — 7–10 minutes
- Yarn: CC1 (white)
- Work in continuous rounds.
Round 1: MR, 6 sc (6)
Round 2: inc around (12)
Round 3: (sc, inc) x 6 (18)
Round 4: (2 sc, inc) x 6 (24)
Optionally, add one more round for a larger belly:
Round 5 (optional): sc around (24) for a slightly bigger oval without adding further increases.
Fasten off with a long tail for sewing:
- Leave approximately 25–30 cm (10–12 in) tail. Moreover, flatten the oval with your fingers so it sits neatly against the body.
- Beak (Tiny 3D Cone) — 4–6 minutes
- Yarn: CC2 (yellow/orange)
- Work in continuous rounds.
Round 1: MR, 4 sc (4)
Round 2: (sc, inc) x 2 (6)
Round 3: sc around (6)
Round 4 (optional for a longer beak): sc around (6)
Fasten off, leaving a 15–20 cm (6–8 in) tail for sewing:
- Lightly pinch the cone so the tip looks slightly flattened. Additionally, do not stuff for a petite look.
- Wings (Make 2) — 10–12 minutes each
- Yarn: MC
- Work in continuous rounds; then flatten.
Round 1: MR, 6 sc (6)
Round 2: (sc, inc) x 3 (9)
Round 3: sc around (9)
Round 4: sc around (9)
Afterward, flatten the piece:
- Fold the small tube so the stitches align. Then, sc across both layers for 4–5 stitches to close the opening. Finally, fasten off with a 20–25 cm (8–10 in) tail for sewing.
- Feet (Make 2) — 7–9 minutes each
- Yarn: CC2
- Option A (simplest—flat feet with toe bumps):
Row 1: ch 5, sc in 2nd ch from hook, sc in next 3 (4); ch 1, turn.
Row 2: sc, picot (ch 3, sl st to first ch), sc, picot, sc, picot, sc (creating three tiny “toes” evenly spaced).
Edge: sl st around the perimeter to smooth the shape if desired. Then, fasten off with a 20–25 cm (8–10 in) tail for sewing.
- Option B (tiny ovals, slightly 3D):
Round 1: MR, 6 sc (6)
Round 2: (sc, inc) x 3 (9)
Round 3: sc around (9)
Flatten and sc through both layers for 4–5 stitches to close. Fasten off with a tail for sewing.
- Keychain Loop (Two Options) — 5–8 minutes
- Option A: Crocheted loop
- Yarn: MC or CC1
- ch 8, sl st to first ch to form a ring. Then, sc around the ring for 10–12 stitches to bulk it up. Finally, fasten off with a 20–25 cm (8–10 in) tail.
- Placement: Sew to the top-center of the head. Consequently, ensure the loop sits vertically so the penguin hangs straight.
- Option B: Sew-on hardware
- Use a 25–30 mm split ring with a short chain and a small jump ring.
- Stitch the last link of the chain to the top of the head using strong sewing thread. Additionally, take several passes through the same points for security.
- Assembly — 15–20 minutes
- Belly patch first: Pin the white oval to the front center, slightly below the eyes. Then, sew around with small whip stitches using the long white tail. Moreover, keep the curve smooth by taking even bites of fabric.
- Beak next: Position the beak centered between the eyes, with the flat edge against the face. Then, sew all around the base with the yellow tail. Additionally, tug gently to settle the beak without distorting the face.
- Wings: Align each wing at the sides, roughly level with the lower half of the belly patch. Then, sew along the top edge of each wing, leaving the bottom edge slightly loose for a natural flipper effect.
- Feet: Place feet underneath the belly patch, toes pointing forward and slightly outward. Next, sew across the top edges only so the toes can still flex a little.
- Keychain loop: Attach your loop or hardware securely to the top center. Consequently, double-knot, weave ends, and add a drop of clear-drying fabric glue if desired.
- Finishing Touches — 5 minutes
- Gently reshape by hand; then roll the penguin between your palms to even out stuffing. Additionally, add a tiny blush on the cheeks with fabric-safe blush or a touch of pink embroidery. Finally, weave in any remaining ends and trim neatly.
Basic Tips for a Neat, Pro-Looking Penguin
- Use a stitch marker: Place it in the first stitch of each round. Additionally, move it up every round so your counts stay accurate.
- Keep tension consistent: Tug lightly after each stitch fora snug fabric. Moreover, if you see stuffing peeking, switch to a smaller hook.
- Invisible decrease: Work the decrease through front loops only to minimize bumps. Consequently, your shaping will look smooth and tidy.
- Stuff gradually: Add small tufts as you go, especially before final decreases. Furthermore, press stuffing into corners with the back end of your hook.
- Pin before sewing: Use pins or clips to check the placement of the belly, beak, wings, and feet. Therefore, you’ll avoid crooked features and last-minute unpicking.
- Secure keychain hardware: Stitch through the same anchor points multiple times. Additionally, consider a dab of fabric glue inside the knot for extra security.
Common Mistakes and How to Avoid Them
- Uneven stitch count: Skipping the stitch marker often leads to accidental increases or decreases. Therefore, always mark your round start and recount after increasing rounds.
- Eyes too low or too wide: Placing eyes without testing can throw off the expression. Consequently, hold the belly patch in place and audition eye positions before securing washers.
- Overstuffing the head: Cramming too much fiberfill stretches stitches and shows gaps. Instead, stuff firmly yet evenly, and additionally rotate the piece while shaping to distribute filling.
- Loose decreases: Regular sc2tog can look bumpy on amigurumi. Therefore, switch to invisible decreases to keep the fabric consistent.
- Weak loop attachment: A loosely attached loop or chain risks tearing with daily use. Accordingly, sew the loop to several stitches on the crown and knot securely.
- Mismatched wings or feet: Attaching without pins can shift placement. Thus, pin symmetrically and check from the front and sides before sewing.
Simple Variations to Personalize Your Penguin
- Size swaps: Use sport-weight yarn with a 2.25 mm hook for a tiny micro penguin or worsted weight with a 3.5 mm hook for a chubbier charm. Moreover, adjust the safety eyes to 5 mm for smaller and 8 mm for larger.
- Color play: Try pastels for baby themes (mint, blush, lavender) or bold school colors for team spirit. Additionally, a navy body with a cream belly gives a classic, cozy vibe.
- Embroidered eyes: For baby-safe gifts, embroider eyes with black yarn or thick thread in small ovals. Furthermore, add a tiny white stitch for a sparkly highlight.
- Seasonal flair: Add a mini scarf (ch 35–45, sc back), a Santa hat (red cone with white brim), or a heart applique for Valentine’s. Consequently, your penguin doubles as an ornament or gift topper.
- Textured belly: Work the belly in FLO for a subtle ridge or switch to fuzzy yarn for a plush look. Additionally, a few surface slip stitches can create a tuxedo edge.
- Accessory charm: Stitch a tiny fish, star, or snowflake to the wing. Moreover, attach a bell to the keyring for a playful jingle.
Care, Safety, and Durability
- Care: Spot clean with a damp cloth and mild soap. Additionally, avoid high heat and harsh chemicals to protect the fiber and shape.
- Safety: For items intended for children under three, replace safety eyes with embroidered eyes. Therefore, you’ll avoid small detachable parts.
- Durability: Use cotton for sturdiness and clean stitch definition. Furthermore, reinforce the keychain loop with extra stitches and secure knots.
Troubleshooting and Quick Fixes for (Crochet Penguin Keychain Amigurumi )
- Body looks lumpy: Remove a little stuffing and massage to redistribute. Additionally, steam lightly from a distance and shape with your hands.
- Beak points downward too much: Re-sew the top edge 1–2 rows higher. Consequently, the beak will tilt outward slightly, creating a friendlier face.
- Penguin tilts when hanging: Move the loop slightly forward, or sew it across two or three crown stitches. Furthermore, check the balance before trimming the final tail.
Why This Pattern Works for Beginners
- Clear shaping: Simple increases and decreases make a tidy sphere-like body. Moreover, short rounds keep the project manageable.
- Minimal sewing: Only four small pieces attach to the body, and they’re easy to position. Additionally, the belly patch acts as a visual guide for eye and beak placement.
- Fast finish: Most makers complete it in under two hours. Therefore, it’s ideal for gifts, markets, and weekend crafting.
Quick Reference: Step Times and Yarn Usage
- Body: 30–40 minutes — MC ≈ 20 m (22 yd)
- Belly: 7–10 minutes — CC1 ≈ 10 m (11 yd)
- Beak: 4–6 minutes — CC2 ≈ 2 m (2 yd)
- Wings (2): 10–12 minutes each — MC ≈ 5 m (5.5 yd) total
- Feet (2): 7–9 minutes each — CC2 ≈ 4 m (4.5 yd) total
- Loop/Hardware: 5–8 minutes — minimal yarn
- Assembly/Finishing: 15–20 minutes — no extra yarn beyond tails
SEO-Friendly Summary for Makers
Create the Lovely Crochet Baby Penguin Keychain Amigurumi with easy, step-by-step instructions. Moreover, use DK yarn, a 2.75 mm hook, and 6 mm safety eyes for a pocket-sized penguin that’s perfect for bags and keys. Additionally, follow the quick pattern to crochet the body, add a white belly patch, attach a tiny beak, sew on wings and feet, and finish with a sturdy loop. Consequently, you’ll have an adorable, beginner-friendly penguin keychain that’s ideal for gifts, craft fairs, and Etsy shops. For a visual companion,
Call to Create
Ready to stitch a little joy? Then grab your hook, pick your favorite colors, and start your Lovely Crochet Baby Penguin Keychain today. Furthermore, share your makes with friends, add them to market inventory, and keep one for your own keys because cute companions make every day brighter. Finally, happy crocheting.