Crochet Easter Egg Bunny Pattern Removable Bunny Head + Egg Basket
This adorable Easter Egg Bunny Crochet is a two-in-one project: a crochet egg basket with a sweet bunny head topper you can remove and swap. It’s the perfect quick seasonal make for Easter displays, egg hunts, and handmade gifting.
This crochet item is a cute amigurumi Easter egg basket topped with a removable bunny head, creating a playful “bunny-in-an-egg” look. It’s perfect for Easter decor because it’s festive, pastel-friendly, and works beautifully as a table centerpiece, tiered tray accent, or Easter basket stuffer.
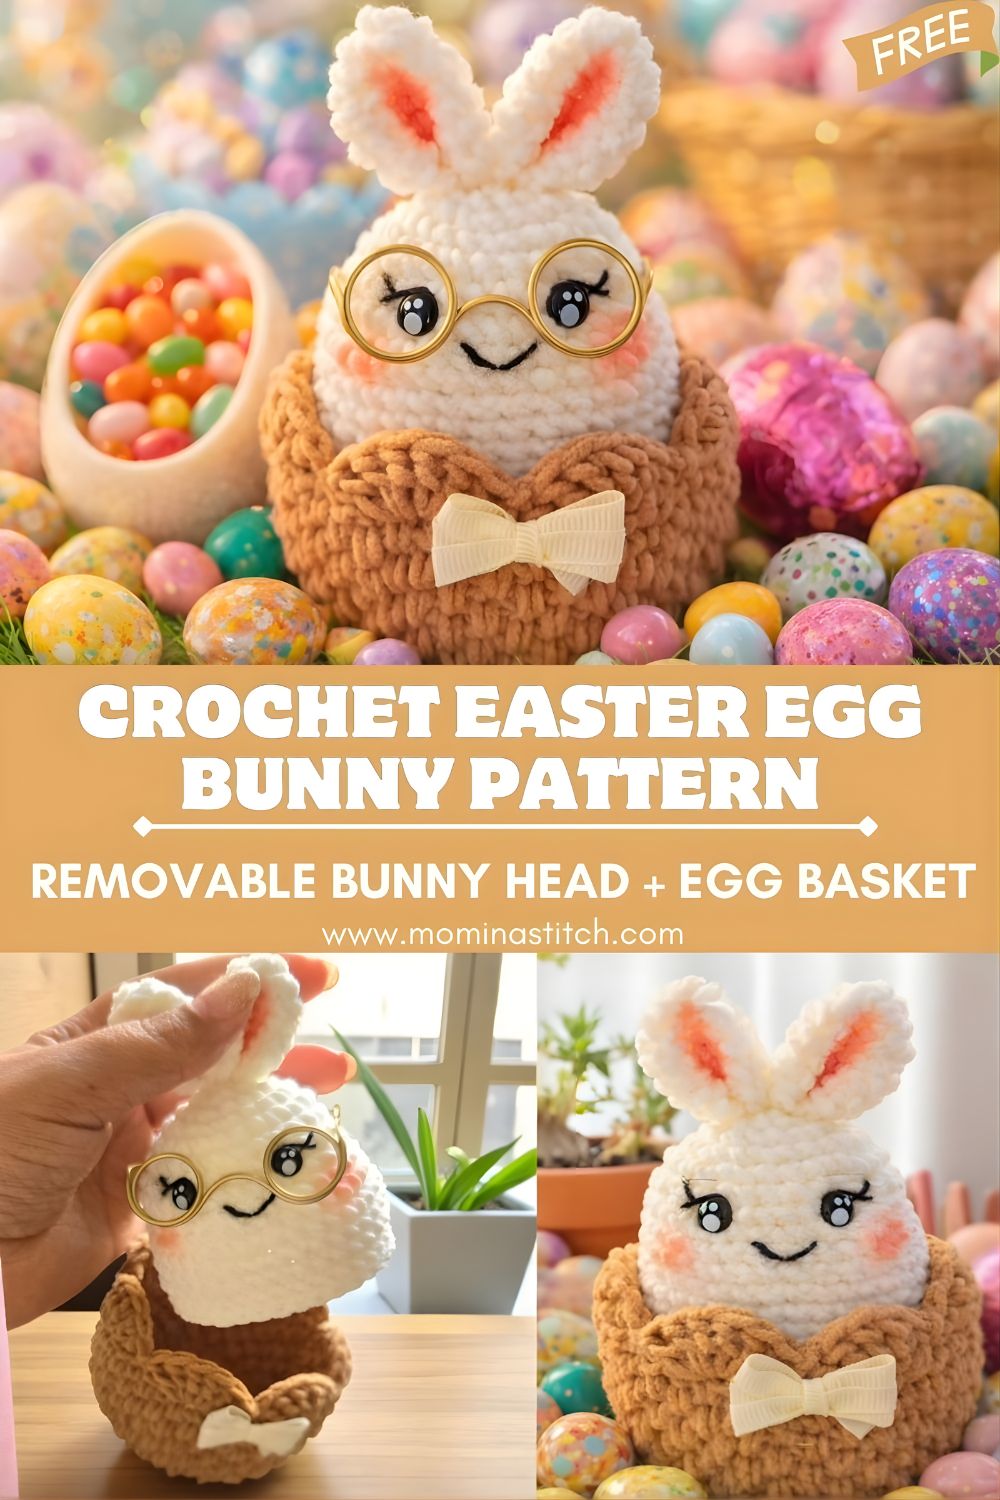
Beginners can absolutely make this with basic stitches (single crochet, increases, decreases) and simple sewing, while intermediate crocheters will enjoy polishing the details like shaping, embroidery, and a clean, removable fit. Use it as a crochet egg holder, a small treat basket, a giftable spring plush, or even a cute way to present money, candy, or mini eggs.
5. Materials Needed
Yarn (suggested):
- Worsted weight (Category 4) cotton or acrylic (cotton holds basket shape nicely)
- Main egg/basket color: pastel mint, yellow, lavender, or pink
- Bunny head color: white, cream, or light gray
- Inner ear: pink
- Details: black (mouth/eyelashes), pink (cheeks), optional brown (nose)
Hook:
- 3.5 mm–4.0 mm for worsted weight (use a smaller hook than usual for tighter amigurumi stitches)
Notions:
- 8–10 mm safety eyes (or embroider eyes for baby-safe version)
- Fiberfill stuffing (for head)
- Yarn needle (tapestry needle)
- Scissors
- Stitch markers
- Optional decorations:
- Tiny bow (ribbon or crocheted)
- Glasses (mini craft glasses or pipe cleaner wire frames)
- Felt flowers, buttons (avoid for small children)
6. Crochet Abbreviations
- MR – Magic Ring
- SC – Single Crochet
- INC – Increase (2 SC in the same stitch)
- DEC – Decrease (single crochet 2 together / invisible decrease)
- SL ST – Slip Stitch
- CH – Chain
- BLO – Back Loop Only
- FLO – Front Loop Only
- ( ) – repeat instructions in parentheses
- [ ] – stitch count at end of round
7. Finished Size
Approximate finished size using worsted yarn and a 3.5–4.0 mm hook:
- Egg basket: ~4–5 in (10–13 cm) tall
- Bunny head topper: ~3–3.5 in (7.5–9 cm) tall
- Finished piece overall: ~6–7 in (15–18 cm) tall
Size will vary with yarn weight, hook size, and tension.
8. Crochet Pattern – Step by Step
Important Notes Before You Start
- Work in continuous rounds unless stated.
- Use a stitch marker to mark the first stitch of each round.
- For a sturdy basket, keep tension firm and consider cotton yarn.
Egg Basket Base (worked bottom-up)
R1: MR, 6 SC in MR [6]
R2: INC x6 [12]
R3: (SC, INC) x6 [18]
R4: (2 SC, INC) x6 [24]
R5: (3 SC, INC) x6 [30]
R6: (4 SC, INC) x6 [36]
R7: (5 SC, INC) x6 [42]
Create the “base edge” (turn the corner)
R8 (BLO): SC around in BLO only [42]
Build the basket walls
R9–R13: SC around [42] (5 rounds)
At this point, you should have a neat cup/basket shape. Adjust height by adding/removing rounds.
Optional: Slight taper near top (helps the head sit snugly)
R14: (5 SC, DEC) x6 [36]
R15: SC around [36]
Fasten off for now if addingthe shell edge separately, or continue into the decorative edge below.
Egg Shell Edge (decorative “cracked egg” look)
Attach yarn at any stitch on the top edge.
Work this edging loosely so it ruffles slightly.
Edging Round:
Repeat around:
- (SL ST in next st, CH 2, 2 DC in same st, SL ST in next st)
This makes little scallops that resemble an eggshell edge.
Fasten off, weave in ends.
Optional extra “crack” points:
In a few spots, replace the scallop with: (SL ST, CH 3, 3 DC in same st, SL ST) for taller peaks.
Bunny Head (removable topper)
Head (worked bottom-up)
R1: MR, 6 SC [6]
R2: INC x6 [12]
R3: (SC, INC) x6 [18]
R4: (2 SC, INC) x6 [24]
R5: (3 SC, INC) x6 [30]
R6: (4 SC, INC) x6 [36]
R7–R10: SC around [36] (4 rounds)
Add safety eyes
Place safety eyes between R9 and R10, about 6–7 stitches apart (adjust for your look).
Shape down (keep the bottom opening smaller for a snug fit)
R11: (4 SC, DEC) x6 [30]
R12: (3 SC, DEC) x6 [24]
R13: (2 SC, DEC) x6 [18]
Stuff firmly, shaping as you go.
R14: (SC, DEC) x6 [12]
Stuff a bit more.
Create a flat-ish base opening (so it can sit on the basket)
Instead of closing completely, we’ll make a small “neck ring” that stays open.
R15: SC around [12]
Fasten off, weave in.
Fit Check (important)
Test the head on the basket opening. If it’s too loose:
- Add another decrease round before R15 (e.g., DEC x6 to [6], then work a small opening), or
- Stitch a simple elastic thread around the base opening.
If it’s too tight:
- Skip R14 and keep [18] at the base opening.
Bunny Ears (make 2)
Outer Ear (main bunny color)
R1: MR, 6 SC [6]
R2: (SC, INC) x3 [9]
R3: SC around [9]
R4: (2 SC, INC) x3 [12]
R5–R7: SC around [12] (3 rounds)
Do not stuff (or lightly stuff only the bottom).
Flatten the bottom and SC across to close (about 6 SC). Fasten off, leaving a long tail.
Inner Ear (pink, make 2)
CH 6
- SC in 2nd CH from hook, SC, HDC, DC, 3 DC in last CH
Working down the other side: DC, HDC, SC, SL ST
Fasten off, sew onto the outer ear.
Attach ears to the top of the head, slightly angled outward for extra cuteness.
Face Embroidery (eyes, smile, blush)
Even with safety eyes, embroidery adds that “kawaii” finish.
Nose (optional):
- Use pink or brown yarn to stitch a tiny triangle or a small “V” between the eyes, 1–2 rounds below.
Smile:
- With black yarn, stitch a small curved smile under the nose.
Blush cheeks:
- Use pink yarn to make two short horizontal stitches on each cheek.
Or use soft blush makeup (apply lightly; seal with a tiny dab of fabric-safe glue if desired).
Assembly Instructions (removable head + basket)
- Weave in all ends on the basket and head.
- Attach ears securely to the head (sew through multiple stitches).
- Test the head fit into the egg basket opening. The head should “nest” into the opening and stay put by friction.
- If you want a more secure removable join, add one of these:
- Hidden button + loop: sew a button inside the basket, crochet a small loop inside the head.
- Velcro dots: one inside the basket, one on the head base (great for display; avoid for baby toys).
- Snap button: stitch one half inside the basket, one half on the head base.
- Optional: Add a tiny bow at the ear base or near one ear.
9. Tips for Beginners
- Use a stitch marker every round—amigurumi is all about stitch counts.
- Count out loud at the end of each round to prevent “mystery shaping.”
- For fewer gaps, use a smaller hook and keep stitches snug.
- Stuff gradually and evenly—lumpy stuffing shows more in light pastel yarns.
- When sewing, pin pieces first (ears especially) so the face looks centered.
- Cotton yarn helps the egg basket hold its shape better than very stretchy yarns.
10. Customization Ideas
- Color swaps: make pastel rainbow baskets, speckled “egg” yarns, or classic white eggshells.
- Add ribbons: tie a satin bow around the shell edge or sew a tiny ribbon to the bunny ear.
- Make it bigger/smaller:
- Bigger: bulky yarn + 5–6 mm hook
- Smaller: DK yarn + 3.0 mm hook
- Accessories: add mini glasses, a flower crown, a carrot applique, or a tiny crochet vest.
- Personalization: stitch initials on the basket for a giftable keepsake.
11. Conclusion
This Easter Egg Bunny Crochet is the kind of project that instantly makes your space feel festive—cute, functional, and fun to customize. Whether you use it as an egg holder, a candy basket, or a handmade Easter gift, you’ll love how quickly it comes together. Happy crocheting, and don’t forget to make a whole bunny egg “family” in different pastel colors!