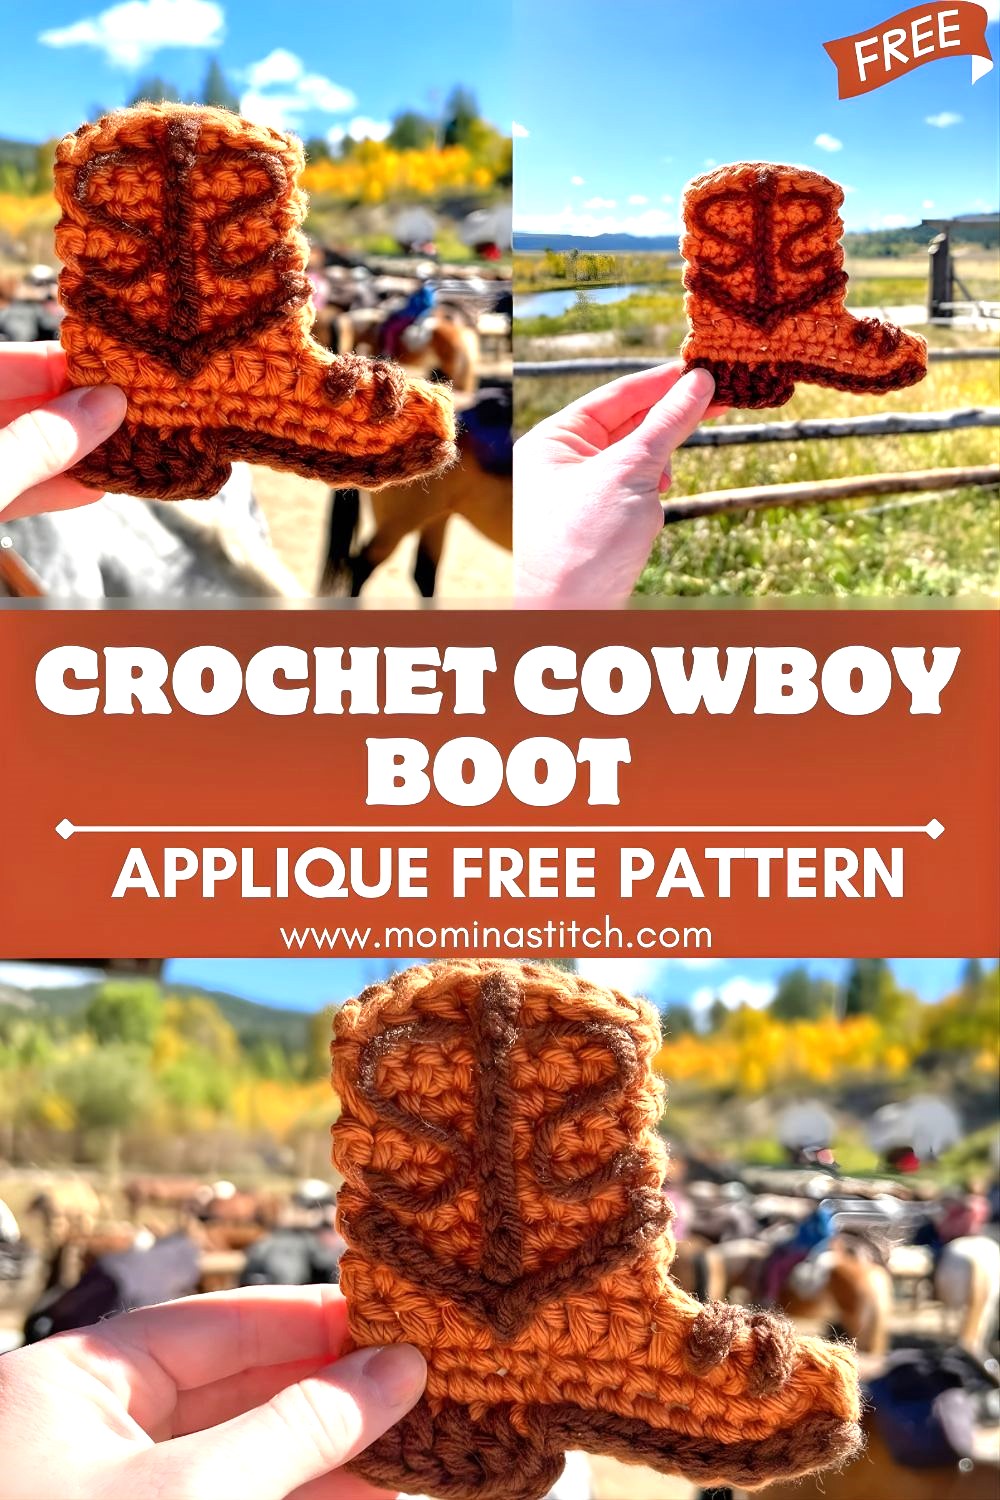
Crochet Cowboy Boot Applique Free Pattern
A crochet cowboy boot applique is a small, flat crochet piece shaped like a classic western boot. You can stitch or glue it onto other projects to add a fun “cowboy” vibe, think country themes, rodeo parties, western baby showers, or simply a cute detail on everyday crochet items.
This project is popular with crochet lovers because it’s:
- Quick to make (great for scraps of yarn)
- Beginner-friendly (simple stitches and easy shaping)
- Perfect for decorating hats, bags, blankets, and more
This blog post is based on the YouTube tutorial “Crochet Cowboy Boot Applique Free Pattern For Crochet Lovers” from the channel Crochet by Colleen (with a written pattern linked on the creator’s blog). I’m sharing a clear, beginner-style written version so you can follow along easily.
Materials Needed
Here’s what you’ll want to gather before you start:
- Medium-weight yarn (worsted/aran) in any colors
- One color for the boot (main color)
- Optional contrast color for trim or decorative stitches
- Crochet hooks:
- 5mm (main hook)
- 6.5mm (optional for looser stitches or larger applique)
- Scissors
- Felt (for backing—any color that matches your boot)
- Hot glue gun (or fabric glue as an alternative)
- Yarn needle (for weaving ends and sewing on)
Optional extras:
- Stitch markers (helpful for counting)
- Small beads or buttons (for decoration)
- Embroidery floss (for adding stitch details)
Crochet Abbreviations (Beginner Guide)
These are common abbreviations you’ll see in appliqué patterns:
- ch – chain
- sl st – slip stitch
- sc – single crochet
- hdc – half double crochet
- dc – double crochet
- tc – triple crochet
Tip: If you’re new, keep your tension relaxed. Tight stitches can make shaping harder.
Step-by-Step Crochet Pattern: Cowboy Boot Applique
This applique is worked in a simple boot shape: sole first, then toe/heel shaping, then the boot shaft, and finally decorative trim. The steps below are written in a beginner-friendly way and mirror the general construction shown in the tutorial.
Sizing Note: Appliques can vary slightly depending on yarn and hook size. Use a 5mm hook for a standard medium applique. Use a 6.5mm hook for a larger, softer look.
Step 1 – Make the Starting Chain
- With your main boot color, make a slip knot.
- Chain 10–14 (choose based on how long you want the boot; 12 is a good middle size).
- Add 1 extra chain to turn.
Beginner tip: Your starting chain should not be too tight. If it pulls, go up a hook size just for the chain.
Step 2 – Create the Sole of the Boot
You’ll crochet along the chain, then around the end, and back along the other side to form an oval-ish sole.
- Starting in the second chain from the hook, work sc across (1 sc in each chain).
- At the last chain, work 3 sc in the same stitch (this curves the toe end).
- Now work back down the other side of the foundation chain with sc in each chain.
- At the final stitch (the other end), work 2–3 sc in the last stitch to round the heel end.
- Sl st to join (or continue in rows if you prefer a flatter shape).
Goal: You should have a neat sole shape—rounded at both ends.
Step 3 – Crochet the Heel and Toe Shaping
Now you’ll add a little shaping so the applique looks like a cowboy boot (toe + heel bump).
- Work 1 round (or one shaping row) using a mix of stitches:
- Along the toe area, use hdc/dc to create a slightly taller curve.
- Along the sides, use sc to keep it neat and flat.
- To create the heel bump, add a small cluster near the back:
- For example: (hdc, dc, hdc) all in one stitch at the heel curve.
- Sl st to end the shaping section.
Beginner-friendly shaping tip: If your boot doesn’t look perfect the first time, don’t worry—appliques are forgiving, especially after blocking and adding felt backing.
Step 4 – Build the Boot Shaft
The boot shaft is the upper part of the boot. This section gives the applique its “cowboy boot” look.
- Decide where the boot opening will be (usually closer to the back/heel side).
- Attach yarn (if needed) and begin working upward with stitches like sc and hdc.
- Work in rows:
- Row 1: ch 1, sc/hdc across part of the top of the boot (not the whole sole—only the back section).
- Turn.
- Row 2–4: repeat to build height.
- As you go, you can add a gentle slant by making one side slightly taller:
- On the “front” side of the shaft, add hdc/dc at the top edge.
- On the back side, keep it sc/hdc.
What you’re aiming for: A short boot shaft with a slight curve or angle at the top.
Step 5 – Add Decorative Stitches
Decorative stitches make the applique look more like a real cowboy boot.
Here are easy, beginner-approved options:
Option A: Contrast Trim (Simple & Cute)
- Join a contrasting yarn color at the top edge of the boot.
- Work sl st or sc evenly around the top opening.
- Fasten off and weave in ends.
Option B: Western “V” Embroidery Look
Using a yarn needle + contrast yarn:
- Stitch small V shapes or diagonal lines on the boot shaft.
- Keep stitches evenly spaced for a polished look.
Option C: Picot-Style Detail (If you want a fancy edge)
- (sl st, ch 2–3, sl st in same stitch) Repeated along the top edge.
Tip: Even one simple trim line can make a big difference in the finished look.
Step 6 – Finish and Weave in Ends
- Fasten off yarn neatly.
- Use a yarn needle to weave in all ends on the back of the applique.
- If the applique curls a bit, gently shape it with your hands.
Optional blocking:
- Lightly mist with water and press flat under a book or blocking board for 15–30 minutes.
Finishing Touches: Add Felt Backing (Neat + Strong)
Felt backing makes your applique:
- look cleaner from the back
- feel sturdier
- easier to glue onto items without stitches showing
How to attach felt backing.
- Place your finished bootappliquée on felt.
- Trace around it with a pen or chalk.
- Cut the felt slightly smaller than the crochet shape (so it won’t show from the front).
- Use a hot glue gun to attach:
- Add a thin line of glue around the edges and a small amount in the center.
- Press the felt down carefully.
Alternative: You can also sew the felt on using a whip stitch if you prefer no glue.
Customization Ideas (Make It Your Own)
Want to turn this free cowboy boot applique idea into something unique? Try:
- Different yarn colors
- Classic: brown boot + cream trim
- Cute: pink boot + white trim
- Bold: black boot + red details
- Embroidery details
- Add initials, stitch lines, or western motifs (stars, hearts)
- Beads or buttons
- Use tiny buttons like “boot studs.”
- Add a bead near the heel for sparkle
- Two-tone boot
- One color for the sole, one color for the shaft
Creative Uses for a Crochet Cowboy Boot Applique
This little applique can be used in so many fun ways—especially if you love themed crochet projects.
Try it on:
- Hats (beanies, cowboy-themed party hats)
- Bags (totes, purses, project bags)
- Blankets (as a motif for a western-themed throw)
- Keychains (stiffen with felt and add a keyring)
- Western-themed decorations
- bunting flags, wall hangings, party table décor
- Kids clothing
- tiny appliques on sweaters, dresses, bibs, and rompers
Craft blogger tip: This applique is also great for “scrap yarn projects” roundups and quick gift ideas posts.
Tips for Beginners (And Common Mistakes to Avoid)
Beginner tips
- Count your stitches as you work the sole—this helps keep both sides even.
- If your foundation chain is tight, use a larger hook just for the chain.
- Keep your stitches consistent (same tension = cleaner edges).
- Use simple stitches first, then add decoration later.
Common mistakes
- Boot looks too round: Add a few taller stitches (hdc/dc) at the toe and reduce extras at the heel.
- Edges look wavy: Too many increases—remove a couple of extra stitches at the curved ends.
- Applique curls: Tension is too tight, or shaping is uneven—try gentle blocking or go up a hook size.
Conclusion
A crochet cowboy boot applique is a fun, fast project that adds instant personality to your crochet makes. It’s beginner-friendly, works up quickly with medium-weight yarn, and looks amazing with simple trim or a few embroidered details.
If you try this cowboy boot applique pattern idea, save your version, share it on social media, and tag the tutorial creator Crochet by Colleen (and link back to the original video and written pattern on her blog if you post about it). Your color choices and creative touches can make every boot look totally different, and that’s the best part.