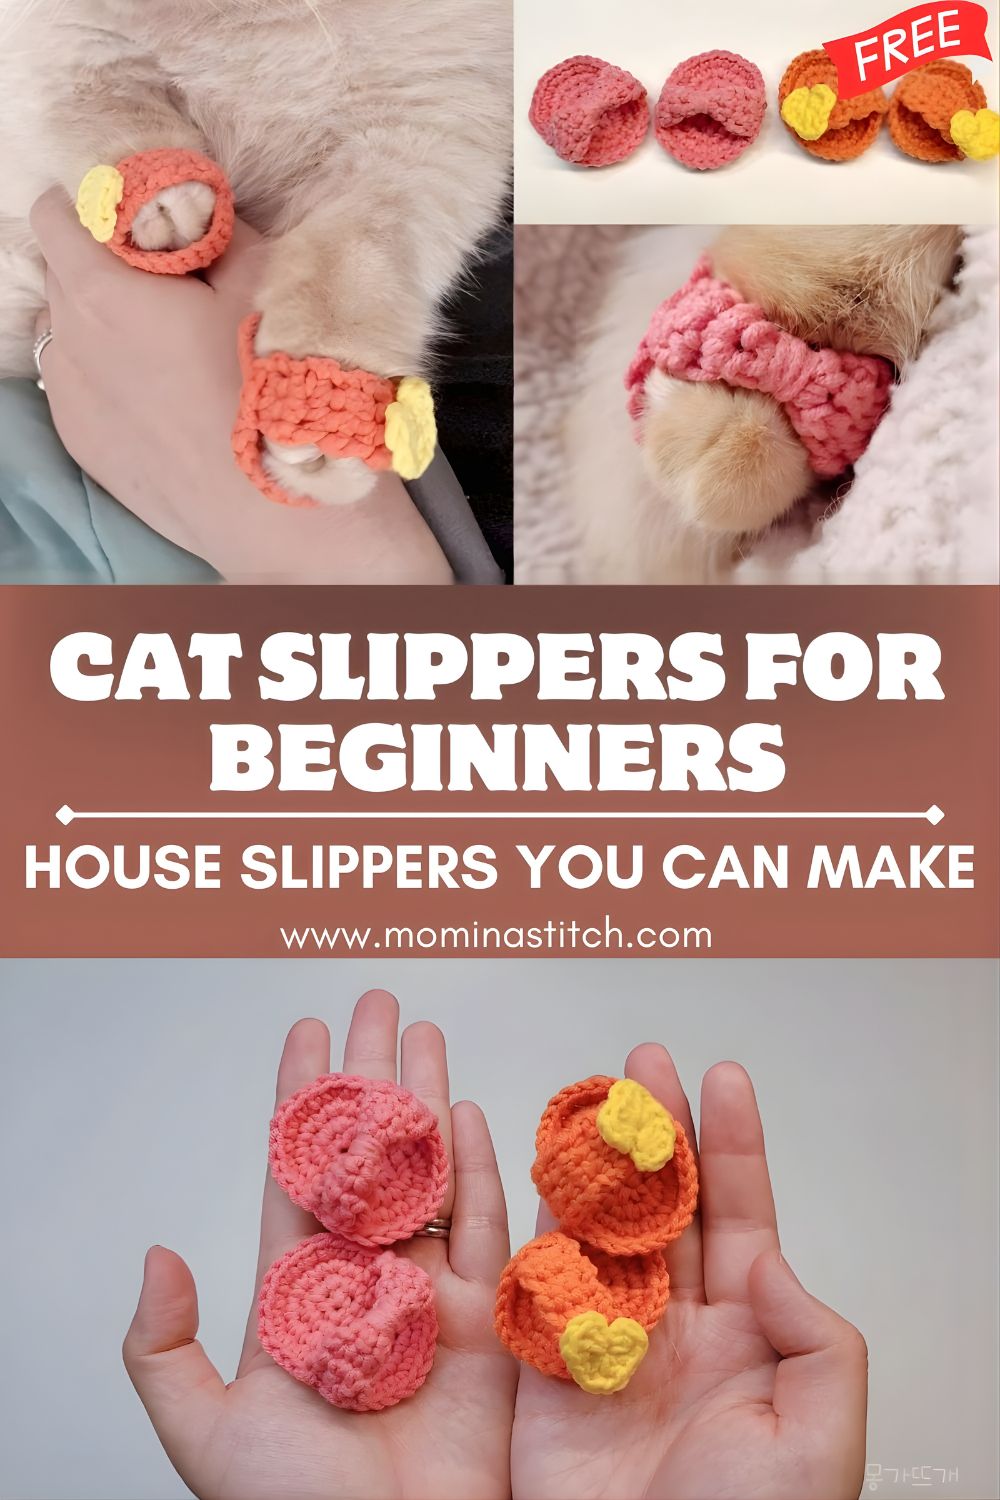
Crochet Cat Slippers for Beginners House Slippers You Can Make
Learn how to crochet the cutest cat slippers with this easy step-by-step pattern! These cozy handmade slippers feature adorable cat ears and face details, making them perfect for gifts, winter comfort, or fun DIY crochet projects. Great quick crochet projects for beginners and crochet lovers.
These slippers are perfect for lazy weekends at home, keeping your feet cozy on cold floors, or making thoughtful, handmade gifts. And the best part? You don’t need advanced skills. If you can crochet basic stitches and count a little, you can absolutely make these.
Materials Needed
Here’s what you’ll want to have ready before you start:
- Yarn: Soft acrylic or cotton yarn
- Worsted medium-weight yarn is a great beginner choice
- If you want extra cozy slippers, choose a soft, slightly fluffy yarn
- Crochet hook: Recommended 5.0 mm (H/8) for worsted yarn
- You can use 4.5–5.5 mm, depending on your yarn and tension
- Yarn needle (for sewing and weaving in ends)
- Scissors
- Stitch markers (very helpful for shaping the toe evenly)
- Safety eyes or black yarn/embroidery thread (for the cat face)
- Optional extras:
- Non-slip sole dots or puffy paint (for grip)
- Felt (to add paw pads or reinforce the sole)
- Pipe cleaner or extra yarn for whiskers (if you want them to pop)
Crochet Abbreviations
These are the common abbreviations you’ll see in slipper patterns:
- ch – chain
- sl st – slip stitch
- sc – single crochet
- hdc – half double crochet
- dc – double crochet
Step-by-Step Pattern (Beginner-Friendly Overview)
Step 1 – Create the Slipper Sole
Most crochet slippers start with an oval sole made by crocheting around a starting chain.
Basic idea:
- Chain to the length of your foot (or close to it).
- A good starting point for adults is often around ch 20–28, but sizing depends on yarn, hook, and foot size.
- Work stitches along one side of the chain.
- Add multiple stitches in the last chain to curve around the toe end.
- Work back down the other side of the chain.
- Add multiple stitches in the last chain again to curve around the heel end.
- Keep working in continuous rounds (or joined rounds—either is fine), increasing at both ends to keep the sole flat.
How to know your sole is the right size:
- Place it under your foot. You want it to be about the same length, or just a tiny bit shorter (crochet stretches a little with wear).
- If it starts getting wavy, you’re increasing too much.
- If it cups upward, you need a few more increases.
Beginner tip: Use a stitch marker at the start of each round so you never lose your place.
Step 2 – Build the Slipper Body (Bring Up the Sides)
Once your sole is the right size, you’ll stop increasing and start building height.
A common technique is crocheting the next round in the back loops only (BLO). This creates a “ridge” and helps the sides turn upward.
Simple approach:
- Crochet 1 round BLO using sc, hdc, or dc (depending on the look you want).
- Then crochet even rounds (no increases) to build the slipper wall.
You’ll start seeing it look like a real slipper now—this is the satisfying part.
Step 3 – Shape the Toe Area
To shape the toe, you’ll usually decrease stitches across the front of the slipper so it hugs your foot.
Here’s a beginner-friendly way to think about it:
- Put the slipper on your foot (or stuff it with a sock/towel).
- Use stitch markers to mark the front toe section (the area you want to close in).
- In the next rounds, work normal stitches on the sides, then do decreases across the front between the markers.
Common decrease methods:
- For single crochet: sc2tog
- For half double crochet: hdc2tog
- For double crochet: dc2tog
Keep trying it on as you go. Stop decreasing when the opening feels snug but not tight.
Fit tip: You want the slipper to stay on without gripping painfully. Crochet relaxes as you wear it.
Step 4 – Crochet the Cat Ears
Cat ears are usually small triangles made separately and sewn on.
Basic ear shape (simple version):
- Make a magic ring (or ch 2).
- Work a few stitches into the ring to make a small base.
- Crochet short rows, turning each row and decreasing to form a triangle.
- Make two ears per slipper.
If you want slightly rounded ears, don’t decrease too aggressively. If you want pointy ears, decrease more.
Placement tip: Put the slipper on a flat surface and pin the ears where they look cutest—usually on the top front, spaced evenly.
Step 5 – Add the Cute Cat Face Details
This is where your slippers really come to life.
You can make the face as simple or as fancy as you like:
Options for eyes:
- Safety eyes (fast and cute, but use caution if the slippers are for children)
- Small embroidered eyes using black yarn
- French knots (for a soft stitched look)
Nose + mouth:
- A tiny pink triangle nose looks adorable
- You can stitch a small “V” or “Y” shape for the mouth
Whiskers:
- Stitch 3 lines on each side with yarn or embroidery thread
- Or sew in short strands of yarn and trim them evenly
Important: If using safety eyes, attach them before you fully close or finish the slipper top (it’s easier to secure the backs).
Step 6 – Finish and Weave in the Yarn Ends
Once everything is assembled:
- Slip stitch around the opening for a neat edge (optional but nice).
- Fasten off and pull the tail through.
- Use a yarn needle to weave in all ends securely on the inside.
- Repeat the full process for the second slipper—then make sure the ears and face placement match so they look like a pair.
Optional: Make them non-slip
- Add dots of puffy paint or non-slip fabric paint on the bottom
- Or stitch on a suede/felt sole piece
Customization Ideas
This pattern style is perfect for creative variations. Here are fun ways to personalize your crochet cat slippers:
- Change the color:
- Black cat, grey tabby, white kitten, calico-inspired patches
- Add stripes or spots:
- Switch yarn colors every few rounds for a playful look
- Use fluffy yarn:
- Faux fur yarn for the cuff or the whole slipper (cozy, but harder to see stitches)
- Embroider details:
- Add rosy cheeks, sleepy eyes, eyebrows, and little hearts
- Add a cuff:
- Crochet a ribbed ankle cuff so they feel extra snug and warm
- Make them bigger/smaller:
- Adjust the starting chain and the sole increase rounds
- Try them on often—slippers are forgiving that way
Tips for Beginners (Common Mistakes to Avoid)
A few small tips will make your slippers look more polished and fit better:
- Try on as you crochet. Slippers are all about comfort. Don’t wait until the end to check sizing.
- Count your stitches, especially during toe shaping. Uneven decreases can make the toe twist.
- Use stitch markers to mark the toe section so both slippers match.
- Don’t crochet too loosely. If your stitches are loose, the slippers may stretch out quickly.
- Make the soles sturdy. Consider using single crochet for the sole or holding two strands together.
- Weave in ends well. Slippers get a lot of friction—secure ends so nothing pops out later.
Conclusion
Crochet cat slippers are one of those projects that feel extra rewarding: you get something cozy to wear, plus the cutest little cat face looking back at you. Whether you’re making them for yourself or as a gift, they’re a fun way to practice shaping, working in rounds, and adding simple crochet details like ears.
If you make a pair, don’t be afraid to experiment with different colors, sleepy eyes, fluffy cuffs, even matching “kitty” slippers for the whole family. Turn on the video, grab your yarn, and enjoy the process.