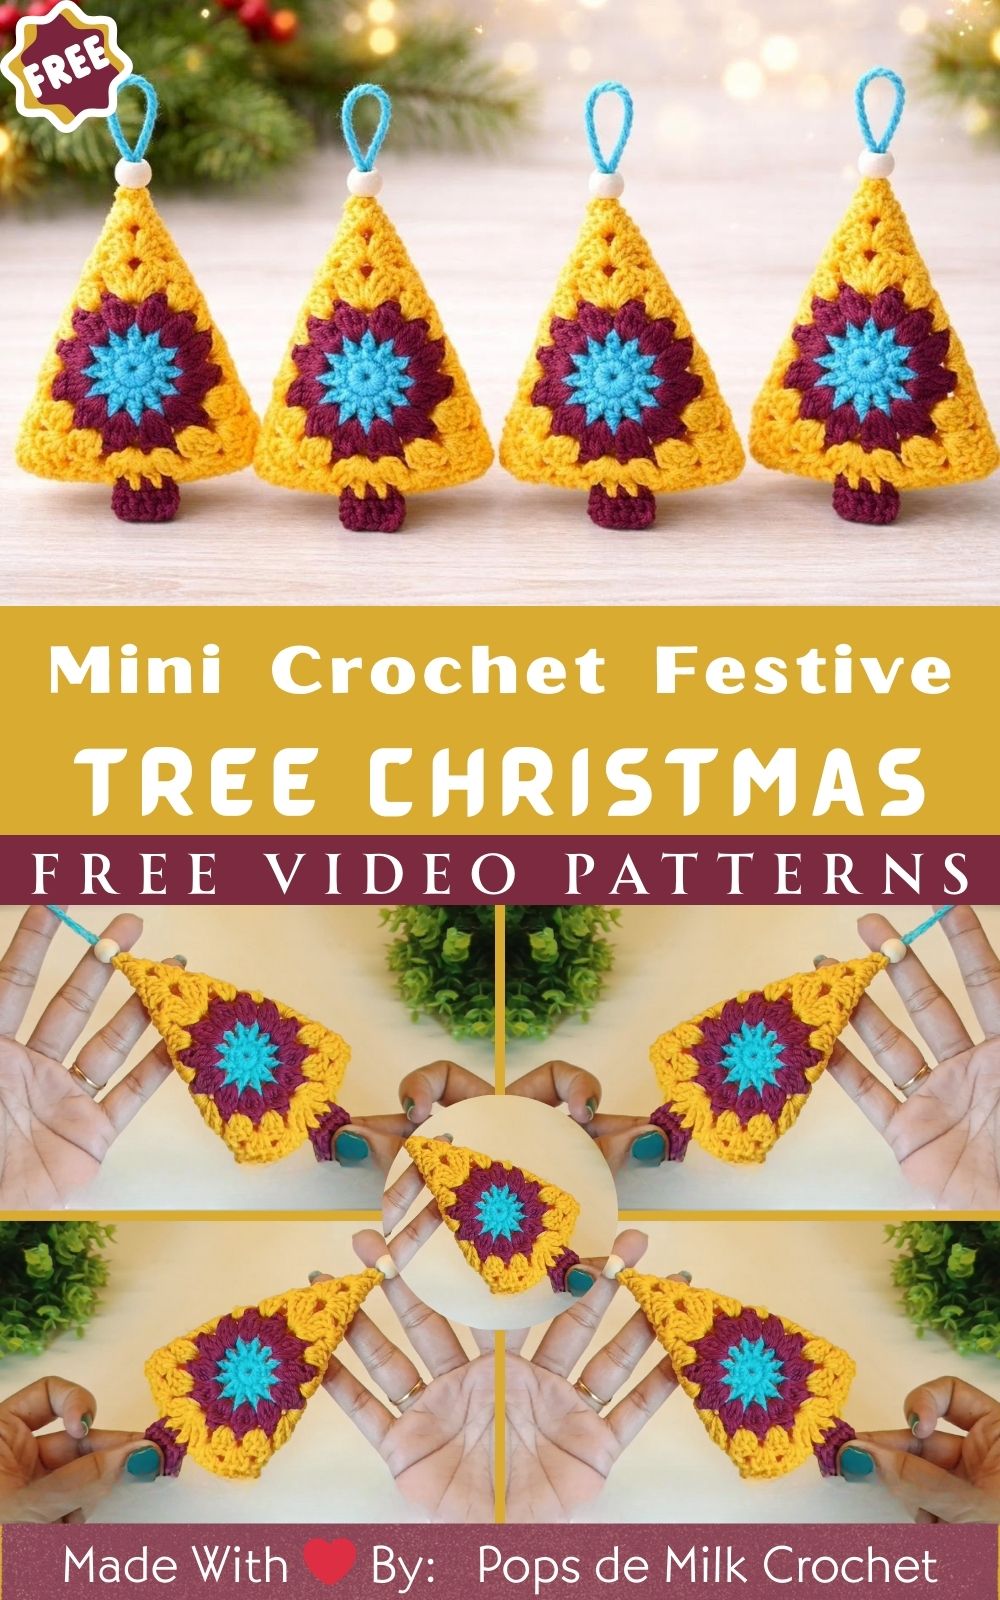
Mini Crochet Festive Crochet Tree Christmas Pattern
Some holiday cheer with the Mini Crochet Festive Tree Christmas Pattern. This quick, beginner-friendly project is adorable and fun to make. Mix and match colors, add sparkly beads, and use these palm-sized trees to decorate shelves or stockings with a touch of festive magic.
Bring cozy holiday vibes to life with this Mini Crochet Festive Tree Christmas Pattern quick, cute, and perfect for beginners. Work it up in minutes, customize with beads, stars, or snow-flecked yarn, and create a merry forest of tiny trees.
Plus, it’s a charming stash-buster and an ideal last-minute gift. Moreover, the portable size makes it great for on-the-go crafting and seasonal market sets.
Uses:
- Ornament for trees, garlands, and wreaths
- Gift topper or stocking stuffer
- Desk, shelf, or market-stall decor
Mini Crochet Festive Tree Christmas Pattern (Beginner Friendly)
Because holiday crafting should feel joyful and stress-free, this Mini Crochet Festive Tree Christmas Pattern helps you whip up charming décor in a single cozy session. Moreover, the design is quick, the stitches are simple, and the results are delightfully giftable. Additionally, you can personalize colors, add sparkles, and create a tiny forest for your mantel or market table. Consequently, whether you’re a new crocheter or a seasoned maker looking for a fast project, this palm-sized tree will brighten gift wrap, stockings, desks, and wreaths. Furthermore, the pattern includes clear steps, precise measurements, helpful tips, common mistake fixes, and fun variations.
Finished Size, Skill Level, and Time
Because sizing matters for ornaments and gift toppers, the finished tree stands about 3.5–4 in (9–10 cm) tall without the hanging loop and about 2–2.25 in (5–5.5 cm) wide at the base. Moreover, the skill level is beginner-friendly, and it focuses on single crochet in the round and simple increases and decreases. Additionally, the total make time is about 60–90 minutes for most crafters, and it can vary with experience and embellishments.
Materials Required
Because accurate supplies make crafting smoother, gather these:
- Yarn: DK (Category 3) acrylic or cotton
- Tree: 25–30 yd (23–27 m) green
- Trunk: 6–8 yd (5.5–7.5 m) brown
- Snow trim/garland/star (optional): 3–10 yd (3–9 m) white/contrast/metallic
- Hook: 3.0 mm (US C/2) crochet hook; alternatively, use 2.75 mm for a tighter fabric
- Safety eyes (optional face): 6 mm pair
- Embroidery thread: black for mouth, pink for cheeks (optional), or use a touch of blush
- Stuffing: 0.3–0.4 oz (8–12 g) polyester fiberfill
- Base stabilizer (optional but helpful): 1 small circle of felt or thin cardboard, 1–1.25 in (2.5–3.2 cm) diameter
- Beads or sequins (optional ornaments): assorted 4–6 mm
- Tapestry needle: size 16–18 for sewing
- Stitch marker: 1 locking marker to track rounds
- Scissors: a small, sharp pair
- Pins or clips: a few for positioning embellishments
- Measuring tape: to verify size
- Fabric glue (optional): to secure knots or beads
Abbreviations and Notes (US Terms)
Because clarity helps beginners, this pattern uses US crochet terms:
- MR: magic ring
- ch: chain
- sc: single crochet
- inc: increase (2 sc in the same stitch)
- dec: invisible decrease (work 2 sc together through front loops)
- sl st: slip stitch
- BLO: back loop only
- FLO: front loop only
- R#: Round number
- (…) x n: repeat instructions inside parentheses n times
- [#]: stitch count at the end of a round
Additionally, work in continuous rounds unless stated; therefore, place a stitch marker in the first stitch of each round. Moreover, keep tension firm to prevent stuffing from peeking through. Furthermore, always count stitches at the end of each round, because accurate counts keep the tree nicely shaped.
Gauge and Tension
Because amigurumi relies on tight fabric more than exact gauge, aim for firm stitches with no gaps. Moreover, with DK yarn and a 3.0 mm hook, many crocheters get about 7–8 sc per inch (2.5 cm). Additionally, if you see stuffing, drop to a 2.75 mm hook; alternatively, if your fabric feels too stiff, move up to a 3.25 mm hook. Consequently, consistent tension gives the tree clean edges and crisp tiers.
Step-by-Step Instructions (With Time Estimates)
Because structure helps, the project is broken into bite-sized steps. Moreover, each step lists an estimated making time so you can plan your session.
1: Prepare and Place Marker (Estimated time: 5 minutes)
Because organization reduces mistakes, gather all materials, wind small balls for green and brown, and set up a comfortable, well-lit spot. Additionally, attach a locking stitch marker to your project bag and keep your tapestry needle handy. Consequently, you’ll keep your rounds tidy and your finishing seamless.
2: Optional Star Topper (Crochet or Felt) (Estimated time: 10–15 minutes)
Because toppers add festive flair, choose one of the quick methods below.
- Crochet Mini Star (with 2.5–3.0 mm hook and contrast yarn)
- R1: MR, ch 1, work 10 sc into ring, pull tight, sl st to first sc [10].
- R2: (ch 3, sl st in second ch from hook, sc in next ch, sl st back into same stitch on the round) x 5 to form 5 points.
- Fasten off, leaving a 6 in (15 cm) tail for sewing.
- Additionally, block lightly with your fingers to sharpen points.
- Felt or Glitter Foam Star
- Cut a 0.75–1 in (2–2.5 cm) star from felt or foam.
- Moreover, pierce a tiny hole near the base point if you plan to thread it.
- Additionally, set aside with a dot of fabric glue, ready for final assembly.
3: Crochet the Tree Cone (Top Down) (Estimated time: 35–45 minutes)
Because the classic Christmas tree is conical, you’ll build a neat cone with simple increases. Additionally, you’ll sprinkle in a few BLO rounds to create subtle branch tiers you can decorate later.
- With green yarn:
- R1: MR, 4 sc into ring, pull tight [4].
- R2: sc around [4].
- R3: (sc, inc) x 2 [6].
- R4: sc around [6].
- R5: (2 sc, inc) x 2 [8].
- R6: sc around [8].
- R7: (3 sc, inc) x 2 [10].
- R8: sc around [10].
- R9: (4 sc, inc) x 2 [12].
- R10: BLO sc around to form a soft ridge [12].
- R11: (5 sc, inc) x 2 [14].
- R12: sc around [14].
- R13: (6 sc, inc) x 2 [16].
- R14: sc around [16].
- R15: (7 sc, inc) x 2 [18].
- R16: BLO sc around for the second tier [18].
- R17: (8 sc, inc) x 2 [20].
- R18: sc around [20].
- R19: (9 sc, inc) x 2 [22].
- R20: sc around [22].
- R21: (10 sc, inc) x 2 [24].
- R22: sc around [24].
- R23: (11 sc, inc) x 2 [26].
- R24: BLO sc around for the third tier [26].
- R25: (12 sc, inc) x 2 [28].
- R26: sc around [28].
- R27: (13 sc, inc) x 2 [30].
- R28: sc around [30].
Additionally, pause to insert safety eyes if you’re adding a face, and place them between R16 and R17 about 5–6 stitches apart. Moreover, add a small smile later with embroidery thread or a tiny V-shape. Furthermore, lightly stuff the cone from the tip downward so the point stays crisp, and add more stuffing as you progress.
- Optional extra round for a slightly wider base:
- R29: sc around [30].
- Finish the cone:
- Sl st in next stitch to level off and fasten off with a long tail only if you plan to sew the trunk from inside; alternatively, leave no tail if you will sew the trunk externally.
- Additionally, keep stuffing light-to-medium so the cone holds shape without bulging.
4: Add Snow Edges and Garland (Before Assembly) (Estimated time: 10–15 minutes)
Because surface detail elevates the look, use FLO loops left on the tier rounds or add surface slip stitches.
- Snow-Tipped Branches:
- With white yarn, join to any FLO loop from R10, R16, or R24, and sl st around the round loosely to avoid puckering.
- Additionally, fasten off discreetly inside the cone after each trim ring.
- Quick Garland:
- With metallic or contrast yarn, work a gentle spiral of surface sl sts around the cone from tip to base.
- Moreover, space stitches are slightly wider near the base to keep the spiral even.
- Alternatively, use embroidery thread and weave a zigzag garland with a tapestry needle.
- Mini Ornaments:
- Sew or glue 4–8 tiny beads or sequins evenly on the cone.
- Additionally, avoid areas where you plan to embroider a face.
5: Crochet the Trunk (Sturdy, Flat-Bottom Cylinder) (Estimated time: 10–15 minutes)
Because a stable base helps your tree stand, this trunk uses a flat base, a BLO turn for a crisp edge, and a short cylinder.
- With brown yarn:
- Base Disc:
- R1: MR, 6 sc [6].
- R2: inc around [12].
- R3: (sc, inc) x 6 [18].
- Side Wall:
- R4: BLO sc around [18].
- R5–R7: sc around [18] for a 0.75 in (2 cm) tall trunk.
- R8: (sc, dec) x 6 [12] to taper slightly toward the top.
- Finish:
- Sl st in next stitch and fasten off, leaving a 10 in (25 cm) tail for sewing.
- Additionally, cut a felt or thin cardboard circle about 1–1.25 in (2.5–3.2 cm) to fit snugly inside R3, and insert it after R5 for stability.
- Moreover, stuff the trunk firmly but not overfull so the base remains flat.
- Base Disc:
6: Join Cone and Trunk (Estimated time: 10–12 minutes)
Because neat assembly improves the silhouette, center the cone over the trunk opening and pin it in place.
- Assembly:
- Thread the trunk’s long tail on a tapestry needle.
- Additionally, sew the trunk to the cone through the cone’s last round and the trunk’s top edge, taking small, even stitches.
- Moreover, pause halfway to adjust stuffing: add a bit more to the cone for a firm base and a bit more to the trunk for stability.
- Consequently, close any gaps and knot securely inside the trunk to hide the tail.
7: Add Face, Star, and Hanging Loop (Estimated time: 8–12 minutes)
Because personality makes amigurumi irresistible, finish with cute details.
- Face:
- With black thread, embroider a tiny smile 1–2 rounds below the eyes using a small curve or V with a backstitch.
- Additionally, add two short pink stitches for cheeks or dab a touch of blush.
- Moreover, weave in ends inside the cone for a clean finish.
- Star:
- Sew or glue the crochet or felt star to the top point.
- Additionally, if you plan to hang the tree, sew the star slightly forward so the tree faces outward when suspended.
- Hanging Loop:
- With matching yarn or twine, ch 18–22, sl st to form a loop, and stitch it to the top behind the star.
- Furthermore, secure with extra stitches and a tiny drop of fabric glue if desired.
8: Final Shaping and Fiber Tidy (Estimated time: 5–8 minutes)
Because finishing touches elevate your work, roll the cone gently between your palms to smooth the stuffing. Additionally, pinch the tiers where the BLO rounds created ridges to emphasize branch levels. Moreover, trim any fuzzy fibers and hide all tails inside the trunk. Consequently, your Mini Crochet Festive Tree looks crisp, even, and ready to display or gift.
Basic Tips for Success
Because small adjustments create big improvements, consider these essentials:
- Keep it tight: Use a smaller hook if you see gaps, and, additionally, avoid splitting the yarn by inserting the hook cleanly.
- Count every round: Place a marker in the first stitch, and move it up each round to avoid drift.
- Use invisible decreases: Work dec through the front loops only, and, consequently, prevent bumps and holes.
- Stuff gradually: Add small pinches of stuffing often, and, additionally, shape as you go to maintain the cone tip and tiers.
- Secure embellishments: Knot and weave ends twice, and, furthermore, add a discreet dot of fabric glue for market-ready durability.
- Stabilize the base: Insert felt or cardboard in the trunk, and, consequently, keep the tree upright and wobble-free.
Common Mistakes and How to Fix Them
Because most issues are easy to correct, use these quick fixes:
- Loose, gappy stitches:
- Problem: Stuffing peeks through the fabric.
- Fix: Drop to a 2.75 mm hook, and, additionally, tighten your tension slightly while keeping your hands relaxed.
- Lopsided cone:
- Problem: Missed an increase or miscounted stitches.
- Fix: Count your current round, and, moreover, frog back to the last correct count and rework the round with the stitch marker anchored.
- Tilted trunk:
- Problem: Trunk sewn off-center.
- Fix: Pin in four quadrants before sewing, and, consequently, align the trunk opening with the cone’s center.
- Puckered garland:
- Problem: Surface sl sts pulled too tight.
- Fix: Loosen your tension, and, additionally, block the area by gently tugging the stitches into a smooth curve.
- Star flops forward:
- Problem: Star positioned too high or loosely attached.
- Fix: Stitch through multiple layers at the top point, and offset the attachment slightly forward to compensate for gravity.
- Overstuffed base:
- Problem: Bottom bulges and won’t sit flat.
- Fix: Remove a pinch of stuffing, insert a stabilizer circle, and, consequently, reshape by pressing down on a hard surface.
Helpful Safety Notes
Because safety matters, consider age and usage:
- For babies and pets: Skip safety eyes and beads, and, additionally, embroider features with secure stitches only.
- For hanging near lights: Avoid metallic threads near heat sources, and, moreover, choose flame-resistant yarns if possible.
- For scented décor: Add a tiny sachet in the trunk, and, consequently, ensure essential oils never contact sensitive skin surfaces.
Variations and Customizations
Because creativity shines in small ways, personalize your tree with these ideas:
- Size shifts:
- Use fingering yarn with a 2.25–2.5 mm hook for a 2.5–3 in (6–7.5 cm) mini; alternatively, use worsted (4) yarn with a 3.5–3.75 mm hook for a 4.5–5 in (11–13 cm) tree.
- Additionally, add extra increase rounds to widen the base, or stop earlier for a slimmer profile.
- Snowy edges:
- Work R10, R16, and R24 in BLO, and sl st through FLO afterward with white for frosted tiers.
- Alternatively, add reverse single crochet (crab stitch) along the FLO for a chunky snowcap.
- Lights and sparkle:
- Thread tiny seed beads on fine metallic thread, and, additionally, couch them along a spiral with little tacking stitches.
- Furthermore, hold a strand of metallic filament together with green while crocheting for a subtle shimmer.
- Rustic pine:
- Swap to heathered green or tweed DK, and add a twine hanging loop and wood bead “trunk” for a minimalist look.
- Kawaii face:
- Place 6 mm eyes between R16–R17 about 5–6 stitches apart, and, additionally, embroider a tiny U smile and blush for cheeks.
- Weighted desk buddy:
- Insert a small pouch of poly pellets in the trunk base, and, consequently, keep the tree firmly upright on your desk.
- Gift-topper duo:
- Make two trees in complementary colors, and, moreover, tie them to a present with satin ribbon for a luxe finish.
Care and Storage
Because handmade décor deserves gentle care, dust the tree with a lint roller or soft brush. Additionally, spot clean with mild soap and cold water, and avoid soaking if you used cardboard in the trunk. Furthermore, store in a dry box after the holidays, and, consequently, keep the cone tip crisp by supporting it with tissue paper.
Quick Reference Pattern (Condensed)
Because you might want a rapid refresher, here’s the core in brief:
- Tree Cone (green):
- R1: MR 4 sc [4]
- R2: sc around [4]
- R3: (sc, inc) x2 [6]
- R4: sc [6]
- R5: (2 sc, inc) x2 [8]
- R6: sc [8]
- R7: (3 sc, inc) x2 [10]
- R8: sc [10]
- R9: (4 sc, inc) x2 [12]
- R10: BLO sc [12]
- R11: (5 sc, inc) x2 [14]
- R12: sc [14]
- R13: (6 sc, inc) x2 [16]
- R14: sc [16]
- R15: (7 sc, inc) x2 [18]
- R16: BLO sc [18]
- R17: (8 sc, inc) x2 [20]
- R18: sc [20]
- R19: (9 sc, inc) x2 [22]
- R20: sc [22]
- R21: (10 sc, inc) x2 [24]
- R22: sc [24]
- R23: (11 sc, inc) x2 [26]
- R24: BLO sc [26]
- R25: (12 sc, inc) x2 [28]
- R26: sc [28]
- R27: (13 sc, inc) x2 [30]
- R28: sc [30]
- Stuff as you go; add face; sl st to finish.
- Trunk (brown):
- R1: MR 6 [6]
- R2: inc around [12]
- R3: (sc, inc) x6 [18]
- R4: BLO sc [18]
- R5–R7: sc [18]
- R8: (sc, dec) x6 [12]
- Insert stabilizer; stuff; sew to cone.
- Star:
- R1: MR, 10 sc; sl st to join.
- R2: (ch 3, sl st 2nd ch, sc next ch, sl st same st) x5; sew to tip.
SEO Tips, Description, and Tags
Because you asked for an SEO-friendly structure, consider the following for your blog or product page:
- Suggested meta description (about 155–160 characters):
- Crochet a Mini Festive Tree Christmas beginner-friendly, quick, and customizable with a star, garland, and trunk. Free step-by-step pattern and tips.
- Suggested keywords and phrases:
- mini crochet festive tree, Christmas amigurumi pattern, beginner crochet tree, crochet Christmas decor, amigurumi tree tutorial, easy holiday crochet
- Internal linking ideas:
- Additionally, link to your ornament collection, star appliqué, or beginner crochet stitch guide.
- Moreover, embed the URL https://youtu.be/9kKEqjabcWY as optional inspiration for readers who enjoy videos.
Troubleshooting Quick Q&A
Because fast answers help:
- Why is my cone curving?
- Because tension varies, rotate the piece every few rounds and, additionally, redistribute stuffing to correct lean.
- How do I hide color joins for snow trim?
- Because visibility happens at joins, start trims at the back and pull tails inside with a needle to bury them.
- Can I make this with cotton?
- Because cotton is crisp and defined, it works beautifully and shows the tier ridges nicely.
- What if I don’t have safety eyes?
- Because alternatives are easy, embroider French knots or small horizontal stitches, and add felt circles for a soft look.
Final Friendly Wrap-Up
Because handmade holidays feel extra special, this Mini Crochet Festive Tree Christmas Pattern gives you a fast, adorable win. Moreover, you can batch-make a little forest for gifts and markets, and you can enjoy experimenting with trims, colors, and sizes. Additionally, share your finished tree with friends, tag your photos on social media, and keep this pattern handy for last-minute gifting all season long. Consequently, happy crocheting, and may your days be merry, bright, and delightfully yarn-filled!