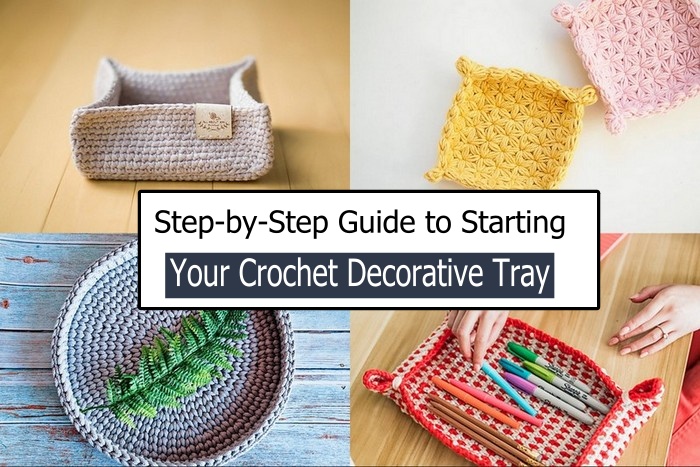
Easy Cute Free Crochet Christmas Light Cover Pattern
When December rolls around, the twinkle of Christmas lights instantly brings magic to any home. Whether they’re wrapped around the tree, draped across the fireplace, or glowing softly in the window, these tiny bulbs make everything feel cozy and festive. But if you’re a crochet lover, you already know that adding a handmade touch takes holiday décor to a whole new level.
That’s where crochet Christmas light covers come in adorable, reusable, and completely customizable!
These tiny crochet bulb covers are a creative way to decorate string lights while protecting the bulbs and adding a soft, colorful glow. Best of all, they’re super easy to make, beginner-friendly, and use only a small amount of yarn perfect for stash-busting those leftover scraps from other projects.
In this tutorial, inspired by the pattern featured in this video, you’ll learn how to crochet your own Christmas light covers step by step. We’ll cover everything from materials and stitches to creative variations and styling ideas so you can fill your home with the warm, handmade charm of the holidays.

Why You’ll Love This Crochet Project
Before we grab our hooks and yarn, here’s why this crochet light cover pattern is such a hit among crafters:
Quick and Easy: Each bulb cover can be finished in under 15 minutes once you get the hang of it.
Perfect for Beginners: Only basic stitches are required — no complex techniques!
Colorful and Fun: Mix and match colors to match your Christmas theme or décor palette.
Reusable and Eco-Friendly: Ditch disposable plastic décor — these covers last year after year.
Customizable: Add sparkle yarn, beads, or embroidery for your own festive flair.
Budget-Friendly: You can make dozens of covers from leftover yarn scraps.
Versatile: Use them for light strings, garlands, gift wrapping, or even tree ornaments.
In short, it’s the perfect project for those who love holiday crafting but don’t want anything too time-consuming or complicated.
Materials You’ll Need
You don’t need fancy tools to make these — just a few essentials from your crochet kit:
Yarn
Use lightweight or DK yarn for best results.
Acrylic or cotton both work — cotton gives structure, while acrylic adds a soft shine.
Choose festive colors like red, green, gold, silver, blue, and white, or create your own rainbow theme.
Crochet Hook
Hook Size: 3.5mm (E/4) or 4mm (G/6).
Adjust based on your yarn’s thickness. A smaller hook makes a snug fit around the bulb.
Other Supplies
Scissors
Yarn needle (for weaving in ends)
Stitch marker (optional, if working in continuous rounds)
LED string lights (mini or fairy lights work best — use low-heat LEDs for safety)
Abbreviations (US Crochet Terms)
| Abbreviation | Meaning |
|---|---|
| ch | Chain |
| sc | Single crochet |
| sl st | Slip stitch |
| inc | Increase (2 sc in same stitch) |
| dec | Decrease (sc two together) |
| st | Stitch |
| rnd | Round |
Step-by-Step Crochet Pattern Instructions
We’ll be working in rounds to form the shape of a traditional Christmas bulb. The pattern starts at the bulb tip, expands to form the main body, and ends with a neat top loop for attaching to your light string.
Step 1: Form the Tip (Bulb Bottom)
Start with a magic ring (or ch 2 and work into the first chain).
Work 6 sc into the ring. (6 sts)
Pull tight to close the ring.
Rnd 2: 2 sc in each st around. (12 sts)
Rnd 3: 1 sc in next st, 2 sc in next st — repeat around. (18 sts)
You’ll now see a small circular base — this is the start of the light bulb’s bottom.
Step 2: Shape the Bulb
Now it’s time to build the rounded shape of the bulb cover.
Rnd 4–6: sc in each stitch around. (18 sts each round)
This forms the curved body of the bulb.
You can adjust the number of rounds for taller or shorter bulbs.
Rnd 7: sc in next 2 sts, dec 1 — repeat around. (12 sts)
Rnd 8: sc in each stitch around. (12 sts)
At this point, your bulb cover should resemble a rounded capsule or teardrop shape.
Step 3: Create the Bulb Neck (Top Section)
This is the part that fits snugly over the light’s base.
Rnd 9: Switch to a gray, gold, or metallic yarn to simulate the bulb’s cap.
Work 1 sc in each stitch around. (12 sts)
Rnd 10: sc in next st, dec 1 — repeat around. (8 sts)
Rnd 11: sc in each st. (8 sts)
This narrow section forms the neck where the bulb meets the light string.
Step 4: Add the Hanging Loop
If you’re attaching the cover directly to the light string:
Option 1 (Fixed): Slip the bulb cover over the LED light and stitch the top edge closed around the wire base using a yarn needle.
If you’re making detachable covers (for ornaments or garlands):
Option 2 (Removable): Chain 12, sl st into the starting stitch to form a loop, then fasten off.
Now you have a beautiful handmade crochet light cover ready to glow!
Finishing Touches
Weave in all ends neatly.
Test fit on your LED light string. It should fit snugly but not tightly — you don’t want tension on the wire.
If it’s too loose, reduce a stitch or two in the body rounds next time.
For a glossy look, you can lightly spray fabric stiffener to help the shape hold better.
Once you’re happy with the fit, slip it onto your LED bulb and watch your crochet light cover come to life!
Creative Variations
One of the best things about this pattern is how easy it is to customize. Here are some fun ideas to make your crochet light covers unique:
1. Color Gradient Bulbs
Use ombre or variegated yarn for a fading effect perfect for rainbow or pastel themes.
2. Snowy Sparkle
Carry a strand of metallic or glitter yarn along with your main color to give your bulbs a frosty, sparkly look.
3. Mini Face Bulbs
Add tiny embroidered eyes and smiles to turn your light covers into cute characters — great for a playful kids’ room or a “Kawaii Christmas” theme.
4. Star and Heart Shapes
Modify the pattern slightly by shaping decreases differently to create stars or hearts instead of bulbs.
5. Bulb Garland
Crochet 10–20 covers in various colors, string them together, and create a festive garland for your mantle, wall, or window.
6. Frosted Glass Effect
Use lightweight white or translucent yarn for a soft, glowing “frosted bulb” look when the lights are turned on.
Safety Tips
Because we’re dealing with lights, it’s important to keep your project safe:
Use only LED lights — they stay cool and won’t melt yarn.
Avoid incandescent bulbs or any that get hot.
Don’t cover large bulbs that may generate heat.
Ensure your covers fit loosely enough to allow air circulation.
With LEDs, your crochet covers will be perfectly safe and reusable for years to come.
Size Adjustments
Want to make different sizes of light covers? Here’s how:
| Size | Yarn Weight | Hook Size | Adjustment |
|---|---|---|---|
| Mini (tiny fairy lights) | Fingering | 2.5 mm | Skip Rnd 3 (keep 12 sts total) |
| Medium (standard LED string lights) | DK | 3.5 mm | Follow main pattern |
| Large (ornament size) | Worsted | 4.5 mm | Add extra increase round before shaping |
You can even create a mixed-size string large, medium, and small bulbs for a textured, eye-catching effect on your Christmas tree or garland.
Tips for Beginners
Don’t worry if your first bulb looks uneven tension evens out with practice.
Use stitch markers to track rounds, especially if working continuously.
Experiment with color combinations red + gold, blue + silver, or green + white always look festive.
Make a test cover first and check the fit on your actual light string before mass-producing.
Keep your stitches snug but not tight; you want the fabric to stretch slightly when fitting over a bulb.
Styling & Decoration Ideas
Once you’ve made a few covers, it’s time to decorate!
1. Christmas Tree Lights
Slip these crochet covers directly over your LED light string — they diffuse the light beautifully, giving off a soft, cozy glow.
2. Garland & Mantel Décor
Weave them into a garland with pine cones, ribbons, or small ornaments.
3. Table Centerpieces
Wrap the string around a glass jar or candle holder to create a handmade glowing centerpiece.
4. Window Display
Hang the light string with covers along your window frame it looks magical from inside and outside.
5. Gift Wrapping
Attach a single crochet light bulb as a gift topper cute, personal, and reusable!
Pattern Recap
| Step | Instructions | Stitches |
|---|---|---|
| 1 | Magic ring, 6 sc | 6 |
| 2 | inc around | 12 |
| 3 | (1 sc, inc) repeat | 18 |
| 4–6 | sc around | 18 |
| 7 | (2 sc, dec) repeat | 12 |
| 8 | sc around | 12 |
| 9–11 | change color for bulb neck | 8–12 |
| 12 | add loop or attach to light | — |
Benefits of Handmade Christmas Décor
Crocheting your own light covers isn’t just fun — it’s meaningful. Here’s why:
Sustainability: You reduce waste by using leftover yarn and avoiding plastic décor.
Sentimental Value: Handmade pieces add warmth and memory to your holiday setup.
Customization: Every piece is one-of-a-kind, reflecting your creativity.
Gift Potential: These make excellent small gifts for friends and family especially paired with a strand of fairy lights!
A home decorated with handmade crochet touches always feels more heartfelt and special.
Common Mistakes and How to Fix Them
| Problem | Cause | Fix |
|---|---|---|
| Bulb cover too tight | Hook too small or tension too tight | Use larger hook or add one more increase round |
| Bulb cover too loose | Too many stitches | Decrease stitch count or use smaller hook |
| Uneven shape | Missed increase or decrease | Count stitches every round |
| Doesn’t fit over bulb | Yarn too stiff | Use softer yarn or add 1–2 extra rounds |
| Twisted loop | Chain loop too tight | Add more chains or block gently |
Remember, crochet is flexible small adjustments go a long way toward perfecting your pattern.
Final Touch Assembly and Display
Once you’ve made a full set of covers, thread them onto your LED string lights. Alternate colors for a candy-colored effect or stick to one theme (like silver and white for a winter wonderland vibe).
Plug them in, step back, and admire how your DIY crochet light covers cast a soft, diffused glow that feels both festive and cozy.
You can reuse them every year just store them flat in a dry box after the holidays.
Final Thoughts
Making your own Crochet Christmas Light Covers is a joyful way to bring creativity and warmth into your festive décor. The simplicity of the pattern, the burst of colors, and the handmade touch turn ordinary lights into something magical.
Each tiny bulb cover tells its own story a few minutes of your time, a dash of yarn, and a sprinkle of imagination. They’re not just decorations; they’re pieces of holiday love that you can bring out year after year.
So grab your yarn and hook, put on your favorite Christmas playlist, and start crocheting your way to a more handmade holiday. The glow of your lights will feel extra special because you made it yourself.