Fabulous Crochet Strawberry Cat Doll Amigurumi Plush Pattern for Beginners
Meet the crochet strawberry cat doll, an adorable strawberry cat amigurumi made for quick, cozy stitching. This beginner amigurumi pattern uses simple shapes and beginner-safe techniques to create a cute crochet doll that’s perfect for gifts, desks, or keychains.
If you have been searching for a crochet cat plush pattern that feels achievable, this is it. You’ll create a DIY crochet plushie with a tiny cat face nestled into a sweet berry body. The shaping stays simple, making it an easy amigurumi cat even for newer makers. With its bright red crochet strawberry plush look and leafy green top, this handmade cat amigurumi works beautifully as a small gift, bag charm, or playful shelf buddy.
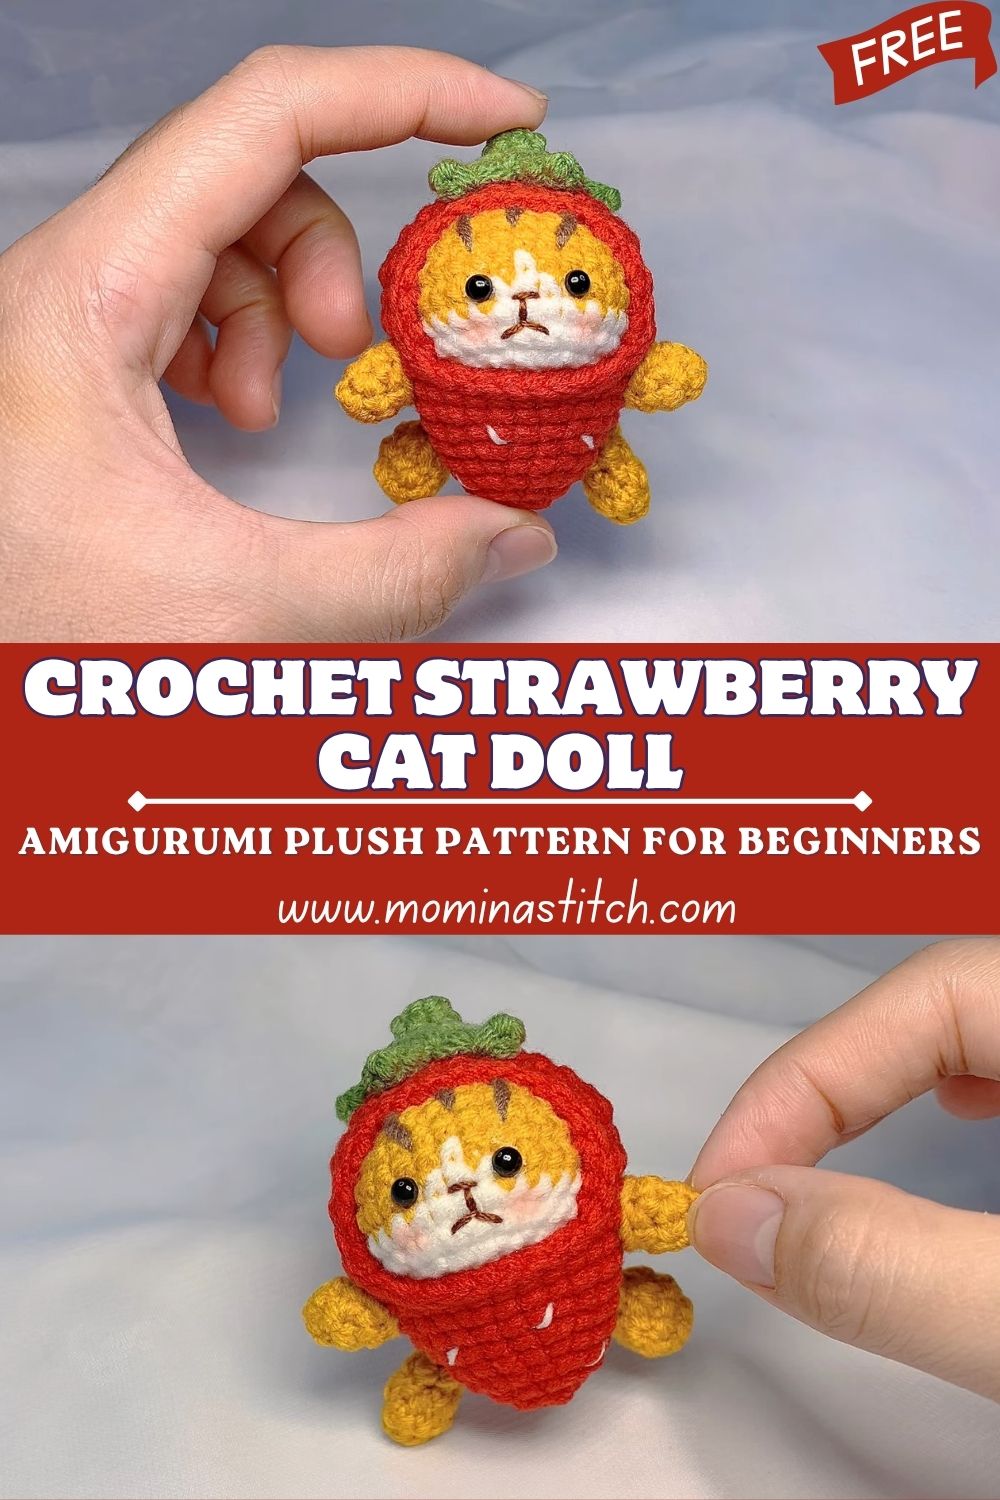
This project is a mini kawaii plush featuring a red, strawberry-shaped body, a green, leafy cap, and a soft orange-and-yellow cat head with a white muzzle. Add small limbs, shiny safety eyes, and optional blush for a sweet, beginner-friendly finish.
What This Project Is
- A tiny amigurumi plush that combines a strawberry and a cat
- Built from easy, repeatable shapes (sphere head, rounded strawberry body)
- Minimal parts and straightforward sewing
- Optional details (seeds, blush) so beginners can keep it simple
Who This Pattern Is For
This pattern is ideal if you:
- want a cute, quick weekend amigurumi
- are learning increases/decreases and basic assembly
- like tiny plushies, charms, and desk-sized decor
- want an approachable, small crochet toy pattern that still looks polished
Finished Size Estimate
- About 10–12 cm (4–5 in) tall using DK/worsted yarn
- Size changes with yarn weight and hook size
Skill Level
- Beginner / Easy
You’ll use: MR, sc, inc, dec, slip stitch, chains, and simple embroidery.
Why Beginners Will Enjoy It
- Works up fast with small pieces
- Simple stitch vocabulary (mostly single crochet)
- Clear facial placement tips help you get a cute expression
- Optional details let you customize without stress
Materials Needed
Yarn Colors Needed
- Red (strawberry body)
- Green (leaf cap/top)
- Orange or Yellow (cat head, ears, limbs)
- White/Cream (muzzle)
- Black (mouth/whiskers embroidery)
- Optional: Pink (blush)
Hook Size
- 2.5 mm to 3.5 mm (choose a smaller hook than you’d normally use for that yarn to prevent gaps)
Tools & Accessories
- Fiberfill stuffing
- 6 mm safety eyes (or 7–8 mm if using thicker yarn)
- Tapestry needle
- Stitch marker
- Scissors
- Optional: keychain ring + jump ring + strong thread
Abbreviations
- MR = magic ring
- sc = single crochet
- inc = increase (2 sc in one stitch)
- dec = decrease (use invisible decrease if possible)
- sl st = slip stitch
- ch = chain
- ( ) = repeat instructions
- [ ] = stitch count at end of round
Notes Before Starting
- Work in continuous rounds unless stated otherwise.
- Use a stitch marker to track the first stitch of each round.
- Keep tension tight to avoid holes.
- Test placement before locking safety eyes.
Simple Gauge Note
Gauge isn’t critical—just make sure your stitches are tight enough that stuffing won’t show. If you see gaps, go down a hook size.
Stuffing Guidance
Stuff gradually and evenly. Aim for “firm but squishy.” Overstuffing can distort the strawberry shape.
Safety Eyes Placement Suggestion
Place eyes between Rounds 6–7 of the head, about 5–6 stitches apart (center-to-center). Adjust slightly closer for an extra-kawaii look.
Assembly Overview
- Crochet head and insert eyes
- Make and sew muzzle + embroider face
- Add ears
- Crocheta strawberry body and stuff
- Make arms and legs
- Sew the head onto the body
- Sew limbs and leaf cap
- Add blush/seeds (optional) and shape
7) Complete Detailed Original Pattern
A) Cat Head / Face (Orange/Yellow)
R1: MR 6 sc 6
R2: inc x6 12
R3: (sc, inc) x6 18
R4: (2 sc, inc) x6 24
R5: (3 sc, inc) x6 30
R6: sc around 30
R7: sc around 30
Insert safety eyes: between R6–R7, 5–6 stitches apart.
R8: (3 sc, dec) x6 24
R9: (2 sc, dec) x6 18
R10: (sc, dec) x6 12
Stuff firmly and smoothly.
R11: dec x6 6
Fasten off, close the opening.
B) Cat Muzzle (White/Cream)
R1: MR 6 sc 6
R2: inc x6 12
R3: (sc, inc) x6 18
R4: sc around 18
Fasten off, leave a tail for sewing.
Embroider the face:
- With black yarn/thread, stitch a tiny Y mouth or a small smile.
- Optional: add a tiny pink nose stitch.
C) Ears (Make 2) (Orange/Yellow)
R1: MR 4 sc 4
R2: (sc, inc) x2 6
R3: sc around 6
R4: (2 sc, inc) x2 8
Fasten off, leave a tail. Flatten (no stuffing).
D) Arms (Make 2) (Orange/Yellow)
R1: MR 6 sc 6
R2: sc around 6
R3: sc around 6
R4: (sc, dec) x2 4
R5: sc around 4
Lightly stuff the hand end only (optional). Fasten off, leave a tail.
E) Legs (Make 2) (Orange/Yellow)
R1: MR 6 sc 6
R2: (sc, inc) x3 9
R3: sc around 9
R4: (sc, dec) x3 6
Lightly stuff the bottom (optional). Fasten off, leave a tail.
F) Strawberry Body (Red)
R1: MR 6 sc 6
R2: inc x6 12
R3: (sc, inc) x6 18
R4: (2 sc, inc) x6 24
R5: (3 sc, inc) x6 30
R6: (4 sc, inc) x6 36
R7: sc around 36
R8: sc around 36
Optional seeds (after R8 or at the end):
Surface embroider small “V” stitches using cream/yellow yarn in scattered spots.
R9: (4 sc, dec) x6 30
R10: sc around 30
R11: (3 sc, dec) x6 24
R12: (2 sc, dec) x6 18
Start stuffing. Keep it rounded with a gentle strawberry taper.
R13: (sc, dec) x6 12
Add more stuffing.
R14: dec x6 6
Fasten off and close.
G) Leaf Cap / Strawberry Top (Green)
Base circle
R1: MR 6 sc [6]
R2: inc x6 [12]
R3: (sc, inc) x6 [18]
R4: (2 sc, inc) x6 [24]
sl st to next st (do not fasten off yet).
Leaves (make 5)
Repeat this 5 times around the circle:
- ch 6
- sl st in 2nd ch from hook
- sc in next ch
- hdc in next ch
- dc in next ch
- hdc in last ch
- sl st into the same base stitch where the leaf started
Move forward about 3 stitches on the base circle with sl st (adjust spacing), then begin the next leaf.
Fasten off with a long sewing tail.
H) Optional Blush + Whiskers
- Blush: embroider 2–3 short pink stitches under each eye.
- Whiskers: 2 short black lines on each side of the muzzle.
I) Sewing & Assembly Instructions
1) Sew muzzle onto head
Center the muzzle beneath the eyes. Stitch around the edge. Optional: add a pinch of stuffing before closing the final stitches.
2) Sew ears onto the head
Place ears on the top sides of the head, slightly angled outward. Sew firmly.
3) Sew the head onto the strawberry body
Position the head on the upper front of the strawberry body (peek-out style). Sew around the head edge, keeping stitches neat and even.
4) Attach arms and legs
- Arms: sew to the sides, slightly forward for a cuddly pose.
- Legs: sewn low on the front/bottom area, evenly spaced.
5) Attach leaf cap
Center the green cap on top of the strawberry body and sew the base circle down, leaving the leaves free for dimension.
Finishing Instructions
Weave in all ends. Gently shape the plush with your hands so the strawberry looks smooth and the face sits centered.
Optional Keychain Version
Stitch a jump ring to the center of the leaf cap base using strong thread, knot securely, and weave in well. For child-safe toys, use embroidered eyes instead of safety eyes.
8) Step-by-Step Making Guide
Step 1: Gather materials
Pick your yarn colors, hook, stuffing, safety eyes, needle, marker, and scissors. This keeps the project fast and relaxing.
Step 2: Crochet the cat face/head
Work the head in continuous rounds. Add safety eyes between R and –R7 before closing the head.
Step 3: Make the muzzle and facial details
Crochet the white muzzle and sew it under the eyes. Embroider a small mouth and optional nose, then add blush if you like.
Step 4: Crochet the strawberry body
Crochet the red body, add optional seed embroidery, then stuff gradually as you decrease.
Step 5: Make arms and legs
Crochet tiny arms and legs. Light stuffing helps them keep shape, but you can also leave them unstuffed for a flatter look.
Step 6: Crochet the leaf cap
Make the green base circle, then chain and shape five leaves around it for the classic strawberry top.
Step 7: Assemble all parts
Sew the head to the upper front of the body, then attach arms, legs, and finally the leaf cap.
Step 8: Final shaping and finishing
Weave in ends, smooth the stuffing, and adjust the leaves and limbs for a cute, balanced pose.
FAQ (5)
1) Can I use plush/velvet yarn?
Yes—use a larger hook that still produces tight stitches, and consider stitch markers because plush yarn can hide stitches.
2) What if I don’t have safety eyes?
Embroider eyes with black yarn or use felt circles sewn on securely.
3) How do I keep the head from wobbling?
Stuff firmly and sew with strong, repeated stitches around the neck area.
4) Do I have to add strawberry seeds?
No, they’re optional. The shape reads as a strawberry even without them.
5) Can I make it bigger?
Use thicker yarn (chunky) and a hook smaller than usual for tight fabric.
Tips for Beginners
- Count stitches every round—amigurumi stays neat that way.
- Use invisible decreases for smoother shaping.
- Pin pieces before sewing for perfect placement.
- Add stuffing in small amounts and spread it evenly.
- Take a moment to position the muzzle—this controls the cute expression.
Common Mistakes to Avoid
- Using too large a hook (gaps show stuffing)
- Placing eyes too wide apart (face looks surprised)
- Overstuffing the strawberry (loses smooth taper)
- Rushing assembly without pinning
- Not weaving in ends securely (details can loosen)
Customization Ideas
- Change cat colors: cream, gray, calico-inspired patches (embroidered)
- Add a tiny bow on one ear
- Make a chocolate strawberry version with a brown body
- Add a mini backpack loop for hanging
- Turn it into a pair: strawberry cat + matching strawberry bunny
Conclusion (Soft Call to Action)
This tiny crochet strawberry cat doll is sweet, simple, and perfect for building amigurumi confidence. Try it in your favorite colors, add or skip the seeds, and make it your own. If you enjoyed it, save the pattern and share your finished plushie with friends!