Crochet Fox Plushie Amigurumi Easy Low Sew Pattern for Beginner-Friendly
Crochet animal plushies bring instant comfort to any craft corner. Among all the woodland cuties, fox designs stand out because they look playful, sweet, and a little bit mischievous all at once. Plus, that classic orange-and-white color combo always feels bright and cozy.
Next, this Crochet a Fox Plushie Easy Low Sew amigurumi project keeps things simple and beginner-friendly. Since the shaping is gentle and the sewing is minimal, the finished fox comes together quickly, which makes it perfect for a fun afternoon make or a last-minute handmade gift.
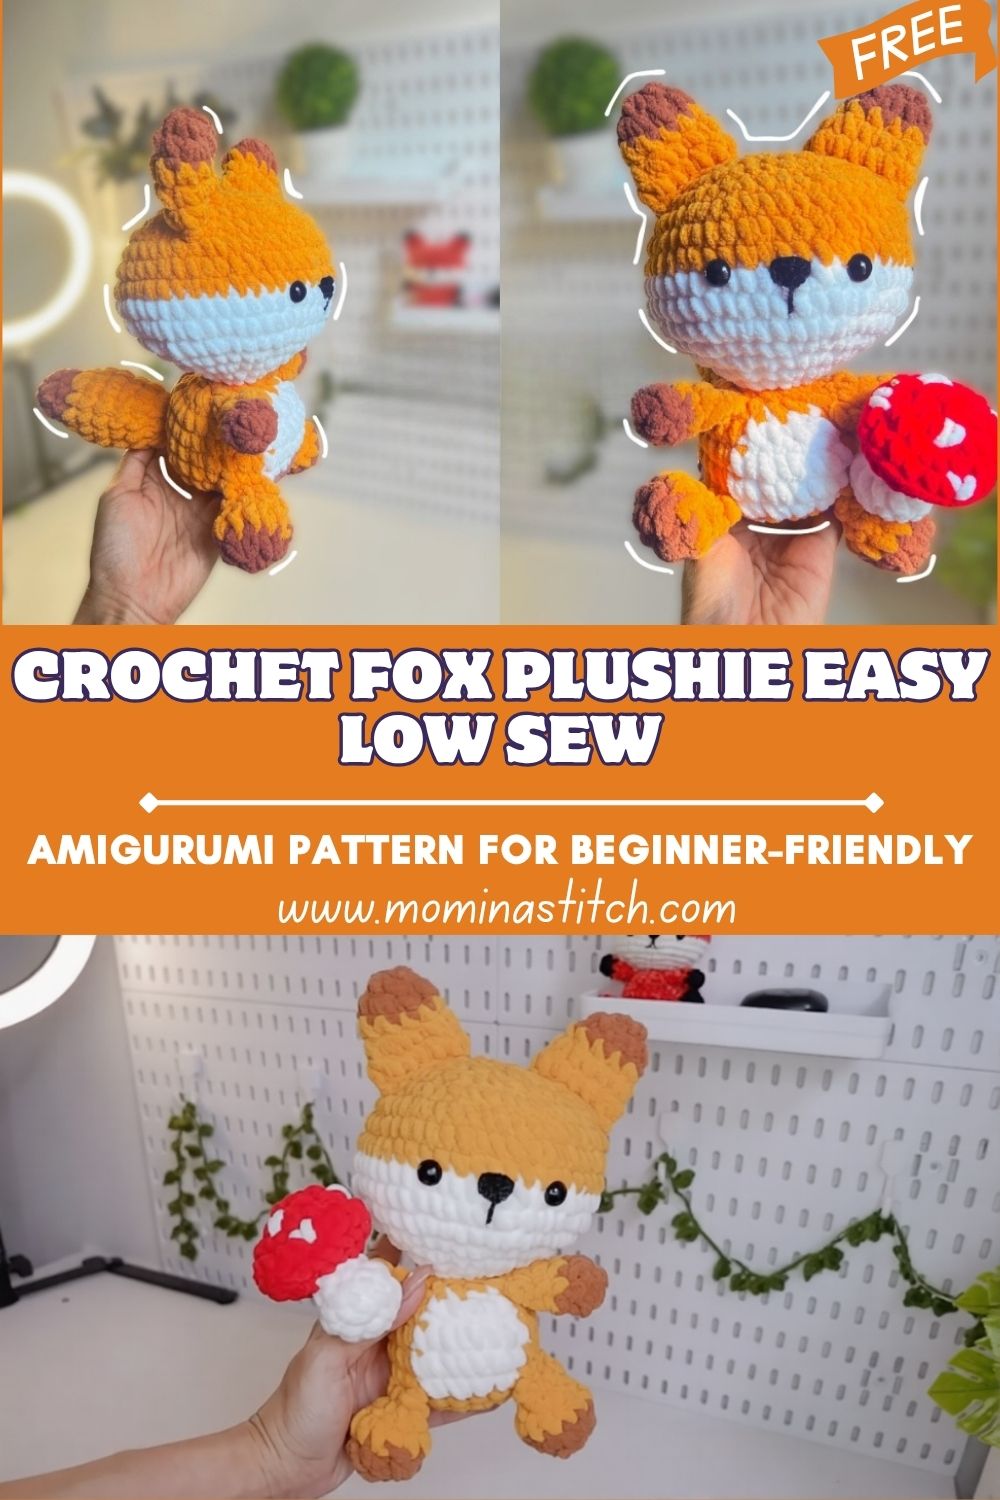
Meanwhile, fox plushies have become a favorite because their features are easy to recognize: pointy ears, a soft snout area, and that fluffy tail that instantly says “fox.” Additionally, the face can be as simple or as detailed as desired, which makes the design feel expressive even with beginner-level skills.
After that, the best part of a low-sew pattern is the smooth, stress-free assembly. Instead of attaching lots of tiny parts, this plush focuses on a single main body with only a few add-ons. As a result, it’s ideal for beginners who want to practice shaping, placing safety eyes, and stitching pieces neatly, without feeling overwhelmed.
Materials Needed
- Yarn (choose one option):
- Soft plush yarn (super bulky / size 6):
- Orange: 50–70 g
- White: 15–25 g
- Brown: 10–15 g
- Medium-weight yarn (worsted / size 4):
- Orange: 35–50 g
- White: 10–20 g
- Brown: 5–10 g
- Soft plush yarn (super bulky / size 6):
- Crochet hook: 4.0 mm–6.0 mm (smaller end for worsted, larger end for plush)
- Safety eyes: 10–14 mm (depending on desired face size)
- Stuffing: 25–40 g polyfill
- Stitch markers: 1–2 pieces
- Yarn needle: 1 blunt tapestry needle
- Scissors: 1 pair
- Optional: keychain ring, tiny bow, mini scarf, or a small decorative prop
Skill Level: Beginner to Easy
Making Time (Overview): Approximately 2–3 hours
Step-by-Step Instructions
Body (Main Shape)
- Start with the head (orange yarn):
First, crochet a round shape in continuous rounds to form a smooth head. Work increases evenly until the circle becomes a gentle dome. Next, keep the rounds even for a short section so the head stays nicely rounded instead of pointy. - Shape the body (same piece, continue downward):
After that, begin shifting from “head” to “body” by increasing spacing in a way that makes the shape slightly oval. Then continue with a few even rounds so the plush becomes taller and huggier. Meanwhile, keep the stitches snug so stuffing will not peek through later. - Stuff and close:
Next, add stuffing slowly in small pieces, pushing it into the curves first (cheeks and lower body). After that, add a little more stuffing to the center so the plush feels firm but not stiff. Finally, close the opening securely and weave in the yarn tail neatly.
Making time for body: 45–60 minutes
Additional Parts
Ears
- Crochet two triangle-shaped ears:
First, crochet two small ear pieces in orange. Next, add a touch of brown as an accent (either a stripe, a tip, or a small inner ear detail), depending on the preferred look. - Shape and attach:
After that, pinch the base of each ear slightly to create a gentle fold. Then attach them to the top of the head with a few tight stitches so they sit evenly.
Making time for ears: 15–20 minutes
Arms & Legs
- Crochet short, rounded limbs:
First, make two small arms and two small legs using simple rounds. Next, keep each limb lightly stuffed so they stay soft and squishy. - Keep them even:
Meanwhile, count rounds carefully so both sides match in length and thickness.
Making time for arms & legs: 25–35 minutes
Tail
- Create a fluffy fox tail:
First, crochet the tail in orange as a tapered tube. Next, switch to white near the end for the classic fox-tip look. - Add a gentle curve:
After that, stuff it lightly so it bends naturally instead of standing stiff. Then, shape it with fingers before stitching it on.
Making time for tail: 15–25 minutes
Accessories (Optional Mushroom or Prop)
- Make a tiny mushroom (simple version):
First, crochet a small stem in white or cream. Next, crochet a rounded cap in red or brown. Then, stitch them together quickly. - Add it as a prop:
After that, attach it to one paw with a couple of stitches or leave it loose as a photo prop.
Making time for accessory: 10–20 minutes
Face & Assembly
- Place safety eyes evenly:
First, decide the face direction—then insert safety eyes between the rounds where the head looks widest. Next, keep them symmetrical by counting stitches from the center line. After that, snap the backs on firmly before stuffing becomes too full. - Embroider the nose and mouth:
Next, use black yarn (or embroidery thread) to stitch a tiny triangle nose. Then, add a short vertical line and a simple smile. Meanwhile, keep stitches small so the face looks neat and gentle. - Attach ears, limbs, and tail securely:
After that, pin pieces in place using stitch markers or spare yarn first. Then, sew each piece with tight, hidden whip stitches. Finally, tug each attachment lightly to confirm it is secure. - Final shaping check:
Lastly, adjust stuffing by massaging the plush so the cheeks and body look smooth. If a spot looks lumpy, push the stuffing around before the last ends are woven in.
Beginner-friendly assembly tips
- First, pin everything before sewing—this prevents crooked ears and uneven legs.
- Next, sew with short, tight stitches to keep pieces from wobbling.
- After that, hide the arn ends by weaving them through the body and trimming them once the tail is buried inside.
Special Features
- Texture: soft and plush finish, especially when made with velvet or chenille-style yarn
- Expression: sweet, calm fox face that looks cute even with simple embroidery
- Design: low-sew construction, so assembly feels easy and fast
Sizing Tips
Yarn thickness and hook size dramatically affect the final plush size. For example, plush yarn with a 6.0 mm hook creates a bigger, squishier fox, often “palm-to-forearm” sized, depending on tension. On the other hand, worsted-weight yarn with a 4.0 mm hook produces a smaller,d more defined fox, which is great for desk decor or gifting.
Additionally, tighter tension creates a firmer plush with cleaner shaping. Meanwhile, looser tension makes a softer toy but can create gaps, so sizing up the yarn without loosening tension usually works best.
Finishing Tips
- First, keep stitches tight and consistent to avoid holes.
- Next, hide yarn ends by weaving through several stitches and changing direction once.
- After that, stuff gradually and shape as the fiber goes in—small amounts look smoother than big clumps.
- Finally, secure every piece with strong stitching, especially if the plush is for a child.
Common Mistakes to Avoid
- Loose stitches create gaps: use a smaller hook or increase tension, especially with worsted-weight yarn.
- Uneven stuffing: add stuffing in layers and smooth the surface often.
- Misaligned ears or facial features: pin placement first, then step back and check symmetry.
- Skipping stitch markers: mark the first stitch of each round to keep the count accurate.
Variations & Customization Ideas
- Color swaps:
- Pastel fox (peach + cream + light brown)
- White fox (white + pale gray accents)
- Fantasy fox (teal + purple tip tail)
- Size changes:
- Mini version using thinner yarn and a smaller hook
- Large version using plush yarn and a bigger hook
- Accessories:
- Tiny scarf, hoodie, flower crown, or a little bow
- Face options:
- Sleepy eyes (embroidered arcs)
- Blushing cheeks (pink yarn or felt circles)
- A curious look (slightly closer-set eyes)
Tutor Suggestions
- First, maintain consistent tension from start to finish so the shape stays even.
- Next, take extra time during assembly, because careful placement makes even simple pieces look polished.
- After that, practice basic stitches (single crochet, increase, decrease) on a small swatch if needed.
- Finally, stay patient and enjoy the process of migurumi rewards: slow, steady stitching.
Conclusion
This Crochet a Fox Plushie Easy Low-Sew amigurumi project keeps everything cozy, simple, and beginner-friendly while still producing a polished, adorable result. Next time a quick handmade gift or a relaxing weekend project is needed, this little fox plush is a perfect pick. After that, try switching colors, adding a tiny accessory, or changing the expression—because a small tweak can give the plush a whole new personality.