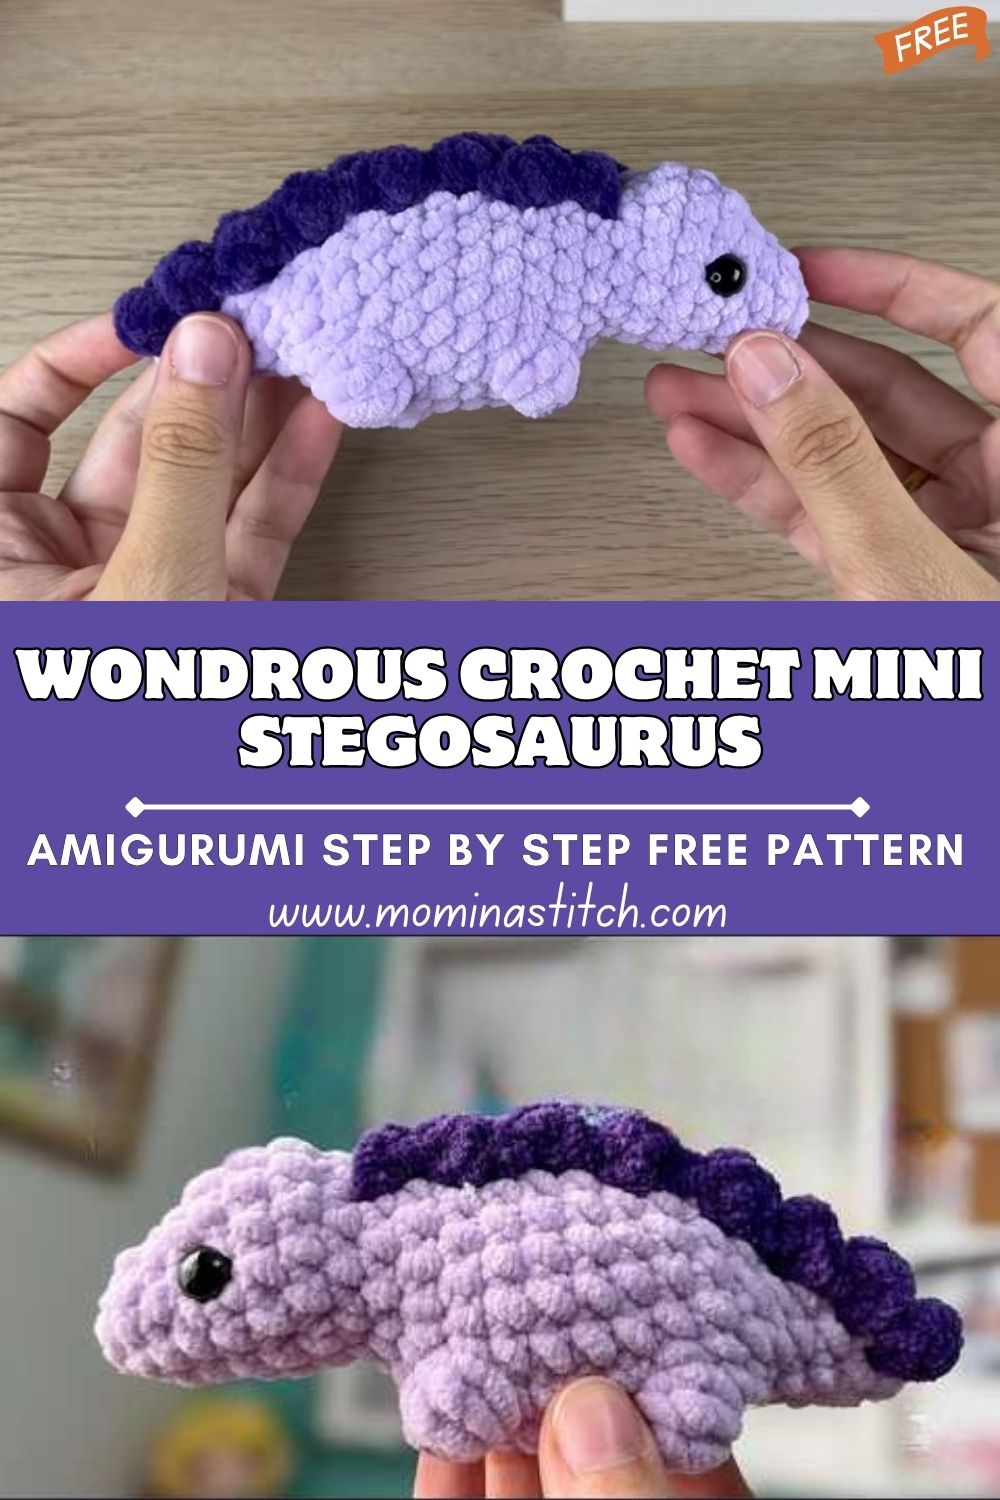
Wondrous Crochet Mini Stegosaurus Amigurumi Step by step Free Pattern
If you’ve been searching for a mini crochet stegosaurus that’s cute, compact, and totally doable, you’re in the right place. This amigurumi dinosaur pattern creates a soft, plush-looking stego with a rounded lilac body, darker purple back plates, and an irresistibly “palm-sized” design.
Whether you want a quick handmade gift, an adorable desk buddy, nursery décor, or even a tiny toy or keychain charm, this step-by-step guide will walk you through the process in a calm, beginner-friendly way that won’t feel overwhelming.
A mini crochet stegosaurus is a small crocheted dinosaur made in the amigurumi style—typically worked in continuous rounds to form a cute 3D plush. Amigurumi (a Japanese term) refers to crocheting or knitting small stuffed creatures with simple shapes, clean stitches, and expressive details like eyes, spikes, and tiny limbs.
This project is ideal for beginners and intermediate crafters because it uses core stitches (single crochet, increases, decreases) and relies on smooth Shaping rather than complicated construction. The design shines thanks to its rounded body, soft plush texture, slightly curved tail, and signature dark back plates/spikes placed neatly down the spine.
Materials Needed
- Yarn (choose one type for body + one for plates)
- Cotton (crisp stitches, great definition)
- Chenille/plush yarn (extra soft, “teddy” look)
- Acrylic (budget-friendly, widely available)
- Velvet yarn (plush finish, slightly slippery)
- Crochet hook
- Use a hook slightly smaller than the yarn label suggests for tight stitches (commonly 2.5–4.5 mm, depending on yarn)
- Safety eyes (small size for mini plush)
- OR black yarn/thread for embroidered eyes (child-safe)
- Fiberfill stuffing
- Stitch marker (or a scrap of contrasting yarn)
- Yarn needle (tapestry needle)
- Scissors
- Optional accessories
- Keychain ring + jump ring
- Blush powder/fabric blush for cheeks
- Felt dots or tiny bows
- Rattle insert (if making a baby toy—use caution and secure well)
Crochet Abbreviations (US Terms)
- MR = Magic Ring
- sc = Single Crochet
- inc = Increase (2 sc in the same stitch)
- dec = Decrease (single crochet 2 together; prefer invisible decrease)
- sl st = Slip Stitch
- ch = Chain
- FO = Fasten Off
Finished Look Description
Your finished stegosaurus will be small, rounded, and plush, with a soft lilac/purple body that fits comfortably in your palm. The shape is compact—often with short, body-integrated legs or a gently flattened base that allows it to sit. A slightly curved tail adds character, and the darker purple back plates/spikes stand upright along the spine for that classic stego silhouette. Overall, it looks chunky, cuddly, and collectible—perfect for gifting or making a whole dinosaur set.
Step-by-Step Crochet Pattern (Structured Guide)
Note: This is written in a realistic “tutorial-pattern” style so you can follow along confidently. If you want a smaller or larger mini crochet stegosaurus, repeat rounds as needed to reach the desired size, keeping the shape symmetrical.
A) Head + Snout Shaping
- Start with MR and crochet in a round to form a small circle.
- Increase evenly over the next rounds until the head looks round and slightly wider than the snout area.
- To create the snout:
- Work a short section with fewer increases (or even plain sc rounds) so the front stays gently rounded rather than wide.
- Add a small amount of stuffing once the head holds its shape.
- If you prefer a cuter face, aim for a “chubby” look by keeping the head more spherical than oval.
B) Eye Placement (Do This Before Closing the Head Fully)
- Place safety eyes or embroider eyes after the head is mostly formed, but before the opening becomes too small.
- Position eyes symmetrically on the front/upper front of the head for a sweet expression.
- If using safety eyes, always check the side angle before locking the backs.
C) Body Construction (Rounded, Palm-Sized)
- Continue from the head into the body (or sew the head to the body if working with separate pieces).
- Make the body rounded by:
- Increasing gradually to create a “belly” width
- Then working even rounds to build height
- Shape evenly while stuffing—add stuffing little by little so the plush stays smooth, not lumpy.
D) Belly Shaping (Keeping the Plush Stable)
- To make it sit nicely:
- Slightly reduce the stuffing near the bottom edge or
- Add a touch more stuffing to the upper body so the base is a bit flatter.
- If you want a “sitting pebble” look, keep the underside subtly flatter while maintaining a round overall silhouette.
E) Tail Tapering (Small + Slightly Curved)
- Attach yarn at the back of the body (or continue crocheting a tail section).
- Crochet a short tube, then decrease gradually to taper.
- For a gentle curve:
- Add one extra sc on one side for a round or two (a simple shaping trick), or
- Slightly angle the tail when sewing it on.
F) Legs or Base Shaping (Body-Integrated Option)
For a super-mini stego, many makers skip separate legs and instead:
- Create simple bumps with small stitched protrusions, or
- Shape the lower body so it looks like tiny legs are tucked in.
If you prefer small legs:
- Crochet 4 tiny cylinders/bumps, lightly stuff them, then sew them evenly spaced under the body.
G) Back Plates/Spikes (Dark Purple)
- Crochet several small plates in darker purple:
- Start small, increase a little to form a triangle/teardrop shape.
- Make multiple sizes (optional):
- Slightly larger in the middle, smaller near the head/tail for a classic stego look.
- Attach plates evenly along the back:
- Pin first to check spacing.
- Sew securely so they stand upright.
H) Stuffing Stage (Final Adjustments)
- Add stuffing until the body is firm but still squishy.
- Avoid overstuffing—it can stretch stitches and show fiberfill.
- Use the back of your hook or a stuffing tool to fill corners smoothly.
I) Final Closing + Shaping
- Decrease to close the opening.
- FO, weave in the end, and gently shape the plush with your hands.
- Optionally add blush cheeks, an embroidered smile, or tiny nostrils.
Detailed Pattern Notes (Technical Tips)
- Tension matters: tighter stitches prevent holes and keep stuffing hidden.
- Use invisible decreases for a smoother finish on plush shapes.
- Always use a stitch marker at the start of each round—mini projects get confusing fast.
- Stuff gradually: add small amounts and smooth as you go.
- Color transitions: if changing colors (body to plates), keep joins neat by sewing plates on instead of crocheting colorwork in the round.
- Eye placement timing: insert/embroider eyes before the head closes too much.
- Keep symmetry: count stitches, and place plates and eyes with pins first.
Beginner Tips
- Master the magic ring: practice pulling it tight so the center hole fully closes. If it keeps slipping, use a “do” ble magic ring” t” chnique.
- Don’t forget your count: check your stitch total at the end of each round (especially after increases/decreases).
- Stuff at the right time: it’s best when the opening is medium-sized—too early distorts stitches, too late is frustrating.
- Plush/chenille yarn tip: Use good lighting, feel for stitches with your fingers, and consider a stitch marker every few stitches.
- Child safety: Embroidered eyes are safest for babies and toddlers; safety eyes can be a choking hazard if not used properly.
Customization Ideas
- Pastel palette: lilac body + mint plates, or pink body + plum plates
- Realistic dino: green body with olive plates, beige belly
- Rainbow stegosaurus: different plate colors down the back
- Keychain mini version: use thinner yarn, smaller hook, and add a keychain ring at the top
- Larger plush: use chenille yarn and a bigger hook; repeat body rounds to scale up
- Decorative add-ons: tiny bow, embroidered name, party hat, heart on the belly
Common Mistakes to Avoid
- Uneven stuffing: causes lumps—stuff in small amounts and smooth often.
- Loose stitches: lead to visible holes; size down your hook if needed.
- Misplaced eyes: can make the face look off; pin/mark placement first.
- Crooked spikes/plates: sew with pins, attaching from the center outward for balance.
- Flat or twisted tail: taper gradually and lightly stuff; avoid overstuffing the tip.
- Misshapen body: too much stuffing at the bottom can force a weird “eg”” s” ape—balance stuffing front-to-back.
Who Is This Pattern For?
This mini crochet stegosaurus tutorial is great for:
- Beginners learning amigurumi shaping and assembly
- Amigurumi lovers who enjoy quick, cute makes
- Handmade gift creators (birthdays, baby showers, stocking stuffers)
- Small business sellers looking for palm-sized plush items (always follow the tutorial creator’s age terms)
- Crochet content creators who want a trendy dinosaur project for reels/tutorial photos
Care Instructions
- Handwashing is recommended with cool water and mild soap.
- Air dry only (lay flat).
- Reshape while damp—gently pinch the body round and straighten the plates.
- Plush yarn can snag: handle gently and avoid rough brushing.
- If made for young children: use embroidered eyes, secure all parts tightly, and inspect regularly.
Conclusion
A mini crochet stegosaurus is one of those amigurumi projects that looks impressively cute without requiring advanced skills. With a rounded plush body, neat little tail, and iconic darker back plates, it’s cheerful, making you feel you can finish, customize, and gift with pride.
Try it in lilac and purple for that soft, dreamy look—or experiment with greens, rainbows, or a tiny keychain version. Once you make one, it’s not to make a whole herd.