Crochet Kawaii Hamster Style Pig Amigurumi Tutorial Beginner
If you’ve been searching for a crochet amigurumi hamster pig that’s extra chubby, extra cute, and totally gift-worthy, this pattern is for you. This kawaii plush combines a hamster-like shape with sweet pig features, plus a tiny cheese accessory it can “hold” in front.
These cute crochet animal projects are trending because they’re quick to make, endlessly customizable, and perfect for handmade gifts. Let’s stitch up a soft, rounded amigurumi plush that looks adorable from the front view and feels cosy in your hands.
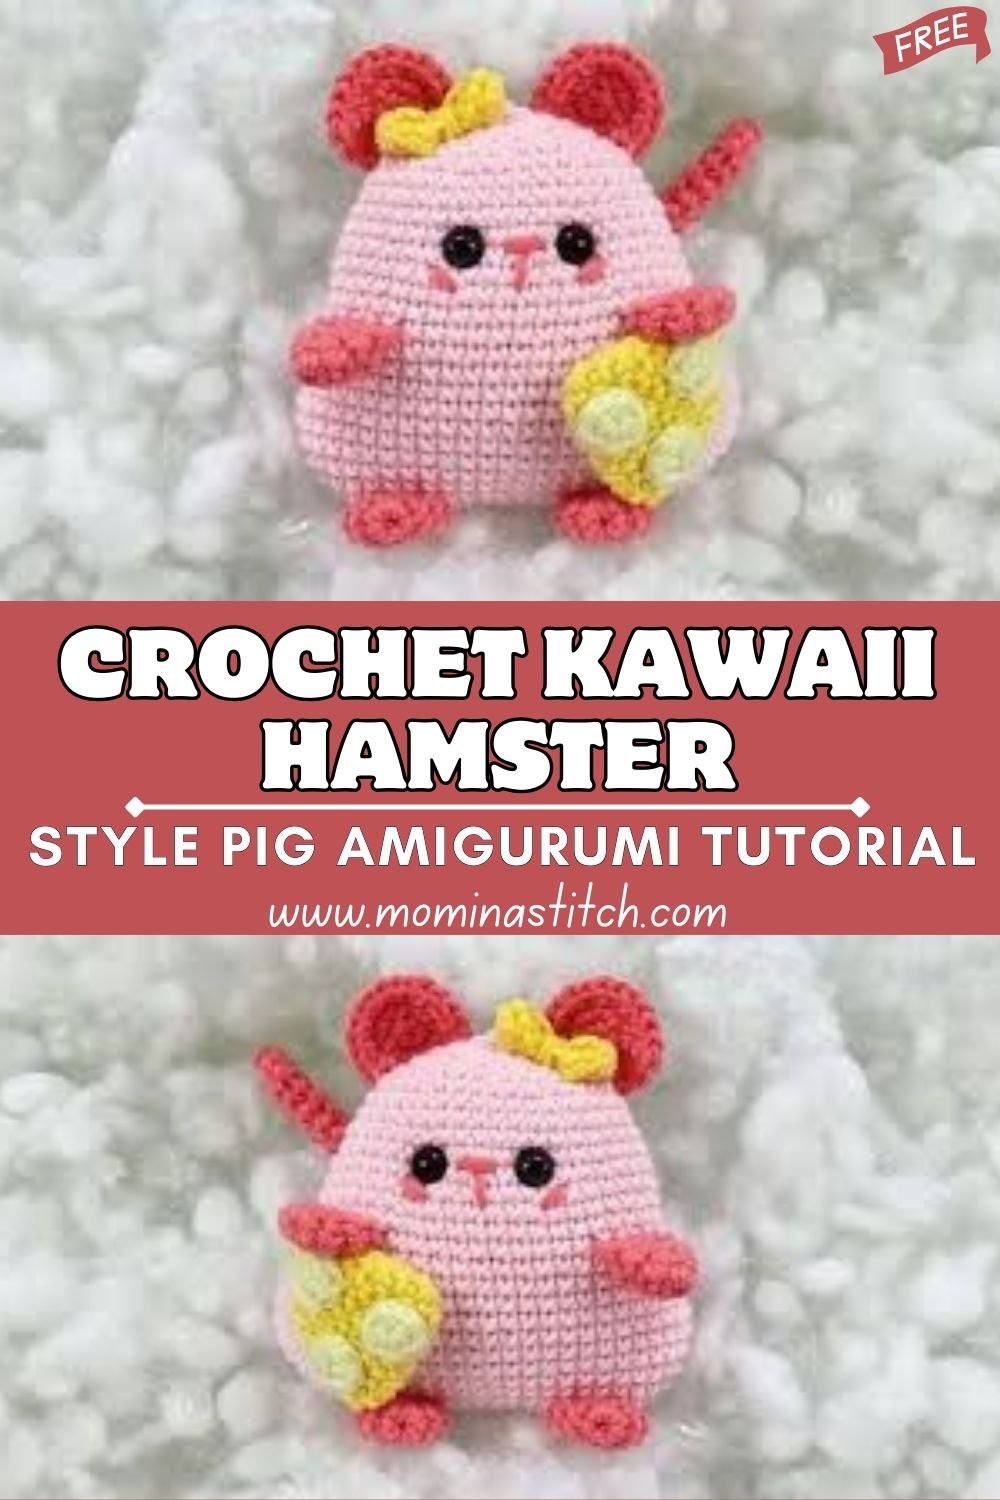
Cute animal plushies are popular because they’re comforting, collectable, and fun to display—think desk buddies, shelf decor, and nursery friends. A pig/hamster hybrid design is especially unique: you get the round “hamster” silhouette (tiny limbs, chubby belly) with piggy details like a soft pink snout and little ears. This plush also works beautifully as a handmade gift, baby shower present, nursery decor, or even a standout item from a handmade shop, especially with that playful cheese detail.
Materials Needed
- Yarn:
- Pink (main body)
- Light pink (snout optional if you want contrast)
- Yellow (cheese)
- Small amounts of black/white (optional embroidery details)
- Crochet hook: 2.75 mm–3.5 mm (choose smaller than yarn label for tight fabric)
- Safety eyes: 6–8 mm (or embroider if for children under 3)
- Stuffing: fiberfill
- Yarn needle (tapestry needle)
- Stitch marker
- Scissors
Amigurumi typically uses tight stitches and stuffing to create structured plush shapes.
Crochet Abbreviations
- MR = Magic Ring
- sc = single crochet
- inc = increase (2 sc in the same stitch)
- dec = decrease (single crochet 2 together; invisible decrease recommended)
- sl st = slip stitch
- ch = chain
- hdc = half double crochet
- dc = double crochet
- BLO = back loop only
- FLO = front loop only
- rep = repeat
- st = stitch
- rnd = round
Skill Level
Skill level: Beginner to easy-intermediate.
You’ll mainly use single crochet in continuous rounds with basic increases and decreases. The “intermediate” bit is light: sewing on small parts neatly and evenly placing facial features.
Important Notes Before Starting
- Work in continuous spiral rounds (do not join unless told).
- Use a stitch marker to track the first stitch of each round.
- Keep stitches tight to prevent stuffing from showing.
- Stuff gradually as you go, don’t wait until the end.
- Count stitches and keep placements symmetrical for a clean kawaii look.
Amigurumi pieces are usually worked in spiral rounds for a seamless look.
Complete Step-by-Step Crochet Pattern
Finished size: about 10–14 cm (4–5.5 in) depending on yarn/hook.
Notes: Use invisible decreases for smoother shaping.
Basic amigurumi shaping is achieved using single crochet, increases, and decreases.
A) Head/Body (combined)
In pink.
Rnd 1: MR, 6 sc (6)
Rnd 2: inc x6 (12)
Rnd 3: (sc, inc) rep x6 (18)
Rnd 4: (2 sc, inc) rep x6 (24)
Rnd 5: (3 sc, inc) rep x6 (30)
Rnd 6: (4 sc, inc) rep x6 (36)
Rnd 7: (5 sc, inc) rep x6 (42)
Rnd 8–12: sc around (42) — creates a rounded “head” cap
Rnd 13: (5 sc, dec) rep x6 (36)
Rnd 14: (4 sc, dec) rep x6 (30)
Rnd 15: (3 sc, dec) rep x6 (24) — gentle neck taper
Now build the chubby body/belly:
Rnd 16: (3 sc, inc) rep x6 (30)
Rnd 17: (4 sc, inc) rep x6 (36)
Rnd 18: (5 sc, inc) rep x6 (42)
Rnd 19–23: sc around (42) — big round belly section
Rnd 24: (5 sc, dec) rep x6 (36)
Rnd 25: (4 sc, dec) rep x6 (30)
Rnd 26: (3 sc, dec) rep x6 (24)
Rnd 27: (2 sc, dec) rep x6 (18)
Rnd 28: (sc, dec) rep x6 (12)
Stuff firmly and shape into a smooth, round ball.
Rnd 29: dec x6 (6)
Fasten off, close the hole, and weave in the end.
B) Snout
In light pink (or the same pink).
Rnd 1: MR, 6 sc (6)
Rnd 2: inc x6 (12)
Rnd 3: (sc, inc) rep x6 (18)
Rnd 4: sc around (18)
Fasten off, leaving a long tail for sewing. Lightly stuff or leave flat (flat gives a simple look).
Optional nostrils: embroider two small vertical stitches with darker pink yarn.
C) Ears (make 2)
In pink.
Rnd 1: MR, 6 sc (6)
Rnd 2: (sc, inc) rep x3 (9)
Rnd 3: sc around (9)
Fasten off,ff leaving a tail. Do not stuff. Pinch slightly flat for a t,iny rounded ear.
D) Arms (make 2)
In pink.
Rnd 1: MR, 6 sc (6)
Rnd 2: sc around (6)
Rnd 3: sc around (6)
Rnd 4: (sc, dec) rep x2 (4)
Rnd 5–6: sc around (4)
Fasten, off leaving a tail. Lightly smooth the “hand only, or leave unstuffed for extra softness.
E) Legs (make 2)
In pink.
Rnd 1: MR, 6 sc (6)
Rnd 2: (sc, inc) rep x3 (9)
Rnd 3: sc around (9)
Rnd 4: (sc, dec) rep x3 (6)
Rnd 5: sc around (6)
Fasten off, leaving a tail. Stuff lightly.
F) Cheese Accessory (wedge)
In yellow.
Rnd 1: MR, 6 sc (6)
Rnd 2: (sc, inc) rep x3 (9)
Rnd 3: (2 sc, inc) rep x3 (12)
Rnd 4: sc around (12)
Rnd 5: (3 sc, inc) rep x3 (15)
Rnd 6: sc around (15)
Fastening of, leaving a long tail for sewing.
Cheese holes (optional):
With a yarn needle and a slightly darker yellow, make 2–4 tiny embroidered circles or “dots” on one side.
Assembly Instructions
- Safety eyes:
- Insert eyes between Rnd 9 and Rnd 10 of the head area, about 6–7 stitches apart.
- Adjust the spacing until the expression looks cute and centred in the front view.
- Sew the snout:
- Centre the snout between and slightly below the eyes (roughly Rnd 11–14 area).
- Stitch around neatly; add a pinch of stuffing if you want it more 3D.
- Attach ears:
- Sew ears on the upper sides of the head (around Rnd 6–8), symmetrical left and right.
- Attach arms:
- Sew arms to the front sides of the body, slightly below the snout area (around Rnd 18–20).
- Angle inward so they look like they’re holding something.
- Attach legs:
- Sew legs low on the body front (around Rnd 24–26).
- Keep them even so the plush sits nicely.
- Position and sew cheese:
- Place the cheese wedge centred on the belly, between the arms.
- Sew it on securely (or stitch it lightly if you want it to “dangle” a bit).
Finishing Touches
- Embroider details:
- Add tiny nostrils on the snout.
- Optional: a small mouth line under the snout with black or dark pink yarn.
- Shaping tips:
- Roll and squish the plush gently to distribute stuffing evenly.
- Add a bit more stuffing through any small gaps before fully closing seams.
- Smoothing:
- Use the blunt end of your hook or a chopstick to push stuffing into curves (cheeks/belly).
- Final adjustments:
- Recheck symmetry: ears level, eyes even, snout centred.
Customization Ideas
- Different colours: pastel peach, white, or a “chocolate” hamster-pig.
- Swap the accessory: a strawberry, tiny heart, cookie, dumpling, or carrot.
- Resize: use thicker yarn and a larger hook for a larger plush, or thin yarn for a mini size.
- Keychain version: make with sport/fingering yarn, reduce rounds slightly, and add a keyring loop on top.
Common Mistakes to Avoid
- Loose stitches: stuffing will show. Use a smaller hook and tighter tension.
- Uneven stuffing: creates lumps; stuff gradually and distribute often.
- Incorrect proportions: skipping stitch counts can make the plush too long or pointy; count every round.
- Misplaced features: pin eyes/snout/ears first and step back to check the face before sewing.
Care Instructions
- Spot clean with a damp cloth and mild soap for best results.
- If fully washable yarn is used, hand wash gently in cool water; squeeze (don’t wring).
- Air-dry completely, reshape while damp.
- If using safety eyes, avoid rough machine washing; for baby toys, consider embroidered eyes instead.
Conclusion
This hamster-style pig amigurumi with a tiny cheese wedge is the kind of cute crochet project that’s hard to make just on. After you finish, you’ll want a whole little collection. If you try the pattern, experiment with colours and accessories and make it truly your own. Happy crocheting, and enjoy your new chubby kawaii plush buddy!