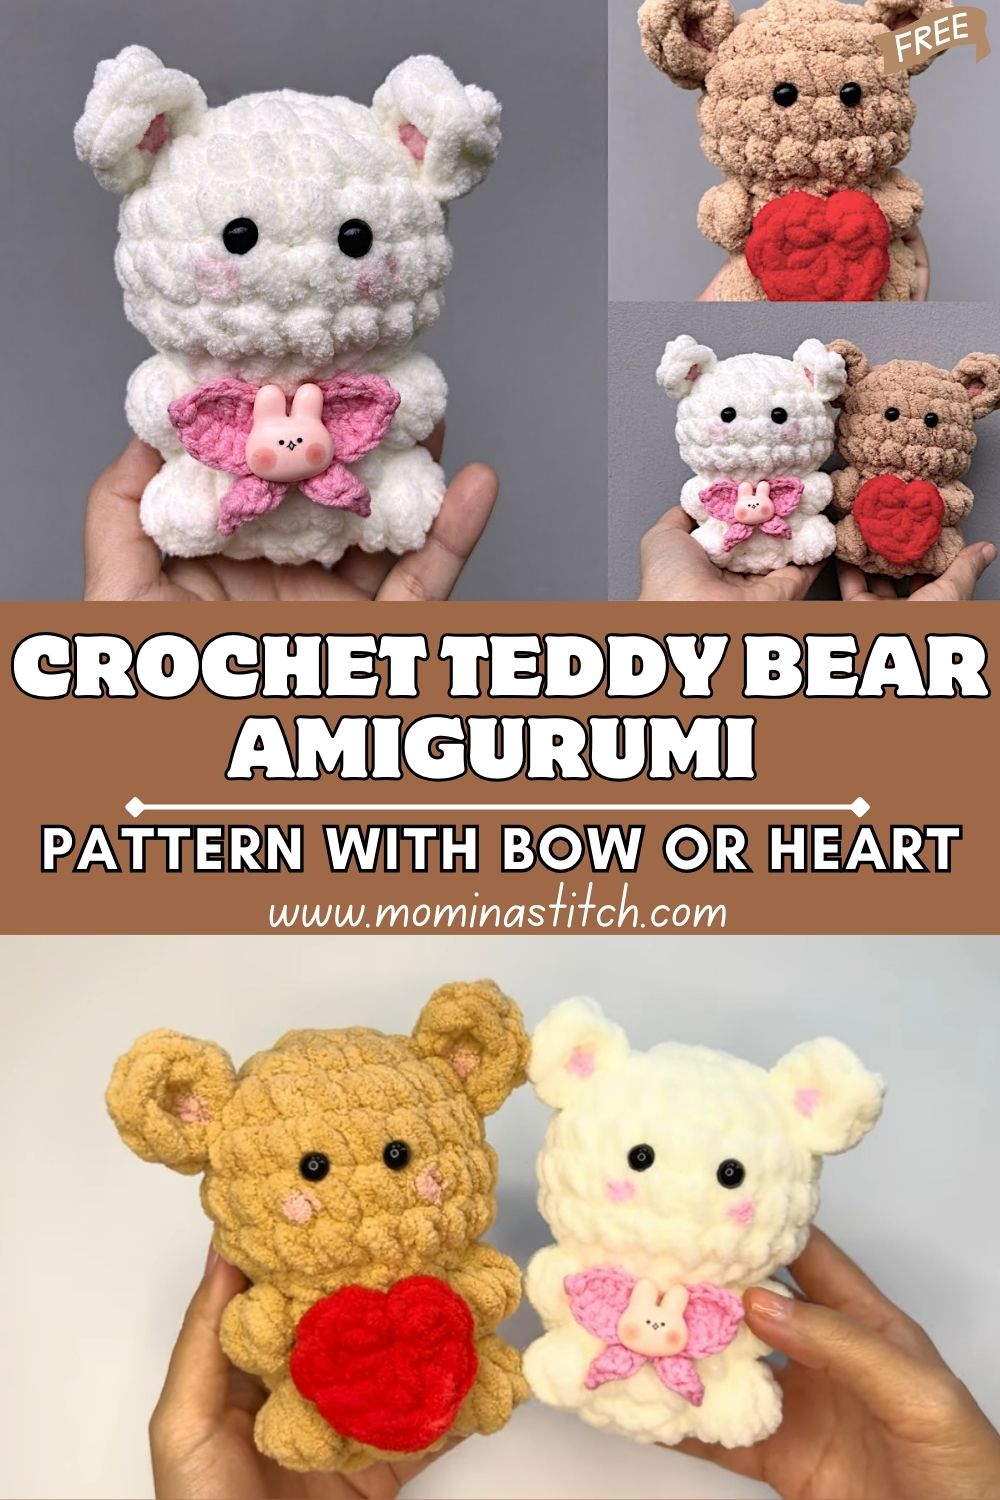
Easy Plush Crochet Teddy Bear Amigurumi Pattern With Bow Or Heart
This amigurumi teddy bear plush toy is the perfect crochet project, made with fluffy chenille yarn for a cute, squishy result. With two variations, a white teddy with a pink bow or a brown teddy holding a heart, it’s a popular kawaii handmade gift and cosy decor piece.
Crochet a fluffy chenille amigurumi teddy bear plush, chubby, kawaii, and super squishy. Choose white with a pink bow and bunny charm, or brown holding a red heart. Perfect gift.
If you love soft, huggable makes, an amigurumi teddy bear plush is a timeless go-to: teddy bears feel comforting, nostalgic, and universally loved, perfect for babies (with embroidered features), kids, teens, and adults who adore cute decor.
This pattern includes two adorable looks:
- Soft white teddy with a pink bow and an optional bunny charm for extra sweetness.
- Light brown teddy holding a red heart—perfect for Valentine’s Day, anniversaries, or a “just because” gift.
Finished Toy Description
This teddy bear amigurumi is built from simple, rounded pieces (because amigurumi toys are typically made from simple,e rounded shapes like spheres and ovals), giving it that classic kawaii plush silhouette.
- Head: A round, chubby teddy head with smooth curves and a soft, squishy feel.
- Ears: Sma, rounded, set slightly to the sides; each ear has inner-ear detail in a coordinating colour for extra cuteness.
- Eyes: Black safety eyes sit between the mid and lower part of the head, giving that sweet “baby teddy” expression.
- Body: A compact oval body with a gentle belly curve, short and cuddly rather than tall.
- Arms & legs: Short little limbs that sit close to the body, enhancing the plush, chubby vibe.
- Texture: The chenille yarn gives an irresistibly fluffy, velvety finish that looks extra soft from the front view.
- Accessories:
Materials Needed
- Plush/chenille yarn:
- Teddy: white and/or beige/light brown
- Accessories: pink (bow), red (heart)
- Inner ear detail: small amounts of pink (for white teddy) and cream/tan (for brown teddy), optional
- Crochet hook: Use a smaller hook for tight stitches (typically 3.5–4.5 mm, depending on yarn thickness)
- Safety eyes: 8–12 mm (adjust based on head size)
- Stuffing: Polyester fiberfill
- Yarn needle (tapestry needle)
- Stitch marker
- Scissors
Amigurumi usually uses tight stitches and stuffing to hold its shape.
Crochet Abbreviations
- MR = Magic Ring
- sc = Single crochet
- inc = Increase (2 sc in same stitch)
- Decrease (invisibly recommended)
- sl st = Slip stitch
- ch = Chain
- hdc = Half double crochet
- dc = Double crochet
- BLO = Back loop only
- FLO = Front loop only
- rep = Repeat
- st = Stitch
- rnd = Round
Important Notes Before Starting
- Work in continuous rounds (spiral) unless stated otherwise.
- Always use a stitch marker to mark the first stitch of each round.
- Keep even tension—especially with chenille, which can hide uneven stitches.
- Stuff gradually as you go for a smooth shape (don’t overstuff).
- Make sure matching parts (ears/arms/legs) are symmetrical and have equal stitch counts.
Most amigurumi patterns are worked in spiral rounds for a seamless look.
Complete Step-by-Step Crochet Pattern (Two Variations)
Finished size (approx.): 6–9 in / 15–23 cm tall, depending on yarn and hook.
Notes:
- Use tight sc stitches.
- Use invisible decreases for a cleaner plush look.
- For safety: if gifting to a child under 3, replace safety eyes with embroidered eyes.
A) Head (Make 1)
R1: MR, 6 sc (6)
R2: inc x6 (12)
R3: (sc, inc) rep x6 (18)
R4: (2 sc, inc) rep x6 (24)
R5: (3 sc, inc) rep x6 (30)
R6: (4 sc, inc) rep x6 (36)
R7: (5 sc, inc) rep x6 (42)
R8: (6 sc, inc) rep x6 (48)
R9–R12: sc around (48) for 4 rounds
R13: (6 sc, dec) rep x6 (42)
R14: (5 sc, dec) rep x6 (36)
R15: (4 sc, dec) rep x6 (30)
Add eyes: Place safety eyes between R10 and R11, about 7–8 sts apart (adjust for your preferred expression).
R16: (3 sc, dec) rep x6 (24)
Begin stuffing firmly but softly.
R17: (2 sc, dec) rep x6 (18)
R18: (sc, dec) rep x6 (12)
R19: dec x6 (6)
Fasten off, close the hole, and weave in the end.
B) Snout / Muzzle (Optional but Recommended) (Make 1)
Use the main teddy colour or a slightly lighter shade for definition.
R1: MR, 6 sc (6)
R2: inc x6 (12)
R3: (sc, inc) rep x6 (18)
R4: sc around (18)
Fasten off, leaving a long sewing tail. Lightly stuff.
Optional nose: Embroider a tiny oval/triangle nose with black or brown yarn on the snout centre.
C) Body (Make 1)
R1: MR, 6 sc (6)
R2: inc x6 (12)
R3: (sc, inc) rep x6 (18)
R4: (2 sc, inc) rep x6 (24)
R5: (3 sc, inc) rep x6 (30)
R6: (4 sc, inc) rep x6 (36)
R7–R10: sc around (36) for 4 rounds
R11: (4 sc, dec) rep x6 (30)
R12: sc around (30)
R13: (3 sc, dec) rep x6 (24)
Stuff body gradually (rounded bottom, chubby belly).
R14: (2 sc, dec) rep x6 (18)
R15: (sc, dec) rep x6 (12)
Fasten off, leaving a long tail for sewing to the head. Close opening lightly (or leave slightly open to seam).
D) Ears (Make 2 Outer + 2 Inner Details)
Outer Ear (Make 2 in teddy colour)
R1: MR, 6 sc (6)
R2: (sc, inc) rep x3 (9)
R3: sc around (9)
R4: (2 sc, inc) rep x3 (12)
R5: sc around (12)
Fasten off,f leaving a tail. Do not stuff; pinch slightly flat.
Inner Ear (Make 2 in innecolouror)
R1: MR, 5 sc (5)
R2: inc x5 (10)
Fasten, leaving a sewing tail.
Attach the inner to the ear, and sew around the outercentre, then sew the inner and outer ear.
E) Arms (Make 2)
R1: MR, 6 sc (6)
R2: (sc, inc) rep x3 (9)
R3–R6: sc around (9) for 4 rounds
R7: (sc, dec) rep x3 (6)
Lightly stuff the bottom half only.
R8–R10: sc around (6) for 3 rounds
Fasten off, leaving a long tail. Flatten the top; sew closed.
F) Legs (Make 2)
R1: MR, 6 sc (6)
R2: inc x6 (12)
R3: (sc, inc) rep x6 (18)
R4: sc around (18)
R5: (4 sc, dec) rep x3 (15)
R6: sc around (15)
Stuff firmly (little plush feet!).
R7: (3 sc, dec) rep x3 (12)
R8–R9: sc around (12) for 2 rounds
Fasten off,f leaving a long tail. Flatten the top and set it closed.
G) Bow (White Teddy Version) (Make 1 in Pink)
Centre knot:
Ch 6
Row 1: sc in 2nd ch from hook and across (5)
Fasten off; wrap around the bow centre later.
Bow sides (make 1 rectangle):
Ch 16
Row 1: hdc in 2nd ch from hook and across (15)
Row 2–4: ch 1, turn, hdc across (15)
Fasten off, leaving a tail.
Shape bow: Fold the rectangle ends toward the centre and sew. Wrap the small “knot” piece around the middle, and sew it in place.
Optional bunny charm: Attach a small store-bought charm to the bow with thread/yarn OR crochet a tiny mini-bunny head (see quick option below).
Tiny Bunny Head (Optional, super simple)
R1: MR, 6 sc (6)
R2: inc x6 (12)
R3: sc around (12)
Fasten off, lightly stuff.
Ears (make 2): ch 5, sl st in 2nd ch, sc, hdc, dc; fasten off.
Sew ears to the bunny head; attach the bunny to the bow.
H) Heart Accessory (Brown Teddy Version) (Make 1 in Red)
R1: MR, ch 2, 3 dc into MR, 3 hdc into MR, ch 2, 3 dc into MR, ch 2, sl st into MR.
Pull the MR tight to form the heart top.
Now, crochet the bottom point:
Rnd 2: ch 1, sc around the heart shape evenly (aim for ~18–22 sc depending on your tension), placing (sc, ch 1, sc) at the bottom point to sharpen it.
Sl st to join; fasten off,, leaving a a long tail for sewing.
Tip: If you prefer exact counts, you can build a heart from 2 small circles sewn together. The above version is the quickest and looks great in plush yarn.
Skill Level
Skill Level: Beginner to Easy-Intermediate
You’ll mostly use single crochet in continuous rounds with basic shaping (increases and decreases). Chenille yarn can make stitch definition slightly harder to see, so this is “beginner-friendly” if you go slowly and use a stitch marker.
Assembly Instructions
- Attach snout (optional): Sewsnout centred on the lower half of the head, beneath the eyes. Lightly stuff as you sew for a rounded muzzle.
- Secure eyes: If using safety eyes, lock washers firmly before closing the head (or ensure they’re already secured).
- Sew ears: Place the ears on the head around the R6–R8 area, slightly to the sides (not too top-centred). Sew firmly.
- Join head and body: Align headcentred onn body. Sew around with small, tight stitches. Add a bit more stuffing at the neck if needed before fully closing.
- Attach legs: Sew legs to the lower sides/front of the body so the teddy can sit. Make sure both are even.
- Attach arms: Sew arms slightly below the neck seam, evenly spaced.
- Add accessories:
- White teddy: Sew a bow at the neck; attach a bunny charm to the bow centre.
- Brown teddy: Sew or lightly tack the heart onto the front, positioned as if held by the arms (you can also stitch the arms over the heart edges).
Finishing Touches
- Shape your plush: Gently roll the head and body between your hands to distribute stuffing smoothly.
- Embroidery details (optional): Add a tiny smile under the snout, or stitch a small nose if you didn’t earlier.
- Blush effect: Use a small amount of blush powder or pink fabric pastels on cheeks (test lightly; avoid over-applying on chenille).
- Final check: Ensure seams are tight, accessories secure, and limbs symmetrical.
Customization Ideas
- Colour swaps: Try grey caramel, pastel blue, or lavender for a modern, kawaii teddy.
- Outfits: Add a mini scarf, diaper cover, sweater, or tiny hat.
- Resizing: Use thicker yarn and a larger hook for a bigger plush; thinner yarn for a mini keychain bear (embroidered eyes recommended).
- Seasonal themes:
- Red/green bow for holidays
- Pink/purple heart for Valentine’s
- Pumpkin accessory for autumn
- Sleepy nightcap for nursery style
Common Mistakes to Avoid
- Loose stitches: Chenille can “gap” if your hook is too large—use a smaller hook for tight fabric.
- Uneven stuffing: Lumpy stuffing shows more on round shapes; add small bits gradually.
- Incorrect feature placement: Eyes too high can look surprised; too low can look sleepy—pin first, then secure.
- Asymmetrical limbs: Count rounds carefully and pin limbs before sewing to confirm placement.
Care Instructions
- Spot clean with mild soap and cool water when possible.
- If machine washing is necessary, place the teddy in a mesh laundry bag anduseu the gentle cycle with cold water.
- Air dry only (avoid high heat; chenille can melt or lose softness).
- For gifting to babies: ensure all parts are securely sewn; avoid charms/safety eyes for under-3s.
Conclusion FOR ( Crochet Teddy Bear Amigurumi)
This fluffy amigurumi teddy bear plush toy is the kind of project that looks adorable from every angle—and even better as a pair in its bow and heart variations. If you’ve been wanting a soft, squishy chenille amigurumi that feels special but still approachable, this teddy is a perfect next make. Try one version first, then crochet the matching companion for an irresistibly cute set.