Chunky Yarn Crochet Doll Pattern for Beginners Dress, Curly Hair & Hat
If you’ve been wanting to try a chunky yarn crochet doll, this is the kind of project that makes you fall in love with amigurumi. It’s soft, squishy, and works up fast, plus the curly hair, cute dress, and matching hat make it extra special.
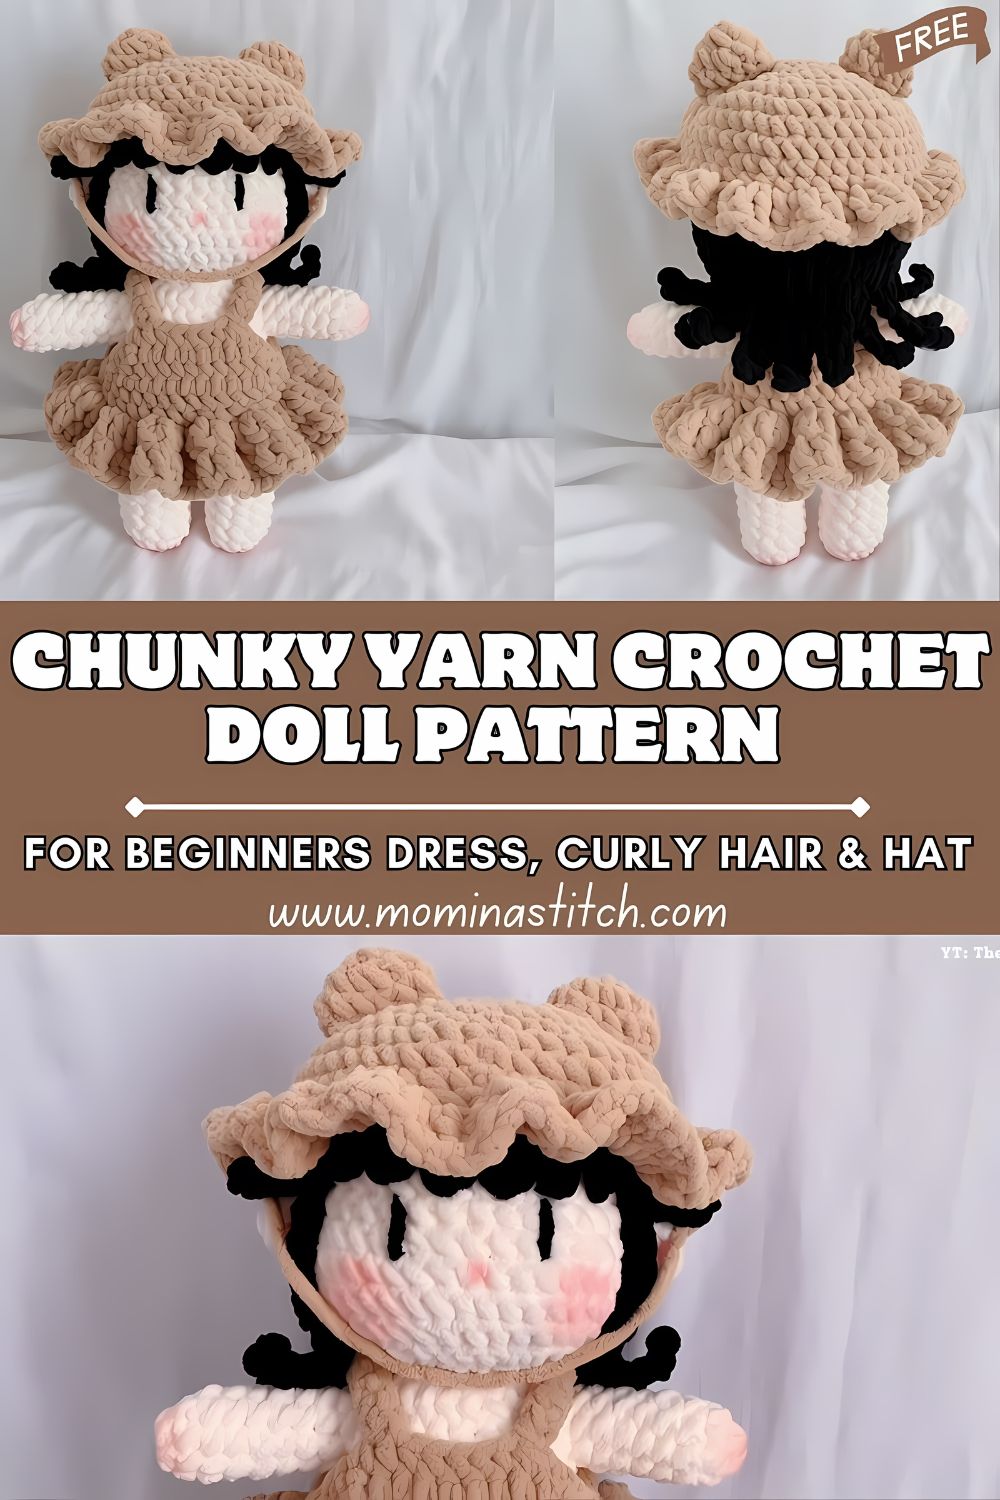
A crochet doll (amigurumi style) is a small stuffed doll made in tight stitches, shaped with simple increases and decreases, and finished with sweet little details. This crochet doll pattern is designed with beginners in mind—with a round head, small body, short limbs, and a simple embroidered face.
The big win here is the yarn. Chunky or chenille yarn is great for beginners because it’s plush, cosy, and builds up quickly. You see progress fast, which keeps you motivated. And since the doll is made with thicker yarn, it becomes a huggable little plush rather than a tiny, fiddly toy.
This easy crochet doll is perfect for:
- A soft toy (especially with embroidered eyes)
- A handmade gift for birthdays or baby showers
- Nursery or shelf decor
- A cute collectable if you love making characters
If you’re looking for a fun, confidence-boosting crochet doll tutorial, this one is a great place to start.
Materials Needed
Chunky yarn projects are all about comfort and simplicity. Here’s what you’ll need:
- Chunky/chenille yarn
- Skin tone
- Dress color
- Hair color
- Crochet hook: typically 5mm–7mm, or whatever suits your yarn and tension
- Stuffing (fiberfill)
- Yarn needle (for sewing and embroidery)
- Stitch marker
- Scissors
- Black yarn or embroidery thread (for eyes and facial details)
- Optional: pink yarn or blush for cheeks, small ribbon for accessories
Tip: With chenille yarn, going slightly smaller on the hook usually helps keep stitches neat and reduces gaps.
Crochet Abbreviations & Stitches (Beginner Friendly)
You’ll see these in most amigurumi patterns, including this one:
- MR (magic ring): an adjustable loop to start crocheting in the round
- ch (chain): the starting chain stitch
- sc (single crochet): the main stitch for amigurumi
- inc (increase): 2 sc into the same stitch
- dec (decrease): turn 2 stitches into 1 (shaping)
- sl st (slip stitch): used to join or finish edges neatly
Most of the doll is just sc plus a few inc/dec rounds to shape the body.
Finished Doll Description
Once finished, your doll will have that soft plush “squish” that chunky yarn does so well. Here’s what it looks like:
- A round, cuddly head with a simple embroidered face
- Blush cheeks for a sweet, friendly expression
- Short, rounded arms and legs (simple and sturdy)
- Curly yarn hair with lots of texture and bounce
- A cute dress with a flared skirt and ruffled edge
- A matching hat with a soft brim that ties the look together
It’s the kind of doll that looks adorable sitting on a shelf—but also feels sturdy enough to be handled and hugged.
Step-by-Step Crochet Pattern (Chunky Yarn Amigurumi Doll Beginner)
This pattern is written in a clear, “do this next” style. Exact stitch counts can vary depending on your yarn and hook, so focus on the shaping and keep pieces proportional.
Step 1: Head
Use skin-tone chunky yarn.
- Start with MR.
- Work 6 sc into the ring.
- Increase each round evenly to create a flat circle (typical head start):
- Round 2: inc around
- Round 3: (sc, inc) around
- Round 4: (2 sc, inc) around
- Keep increasing until the head width looks right for your doll size.
- Crochet a few rounds with no increases to build the height of the sphere.
- Begin decreasing evenly until the opening is small.
- Stuff lightly as you go (chunky-yarn dolls look best when soft, not overpacked).
- Finish closing the head and leave a long tail for sewing if you’re making the body separately.
Important: Keep stitches tight and even. Chunky yarn can hide stitches a bit, so work slowly and use a stitch marker.
Step 2: Body
You can either crochet the body separately and sew it on, or continue directly from the head (both work).
Separate body method (easy to control):
- Start with MR in skin tone.
- Build a small, rounded base (a mini sphere/oval).
- Crochet a few rounds, seven for the body height.
- Add slight shaping with one gentle decrease round if you want a defined “waist.”
- Stuff firmly so the doll sits nicely and feels stable.
Leave a tail for attaching the head.
Step 3: Arms (Make 2)
Use skin tone.
- Start with MR or ch 2 and work into the first chain (whichever you prefer).
- Make a small tube by crocheting a few rounds of sc.
- Lightly stuff (optional—many people leave arms unstuffed for a softer look).
- Close the top and leave a tail for sewing.
Attach the arms to the sides of the body, slightly below the neckline.
Step 4: Legs (Make 2)
Use skin tone.
- Start with MR to form a small, rounded foot.
- Increase slightly for a couple of rounds to create a soft base.
- Crochet even rounds to create a short leg.
- Stuff firmly enough to help the doll stand/sit without flopping.
Sew legs evenly onto the base of the body.
Step 5: Hair (Curly Yarn Strands)
Use hair-colour chunky yarn (or a smoother bulky yarn works nicely for curls).
Easy curly-strand method:
- Cut multiple strands of yarn (about 6–10 inches each, depending on how long you want the hair).
- Fold a strand in half, then use a yarn needle or your hook to pull it through the head stitches to create a loop.
- Pull the ends through the loop to secure (like a simple tassel knot).
- Repeat across the scalp area until it looks full.
- To make curls:
- Twist strands tightly and let them coil naturally, or
- Braid a few strands overn, then gently undo for a wavy texture.
Placement tip: Start hair around the top centre and build outward so there isn’t a random part you didn’t intend.
Step 6: Dress
Use dress-colour chunky yarn.
A simple way to make a beginner-friendly dress is to crochet it as a tube at the waist, then increase for the skirt.
- Crochet a short waistband that fits around the doll’s body (you can crochet a chain strip and join it into a ring).
- Crochet rounds of sc to create a snug top section.
- For the skirt flare, add increases evenly around the skirt (for example, every few stitches).
- Finish with a ruffled edge:
- Work an increase-heavy round at the bottom (like 2 sc in many stitches) to make it naturally ripple.
If you prefer the dress to be removable, avoid sewing it down and instead make it fit snug.
Step 7: Hat
Use matching yarn (the dress colour or a coordinating shade).
- Start with MR and crochet a flat circle (increase rounds) until it’s about as wide as the top of the head.
- Crochet a few rounds with no increases to give it depth.
- Add a soft brim by increasing around the edge for 1–2 rounds.
- Optional: add a little ruffle brim the same way you did for the dress edge.
Try the hat on as you go. Chunky yarn sizes can vary a lot, so fitting beats guessing.
Step 8: Face Details
Keep the face minimal—simple is what makes it so cute.
- Eyes: embroider two small lines, dots, or tiny “sleepy” curves with black thread/yarn.
- Cheeks: add blush with pink yarn stitches or a tiny dab of craft blush (very lightly).
- Optional: a tiny stitched mouth (one short line or gentle curve).
Balancing tip: Place your eyes slightly lower than you think on round amigurumi faces, as this often makes them look sweeter and more natural.
Step 9: Assembly
Now bring it all together:
- Sew head to body, centred and secure.
- Attach arms evenly on both sides.
- Sew legs so the doll sits flat and doesn’t lean.
- Add hair and hat (or attach hat after hair so it sits nicely).
- Adjust the dress positioning so the front looks even.
Take a minute to step back and check symmetry. A tiny shift can make a big difference.
Step 10: Final Touches
- Weave in all yarn tails securely.
- Massage and adjust stuffing for a smooth shape.
- Style curls with your fingers (you can trim strands carefully if needed).
- Make sure the accessories feel secure if the doll will be handled frequently.
Pattern Notes
- Work in continuous rounds for the cleanest amigurumi look.
- Always use a stitch marker—it saves so much frustration.
- Maintain even tension. Chunky yarn can make stitches harder to “read,” so consistency matters.
- One of the best parts of a chunky yarn crochet doll is how fast it works up—perfect for weekend crafting.
Beginner Tips
- Use tight stitches to avoid gaps where stuffing might show.
- Count stitches each round, especially during increases and decreases.
- Practice a magic ring with scrap yarn first if it’s new to you.
- Don’t rush assembly. Sewing slowly is what makes the doll look polished.
- If the chenille yarn splits, move your hook slowly and keep the loops controlled.Customising hiss crochet doll pattern is so easy to personalise:
- Change dress colours (pastels, brights, holiday themes)
- Add a bow, tiny flower, or a little heart on the dress
- Try different hairstyles: side ponytail, bangs, bun, pigtails
- Create themed dolls: winter outfit, birthday doll, fairy doll
- Add shoes (simple crocheted slippers)
- Make a matching set of dolls as gifts—same pattern, different colours
Why This Project is Perfect for Beginners
If you’re an amigurumi doll beginner, this project checks all the right boxes:
- It’s quick to finish because chunky yarn grows fast
- It uses basic stitches (mostly sc, inc, dec)
- The plush texture is forgiving—little imperfections barely show
- Minimal shaping means less stress and more fun
- You end up with a cute, giftable, easy crochet doll you’ll actually be proud to display
Conclusion
A chunky yarn crochet doll is one of those projects that feels instantly rewarding—soft texture, fast results, and endless ways to make it your own. If you’ve been waiting for the right crochet doll tutorial to try, this is it: friendly shapes, simple details, and a finished doll that looks adorable with curly hair, a ruffled dress, and a matching hat.