How to Crochet Jake Amigurumi Pattern Cute Crochet Dog Plush
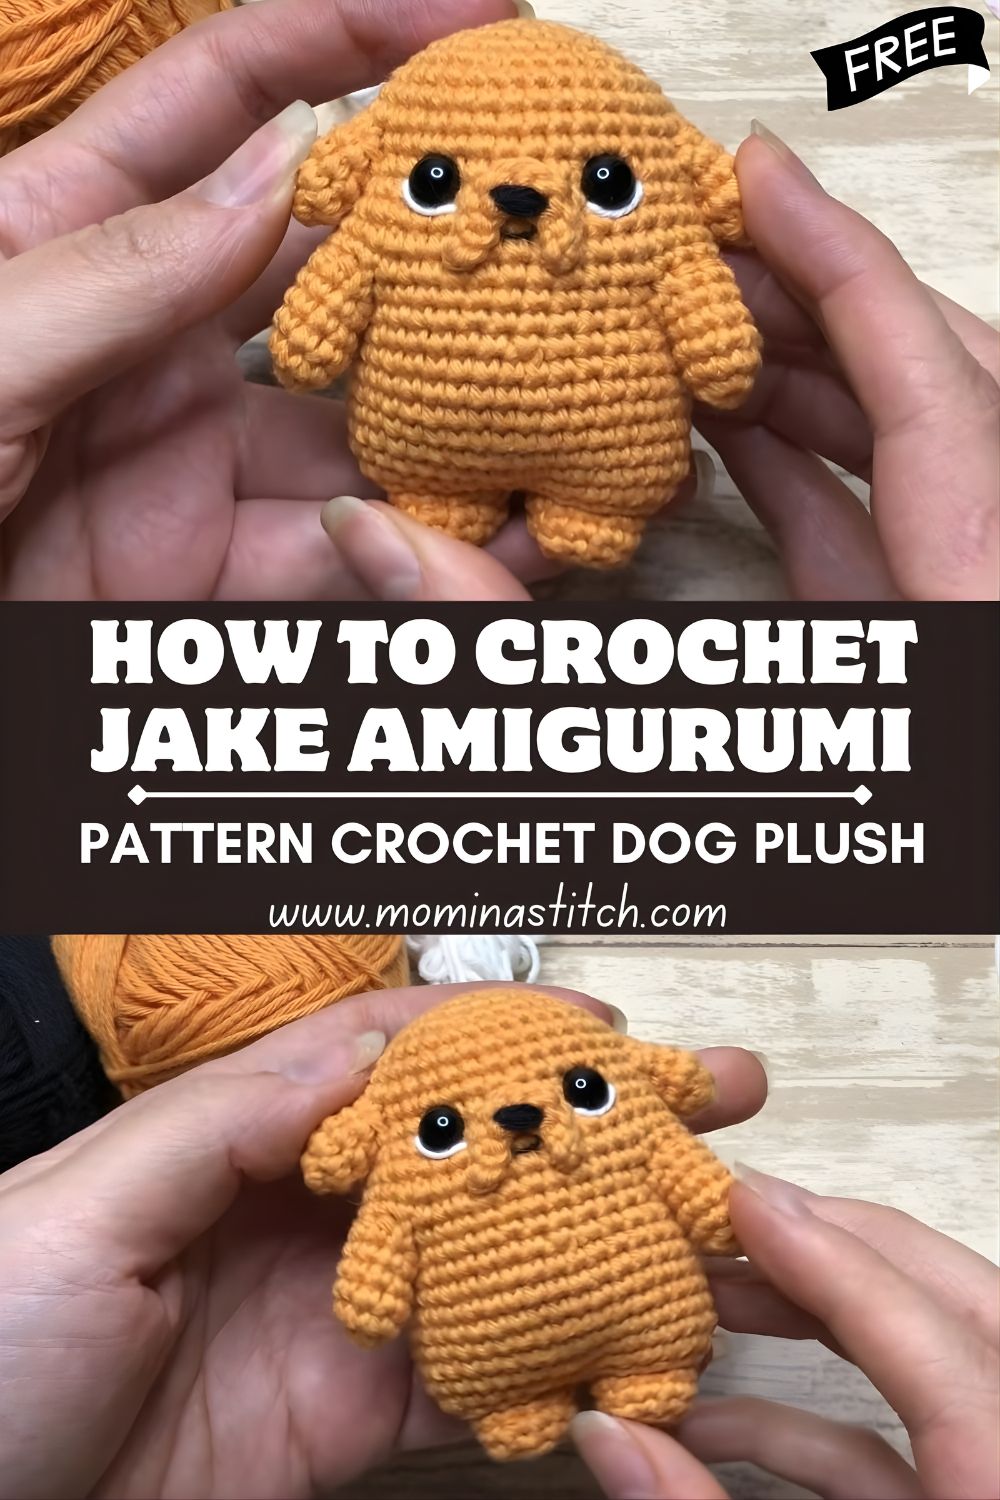
This Jake Adventure Time crochet pattern style tutorial will show you how to make a small, squishy crochet Jake amigurumi with a round body, tiny limbs, and classic cartoon eyes. If you want a fun, fan-inspired crochet dog plush tutorial that’s friendly for beginners, you’ll love this step-by-step project.
Jake the Dog from Adventure Time is one of those characters who instantly make people smile—his simple shape, expressive face, and bright yellow colour are perfect for amigurumi. In this Adventure Time crochet tutorial, we’ll create a soft, rounded plush with minimal facial features (just like the show’s clean cartoon style), while keeping the construction approachable and satisfying.
Character amigurumi is especially popular right now because it blends nostalgia with handmade charm. Fans love displaying small crochet characters on desks, shelves, and in gift baskets—and makers love that these plushies work up quickly and are easy to personalize (a very “Punqa” kind of crafting joy: cute, comforting, collectable).
This beginner-friendly amigurumi dog pattern is designed to be easy to follow yet polished enough for intermediate crocheters who want neat shaping and clean assembly. The instructions are inspired by common amigurumi techniques and the general structure you see in YouTube tutorials, but the pattern is 100% original and written in a clear, blog-ready format.
What is Jake Amigurumi?
A Jake amigurumi is a small crochet plush inspired by Jake’s iconic look:
- Round, soft yellow body (head and body made as one piece for simplicity)
- Tiny arms and legs (simple tubes that keep the silhouette cute)
- Small ears are placed on the upper sides
- Minimal face: oval muzzle, simple black nose, small mouth line
- Big cartoon-style eyes set high enough to feel expressive
Visually, your finished plush should look like a smooth, chubby yellow bean with little limbs—simple, balanced, and unmistakably “Jake-like” even with very few details.
Note: This is a fan-inspired crochet project. Use it for personal crafting and gifting, and be mindful of licensed character usage if selling.
Materials Needed
To make your cute crochet dog plush, gather:
Yarn
- Yellow/mustard yarn (main body)
- Black yarn (nose, mouth, optional embroidered eyes)
- White yarn (eye whites if embroidering/appliqué eyes)
Tip: Worsted/DK works great. Choose a yarn you can crochet tightly with your hook size.
Tools & Notions
- Crochet hook: 2.5–3.5 mm (smaller = tighter stitches)
- Fiberfill stuffing
- Safety eyes (6–10 mm) or embroidery thread/yarn for eyes
- Yarn needle
- Stitch marker
- Scissors
Crochet Abbreviations (US Terms)
- MR = magic ring
- sc = single crochet
- inc = increase (2 sc in one st)
- dec = decrease (sc2tog / invisible decrease recommended)
- sl st = slip stitch
- ch = chain
- FO = fasten off
Skill Level
Beginner to Intermediate
You’ll use:
- basic stitches (sc, inc, dec)
- crocheting in the round (spiral rounds)
- simple shaping and stuffing
- sewing on small parts neatly
If you’ve made one basic amigurumi ball before, you’re absolutely ready. If you’re brand new, go slowly, count stitches, and you’ll still do great—this is meant to feel like a calm YouTube-style build.
Finished Size & Design
- Finished size: about 7–12 cm (3–5 in) tall, depending on yarn and hook
- Style: soft, rounded, cute cartoon proportions (Punqa vibes: chubby + simple)
- Feel: squishy but structured, with smooth shaping and minimal features
STEP-BY-STEP PATTERN (Simplified & Original)
Pattern Notes (Read First)
- Work in spiral rounds (do not join unless stated).
- Use a stitch marker in the first stitch of each round.
- For tight amigurumi fabric, use a hook that produces snug stitches (no visible gaps).
- Stitch counts are listed at the end of rounds in ( ).
A. Head & Body (One Piece)
This one-piece construction keeps the project beginner-friendly and gives Jake that classic, simple silhouette.
Start at the Top of the Head
R1: MR, 6 sc (6)
R2: inc x6 (12)
R3: (sc, inc) x6 (18)
R4: (2 sc, inc) x6 (24)
R5: (3 sc, inc) x6 (30)
R6: (4 sc, inc) x6 (36)
Round Out the Head
R7–R10: sc around (36) for 4 rounds
At this stage, you should have a smooth dome. If it looks pointy, add one more even round.
Grow Into the Body
To make the body slightly bigger than the head (a very Jake-like look), add a gentle increase in the round:
R11: (5 sc, inc) x6 (42)
R12–R16: sc around (42) for 5 rounds
Your shape should now look like a rounded cylinder—soft and plush, not tall.
Begin Decreasing (Bottom Closure)
Start stuffing firmly now. Push stuffing outward to keep the sides smooth.
R17: (5 sc, dec) x6 (36)
R18: sc around (36)
R19: (4 sc, dec) x6 (30)
R20: (3 sc, dec) x6 (24)
R21: (2 sc, dec) x6 (18)
R22: (sc, dec) x6 (12)
Add more stuffing. Shape it like a cute, rounded bean.
R23: dec x6 (6)
FO, weave the tail through the final 6 stitches, then pull tight to close. Weave in ends.
B. Legs (Make 2)
Jake’s legs are small and simple—short tubes that attach at the front bottom.
R1: MR, 6 sc (6)
R2: (sc, inc) x3 (9)
R3–R6: sc around (9) for 4 rounds
Lightly stuff (optional—just a pinch for shape).
Flatten opening and sc across through both layers (or just sew closed).
FO, leave a long tail for sewing.
Placement Tip: Sew legs on the lower front, spaced about 4–6 stitches apart. Angle them slightly outward for a stable “sitting” pose.
C. Arms (Make 2)
Arms are thinner than legs—little noodles that sit on the sides.
R1: MR, 5 sc (5)
R2–R6: sc around (5) for 5 rounds
Do not stuff (or use the tiniest bit).
Flatten the top and FO, leaving a long sewing tail.
Sew arms to the sides at mid-height. Slightly forward placement makes the plush look like it’s ready for a hug.
D. Ears (Make 2)
Small,l rounded ears help sell the character immediately.
R1: MR, 6 sc (6)
R2: sc around (6)
R3: (sc, inc) x3 (9)
R4: sc around (9)
FO, leave tail.
Flatten ears slightly and sew to the upper sides of the head, a little behind the eye line.
E. Muzzle / Face (Protruding Oval)
This piece adds dimension and gives you a clean spot for the nose and mouth.
R1: ch 5
Sc in 2nd ch from hook and across: 3 sc.
In the last ch, 3 sc (this rounds the end).
Continue on underside of chain: 3 sc, inc in last (or add 2 sc) to round (about 10–12 sts total)
Now work 1–2 rounds evenly around to create a small oval “pillow” shape:
- sc around for 2 rounds
FO, leave a long tail. Lightly stuff or keep flat (Jake’s muzzle is simple—either works).
Sew the muzzle to the centre front of the face, positioned in the lower half of the head.
F. Eyes (Safety Eyes or Embroidered)
Jake’s eyes are a big part of his expression—keep them even and calm.
Option 1: Safety Eyes (Fast + Glossy)
- Place eyes above the muzzle, between about Rounds 7–9.
- Space them 6–8 stitches apart, depending on your plush width.
- Before locking back, look straight on and adjust until friendly and symmetrical.
Option 2: Embroidered Cartoon Eyes (More Customizable)
Use white yarn to stitch oval/round whites, then black yarn for pupils:
- Make two white ovals (or simple circles)
- Add a small black pupil in each
- Optional tiny white highlight stitch for extra “cartoon shine”
Add Nose + Mouth (Black Yarn)
On the muzzle:
- Nose: a small filled triangle or oval (satin stitch)
- Mouth: a short, curved line or a small smile under the nose
Keep it minimal—Jake’s charm is in simplicity.
G. Tail (Small Stub)
Jake’s tail, in plush form, can be tiny or a rounded stub.
R1: MR, 6 sc (6)
R2: sc around (6)
FO, leave sewing tail.
No stuffing needed (optional pinch).
Sew to the back lower arcentredered.
H. Assembly (Neat Finishing)
- Confirm body is evenly stuffed and nicely rounded.
- Attach muzzle first (helps plan the face).
- Place and secure eyes evenly about the muzzle.
- Embroider nose and mouth.
- Sew on ears (symmetrical, slightly behind eye line).
- Sew legs to the lower front; check that the plush sits well.
- Sew arms to the sides, slightly forward.
- Attach the tail at the back.
- Weave in all ends inside the plush.
Shaping trick: After sewing, gently squeeze and roll the plush in your hands. This redistributes stuffing and smooths the surface.
Beginner Tips
- Use a stitch marker to track rounds and avoid accidental extra stitches.
- Keep stitches tight so stuffing doesn’t show through (especially in yellow yarn).
- Stuff evenly: add small amounts, push to the edges, then add more (a tip often emphasized in amigurumi tutorials, such as Crochetto-style guidance).
- If your circle starts to ruffle as you increase, your tension may be uneven—slow down and count carefully.
Common Mistakes (and How to Fix Them)
- Loose stitches/holes go down a hook size and keep consistent tension.
- Misplaced eyes: pin or mark placements before committing; symmetry is everything in cartoon faces.
- Uneven stuffing (lumpy body): add stuffing gradually and push it outward with a chopstick or the back of your hook.
- Wobbly legs: sew the legs slightly wider apart and ensure the bottom is well stuffed.
Customization Ideas
Make your crochet Jake amigurumi your own:
- Mini keychain version: use thinner yarn (sport/fingering) + smaller hook; add a ch loop on top
- Different expressions:
- sleepy eyes (half-moon embroidery)
- surprised mouth (small “o”)
- happy smile (curved line)
- Change size: bulky yarn + 4.0–5.0 mm hook for a bigger plush
- Add a simple felt tongue or embroidered cheek freckles for extra personality
Care Instructions
- Hands should be washed only in cool water with mild soap.
- Press gently with a towel—don’t wring.
- Air dry completely; reshape while damp.
- If using safety eyes, avoid tossing them into machines—they can loosen over time.
FAQ
1) Is this an exact Jake Adventure Time crochet pattern from the show?
No—this is a fan-inspired, original amigurumi pattern written from scratch using common crochet construction methods.
2) What yarn is best for a cute crochet dog plush like Jake?
A smooth DK or worsted yarn in mustard yellow works well. Cotton gives crisp stitches; acrylic gives extra softness.
3) Can a beginner really follow this beginner amigurumi dog pattern?
Yes. The core is a simple ball/body shape with small add-ons. Take it step by step, count the stitches, and you’ll be fine.
4) How do I make the eyes look more “cartoon”?
Use safety eyes for shine, or embroider large white ovals with smaller black pupils and a tiny highlight stitch.
5) My body looks like an egg—how do I make it rounder?
Add a round or two of even stitches before decreasing, and stuff more firmly around the sides.
6) Can I sell the finished plush?
Finished makes are often sold at markets, but character designs are tied to licensing. For safety, label as “fan-inspired” and check your local rules and platform policies.
Conclusion
This Jake Adventure Time crochet pattern style project is a cosy, satisfying make: one rounded body piece, tiny limbs, and a simple face that instantly reads as Jake. It’s beginner-friendly, quick to finish, and perfect for gifting to any Adventure Time fan—or keeping as a cheerful desk buddy.
If you try it, experiment with eye styles and expressions. Small changes make a big difference in character amigurumi, and that’s where the fun really begins.