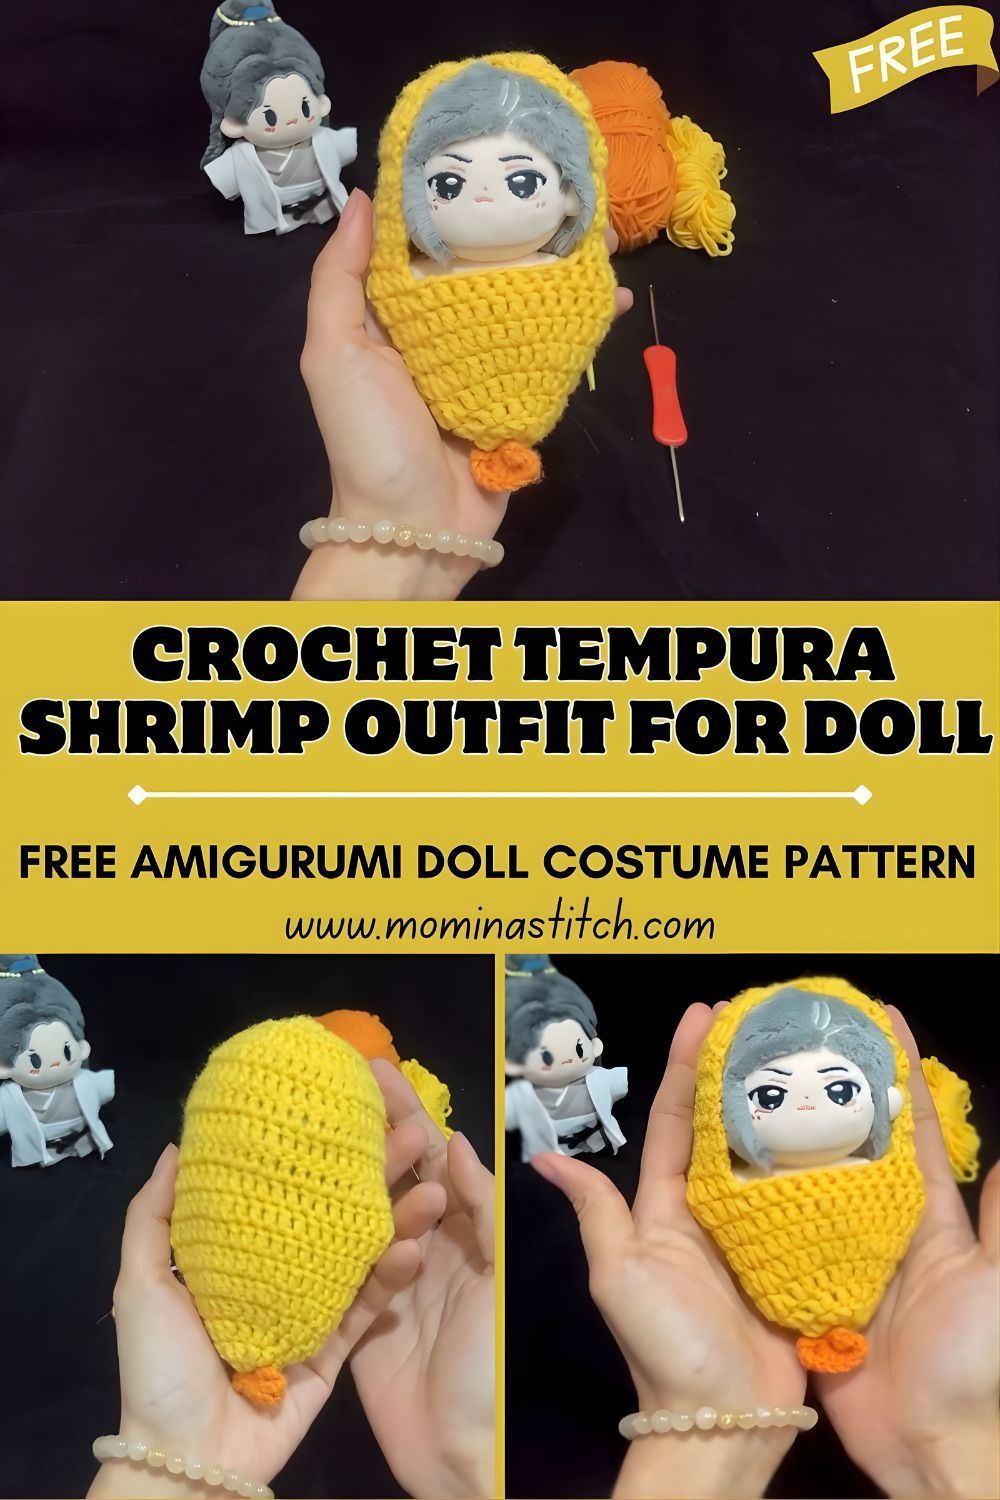
Crochet Tempura Shrimp Outfit for Doll – Free Amigurumi Doll Costume Pattern
If you love quirky amigurumi accessories, this crochet tempura shrimp outfit for a doll is going to steal your heart. It’s a cozy little amigurumi doll costume that looks like crispy tempura batter with a cute orange shrimp tail, perfect for photos, gifts, and display dolls.
A crochet shrimp tempura doll outfit is exactly what it sounds like: a tiny wearable costume that turns your doll into an adorable piece of tempura shrimp. The outfit is usually worked like a snug “sleeve” or cone that slides over the doll’s body, with an opening at the top for the doll’s head and a little shrimp-tail detail at the bottom.
Food-themed crochet outfits are trending for a reason:n they’re playful, instantly recognizable, and they make even the simplest doll look like a character. Plus, they’re fantastic stash-busters because you only need small amounts of yarn in a few colors (hello, yellow tempura batter and orange shrimp tail).
This pattern is beginner-friendly because it uses the basics: single crochet in the round, increases, and decreases to shape the costume. There’s no complicated shaping, and you can try it on your doll as you go to get the fit just right. It’s perfect for crochet beginners who want a “wow” result without advanced techniques, and it’s also a fun little make for amigurumi lovers who collect dolls and outfits.
Materials Needed
- Yellow yarn (tempura batter): The main costume color. A slightly fluffy yarn looks extra “crispy,” but smooth yarn works too.
- Orange yarn (shrimp tail): For the tail fin detail at the bottom.
- Skin tone yarn (optional): Only needed if you’re also making a doll head or adding matching details. (If you’re dressing an existing doll, you can skip this.)
- Crochet hook (2.5 mm–3.5 mm): Use a smaller hook for tight stitches, especially if your doll outfit needs structure.
- Stuffing/fiberfill: Optional—use a tiny amount only if you want the costume to hold a firm shape or create a puffier “batter” look.
- Yarn needle: For sewing and weaving in ends neatly.
- Scissors: For trimming yarn and clean finishing.
- Stitch marker: Really helpful for keeping track of rounds.
Crochet Abbreviations
- MR – Magic Ring
- ch – Chain
- sc – Single Crochet
- inc – Increase (2 sc in the same stitch)
- dec – Decrease (single crochet decrease; invisible dec recommended)
- sl st – Slip Stitch
- st – Stitch
Finished Size
The finished shrimp costume size depends on your doll, but this pattern is designed for a small amigurumi doll (about 10–15 cm / 4–6 inches tall).
The outfit itself will be approximately 6–9 cm (2.5–3.5 inches) tall, with a stretchable head opening.
Tip: If your doll is larger, use thicker yarn + a larger hook (or add a few increase rounds). If your doll is smaller, use thinner yarn + a smaller hook.
Step-by-Step Crochet Pattern
This pattern is written like a simple costume “tube” with shaping. Work in continuous rounds unless noted. Use a stitch marker in the first stitch of each round.
Part 1 – Shrimp Head Opening (Yellow)
This top opening needs to stretch over the doll’s head and then sit around the neck.
Rnd 1: MR, 6 sc in MR [6]
Rnd 2: inc x6 [12]
Rnd 3: (sc, inc) x6 [18]
Rnd 4: (2 sc, inc) x6 [24]
At this point, pause and check your doll’s head size. For many small dolls, 24 sts is a good opening. If your doll has a larger head, add one more increase round:
Optional Rnd 5 (bigger opening): (3 sc, inc) x6 [30]
Now create a short “neck” so the top edge sits nicely:
Next 2 rounds: sc around (no increases) [24 or 30]
Beginner tip: If you want a cleaner edge, finish with a round of sl st around the opening.
Part 2 – Tempura Body (Yellow, cone-shaped)
Now we build the batter body—slightly wider at the bottom like a tempura shrimp.
If you ended Part 1 at 24 sts, follow Version A.
If you ended at 30 sts, follow Version B.
Version A (Starting at 24 sts)
Rnd 1: (3 sc, inc) x6 [30]
Rnd 2: sc around [30]
Rnd 3: (4 sc, inc) x6 [36]
Rnd 4–6: sc around [36]
Rnd 7: (5 sc, inc) x6 [42]
Rnd 8–10: sc around [42]
Version B (Starting at 30 sts)
Rnd 1: (4 sc, inc) x6 [36]
Rnd 2–4: sc around [36]
Rnd 5: (5 sc, inc) x6 [42]
Rnd 6–8: sc around [42]
How to get the “tempura texture” look (easy option):
On any “sc around” round, you can sprinkle in a few texture stitches:
- Replace an sc with a bobble or a sl st + ch 1 + sc in sathe me st to create little bumps.
Keep it random—tempura batter isn’t smooth, so uneven texture actually looks better.
Beginner tip: Try the costume on the doll as you go. If it’s too snug, add one more increase round. If it’s too loose, skip an increase round.
Part 3 – Shrimp Tail (Orange)
The tail is a separate piece you’ll sew onto the bottom back of the costume. You can make it as a simple 3-fin tail that looks cute from every angle.
Tail Base
Rnd 1: MR, 6 sc [6]
Rnd 2: (sc, inc) x3 [9]
Rnd 3: sc around [9]
FO, leave a long tail for sewing.
Tail Fins (worked into the edge)
Join the orange yarn to any stitch of the tail base.
Make 3 fins spaced evenly:
- (ch 3, sl st in 2nd ch from hook, sc in next ch, sl st into next st on base)
Repeat 3 times around.
FO and weave in ends.
Beginner tip: If you want a bigger, flouncier tail, make each fin ch 4 instead of ch 3.
Part 4 – Assembly (Tail + Fit)
- Weave in any loose ends on the yellow tempera body and the orange tail.
- Sew the orange tail to the bottom edge of the outfit (back center). I like placing it slightly angled so it peeks out cutely.
- Check the fit on the doll:
- Slide the costume over the doll’s body.
- Gently work the head through the opening.
- Optional: add a tiny bit of stuffing between the doll and costume if you want the batter to stand out more (only a pinch—too much makes it bulky).
Helpful finishing tip: If the bottom edge flares too much, crochet one final round of (sc, dec) evenly spaced to tighten it slightly.
Helpful Crochet Tips
- Use stitch markers: Especially if you’re adding texture stitches randomly—it’s easy to lose track otherwise.
- Crochet tightly for amigurumi: A tighter stitch keeps the costume sturdy and helps it hold that “crispy” shape.
- Try a soft/fluffy yarn for tempura effect: A fuzzy yellow yarn gives the outfit that perfect fried-batter vibe.
- Check sizing as you go: Doll outfits are all about fit—don’t be afraid to add or remove a round.
- Use invisible decreases: It keeps the cone smooth and more polished.
Customization Ideas
- Make a keychain version: Crochet the tempura body smaller, stuff it, and add a key ring at the top. (Tiny tempura charm = cutest thing ever.)
- Create different colors: Pale golden yellow for “light batter,” deeper amber for “extra crispy,” or even pinkish-orange accents for a more shrimp-like look.
- Add cute face embroidery: Give the tempura a tiny smile, blush cheeks, or sleepy eyes on the front.
- Add drip details: Use a slightly darker yellow to surface-stitch little “crunchy bits.”
- Make it a bag charm instead of doll clothes: Stuff the whole piece and attach hardware.
Who Will Love This Pattern
- Crochet beginners who want a fun, fast costume that uses basic stitches
- Amigurumi collectors who love themed outfits and food plushies
- Doll outfit makers looking for something unique (and very Instagram-worthy)
- Handmade gift lovers—this is such a cute add-on for doll gifts, craft swaps, and birthday surprises
Conclusion
A crochet tempura shrimp outfit for a doll is one of those delightfully random projects that turns out way cuter than you expect—and it’s surprisingly easy to make. If you can single crochet in the round and do basic increases/decreases, you can absolutely make this costume. Pick your favorite golden-yellow yarn, add that bright little orange tail, and have fun dressing your doll in the most adorable tempura shrimp look ever.