Adorable Tiny Crochet Mouse Amigurumi Pattern Beginner Project
This tiny crochet mouse amigurumi is an adorable beginner project that works up fast and looks irresistibly cute in just a few rounds. If you love mini amigurumi, easy crochet animals, and quick makes, this little mouse is perfect for gifts, keychains, bag charms, or handmade decorations.
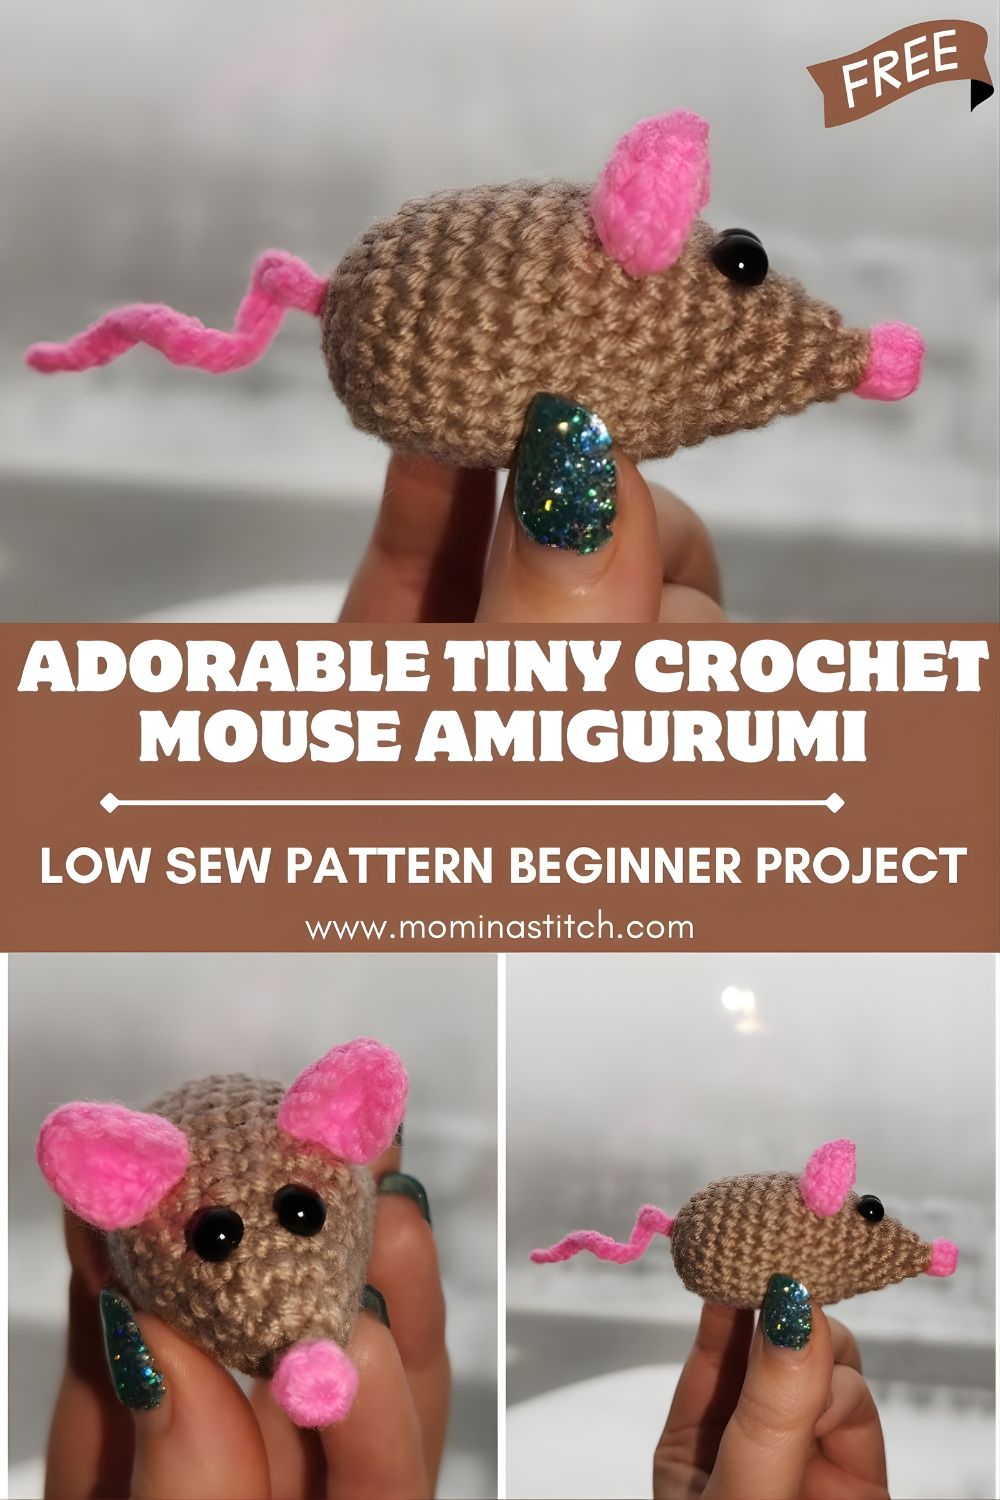
The crochet mouse amigurumi in the image is small, soft, and full of sweet details, exactly the kind of project that makes amigurumi so addictive. It has a cozy brown body, tiny pink ears, a delicate pink nose, and a whimsical curly tail, finished with shiny black safety eyes that instantly bring it to life. Small amigurumi animals like this are so popular with crochet lovers because they’re quick to crochet, use very little yarn, and are easy to personalize with different colors and expressions. The best part is that beginners can absolutely make this mouse using only basic stitches like single crochet, increases, and decreases. With a small hook and tight stitches, you’ll get a neat, sturdy fabric that holds its shape, perfect for a tiny toy, charm, or desk buddy.
3. Materials Needed
- Brown yarn (for body)
- Pink yarn (for ears, nose, and tail)
- Crochet hook: 2.5 mm – 3.5 mm recommended
- Black safety eyes (typically 5–8 mm for tiny amigurumi)
- Fiberfill stuffing
- Yarn needle
- Stitch marker
- Scissors
Optional: embroidery thread for whiskers, blush/pastel for cheeks, keychain ring.
4. Crochet Abbreviations
- MR – Magic Ring
- sc – Single Crochet
- inc – Increase (2 sc in same st)
- dec – Decrease (sc2tog, preferably invisible decrease)
- sl st – Slip Stitch
- ch – Chain
- st – Stitch
5. Step-by-Step Crochet Pattern
Notes Before You Start
- Work in continuous rounds (do not join rounds).
- Use a stitch marker to mark the first stitch of each round.
- For a firm amigurumi fabric, use a hook size that makes your stitches feel tight.
Body (Head + Body in One Piece)
This simple shape creates the same tiny “plush” body style seen in the image.
Round 1: Start with MR, 6 sc in MR (6)
Round 2: inc in each st (12)
Round 3: (sc, inc) repeat around (18)
Rounds 4–6: sc around (18)
Safety Eyes Placement (do this now):
Insert safety eyes between Rounds 4 and 5, about 4–6 stitches apart (adjust for your preferred look). Secure the washers firmly.
Round 7: (sc, dec) repeat around (12)
Stuff the body lightly (add small bits, shape as you go)
Round 8: dec around (6)
Fasten off, leaving a tail. Thread the yarn needle, weave through the front loops of the last 6 stitches, pull tight to close, and weave in the end.
Ears (Make 2)
Round 1: MR with 5 sc (5)
Round 2: inc around (10)
Sl st to finish. Fasten off leaving a long tail for sewing.
Attach: Sew ears slightly toward the top/sides of the body (near the “head” area). Flatten each ear as you sew for a cute rounded shape.
Nose (Pink)
Choose one of these beginner-friendly options:
Option A: Embroidered Nose (recommended for tiny projects)
- With pink yarn, make a few small stitches in the center front of the face to form a tiny triangle/oval nose.
Option B: Tiny Crochet Dot
- MR, 3–4 sc in MR, pull tight, fasten off.
- Sew the tiny circle to the front.
Tail (Pink Curly Tail)
Ch 8–10 (longer chain = longer tail)
Starting in 2nd ch from hook, sl st in each ch back down the chain.
This naturally curls into a springy tail. Fasten off leaving a sewing tail.
Attach: Sew tail to the back/bottom of the mouse.
Assembly
- Attach safety eyes (before closing is best—done above).
- Sew ears to the top/sides.
- Add the nose (embroider or sew on).
- Sew the tail to the back.
- Final shaping: Gently roll and pinch the mouse to smooth stuffing and help it sit nicely.
6. Helpful Tips for Beginners
- Use a stitch marker so you don’t lose track of rounds in continuous crochet.
- Stuff gradually with small pieces—this prevents lumps and gives a smoother shape.
- Keep stitches tight (amigurumi should feel dense) so stuffing doesn’t show through.
- Use a smaller hook than you would for normal crochet with the same yarn for a neat finish.
- Secure safety eyes early (before the opening gets too small), and double-check placement before locking washers.
7. Creative Uses
Your tiny crochet mouse can be used in so many cute ways:
- Keychain or bag charm (add a small loop on top)
- Gift topper (tie onto ribbon or a wrapped present)
- Kids toy (embroider eyes instead of safety eyes for little ones)
- Desk decoration (make a mini mouse family!)
- Handmade craft fair item (fast to make, great for impulse buys)
8. Conclusion
This tiny crochet mouse amigurumi is proof that small projects can be the most satisfying quick to finish, beginner-friendly, and packed with personality. Try making yours in classic brown with pink details like the image, then experiment with different colors (gray, cream, white, or even pastel “fantasy” mice). Have fun, take your time with the little details, and don’t forget to share your finished mouse creations you’ll be surprised how many people fall in love with them!