Natural Crochet Tiny Bow Crochet Candy Keychain Pattern
Sweeten any bag with this Crochet Candy Keychain Pattern. It is quick, adorable, and beginner-friendly. Soft stitches, bold colors, and charming texture create instant handmade delight.
The Natural Crochet Tiny Bow Candy Keychain Amigurumi Pattern is a sweet, eco-minded mini that works up fast. Using soft cotton and beginner-friendly stitches, you’ll shape a plump candy, trim it with a petite bow, and secure it to a key ring or clasp.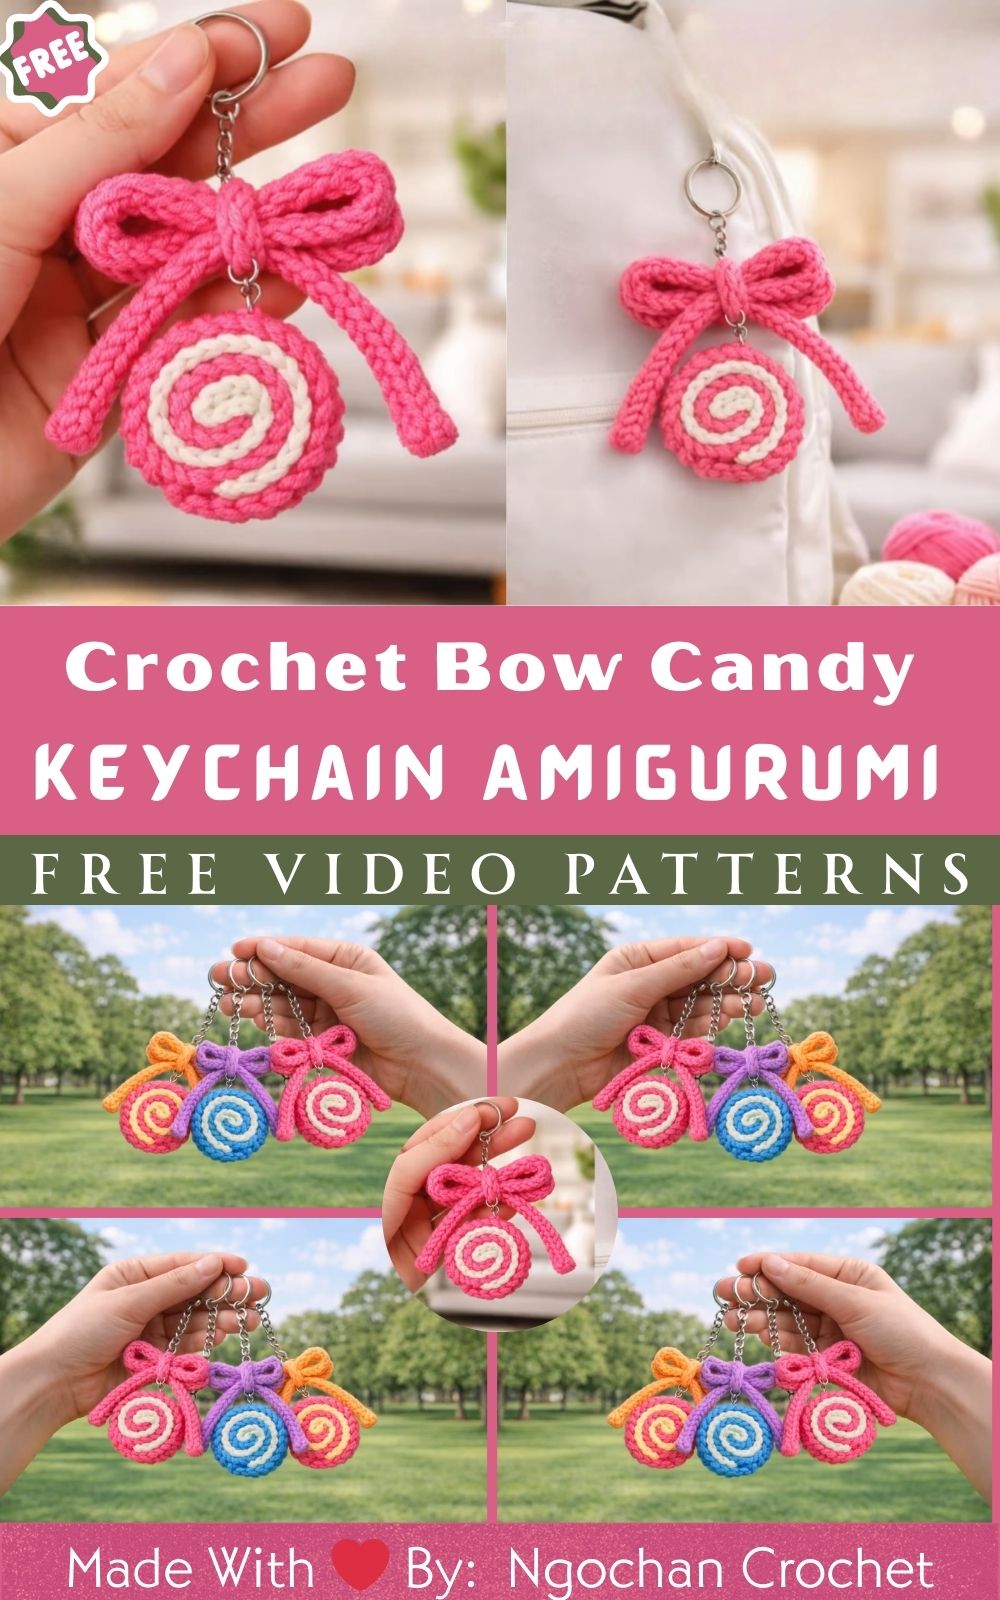
Scrap-friendly and highly customizable, the pattern includes clear round cues and sizing tips for color play and hook swaps. Ideal for last‑minute gifts, market bundles, or daily flair, this pocket project delivers charm, durability, and repeat-worthy results.
Uses:
Mini bag charm or zipper pull
Nature-inspired party favor or gift topper
Durable key identifier for backpacks and keys
Natural Crochet Tiny Bow Candy Keychain Amigurumi Pattern
If you love quick, charming makes, this Natural Crochet Tiny Bow Candy Keychain Amigurumi Pattern brings sweet style, easy steps, and gift-ready results in under two hours. Moreover, the compact project uses scrap-friendly cotton, tight beginner stitches, and a simple bow for instant cuteness. Additionally, the finished keychain looks adorable on bags, keys, and backpacks while staying durable for everyday carry. Whether you’re crocheting for fun, markets, or last-minute presents, this tiny candy amigurumi will brighten your day and your stash.
What You’ll Make and How It Fits
To start, the candy measures approximately 5 cm (2 in) wide at the body and about 7.5–8.5 cm (3–3.3 in) long, including the wrapper ends and bo,w when made with DK cotton and a 2.75 mm hook. Furthermore, the keychain strap adds another 2–3 cm (0.8–1.2 in), depending on how you attach your hardware. As a result, the size remains perfect for everyday use without feeling bulky in your pocket.
SEO-Friendly Note
For better search visibility, this post naturally includes the terms Natural Crochet Tiny Bow Candy Keychain Amigurumi Pattern, crochet candy keychain, tiny bow amigurumi, beginner crochet pattern, and quick crochet gift. Even so, the language stays friendly, clear, and helpful—never keyword-stuffed.
Materials (with exact measurements)
- To begin, choose yarn: 100% cotton DK (Category 3) for durability and a clean stitch look.
- Main Color (MC) for candy body: 8 g (≈ 20 m / 22 yd).
- Wrapper Color (WC): 3 g total (≈ 7 m / 8 yd).
- Bow Color (BC): 1.5 g (≈ 4 m / 4.5 yd).
- Next, select a hook: 2.75 mm (C-2). Alternatively, use 3.0 mm if your tension is very tight.
- Additionally, prepare stuffing: 3–5 g premium polyester fiberfill (or cotton scraps for a natural fill).
- For hardware, add: 25 mm (1 in) split ring + 30–35 mm (1.2–1.4 in) lobster clasp or swivel clasp.
- Optionally, include safety eyes: 6 mm (pair), plus a small scrap of black embroidery thread for a smile.
- Also gather tools: tapestry needle (blunt), one removable stitch marker, and sharp scissors.
- Alternatively, use a small jump ring (8–10 mm) as a detachable strap connector.
Note: For repeatable results, the gram and meter/yard counts intentionally err on the safe side, leaving a little extra for weaving and wrapping.
Abbreviations and Notes
MR: magic ring; ch: chain; sl st: slip stitch; sc: single crochet; hdc: half double crochet; dc: double crochet; inc: increase (2 sc in the same stitch); dec: invisible decrease (front loops together) or sc2tog; st(s): stitch(es); R#: Round number; Row #: flat rows for wrappers/bow; FO: fasten off.
- Generally, work in continuous rounds unless stated otherwise; therefore, place a stitch marker in the first stitch of each round to keep your place.
- For the cleanest fabric, keep an even, firm tension so stuffing doesn’t show.
Sizing and Gauge Tips
- As a reference, 6 sc x 6 rows ≈ 2 cm x 2 cm (0.8 in x 0.8 in) with a 2.75 mm hook and DK cotton.
- If your stitches look loose, then drop to a 2.5 mm hook; alternatively, if they feel too tight or your hands strain, move up to a 3.0 mm hook.
- To size up, use worsted cotton (Category 4) with a 3.5–4.0 mm hook and add 1–2 more straight rounds to the body. Conversely, to make it mini, use sport yarn (Category 2) and a 2.25–2.5 mm hook while removing one straight round.
Estimated Total Making Time
- Typically, plan 60–90 minutes overall, depending on your speed:
- Candy body: 30–40 minutes.
- Wrapper ends (2 pieces): 20–25 minutes total.
- Bow: 8–10 minutes.
- Strap + hardware: 5–8 minutes.
- Assembly + finishing: 10–12 minutes.
Step-by-Step Instructions
Step 1: Crochet the Candy Body (30–40 minutes)
To create a neat candy shape, begin with the main color (MC).
- R1: MR, 6 sc into ring (6). Tighten the ring securely.
- R2: inc around (12).
- R3: (sc, inc) x 6 (18).
- R4: (2 sc, inc) x 6 (24).
- R5: (3 sc, inc) x 6 (30).
Next, build a plump center with straight rounds: - R6–R9: sc around (30) for 4 rounds.
Then, taper the shape symmetrically: - R10: (3 sc, dec) x 6 (24).
- R11: (2 sc, dec) x 6 (18).
At this point, add safety eyes if using them: place between R7 and R8, approximately 6–7 stitches apart and centered on your front. Additionally, embroider a tiny smile if desired. Afterward, stuff the body firmly yet evenly so the surface stays smooth.
Finally, close neatly:
- R12: (sc, dec) x 6 (12).
- R13: dec around x 6 (6). FO and close the hole with the tail.
Tip: Since the wrapper ends will cover the side profile, slight puckering at the closure will be hidden after assembly.
Step 2: Make the Wrapper Ends (2 pieces, 10–12 minutes each)
For the classic candy look, create two identical ruffled pieces in Wrapper Color (WC).
- Row 1: ch 16; sc in second ch from hook and across (15). Turn.
- Row 2: ch 1; 2 dc in each st across (30 dc). FO, leaving a 20–25 cm (8–10 in) tail for sewing.
Optionally, for extra flair, lightly steam-block the outer edge with low heat. However, avoid direct high heat on acrylic blends if you changed yarn types.
To attach the wrappers, proceed as follows:
- First, center each ruffle over a closed end of the body so the straight sc edge meets the candy’s end.
- Then, with the long tail, whip stitch the straight edge around the end using small, even stitches.
- Next, for a twist effect, add a few gathering stitches at the middle of the straight edge and pull gently to pinch the center. Consequently, the edges will fan outward like a wrapped candy.
- Finally, repeat on the second side.
Step 3: Crochet the Tiny Bow (8–10 minutes)
For a sweet personality, switch to Bow Color (BC).
- Row 1: ch 22; hdc in third ch from hook and across (20 hdc). FO, leaving a 30 cm (12 in) tail.
Next, form the bow: - Fold the strip into a small rectangle.
- Then wrap the center snugly 10–15 times with the tail and tie a discreet knot at the back.
- Afterward, weave in one tail, leaving the other tail for sewing.
- Optionally, pinch the corners slightly for crisp loops; notably, cotton holds shape well without stiffeners.
Step 4: Add the Strap and Hardware (5–8 minutes)
For durability and daily ease-of-use, add a simple strap (optional):
- With MC or BC, ch 18; sl st in the back bump of each ch to make a firm strap. FO, leaving a 15–20 cm (6–8 in) tail.
Then, connect the hardware:
- Thread the strap through the split ring or directly through the lobster clasp eye.
- Next, fold the strap in half and sew the ends together behind the bow placement so the seam remains hidden.
Alternatively, opt for a metal connector:
- Use a jump ring and short chain (2–3 cm) to link the lobster clasp and split ring; then sew the jump ring to the top center of the candy.
- For extra strength, pass yarn through multiple body stitches—not just surface loops.
For positioning, follow this:
- Place the bow at the candy’s top center front.
- Subsequently, tuck the strap seam under the bow so it stays invisible. As a result, the finish looks polished from every angle.
Step 5: Final Assembly and Finishing (10–12 minutes)
- First, sew the bow onto the front center top of the candy, taking several secure stitches under the wrapped center so the thread stays hidden.
- Then, attach any remaining hardware and test the swivel/closure.
- Next, weave in all ends firmly and gently tug the bow and strap to confirm stability.
- Finally, softly squish the candy to distribute stuffing and adjust the wrapper frills so they fan symmetrically.
Basic Tips for Beginners
- First, keep your tension firm but comfortable to prevent stuffing from peeking through.
- Second, if you see gaps, switch to a smaller hook for a tighter fabric.
- Third, place a stitch marker at the first stitch of each round to stay on track.
- Additionally, stuff gradually in small tufts for an even shape without lumps.
- Moreover, weave in ends in multiple directions to lock them because keychains are often handled.
- Furthermore, choose cotton for crisp stitches and durability; however, acrylic can work in a pinch.
- Lastly, count frequently to maintain clean, symmetrical shaping.
Common Mistakes and How to Fix Them
- Stuffing shows through: Therefore, use a smaller hook, tighten your tension slightly, or add a thin inner layer of yarn scraps behind any gaps.
- Lopsided shape: Since increases and decreases must align, confirm the round starts with your marker; if you drift, then frog a few stitches and realign.
- Floppy bow: Consequently, wrap the center more tightly and add an extra securing stitch at the back; additionally, cotton performs better than a very stretchy yarn.
- Wrappers not fanning: Specifically, ensure you place 2 dc in each stitch; then gently steam or finger-press the edge to encourage a flare.
- Hardware pulling free: For longevity, sew the strap through multiple body stitches (not just surface loops), and knot tails inside the body before weaving in to anchor the stress point.
Variations and Customization Ideas
- Color-block Candy: For extra personality, switch main colors every 2 rounds on the body; additionally, carry yarn up inside rather than cutting each time to reduce ends.
- Speckled Sprinkles: For texture, embroider tiny French knots or duplicate-stitch dots in contrasting colors over the body.
- Face or No Face: For a kawaii look, add 6 mm safety eyes and a tiny smile; alternatively, keep it “natural candy” with just the bow and wrappers.
- Metallic Accent: For a luxe touch, wrap the bow center with gold or silver embroidery thread.
- Plush Version: For a squishier feel, use chenille/velvet yarn with a 3.5–4 mm hook; consequently, the candy will be larger (≈ 8–10 cm), so adjust the strap length.
- Ribbon Bow: Alternatively, replace the crocheted bow with a 1 cm (3/8 in) organic cotton ribbon; notably, seal ribbon edges with a tiny dot of clear fabric glue.
- Sustainable Fill: For a fully “natural” build, stuff with cotton yarn scraps or wool roving; however, remember that wool reacts to moisture.
- Scented Keepsake: For gifting, tuck a drop of lavender on a cotton scrap deep inside before final closing; as a result, the keychain carries a soft scent.
Care, Durability, and Safety Notes
- For routine cleaning, spot clean with mild soap and lukewarm water; then roll in a towel and air-dry flat.
- For child safety, note that safety eyes are not suitable for children under 3; instead, embroider eyes for a baby-safe option.
- For fiber care, avoid bleach and high heat on cotton yarn; light steam is fine for shaping wrappers, but do not over-iron.
- For longevity, check your hardware connection periodically; if you see wear, then reinforce the strap or swap to a thicker jump ring.
Troubleshooting Fit and Size
- Candy too small: In that case, add one more straight round to the body (R6–R10 instead of R6–R9) and stuff a bit more firmly; alternatively, bump your hook up by 0.25 mm.
- Candy too large: If so, remove one straight round and consider a smaller hook; moreover, reduce the wrapper base to ch 14 and the bow chain to ch 20 for a proportionate look.
- Strap length off: Since this is personal preference, adjust your chain by ±2–4 stitches; then test the drop with your hardware before final sewing.
Quick Reference: Stitch Counts and Flow
- Body peak stitch count: 30 stitches around for 4 rounds (R6–R9).
- Decrease flow: 30 → 24 → 18 → 12 → 6.
- Wrappers: 15 sc base row, 30 dc ruffle row.
- Bow: 20 hdc rectangle wrapped at the center.
Why This Pattern Works for Beginners
- First, the body uses standard increases and decreases in the round, so you practice core amigurumi skills without complicated shaping.
- Second, the wrappers and bow are simple flat pieces, so you finish quickly and build confidence.
- Third, the project uses minimal sewing, short rounds, and clear stitch counts, so the entire process flows smoothly.
- Finally, the exact yardage and time estimates help you plan craft fairs, batch gifts, or relaxing weekend projects.
Final Encouragement and SEO-Ready Close
Ultimately, this Natural Crochet Tiny Bow Candy Keychain Amigurumi Pattern combines mindful materials, friendly steps, and sweet style for a quick, satisfying finish. Consequently, you’ll master essential amigurumi stitches, create a neat bow, and attach durable hardware—ready for gifting, selling, or keeping. Moreover, the pattern’s small size, scrap-friendly yardage, and flexible color choices make it a go-to design whenever you need a last-minute present or a cheerful stash-buster. Therefore, gather your cotton, queue up your favorite playlist, and crochet a charming candy keychain that looks polished, feels sturdy, and brings smiles everywhere it goes.