Awesome Crochet Lucky Coaster Pattern
A sprinkle of Irish luck into your home with this Awesome Crochet Lucky Leprechaun Coaster Pattern! Featuring a jaunty green hat, gleaming gold buckle, and cute shamrock accents, these coasters are quick, beginner-friendly, and fabulously stash-busting. Protect your surfaces in festive style while mastering crisp color changes and simple shaping. Perfect for St. Patrick’s Day gatherings, cheerful gifts, or everyday charm.
Celebrate St. Patrick’s Day in style with this Awesome Crochet Lucky Leprechaun Coaster Pattern. Featuring a jaunty green hat, gleaming gold buckle, and playful shamrock accents, this quick, beginner-friendly make whips up.
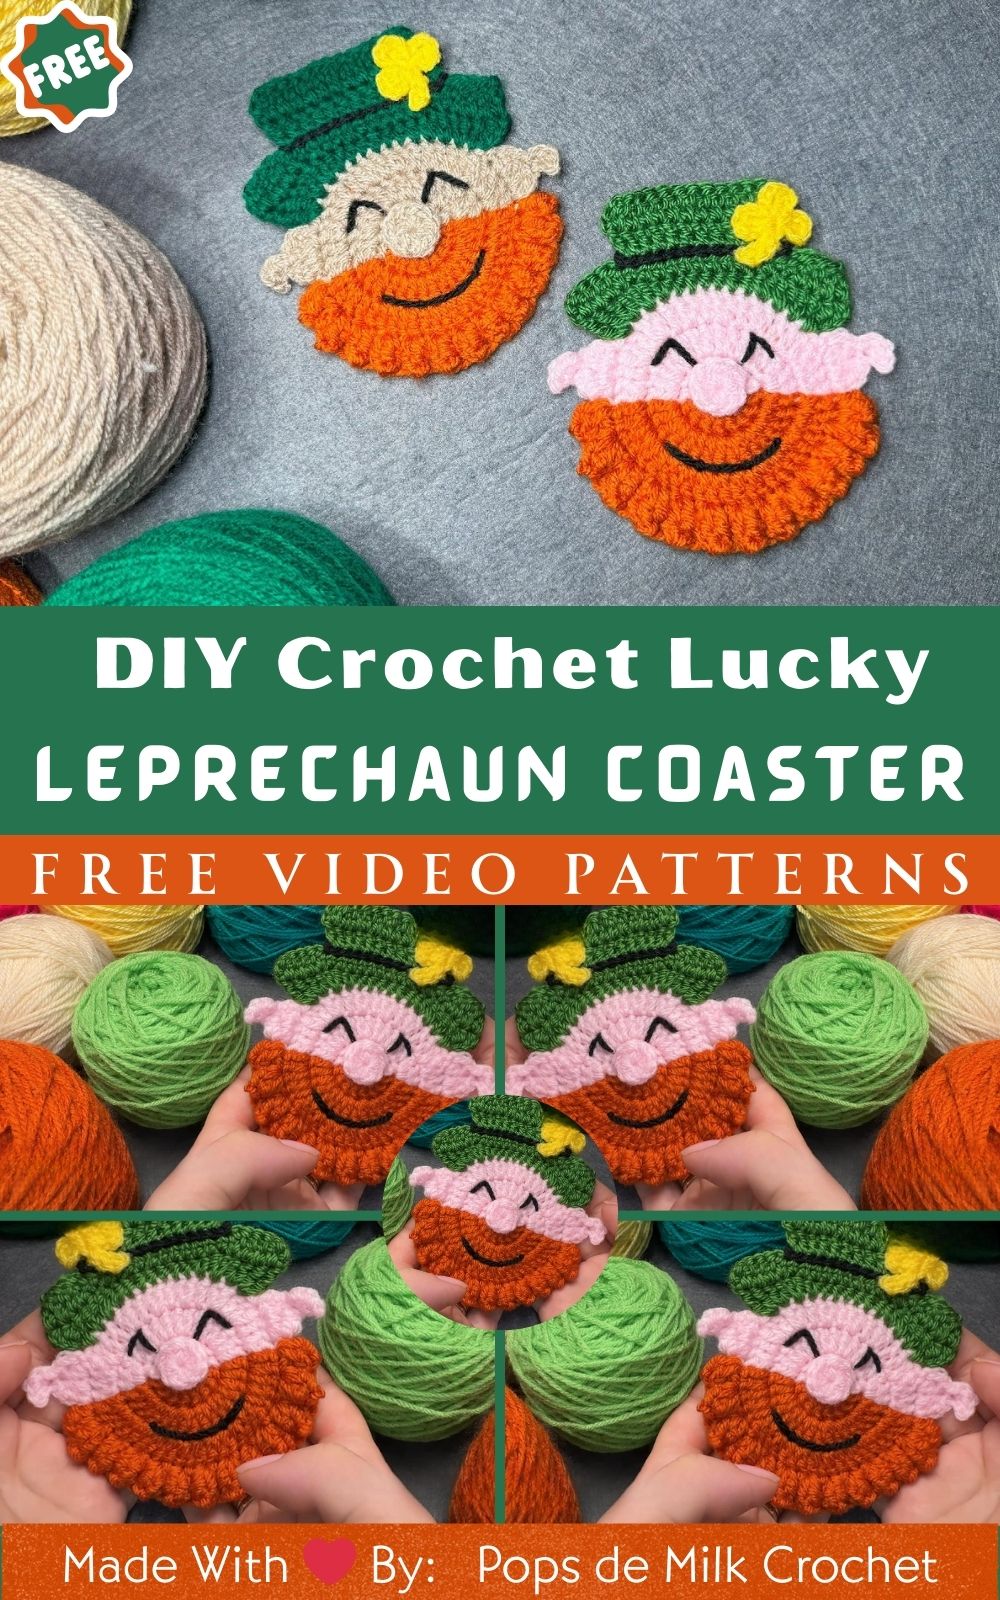
in an evening and busts your stash. The pattern uses basic stitches, clear rounds, and tidy color changes for crisp edges and a sturdy, absorbent finish. Craft a single showpiece or a whole set to brighten coffee corners, protect party surfaces, and gift a sprinkle of Irish luck all year long.
Uses
- Festive coasters for St. Patrick’s Day
- Mug rugs for daily coffee
- Quick handmade gifts or party favors
Awesome Crochet Lucky Leprechaun Coaster Pattern
Bring a dash of Irish luck to your coffee table with this cheerful, beginner-friendly crochet coaster. This pattern turns the adorableappliquée look into a practical, flat coaster you can use daily. Moreover, it is quick to make, delightfully stash-busting, and wonderfully giftable. Additionally, the clear steps, plentiful tips, and carefully placed transition words will help your readability shine. So, gather your yarn, choose your favorite greens, and let’s stitch some good fortune!
Skill Level
- Beginner to confident beginner
Terminology
- US crochet terms throughout
Finished Size and Gauge
- Finished coaster diameter (without hat): approximately 12 cm / 4.75 in
- Total height with hat: approximately 14–15 cm / 5.5–6 in
- Gauge (not critical): after Round 3 of the face circle, the diameter should measure about 8–9 cm. Adjust the hook size if your circle is much smaller or larger.
Materials (with exact tools and practical measurements)
- Yarn: Light/DK weight (approx. 260 m per 100 g)
- Green (hat): about 6–8 g (approx. 16–22 m)
- Cream or beige (face): about 5–6 g (approx. 14–17 m)
- Orange (beard): about 5–6 g (approx. 14–17 m)
- Black (hat band): small scrap (approx. 1–2 m)
- Gold/yellow (buckle + clover center): small scrap (approx. 1–2 m)
- Optional pink (nose/cheeks): small scrap (approx. 1–2 m)
- Optional backing color (for a fully flat, double-layer coaster): 7–9 g (approx. 20–25 m)
- Hook: 3.0 mm crochet hook (or size needed to hit the 12 cm diameter comfortably)
- Tapestry needle for weaving ends and embroidery
- Scissors
- Stitch markers (optional, yet very helpful)
- Blocking mat and pins (optional for a super-flat finish)
- Hot beverage for celebrating (strongly recommended)
Abbreviations
- MR: magic ring
- ch: chain
- sl st: slip stitch
- sc: single crochet
- hdc: half double crochet
- dc: double crochet
- tr: treble (triple) crochet
- inc: increase (2 sts in the same stitch)
- st(s): stitch(es)
- RS/WS: right side/wrong side
Color Legend
- C = Cream (face)
- O = Orange (beard)
- G = Green (hat)
- K = Black (hat band)
- Y = Yellow/Gold (buckle/clover center)
- P = Pink (optional nose/cheeks)
Before You Start: Helpful Notes
- Work in joined rounds for the circle unless noted otherwise. Consequently, you’ll have a neat edge that’s easy to measure.
- Always change colors at the split line between the face and beard to keep the two-tone effect crisp. Additionally, carry the unused strand along the back and crochet over it to minimize weaving in ends.
- Use US terms and maintain even tension; however, do not stress about gauge. Therefore, if the coaster is slightly larger or smaller, it will still work beautifully.
- For best coaster functionality, you can leave it single-layer; nevertheless, adding an optional flat backing circle makes it perfectly level and absorbent.
Step-by-Step Pattern
Part A — Face Circle with Split Beard (C + O)
We will create a clean, flat circle featuring cream on one half (face) and orange on the other half (beard). Meanwhile, we will maintain the color boundary straight up the center.
Time for Part A: 25–35 minutes total
- Round 1 (Foundation circle, two-color): 10–12 minutes
- With C, ch 5, join with a sl st to form a ring.
- Ch 3 (counts as dc), then place 7 dc into the ring (8 cream dc total).
- Then change to O; crochet 8 dc into the same ring with O to complete the round (you now have 16 dc total: 8 C + 8 O).
- Finally, join to the top of the beginning ch-3 with a sl st.
Tip: Moreover, snug up the ring tail so the center closes neatly.
- Round 2 (Even increases across both halves): 8–10 minutes
- Ch 3 (counts as dc). Dc in the same st (C inc made).
- Then continue on the C side: place 2 dc into each of the next 6 sts (you’ll now have 16 C dc in this round’s total).
- Next, switch to O at the boundary; on the O half, work 2 dc in each of the next 8 sts (16 O dc in this round).
- Consequently, join with a sl st to the top of the beginning ch-3. At this point, you should have 32 sts total around (16 C + 16 O).
Note: Additionally, keep floats tidy by lightly trapping the unused color under your stitches.
- Round 3 (Smooth growth to expand the circle): 7–10 minutes
- Ch 3 (counts as dc), dc in the same st (first inc made).
- Next, work the standard even increase pattern around: [dc in next st, 2 dc in next st] repeat.
- While maintaining color placement, switch at the same boundary so the top half remains C and the bottom half remains O (or vice versa, depending on your orientation).
- Then join with a sl st to the beginning ch-3. You should now have 48DCc total.
Size check: After Round 3, your circle should be approximately 8–9 cm across.
- Optional Round 4 (If you need a full 12 cm on thinner yarn): 6–8 minutes
- Work [dc in next 2 sts, 2 dc in next st] around, maintaining the same color boundary.
- Join with a sl st to the beginning ch-3. You’ll have 64 DC.
- As a result, your circle should now measure about 11.5–12.5 cm. If you already reached 12 cm at Round 3, simply skip this round.
Part B — Ears (C)
Time for Part B: 5–7 minutes
We’ll add two tiny half-circle ears to the sides of the face. Therefore, place them symmetrically along the boundary line so they look natural.
- On the C side, choose one side-stitch on the face edge where an ear should sit (about halfway up the circle’s side).
- Join C in that st; ch 3 (counts as dc), place 3 dc into the same st to form a small ear bump. Then fasten off and weave in the small tail to anchor.
- Similarly, repeat on the opposite side so the ears match.
Tip: Additionally, if your ears flare too much, reduce to ch 2 + 2 dc instead.
Part C — Hat Brim (G)
Time for Part C: 10–12 minutes
Now we’ll arc a brim across the top of the face. Consequently, it frames the forehead and gives the coaster its leprechaun charm.
- Identify the top span of the circle above the face (the C half). Mark the second st to the left of the face’s center top.
- Join G on that street. Ch 4. Then, in the same street, place 1 tr.
- Next, place 2 dc in each of the next 2 sts.
- Then work 2 hdc in the next st.
- After that, hdc in each of the next 6 sts to cross the top center.
- Next, 2 hdc in the following st.
- Then, 2 dc in each of the next 2 sts.
- Finally, place 2 tr in the next st and fasten off the brim.
Note: Because you’re shaping an arc, the stitch height blends from tr to dc to hdc and back, creating a soft curve. Moreover, keep tension even so it lies flat against the circle.
Part D — Hat Crown (G, worked in rows above the brim)
Time for Part D: 12–15 minutes
We will build the crown upward in neat rows. Therefore, you’ll get a small rectangular hat sitting on the brim.
Row 1:
- With RS facing, rejoin G at the right edge of the brim’s top. Ch 3 (counts as dc).
- Dc in the next 3 sts, then hdc in the next 14 sts across the brim’s top edge, and finally dc in the last 4 sts. Turn.
Row 2: - Sl st in the first 4 sts to gently taper the lower hat edge.
- Ch 3, dc in the next 12 sts. Turn.
Row 3: - Ch 3, dc in the next 12 sts. Fasten off and weave in ends.
Note: Additionally, feel free to add or subtract 1 row for a taller or shorter hat. However, keep it low-profile if you want mugs to sit comfortably.
Part E — Hat Band and Buckle (K + Y)
Time for Part E: 6–8 minutes
The hat band adds contrast; the buckle adds shine.
- With K, surface-slit-stitch or surface-crochet a horizontal band across the lower third of the hat crown. Consequently, the band should span the width of your Row 2 section.
- With Y, embroider or surface-stitch a small rectangular buckle centered on the band. Additionally, outline the square, then add a tiny vertical bar to suggest the prong (optional).
Tip: Moreover, if you prefer, crochet a tiny ch-10 strip in K, sl st back to create a narrow band, and sew it onto the crown instead of surface crochet.
Part F — Clover (G + Y)
Time for Part F: 5–7 minutes
A tiny shamrock instantly boosts the festive feel. Therefore, we’ll add a simple three-leaf clover following the structure from the source.
- With G, make an MR.
- Repeat 3 times into the ring: [ch 3, 1 dc into MR, ch 3, sl st into MR] to form three petals.
- Then ch 4 for the stem; sl st back down those 4 ch to the ring.
- Pull the MR tight and fasten off.
- With Y (optional), place a tiny French knot or small stitch in the clover center.
- Finally, sew the clover to one side of the hat band or the hat brim.
Tip: Additionally, if you want a four-leaf clover, simply repeat the petal set 4 times before closing.
Part G — Nose (P or C)
Time for Part G: 3–4 minutes
A small, soft nose adds personality without bulk.
- With P (or C for a classic look), make an MR, ch 1, and place 9 hdc into the ring.
- Join with a sl st and fasten off, leaving a tail to sew.
- Position the nose slightly below the brim and centered between the ears.
Note: Moreover, you can lightly stuff the nose with yarn tail ends for a tiny puff.
Part H — Eyes and Smile (Black embroidery)
Time for Part H: 5–6 minutes
Because embroidered features are flatter than beads, they suit coasters perfectly.
- With a tapestry needle and K, embroider two small eyes on the cream face. You can make simple, short horizontal stitches or tiny “U” shapes for closed eyes.
- Then add a small curved smile.
- Finally, secure ends on the WS and weave them in neatly.
Tip: Additionally, for an extra-cute look, add two tiny blush dots with pink embroidery thread or a hint of soft fabric paint.
Part I Optional Backing Circle for Extra Flatness (Any color)
Time for Part I: 10–12 minutes
If you want your coaster ultra-flat and sturdy, add a backing circle and then seam.
- With any coordinating color (cotton works especially well for absorbency), create a flat dc circle that measures the same diameter as your face circle (about 12 cm).
- StandardDCc circle formula:
- Round 1: MR, ch 3, 11 dc into MR (12 total). Join.
- Round 2: 2 dc in each st around (24). Join.
- Round 3: [dc in next st, 2 dc in next] around (36). Join.
- Round 4: [dc in next 2 sts, 2 dc in next] around (48). Join.
- Round 5 (if needed): [dc in next 3 sts, 2 dc in next] around (60). Join.
- Stop when the diameter matches your front piece (usually at 48–60 sts, depending on your tension/hook).
- Placethe WS of the front and the WS of the back together. Then whipstitch around with matching yarn, or sc the edges together through both layers for a clean seam.
- Leave the hat free (do not stitch it into the seam) so the top remains decorative while the coaster base stays flat.
Note: Moreover, lightly block both layers before seaming for the flattest result.
Estimated Total Making Time
- Face circle: 25–35 minutes
- Ears: 5–7 minutes
- Hat brim + crown: 22–27 minutes
- Band + buckle: 6–8 minutes
- Clover: 5–7 minutes
- Nose + embroidery: 8–10 minutes
- Optional backing + seaming: 15–20 minutes
Overall: approximately 1.5–2 hours without backing, and 2–2.5 hours with backing, depending on experience.
Basic Tips for Success For ( Crochet Lucky Coaster Pattern)
- Keep color changes tidy: Moreover, always change colors at the back of a stitch or at the marked boundary to keep the split straight.
- Control yarn floats: Additionally, gently crochet over the inactive color so it’s hidden; however, avoid pulling too tightly, which can pucker the edge.
- Stay flat: Therefore, block lightly if needed. Steam-block acrylic carefully; alternatively, wet-block cotton for perfect crispness.
- Use cotton for coasters: Furthermore, cotton yarn absorbs moisture better and lies flatter under cups.
- Be consistent: Similarly, keep your dc height even; if you notice doming, reduce tension slightly or move up a hook size by 0.5 mm.
Common Mistakes (and How to Fix Them)
- Wavy or ruffled circle: You probably increased too quickly or used a loose tension. Consequently, on your next attempt, check your stitch counts at the end of each round and avoid stretching the circle while measuring.
- Dome or bowl shape: You may need more increases. Therefore, add one more round or loosen your tension slightly.
- Crooked color boundary: The join and color change might be shifting. Additionally, use a stitch marker to track the exact boundary stitch; then, always switch colors in the same place.
- Bulky joins at the hat brim: You might be stacking tall stitches too tightly. Consequently, relax your tension on tr and dc, and block the finished brim to smooth it.
- Uneven hat band: Surface crochet can wander. Therefore, lightly draw a guideline with removable stitch markers across the crown; then follow it as you stitch.
Fun Variations
- Classic coaster set: Moreover, crochet a set of four, alternating hat band colors (black, navy, brown, or even glitter gold).
- Four-leaf clover upgrade: Consequently, add an extra leaf for extra luck; place it at a jaunty angle on the brim.
- Textured beard: Additionally, switch the beard stitches to hdc in the back loop only on the final round to add a soft, fuzzy look.
- Minimalist face: Instead of a nose applique, embroider a tiny triangle or a simple “dot” with satin stitches.
- Keychain or magnet: Moreover, reduce your hook size to 2.5 mm and use finer yarn to make a mini version; then add a lobster clasp or glue on a magnet.
- Garland or bunting: Similarly, make several motifs and string them along a cord for St. Patrick’s Day decor.
- Pocket on the back: Consequently, before seaming to the backing circle, crochet a half-circle pocket and stitch only its curved edge, leaving the straight edge open for a gift card.
Care and Use
- Hand wash gently in cool water; reshape and lay flat to dry.
- Avoid very hot mugs directly on acrylic yarn; additionally, cotton handles heat better.
- Store flat. Moreover, do not fold the hat excessively to prevent creases.
Troubleshooting Size and Fit
- If your coaster finishes smaller than 12 cm: Add Optional Round 4 on the face circle or move up to a 3.5 mm hook.
- If it’s larger than 12 cm: Skip Optional Round 4 or drop to a 2.75 mm hook.
- If the hat feels too tall: Remove Row 3 of the crown or reduce stitch heights from dc to hdc across the crown rows.
Why This Pattern Works (SEO-friendly highlights)
- This Awesome Crochet Lucky Leprechaun Coaster Pattern is beginner-friendly, fast, and festive.
- St. Patrick’s Day crochet coasters add instant seasonal charm to your table.
- The two-tone face-and-beard circle uses simple increases and crisp color changes for a clean, professional finish.
- The hat brim and crown are built directly on the circle; therefore, there’s no complex assembly.
- The tiny clover, buckle, and embroidered face deliver maximum personality with minimal effort.
Frequently Asked Questions For ( Crochet Lucky Coaster Pattern)
Q: Can I use worsted/aran weight yarn?
A: Yes. However, the coaster may grow larger. Therefore, drop to a 3.0 mm or 3.5 mm hook and stop increasing as soon as you hit ~12 cm.
Q: Will acrylic yarn work for coasters?
A: Absolutely, although cotton absorbs condensation better. Consequently, consider adding the optional cotton backing circle for improved performance.
Q: Can I stitch the hat directly onto the backing?
A: Yes. Additionally, just align the hat brim edge before seaming so it sits straight.
Q: Do I need safety eyes?
A: Not at all. Moreover, embroidered eyes keep the surface flat and cup-safe.
Wrap-Up For ( Crochet Lucky Coaster Pattern)
With simple stitches, neat color changes, and charming details, this Awesome Crochet Lucky Leprechaun Coaster Pattern brings playful St. Patrick’s Day magic to your home. Additionally, by following the step-by-step instructions and times, you’ll finish quickly and confidently. So, pour a cup, pop on some Irish tunes, and enjoy the luck you just stitched into every sip.