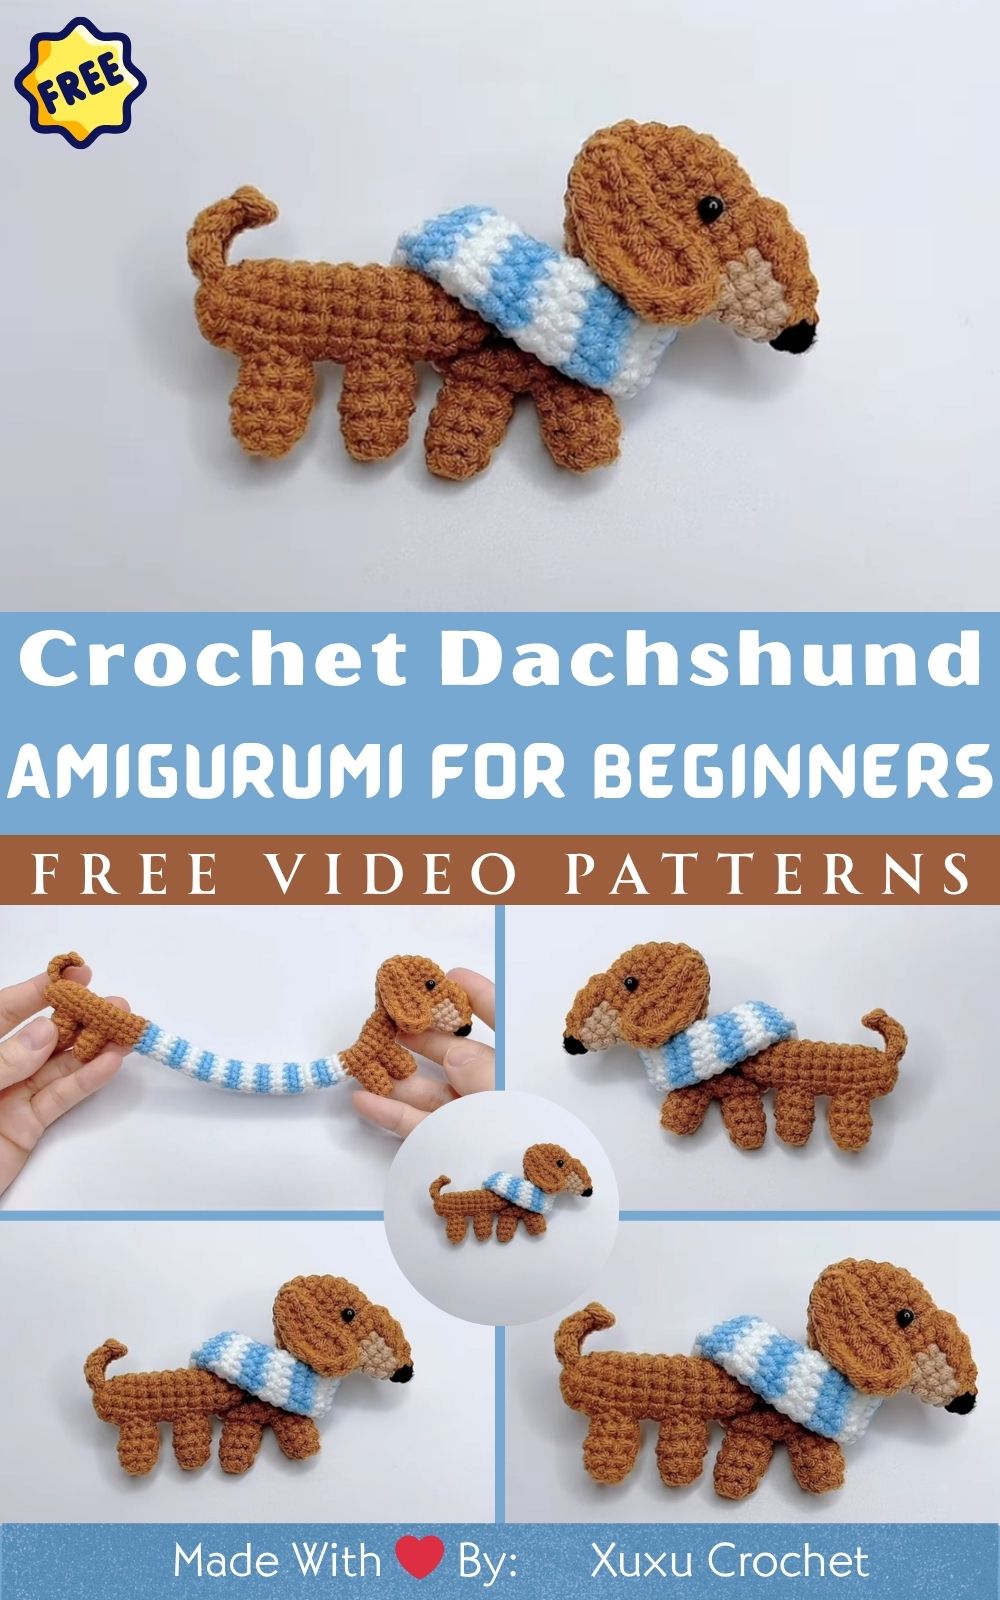
Ultimate Crochet Dachshund Amigurumi Pattern for Beginners
There’s something magical about turning a simple skein of yarn into a living piece of art. The beauty of crochet lies in how it transforms creativity into something you can see, touch, and cherish. Each loop and pull of the hook carries warmth, patience, and the satisfaction of making something from your own two hands. Whether it’s the comforting rhythm of stitching or the joy of watching your creation come to life, crocheting connects you to something deeper a timeless craft rooted in love and creativity.
This Crochet Dachshund Amigurumi Pattern is an irresistible project that captures that magic perfectly. With its long body, floppy ears, and curious expression, this little handmade pup is both heartwarming and delightfully fun to make. It’s the perfect project for dog lovers and amigurumi fans who want to bring a touch of playfulness into their crafting routine. The finished dachshund is small enough to sit on a shelf, desk, or bedside table but big enough to melt hearts instantly.
What makes this pattern truly special is how beginner-friendly it is. Even if you’re just starting your crochet journey, you’ll find this dachshund pattern approachable and satisfying. Advanced crafters, on the other hand, will love the creative freedom it offers from experimenting with yarn types and colors to adding custom accessories that make each dachshund unique.
And perhaps the best part? Crocheting offers peace and joy in every stitch. It’s more than a hobby; it’s a calming ritual that helps you slow down and create something meaningful. Making this dachshund isn’t just about producing a toy it’s about crafting happiness, one loop at a time.
Materials & Tools
Before you begin, gather all the essentials for your crochet adventure. A few thoughtful choices will make your amigurumi soft, durable, and picture-perfect.
You’ll Need
Yarn: Medium-weight (Worsted / Category 4) acrylic or cotton yarn in brown, black, and beige (for body, nose, and accents)
Crochet Hook: Size 3.0 mm or 3.5 mm — smaller hooks create tighter, cleaner stitches
Stuffing: Polyester fiberfill (soft but firm)
Safety Eyes: 6 mm or 8 mm for expressive puppy eyes
Scissors: Sharp, clean scissors for precise trimming
Tapestry Needle: For sewing pieces together and weaving ends
Stitch Markers: To track rounds (especially useful for beginners)
Choosing Yarn and Colors
For realistic dachshund tones, go with chocolate brown, caramel, or black and tan combinations. For a playful or fantasy version, try cream, gray, or even pastel pink yarn.
Cotton yarn gives your dachshund crisp stitch definition, while acrylic yarn adds a soft and flexible finish. If you want extra cuddliness, a touch of velvet yarn works wonders — just use a smaller hook for firm shaping.
Step-by-Step Crochet Instructions
Let’s bring your little dachshund to life! These steps are inspired by the YouTube tutorial (source above) reimagined for clarity, creativity, and ease of understanding.
Step 1: Making the Head
Begin with a magic ring.
Round 1: 6 single crochets (sc) into the ring.
Round 2: 2 sc in each stitch (12 sts).
Round 3: (1 sc, inc) repeat around (18 sts).
Continue increasing evenly until you reach 36 sts.
Work several rounds evenly (no increase) to build head length.
Tip: Shape the head by slightly reducing the last few rounds with small decreases. Stuff firmly but not overly tight to maintain a rounded muzzle.
Add safety eyes between rounds 9–10, spacing them about 6 stitches apart. You can embroider small eyebrows or a smiling mouth for extra personality.
Step 2: Forming the Neck and Upper Body
After completing the head:
Continue crocheting down to create a narrow neck section (around 3–4 rounds of even single crochets).
Gradually increase to shape the body.
This transition creates that adorable dachshund silhouette — long, smooth, and sleek.
Pro Tip: Keep tension even through this area so the shape flows naturally from head to body.
Step 3: Building the Main Body
From the neck, work several rounds without increasing.
Every few rounds, add subtle increases along the belly to form a gentle curve.
Once you reach mid-body, maintain even rounds until the desired body length (about 15–20 rounds for a medium dachshund).
Then, start decreasing slowly toward the tail end.
Stuff the body gradually as you go to avoid lumps. A long, firm shape gives that signature dachshund look.
Step 4: Shaping or Attaching the Base
For a smooth finish:
Continue decreasing until the body is closed off neatly.
Use invisible decreases (front-loop only) to create a clean seam.
Weave in the end with a tapestry needle.
If you want your dachshund to stand, slightly flatten the base before closing and insert a small cardboard disc or plastic base inside for stability.
Step 5: Creating the Tail and Limbs
Tail:
Start with 6 sc in a magic ring.
Increase slightly for the base, then continue several rounds evenly.
Gradually decrease to form a tapered end.
Lightly stuff or leave unstuffed for flexibility.
Attach at the back center of the body.
Legs:
Make four identical pieces:
Magic ring, 6 sc.
(1 sc, inc) around — 9 sts.
Continue for 5–6 rounds to create short legs.
Slightly stuff and sew to the underside of the body.
Position them symmetrically so your pup stands evenly.
Step 6: Ears, Nose & Details
Ears:
Dachshunds have iconic long floppy ears!
Chain 10.
Work 1 sc in each stitch down the chain.
In the last stitch, make 3 sc to round the edge.
Continue along the other side.
Slightly curve by adding an extra sc on one end.
Make 2 identical pieces and sew behind the eyes.
Nose:
Magic ring, 6 sc in black yarn.
Join with a slip stitch and leave a long tail to sew onto the snout.
You can also embroider nostrils or use a tiny safety nose for extra cuteness.
Step 7: Assembly and Finishing Touches
Now that you’ve made all the parts:
Attach the head to the body using whip stitch or mattress stitch.
Sew the legs securely — front legs slightly forward, back legs near the tail.
Attach the tail last.
Add the ears and nose.
Adjust placement before tightening stitches.
Finally, embroider a tiny smile or add a small bow collar!
Pro Tip: Pin all pieces before sewing to ensure symmetry.
Your dachshund is now complete — cheerful, wobbly, and irresistibly cute!
Customization Ideas
Crochet lets you express your imagination. Try these fun ways to personalize your dachshund amigurumi:
1. Color Variations
Classic Brown Dachshund: Deep chocolate with tan accents
Black & Tan: Black body with caramel muzzle and paws
Pastel Pet: Baby pink or mint green for a fantasy look
Rainbow Pup: Stripes of leftover yarn for a fun, quirky twist
2. Yarn Textures
Experiment with soft velvet or fluffy chenille yarn for a plushie feel. Cotton yarn gives a defined, sleek look suitable for décor.
3. Accessories
Add a tiny scarf, bowtie, or collar
Make a mini hat for holidays
Sew on felt hearts or embroidered paw prints
Create a small blanket or basket for your dachshund to sit in!
Advanced Tips & Troubleshooting
Here are 10 expert insights to take your amigurumi from “cute” to “pro-level adorable.”
Invisible Decreases: Use front-loop-only decreases to avoid visible gaps.
Consistent Tension: Practice uniform hand pressure; uneven stitches affect shape.
Prevent Twists: Double-check stitch direction in continuous rounds.
Fixing Uneven Shapes: Steam-block gently or reshape with your hands before closing.
Proper Stuffing: Fill in layers and compact slightly to avoid lumps.
Clean Color Changes: Switch yarn on the last pull-through of the stitch.
Seamless Joins: Use invisible finish methods for clean attachments.
Read Abbreviations: Familiarize yourself with standard crochet terms (sc, sl st, inc, dec).
Finishing Ends: Weave tails in opposite directions to prevent unraveling.
Final Check: Adjust leg placement to ensure the dachshund sits evenly.
Care Instructions
Keep your handmade dachshund as fresh as the day you made it:
Gentle Wash: Hand wash in cool water using mild detergent.
No Harsh Rubbing: Gently squeeze; don’t twist or wring.
Air Dry Flat: Lay on a towel and reshape while drying.
Avoid Sunlight: Prolonged exposure can fade yarn colors.
Storage: Keep in a dry, dust-free area or inside a clear display case if it’s part of your home décor.
If gifting, wrap it in tissue paper and a cotton drawstring bag for a professional handmade touch.
Display & Gift Ideas
Your crochet dachshund can be used in so many fun and heartwarming ways!
Home Décor: Perfect for bookshelves, living rooms, or entryway tables.
Kid’s Companion: Soft, cuddly, and safe when made with securely attached eyes.
Office Desk Buddy: Adds a cheerful, handmade charm to your workspace.
Holiday Ornament: Add a hanging loop to make it part of festive décor.
Personalized Gift: Pair with a small handwritten note or crochet blanket for birthdays or holidays.
Bonus Idea: Make two dachshunds — one sitting and one lying down — to display as a pair!
Benefits of Making a Crochet Dachshund Amigurumi
Crafting this sweet pup offers more than just a finished toy — it’s therapy through creativity.
Relaxation & Mindfulness
Crochet slows down your thoughts. The rhythm of hook and yarn encourages mindfulness, helping you unwind after a busy day.
Stress Relief
Crafting shifts focus away from worries, reducing stress and improving mood. A dachshund’s smile is the cherry on top!
A Sense of Accomplishment
Finishing your amigurumi is deeply satisfying. You’ve created a character — something tangible and full of love.
Eco-Friendly Gifting
Handmade gifts are sustainable, meaningful alternatives to store-bought items. Your dachshund is a symbol of time, care, and creativity.
Emotional Connection
Every handmade item carries emotion. Whether gifted or kept, your crochet dachshund becomes a tiny reminder of joy, patience, and artistry.
Photography & Social Media Tips
Show off your little crochet companion in the best light!
Natural Lighting: Use gentle daylight near a window for true colors.
Soft Backgrounds: White, beige, or wooden textures complement the warm yarn tones.
Props: Add balls of yarn, hooks, or mini dog toys for storytelling flair.
Angles: Capture side, front, and top views to showcase all features.
Close-Ups: Focus on details — stitches, eyes, and ears.
Editing: Keep colors natural; avoid harsh filters.
Conclusion
There’s no greater joy than holding a handmade creation in your hands — especially one as charming as a Crochet Dachshund Amigurumi. From the first chain to the last stitch, you’ve crafted not just a toy, but a memory, a smile, and a story. Each loop carries your creativity and care, turning simple yarn into something irresistibly alive.
Whether you make it for yourself, as a gift, or as a keepsake for someone special, this project reminds us of the simple pleasures of creating. It’s proof that love, patience, and imagination can turn even the humblest materials into something truly magical.
So grab your yarn, hook, and a cozy spot and let this little dachshund wag its way into your heart.