
Crochet Christmas Tree with the Cutest Low-Sew Star for Holiday
There’s something truly magical about the art of crochet how a simple strand of yarn can be looped, twisted, and woven into a three-dimensional creation brimming with personality. For many of us, the rhythmic glide of the hook and the ever-growing fabric beneath our fingertips bring a comforting sense of accomplishment. And what could be cozier or more satisfying than crafting something perfect for the season of warmth and giving?
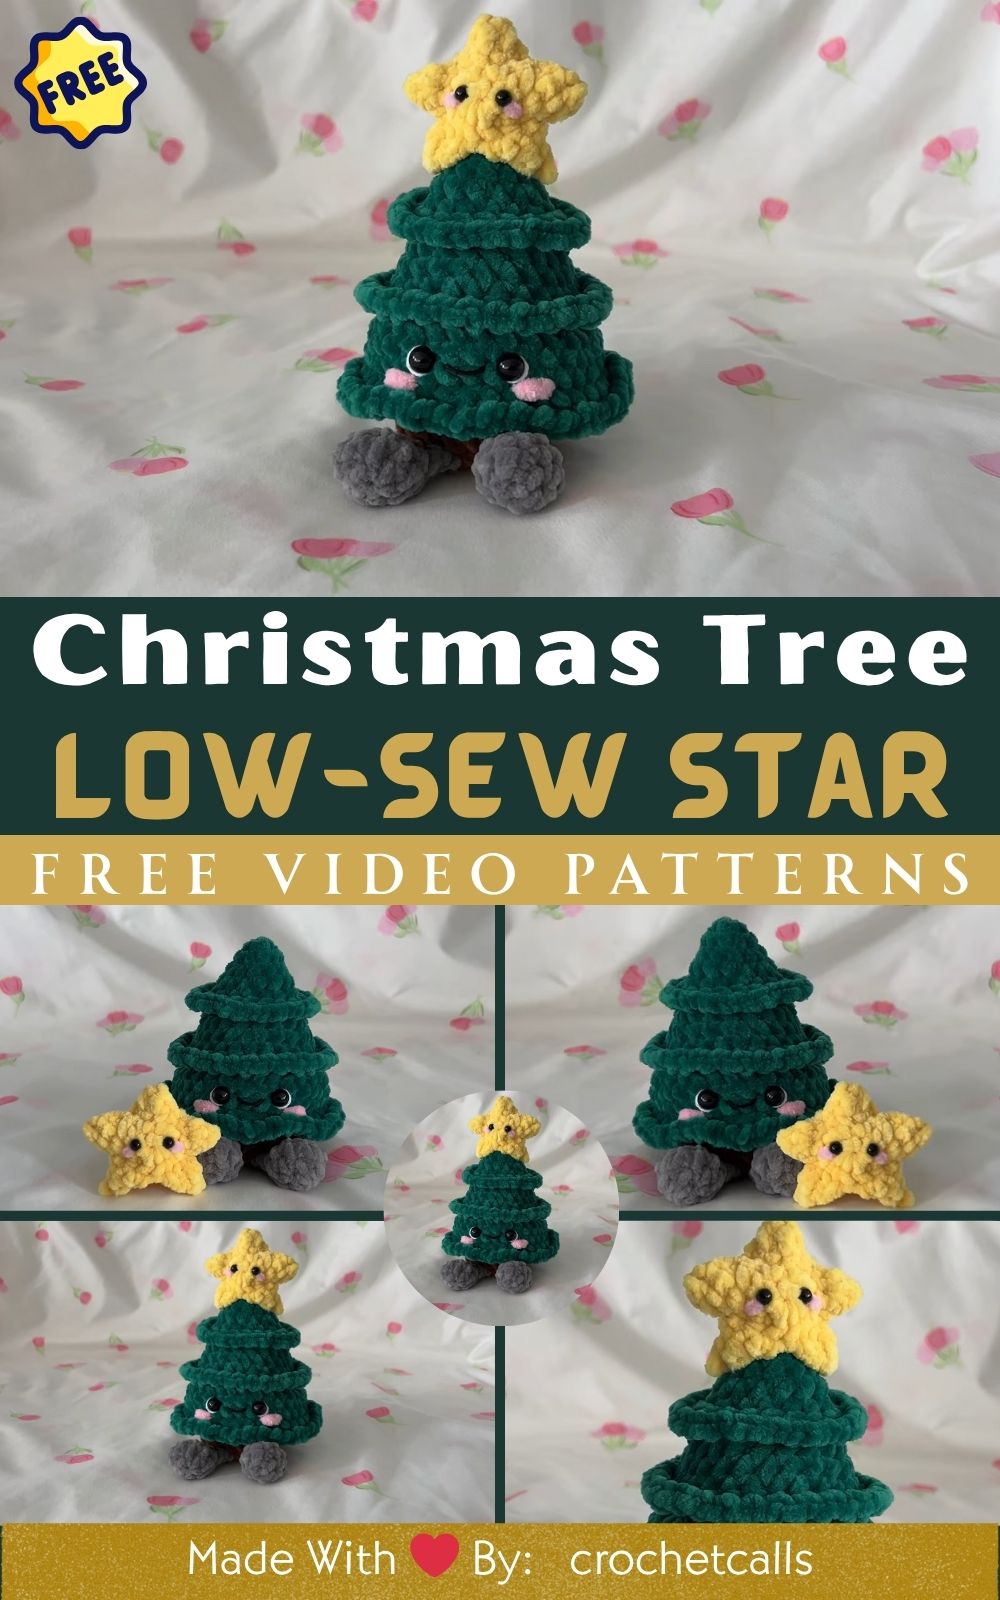
That’s where our featured project comes in: the Crochet Christmas Tree with the Cutest Low-Sew Star. Designed with holiday cheer in mind, this charming amigurumi-style tree brings classic festive vibes with a playful, modern twist. Its shape is delightfully round, squishy, and easy to customize making it a joy to craft whether you’re making one for yourself or as a precious handmade gift.
This project is ideal for all skill levels. Beginners will love the straightforward construction, with minimal sewing involved, while advanced crocheters can have fun adding extra embellishments and fancy textures. Whether you want a minimalist tree with one color or a vibrant rainbow-style holiday tree, this pattern gives you full creative freedom.
Beyond its adorable looks, there’s a deeper satisfaction in creating something by hand especially during the holidays. Crochet encourages us to slow down, switch off the noise, and reconnect with simple pleasures. So, brew some tea, grab your favorite yarn, and let’s make this festive Crochet Christmas Tree that’s sure to bring smiles and holiday spirit wherever it goes.
3. Materials & Tools
Before we dive into the magical world of stitches and stuffing, let’s gather everything we need. Here’s a list of the essential tools and supplies for this project:
Yarn
Worsted weight (Category 4) yarn in the following colors:
Green (for tree body)
Yellow or gold (for the star)
Optional colors for added accessories (red, white, glitter yarn, etc.)
Tip: A soft acrylic yarn works great for durability and stretch, but cotton gives a lovely stitch definition.
Hook
3.5mm to 4mm crochet hook (adjust size depending on your yarn tension)
Stuffing
Polyester fiberfill or scrap yarn for stuffing
Safety Eyes
6–8mm round safety eyes (or embroider eyes using black yarn)
Other Tools
Tapestry needle (for weaving in ends and minimal sewing)
Scissors
Stitch markers
Pins (optional, for placement before final stitching)
Choosing Yarn Tips:
Use bright, festive green to give your tree a traditional look, or choose modern hues like pastel teal or variegated yarns for a whimsical finish.
If you’re making this as a child-safe toy, avoid safety eyes and embroider the facial features instead.
Make sure your yarn weight matches your hook so the stitches look tight enough to hold stuffing without showing gaps.
4. Step-by-Step Crochet Instructions
This adorable Christmas tree is made using amigurumi techniques — crocheting in the round, shaping with increases and decreases, and adding cute personality with a low-sew star topper. Let’s begin!
1. Crochet the Tree Body (Head & Main Section)
R1: Start with a magic ring. Work 6 single crochet (sc) into the ring.
R2: Increase in each stitch around (12 sts).
R3–R4: Continue with sc in each stitch, adding strategic increases to widen the cone-shaped body as you go.
Tip: Use stitch markers to mark the start of each round — this helps keep everything neat and even.
Once the upper “head” and rounded top are formed, switch to working in gradual increases to widen the body. The goal is to create a pyramid shape that’s softly rounded and plush.
2. Creating the “Face”
Before closing the bottom, attach safety eyes between rounds 8 and 9, spaced about 6 stitches apart. You can also embroider a small closed smile, like a gentle ‘u’ shape, under the eyes.
Expert Tip: If you want a blushing look, add a tiny amount of pink yarn or felt circles next to the eyes before stuffing.
3. Shaping the Base
Work the decreases gradually while stuffing firmly as you go. This will help prevent lumps and give your tree a cute, plump appearance. As you approach the last few rows, make sure the base is fully stuffed and evenly rounded.
Slip stitch to close the bottom or finish off with a yarn needle for an invisible close.
4. Making the Low-Sew Star
The star is worked in rows and then shaped into a classic 3D star with just a little sewing — or none at all if you keep it flat. It’s light, dainty, and just the perfect accent for your tree!
Here’s a basic low-sew star method:
Chain 2, then sc 5 into the second chain from hook (like a mini magic ring template).
Work 5 points of the star using short rows and slip stitches.
Once shaped, tie off and weave in ends.
Use a bit of glue or a single hidden stitch to attach the star to the top of the tree. So cute and effortless!
5. Assembly & Final Touches
Attach the star topper.
Add tiny beads or embroidery stitches to resemble ornaments.
Add a felt or crocheted base to stand the tree, if preferred.
5. Customization Ideas
Want to take your Crochet Christmas Tree with the Cutest Low-Sew Star to the next level? Here are a few fun ways to personalize your project:
Rainbow Tree: Work in stripes of pastel or bright rainbow colors.
Winter Wonderland: Use white yarn with sparkly thread and add snowflake details.
Dressed Up: Crochet a little scarf, bow, or heart-shaped ornament.
Festive Fun: Add pompoms, mini buttons, or bells as decorations.
Textured Yarn: Try velvet or chenille yarn for a super cuddly look.
6. Advanced Tips & Troubleshooting
Whether you’re a beginner or advanced maker, these tips will help improve your final result:
Invisible Decrease Trick: Use the front-loop decrease stitch to avoid bulky seams.
Keep Tension Even: Less variation = smoother, cuter amigurumi.
Avoid Twisted Rounds: Check each round is flat before continuing.
Stuff Firmly but Carefully: Don’t overstuff — it can distort shape.
Shape with Your Hands: Roll, squeeze, or adjust stuffing to even out bumps.
Seamless Joins: Use ladder stitch for invisible seam finishes.
Pattern Abbreviation Clarity: SC = single crochet; INC = increase; DEC = decrease.
Test Eye Placement: Use pins to test before final attachment.
Don’t Rush the Base: An even bottom creates better balance.
Count Every Stitch: Avoid mistakes that throw off shaping.
7. Care Instructions
To keep your adorable Christmas Tree looking fresh for years:
Hand wash gently with mild soap
Air dry completely — reshape while drying if necessary
Keep out of direct sunlight to prevent fading
Store in a breathable container or give it a cozy home on display
8. Display & Gift Ideas
Your Crochet Christmas Tree with the Cutest Low-Sew Star is perfect as…
A thoughtful handmade gift for loved ones
Desk companion for cozy holiday spirit
Home décor for shelves, mantels, or TV stands
A festive ornament for the Christmas tree (add a loop!)
A kids’ soft toy or nursery accessory
9. Benefits of Crafting This Project
Making this cute holiday plush isn’t just satisfying — it’s good for you!
Promotes mindfulness and calm through focused crafting
Reduces stress with repetitive, soothing motions
Fosters joy and accomplishment through handmade art
Encourages sustainable gifting with reusable materials
Deepens personal connections through heartfelt, homemade presents
10. Photography & Social Media Tips
Want to show off your creation? Try these tricks:
Use natural lighting for softer tones
Style your project with festive props: ornaments, ribbons, or cinnamon sticks
Keep backgrounds clean — wood, white fabric, or cozy blankets work great
Try macro shots to show off your stitches and cute accessories
11. Conclusion
There’s nothing quite like transforming yarn into a little piece of magic and this Crochet Christmas Tree with the Cutest Low-Sew Star does exactly that. Whether you’re making it for yourself or gifting it to someone special, this is more than just a craft project it’s a bundle of joy, charm, and handmade love. Each stitch, each tiny detail speaks the language of warmth and creativity.
So grab your hook, some yarn, and let your heart guide your crafting. The world could always use a bit more handmade happiness and this little Christmas Tree is a perfect place to start. Happy crocheting and happy holidays!


