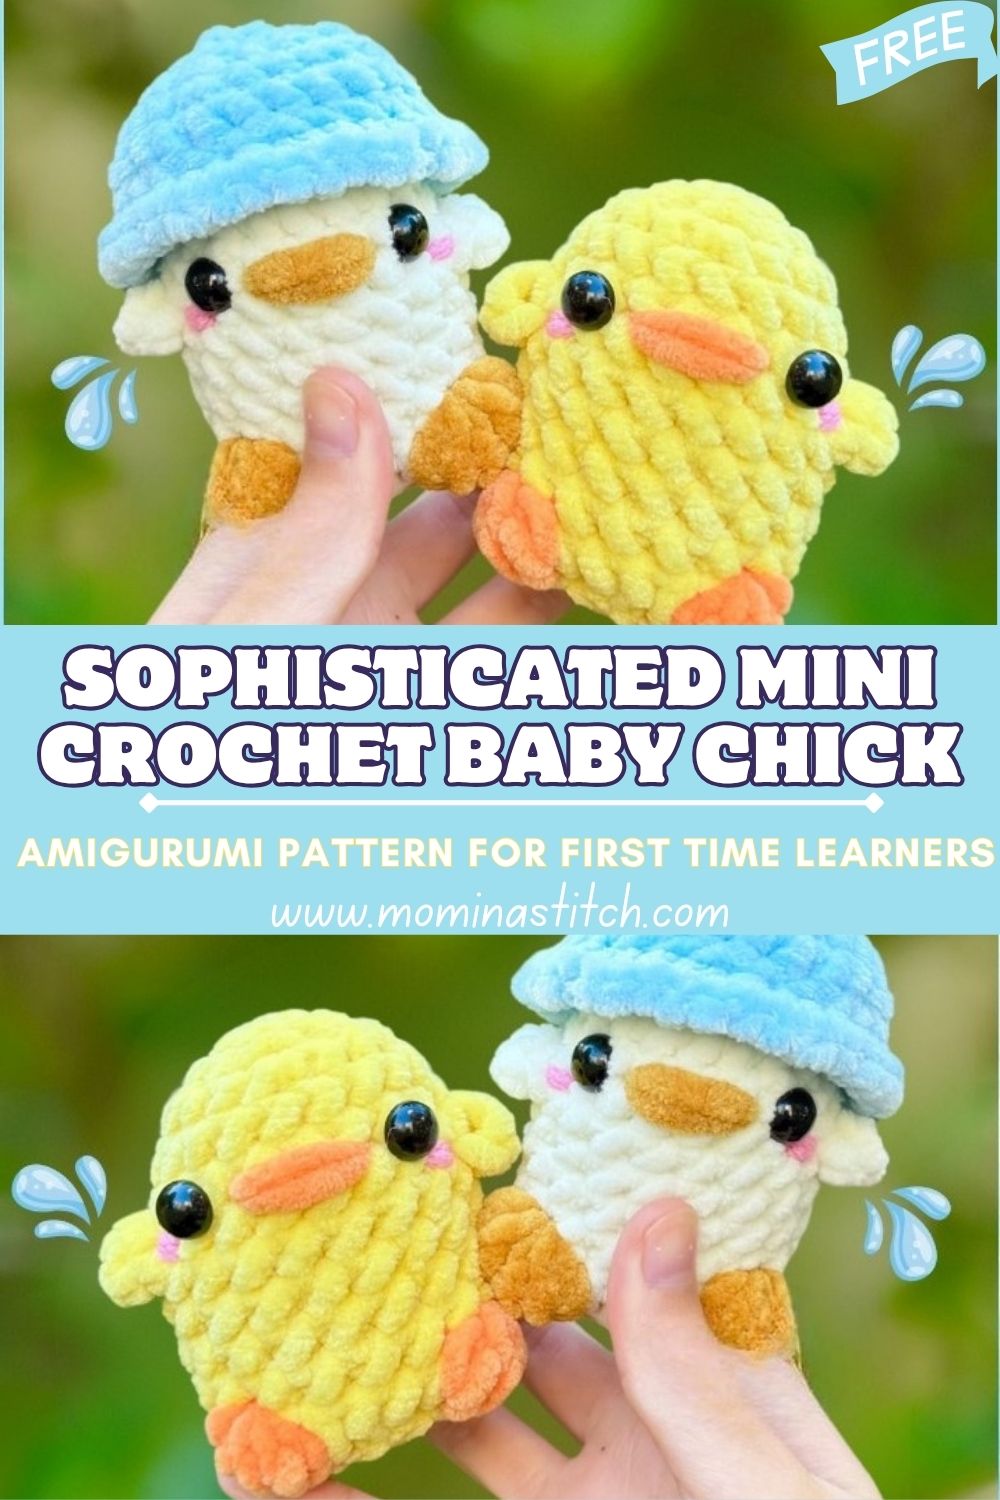
Sophisticated Mini Crochet Baby Chick Amigurumi Pattern For first Time learners
A fluffy amigurumi chick is one of those tiny projects that instantly lifts the mood. Plus, this crochet baby chick is small enough to finish in one sitting, which makes it perfect for anyone craving a quick, cozy win.
Even better, this mini crochet bird pattern uses simple shapes and beginner-friendly stitches. So, the finished chick looks polished and plush, even if the maker is still learning the basics.
Meanwhile, mini crochet animals are trending because they are fast, giftable, and easy to display anywhere on desks, shelves, bedside tables, and even in handbags. Chicks and other tiny birds are especially popular because the shapes are naturally round, the details are minimal, and the result still looks expressive with only eyes and a beak.
This chick pattern is beginner-friendly because it focuses on one main body piece and then adds tiny parts that are forgiving and quick to make. In addition, plush or chenille yarn hides minor imperfections, so the finished chick looks extra neat. Best of all, the stitch list stays simple: single crochet, increases, decreases, and a few slip stitches for clean shaping.
Important Notes Before Starting
- First, use a smaller hook than the yarn label suggests to keep stitches tight and prevent stuffing from showing.
- Next, count stitches every round, because amigurumi relies on consistent shaping.
- Meanwhile, place a stitch marker in the first stitch of each round so the round’s start is never lost.
- After that, stuff gradually as the body closes, because last-minute stuffing usually creates lumps.
- Finally, embroider or attach parts securely, especially if the chick is meant for little hands.
Skill Level
This pattern is beginner/easy. First, it uses basic amigurumi shaping; next, the pieces are small and repeat the same stitches. As long as single crochet and counting rounds feel comfortable, the chick will turn out great.
Materials Needed
- Yarn (main color): Super bulky chenille/plush yarn (Weight #6), about 25–35 g (roughly 20–30 m) in chick yellow
- Yarn (accent): Small amounts of orange (beak/feet), plus optional pink (blush) and black (if embroidering eyes)
- Crochet hook: 4.5 mm or 5.0 mm (choose the smaller size for tighter stitches)
- Safety eyes: 6 mm (or 8 mm for a bigger face), plus washers
- Stuffing: Polyester fiberfill (polyfill), about 10–15 g
- Yarn needle: For sewing parts and weaving ends
- Stitch marker: Locking marker or scrap yarn
- Optional accessories:
- Keychain ring (25–30 mm)
- Mini hat supplies (same plush yarn or smooth worsted yarn for definition)
Abbreviations
- MR = Magic ring
- ch = Chain
- sc = Single crochet
- inc = Increase (2 sc in the same stitch)
- dec = Decrease (single crochet two stitches together)
- inv dec = Invisible decrease (recommended for neat shaping)
- sl st = Slip stitch
- st(s) = Stitch(es)
- rnd = Round
- BLO = Back loop only (optional detail)
Making Time (Overview)
Total estimated time: 60–90 minutes.
First, the body works up quickly with plush yarn; next, small parts take only minutes; finally, assembly is simple because there are only a few pieces.
Step-by-Step Instructions
1) Body (Main Shape) – 3 Steps
Making time: 25–35 minutes
Step 1: Start the round base (build the belly)
- Rnd 1: MR, 6 sc (6)
- Rnd 2: inc x6 (12)
- Rnd 3: (sc 1, inc) x6 (18)
- Rnd 4: (sc 2, inc) x6 (24)
- Rnd 5: (sc 3, inc) x6 (30)
Next, pause and check the circle. If the edge ruffles, loosen tension slightly; however, if it cups too fast, double-check stitch counts.
Step 2: Grow the chubby middle (make it round and plush)
6. Rnd 6–9: sc around (30) for 4 rounds
Meanwhile, the chick’s “roundness” begins to take shape here. If a taller body is preferred, add one more plain round; if a shorter chick is preferred, remove one plain round.
Step 3: Shape the top and close (stuff along the way)
7. Rnd 10: (sc 3, dec) x6 (24)
- Rnd 11: (sc 2, dec) x6 (18)
- Begin stuffing: Add polyfill in small pinches, then press it outward toward the sides for a round finish.
- Rnd 12: (sc 1, dec) x6 (12)
- Add a bit more stuffing: The body should feel firm yet squishy, not stretched.
- Rnd 13: dec x6 (6)
- Cut yarn, leave a tail, then weave through the front loops of the last 6 stitches and pull tight to close. After that, weave in securely.
2) Wings (Make 2)
Making time: 10–15 minutes total
Each wing is a tiny, rounded bump, so it stitches up fast and looks cute from every angle.
- Rnd 1: MR, 6 sc (6)
- Rnd 2: (sc 1, inc) x3 (9)
- Rnd 3: sc around (9)
- Fold the circle in half. Next, sc 4 through both layers to close into a small flap.
- Leave a tail for sewing, then fasten off.
After that, lightly flatten each wing between fingers. Because plush yarn is thick, the wing shape will hold even without stuffing.
3) Feet (Tiny Base Detail – Make 2)
Making time: 8–12 minutes total
Two options are included; choose whichever feels easier.
Option A: Simple flat feet (beginner-friendly)
- With orange yarn, ch 4.
- Next, sc in second ch from hook and across: 3 sc.
- After that, ch 1 and turn, then 3 sc again to thicken.
- Fasten off, leaving a tail for sewing.
Option B: Minimal stitched feet (super quick)
Instead of crocheting feet, embroider three tiny “toes” on the bottom front using orange yarn. First, make one straight stitch; next, make two short angled stitches.
4) Beak (Small Triangle/Oval)
Making time: 5–8 minutes
- With orange yarn, ch 2.
- Next, work 3 sc into the second ch from the hook (a tiny puffed triangle).
- Turn (optional), then sc across 3 to firm it up.
- Fasten off, leaving a tail.
Placement tip: The beak looks best centered between the eyes, slightly below their midpoint. After that, pinch the beak lightly before sewing, so it keeps a cute little “kiss” shape.
5) Accessories / Details (Optional)
Making time: 5–15 minutes
A) Blush cheeks (soft and sweet)
First, dab a tiny amount of pink blush or fabric-safe pastel under each eye; alternatively, embroider two small pink lines with thin yarn.
B) Mini hat (tiny top hat style)
For a micro-hat, use smooth yarn (worsted weight) so stitches look crisp against plush fluff.
- MR 6 sc (6)
- inc x6 (12)
- sc around (12)
- (sc 1, inc) x6 (18) for a tiny brim
- sl st to finish, then sew on top of the head.
C) Keychain loop
After finishing the body, stitch a small loop at the top with strong yarn. Next, attach a keychain ring. Finally, double-knot and weave ends deep inside.
6) Face & Assembly
Making time: 15–25 minutes
Step 1: Place the safety eyes
- First, find the front of the chick (the side that looks smooth and even).
- Next, insert 6 mm eyes between Rnd 7 and Rnd 8, about 5–6 stitches apart.
- After that, check the spacing by temporarily holding the beak piece in place.
- Finally, attach washers on the inside.
Beginner tip: Before locking washers, step back and look at the face from a distance. Slightly wider eye spacing usually makes the chick look calmer and cuter.
2: Sew on the beak
- Next, position the beak centered between the eyes, one round lower than the eye line.
- Then, stitch around the edge with small, neat whip stitches.
- Finally, gently pull the yarn to shape the beak, then knot it securely inside.
3: Attach wings
- Pin wings to the sides first (or hold them in place).
- Next, sew each wing to the body along the closed edge, around the Rnd 8–9 area.
- After that, tug gently to confirm the stitching holds.
4: Attach feet
- Place the feet on the bottom front so the chick can sit without tipping back.
- Next, sew each foot with several passes, because feet take the most handling.
- Finally, hide all yarn tails inside the body using the needle.
Special Features
- Soft fluffy texture: Plush yarn gives that “real chick” fuzz without extra steps.
- Cute round chick shape: Simple round shaping creates a chubby, pocket-sized body.
- Tiny decorative hat option: A mini hat instantly adds personality and gift-worthy charm.
- Pocket-sized and adorable: Perfect for desks, baskets, party favors, and small gifts.
Sizing Tips
Yarn thickness and hook size dramatically affect the final size. For example, super-bulky chenille with a 4.5–5.0 mm hook usually makes a chick about 7–10 cm (3–4 in) tall. Meanwhile, switching to worsted-weight yarn and a 3.0–3.5 mm hook creates a smaller, firmer chick with sharper details. Therefore, if a larger plush is desired, choose a thicker yarn and add one extra “plain sc” round in the middle section.
Finishing Tips
- First, use invisible decreases for a smoother look, especially on the head.
- Next, weave in ends by running the yarn tail through several stitches in different directions.
- Meanwhile, stuff in tiny layers, then shape with fingers so the body stays round.
- After that, tighten the final closure neatly, then hide the knot deep inside.
- Finally, gently brush the plush yarn with your fingers to fluff up any flattened areas.
Common Mistakes to Avoid
- Loose stitches: Stuffing will show through; therefore, use a smaller hook and keep tension steady.
- Overstuffing: The body can stretch and look lumpy; instead, aim for “firm marshmallow,” not “hard ball.”
- Uneven face placement: Eyes too high or too close can change the mood; consequently, always test placement before locking washers.
- Incorrect wing positioning: Wings too low can look like fins; therefore, attach around the widest part of the body.
- Weak assembly: Small pieces get tugged, so sew with multiple passes and secure the knots inside.
Variations & Customization Ideas
- Color swaps: Try white for a “spring chick,” pale yellow for a soft pastel look, or mint/pink for a playful nursery theme.
- Extra accessories: Add a bow, a tiny scarf, or a flower stitched near one wing.
- Change the size: Use worsted for a smaller chick, or jumbo chenille for a big plush.
- Turn it into a keychain: Add a top loop and a ring, then keep the stuffing slightly firmer for durability.
- Add stripes or spots: Use surface slip stitches or small embroidered dots for a speckled “egg chick” style.
Tutor Suggestions
First, focus on counting rounds rather than crocheting fast, because accuracy makes amigurumi look “store-bought.” Next, if the plush yarn feels tricky, practice the first three rounds with smooth yarn, then switch back once the hands remember the motion. Meanwhile, use stitch markers generously, one for the round start and another to mark eye placement. After that, trust the process: the body can look a little odd before stuffing, yet it becomes perfectly chick-shaped as soon as the filling goes in. Finally, keep stitches tight and calm; this pattern rewards steady hands more than speed.
Conclusion FOR ( Crochet Baby Chick Amigurumi )
A tiny amigurumi chick is the kind of project that brings instant joy: quick to crochet, easy to personalize, and cute enough to gift at any time of year. Next time a small handmade surprise is needed, this crochet baby chick is a sweet choice, especially with pastel yarn, a tiny hat, or a keychain finish. Finally, experimenting with colors and expressions turns this mini crochet bird pattern into a whole little flock worth showing off.