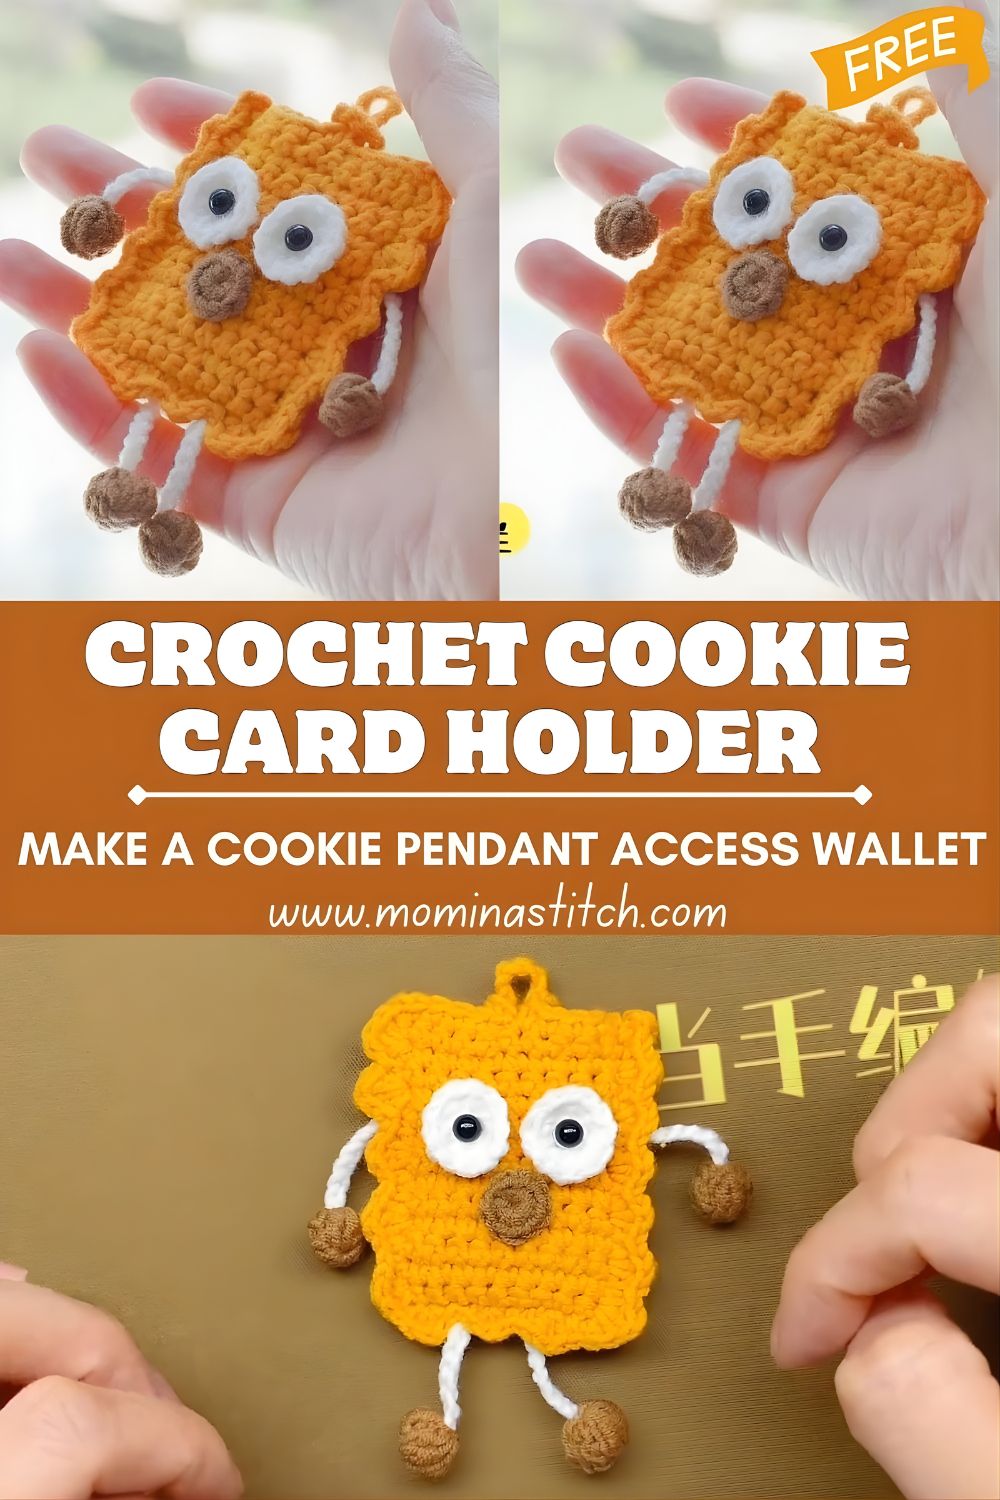
Crochet Cookie Card Holder Pattern Make a Cookie Pendant Access Wallet
Want a functional accessory that’s also ridiculously cute? This crochet cookie card holder tutorial shows you how to make a cookie-shaped pouch with big cartoon eyes and a back pocket for your ID. It’s the perfect crochet access card wallet and an adorable, cute crochet keychain holder you can clip to a bag or lanyard.
If you love crochet projects that are both practical and decorative, you’re going to adore this crochet card holder pattern. We’re making a soft cookie-shaped “pendant” wallet: a textured cookie front with a character face, tiny dangling arms and legs, and most importantly, a functional card pocket on the back for access cards, student IDs, or gift cards.
Crochet card holders are popular in YouTube-style tutorials because they’re quick, giftable, and easy to customize. They also fit right into the trend of kawaii crochet accessories: small, expressive items that make everyday errands feel more fun. Think of it as a mini character plush. that actually holds something useful.
This post is a beginner-friendly crochet mini wallet tutorial that uses simple stitches, clear rows, and straightforward assembly. Everything here is 100% original and designed to be easy to follow, even if you’ve only made a few flat crochet pieces before.
What is a Crochet Cookie Card Holder?
A crochet cookie card holder is a small, flat pouch shaped like a cookie, usually rectangular with rounded corners,s made to hold:
- ID cards/access cards
- Transit cards
- Gift cards
- A folded bill or two (depending on thickness)
In this design, the front looks like a cute cookie character: a warm brown “baked” base, a piped-looking border, and big eyes with a tiny mouth. The back includes a card pocket that’s slightly shorter than the full panel, leaving an opening at the top so you can slide your card in and out easily.
The finishing touch? Tiny dangling arms and legs that swing a little as you move—like a plush charm, but functional.
Materials Needed
Choose firm yarn and tight stitches so the pocket holds cards securely.
Yarn
- Cotton yarn (recommended) in:
- Brown or orange-brown (cookie base)
- White or cream (icing border/highlights)
- Dark brown (mouth, outline, chocolate chips)
Cotton helps your beginner crochet card holder keep its shape. Acrylic can work too, but it may stretch more over time.
Tools & Notions
- Crochet hook: 2.5–3.5 mm (pick a size that creates tight fabric)
- Safety eyes (6–10 mm), beads, or embroidered eyes
- Small amount of fiberfill (for hands/feet nubs, optional but cute)
- Yarn needle, scissors
- Stitch marker (optional but helpful)
Optional Closures (extra security)
- Small button + loop
- Snap
- Mini zipper
These aren’t required, but if your access card falls out easily, a closure can help.
Crochet Abbreviations (US Terms)
- MR = magic ring
- ch = chain
- sc = single crochet
- inc = increase (2 sc in same st)
- dec = decrease (sc2tog)
- sl st = slip stitch
- hdc = half double crochet
- dc = double crochet
Skill Level
Beginner to Intermediate
This project is approachable because it uses:
- basic flat crochet (rows)
- simple edging
- light assembly (sewing panels and details)
It becomes “intermediate” if you add a closure or want very clean, crisp edges. But overall, it’s a friendly, YouTube-inspired build with plenty of flexibility.
Finished Size & Design
- Size: hand-sized, typically about 4–5 in wide and 3–4 in tall (10–13 cm x 8–10 cm), depending on your tension
- Weight: light and portable
- Look: rectangular cookie with rounded corners, a textured border, and a cute cartoon face.e
- Function: back pocket fits standard ID/access cards
Tip: To guarantee fit, measure your card. Most ID/access cards are about 3.4 x 2.1 in (8.6 x 5.4 cm). Build your panel slightly larger so the card slides in comfortably.
STEP-BY-STEP PATTERN (Detailed & Original)
Project Notes (Read First)
- This pattern is written for a flat, stitched-tight fabric so cards don’t slip out.
- Always ch 1 and turn at the end of rows unless stated otherwise (ch 1 does not count as a stitch).
- The exact stitch count can vary a little with tension—focus on matching panel sizes.
A. Main Body (Front Panel – Cookie Shape)
We’ll start with a rectangle base, then round the corners and add a cookie-like border.
Front Panel Base (Brown)
- Foundation: ch 18 (adjust width as needed)
- Row 1: sc in 2nd ch from hook and across (17 sc)
- Rows 2–14: ch 1, turn, sc across (17 sc)
You now have a neat rectangle. Hold your card up to it:
- If it’s too narrow, add chains to the foundation.
- If it’s too short, add more rows.
Round the Corners (simple method)
Instead of shaping during rows, we’ll round the corners in the edging step—easier for beginners and cleaner-looking.
Do not fasten off yet.
B. Back Panel (Card Pocket)
The back has two parts: a full back panel and a shorter pocket panel to create the opening. This creates a sturdier pocket than using a single panel alone.
Full Back Panel (Brown)
Make the same as the front panel base:
- ch 18
- Row 1: 17 sc
- Rows 2–14: sc across
Fasten off.
Pocket Panel (Brown, shorter height)
This will sit on top of the full back panel, leaving space at the top opening.
- ch 18
- Row 1: 17 sc
- Rows 2–9: sc across (make it about 2/3 the height of the full panel)
Fasten off.
Pocket Top Edge (optional but recommended)
For a cleaner opening edge:
- Join yarn at the top of the pocket panel and sl st across, or sc across once for a firmer rim.
Fasten off.
C. Border Edging (Cookie Texture!)
This is where your cardholder starts looking like a cookie rather than a plain rectangle.
Step 1: Attach the Pothe cket to the Full Back Panel
Place the pocket panel on top of the full back panel:
- Align the bottom edges and side edges.
- Sew or sl st the pocket panel to the full back panel along the sides and bottom only (leave the top open).
Now you have a complete back piece with a functioning pocket.
Step 2: Join Front Panel to Back Panel
Place the front and back panels with the wrong sides together (so the nicer sides face outward).
Attach brown yarn to a corner and sc or sl st around the edges:
- Work sc evenly around.
- At each corner: work (sc, ch 1, sc) into the corner space to round it gently.
As you go, check that your stitches aren’t too loose—this seam helps keep cards secure.
Step 3: Add Cookie “Wavy” Border (Cream/White)
Join cream yarn anywhere along the edge.
Work a simple scallop border:
- (sl st, ch 1, 2 hdc) in one stitch,
- skip 1 stitch,
- Repeat around.
If your edge feels tight, switch to: (sl st, ch 2, dc) style scallops, or skip fewer stitches. The goal is a soft “baked cookie” outline—slightly ruffly, not frilly.
Fasten off and weave in ends.
D. Face Details
Time to turn this into a character cookie.
Eyes
Option 1: Safety Eyes (fast and bold)
- Place them on the front panel, centred horizontally.
- Suggested placement: about 1/3 of the way down from the top of the cookie face.
- Space them 6–8 stitches apart, depending on your panel width.
Option 2: Crochet Eyes (no hardware, kid-friendly)
Make 2 white circles:
- MR, 6 sc
- inc around (12)
Fasten off.
Make 2 smaller black circles (pupils):
- MR, 5–6 sc
Fasten off.
Sew pupils onto whites, then sew eyes onto the face. Add a tiny white stitch highlight if you want that glossy cartoon look.
Nose (tiny detail)
With dark brown yarn:
- Embroider a small dot or tiny oval between and slightly below the eyes.
Mouth
- Embroider a small smile (simple curved line).
- Optional: add tiny cheek dots or blush stitches.
Keep features minimal—simple faces look the cutest on small accessories.
E. Arms & Legs (Make 4 total)
These are tiny dangling pieces that give the cookie charm personality.
Simple Dangling Limb (make 4)
- ch 7
- sc in 2nd ch from hook and across (6 sc)
- ch 1, turn, sc across (6 sc) for 2 rows total
Fasten off, leave a tail for sewing.
Add Little “Hands/Feet” Nubs (optional, super cute)
Make 4 tiny balls (or just 2 if you prefer only hands or only feet):
- MR, 6 sc
- sc around (6)
- FO, pull tight (no stuffing needed, or add a pinch)
Sew one nub to the end of each limb strip. If you use fiberfill, use very little—just enough to round it.
F. Attachment Loop (Keychain / Lanyard)
Decide if your cookie will be a bag charm, badge holder, or keychain.
Basic Top Loop
Join yarn at the top centre of the cookie:
- ch 16–25 (depending on how large you want the loop)
- sl st back into the same spot to form a loop
- sl st or sc around the loop once for thickness (optional)
If attaching to a keyring or lobster clasp, slip it onto the loop before closing the loop with a sl st.
G. Assembly
- Ensure the pocket is secure (with the side and bottom seams closed).
- Attach the arms to the upper sides (about mid-height).
- Attach the legs near the bottom corners.
- Sew on eyes (or secure safety eyes), then add nose and mouth.
- Weave in all ends neatly inside or between layers.
Fit Check
Slide your card in:
- If it’s too snug, gently stretch the opening edge once and consider using a slightly larger hook next time.
- If it feels loose, add a closure or crochet one extra row to tighten the top opening.
Beginner Tips
- Use a stitch marker at corners while edging so you don’t miss them.
- Count stitches each row to keep rectangles even (straight edges = professional finish).
- Crochet with tight tension—a looser fabric may let cards slip out.
- Block lightly (optional): Flatten the panels under a book to achieve a crisp shape before assembly.
Common Mistakes (and How to Avoid Them)
- Uneven rectangle shape: count your stitches and always ch 1 + turn consistently.
- Loose stitches (cards fall out): use a smaller hook and/or add a tighter pocket rim edge.
- Misaligned panels: stack the pieces and pin/clamp before sewing or slip-stitching.
- Wavy border gone wild: adjust by skipping more stitches, or switch to smaller scallops.
Customizationation Ideas
Make your crochet cookie card holder truly yours:
- Add chocolate chips: embroider small dark brown dots or sew tiny circles
- Add sprinkles: short, colourful stitches scattered around
- Try pastel “sugar cookie” colours
- Add a button-and-loop closure for secure access cards
- Turn it into a cute crochet keychain holder by shrinking the panel to gift-card size
- Make themed versions: gingerbread, wafer cookie, or iced biscuit
Uses of This Crochet Item
This is more than just decoration—your crochet access card wallet can be used as:
- ID holder for work/school
- Access card wallet for apartments or gyms
- Gift card holder (amazing presentation for holidays)
- Mini wallet for a couple of cards + folded cash
- A cute bag charm accessory (YouTube-style kawaii accessory trend)
Care Instructions
- Hands are washed only with mild soap and cool water.
- Press gently with a towel (no wringing).
- Air dry flat to maintain shape.
- Avoid stretching the pocket—remove cards before washing.
FAQ
1) Does this crochet card holder pattern fit standard ID cards?
Yes—if you size your rectangle slightly larger than your card. Always check your card measurements and adjust starting chains/rows if needed.
2) What yarn is best for a beginner crochet card holder?
Cotton yarn is ideal because it holds its shape and stretches less than many acrylic yarns.
3) Can I make this without safety eyes?
Absolutely. Crochet or embroider eyes instead—great if the holder is for a child or you want a softer look.
4) How do I stop cards from slipping out?
Use tight stitches, make the pocket panel slightly snug, and consider adding a button loop or small snap for extra security.
5) Can I add a zipper?
Yes! Sew a small zipper along the pocket opening. This is a nice upgrade if you plan to carry coins or multiple cards.
6) Can this be used as a badge holder for a retractable reel?
Yes—add a sturdy top loop or a reinforced tab, and clip the reel to it. Cotton yarn works best for durability.
Conclusion
This cookie-shaped card wallet is the perfect mix of cute and practical: a soft, character-style cookie on the front, wavy “baked” edges, and a functional pocket for your everyday cards. Whether you’re making it for yourself, a friend, or as a sweet little craft-fair item, this crochet cookie card holder is a feel-good project that’s qucustomizablezable, and genuinely useful.
Try different “flavours,” add sprinkles, or give your cookie a new facial expression—your yarn cookie can have its own personality. And if you love tiny functional projects, this is a must-try crochet mini wallet tutorial.