Crochet Chicken Mug Coaster Pattern (Mug Hugger That “Holds” Your Cup)
This Crochet Chicken Mug Coaster Pattern makes an adorable crochet mug coaster that looks like a tiny chicken holding your mug. It’s a fun crochet mug hugger project, perfect for using up scrap yarn and creating a cute, practical DIY crochet gift idea.
A crochet chicken mug coaster (also known as a mug hugger) is a round coaster with a raised chicken body that sits under and slightly around your mug, making it look like a little chicken is cuddling your cup. It’s a fun and cute crochet project because it combines a simple coaster base with small amigurumi-style details like wings, eyes, a beak, and a comb.
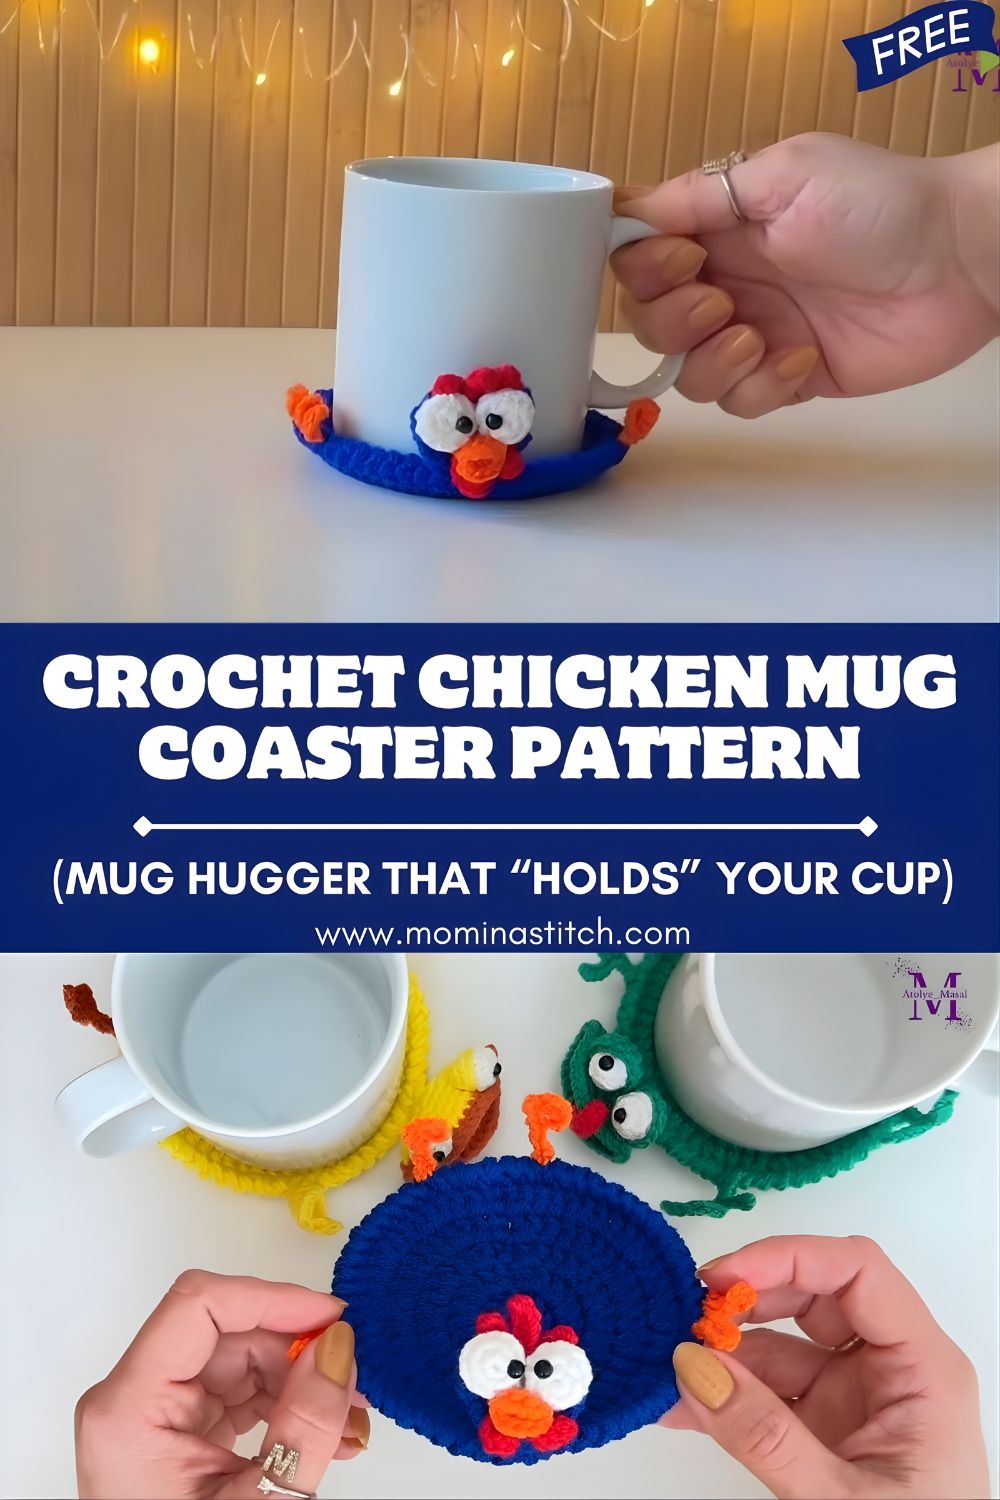
Beyond the cuteness, this cute crochet coaster helps protect your table, desk, or nightstand from heat, drips, and condensation. And because it’s quick to make and easy to personalize with colors, it’s a wonderful handmade gift for coffee lovers, teachers, coworkers, housewarmings, and spring/Easter-themed gift bundles.
Materials Needed
Yarn (worsted/medium weight is ideal):
- Blue yarn (coaster base/background)
- White yarn (chicken body)
- Orange yarn (beak and/or feet accents if desired)
- Red yarn (comb on top)
Tools & Notions:
- Crochet hook: 4.0 mm–5.0 mm (use 4.0–4.5 mm for a tighter, sturdier coaster)
- Safety eyes (6–8 mm) or small black beads or black yarn for embroidery
- Yarn needle (tapestry needle)
- Scissors
- Stitch markers (helpful for counting rounds)
- Optional stuffing: a pinch of fiberfill to puff the wings/comb slightly (not required)
Crochet Abbreviations
- MR – Magic Ring
- CH – Chain
- SC – Single Crochet
- HDC – Half Double Crochet
- DC – Double Crochet
- SL ST – Slip Stitch
- INC – Increase (2 stitches in the same stitch)
- DEC – Decrease (single crochet 2 together)
- BLO/FLO – Back loop only / Front loop only
- RS/WS – Right side / Wrong side
- ( ) – repeat instructions within parentheses
Finished Size
Approximate size using worsted yarn and a 4.5 mm hook:
- Coaster base: 4.5–5.5 in (11.5–14 cm) diameter
- Chicken body height (raised edge): about 1–1.5 in (2.5–4 cm)
- Fits most standard mugs (adjust base diameter if your mug is extra wide)
Crochet Pattern – Step by Step
Coaster Base (Round)
Color: Blue (or your chosen base color)
Work in joined rounds or continuous rounds (joined rounds look neater for flat circles).
Round 1: MR, CH 1, 6 SC in MR, join with SL ST to first SC. [6]
Round 2: CH 1, INC in each st around, join. [12]
Round 3: CH 1, (SC, INC) around, join. [18]
Round 4: CH 1, (2 SC, INC) around, join. [24]
Round 5: CH 1, (3 SC, INC) around, join. [30]
Round 6: CH 1, (4 SC, INC) around, join. [36]
Round 7: CH 1, (5 SC, INC) around, join. [42]
Round 8: CH 1, (6 SC, INC) around, join. [48]
Size check: Place your mug on the circle. You want the coaster slightly wider than the mug base.
- Smaller mug: stop at R7 (42 sts)
- Larger mug: add R9 = (7 SC, INC) around = [54]
Fasten off blue and weave in.
Chicken Body Edge (Raised “Hugger” Shape)
Color: White
This section creates a raised chicken shape along part of the coaster edge so it looks like the chicken is wrapping the mug.
Step 1: Attach white yarn
Attach white yarn anywhere on the outer edge of the coaster. Decide where you want the chicken to “sit” (front center).
Step 2: Work a partial round to form the chicken body panel
You’ll crochet a curved panel that covers about ⅓ to ½ of the coaster circumference (adjustable).
Body Row 1: CH 1, SC in next 18–24 sts (depending on coaster size). Turn.
Body Row 2: CH 1, SC across. Turn.
Body Row 3: CH 1, SC across. Turn.
Body Row 4: CH 1, DEC, SC across until 2 sts left, DEC. Turn.
Body Row 5: CH 1, SC across. Turn.
Repeat Rows 4–5 as needed until the panel looks like a rounded “chicken chest” (not too tall).
Fasten off leaving a long tail for shaping/sewing if needed.
Optional shaping tip: If you want the body to hug the mug more, sew the side edges of the panel down slightly so it curves upward like a little apron.
Chicken Wings (Make 2)
Color: White
These are small, simple wing ovals.
Round 1: MR, 6 SC in MR. [6]
Round 2: (SC, INC) around. [9]
Round 3: SC around. [9]
Flatten the piece and SC through both layers across the top (about 4–5 SC) to close.
Fasten off leaving a tail for sewing.
Optional: Add a pinch of stuffing before closing for a puffy wing.
Chicken Eyes (Attach or Crochet)
Choose one method:
Option A: Safety eyes (quick and cute)
- Place eyes on the chicken body panel, about 2–3 stitches apart, centered near the top of the white panel.
- If the panel is thin, use a small felt circle behind the eye backs for stability.
Option B: Embroidered eyes (kid-friendly)
- With black yarn, stitch two small vertical lines or French knots for eyes.
Chicken Beak (Small Triangle)
Color: Orange
Row 1: CH 3
Row 2: SC in 2nd CH from hook, SC in next CH. (2 sts)
Row 3: CH 1, DEC over 2 sts. (1 st)
Fasten off leaving a tail. Sew beak centered under the eyes.
Chicken Comb (Top Red Part)
Color: Red
This is a simple 3-bump comb.
CH 7
- In 2nd CH from hook: SL ST
- Next CH: SC
- Next CH: HDC
- Next CH: SC
- Next CH: HDC
- Last CH: SC
Fasten off leaving a tail.
Sew comb to the top of the chicken body panel (centered above eyes).
Assembly Instructions
- Position the chicken body panel on the coaster edge (white section should sit where the mug front will be).
- Sew the body panel edges to the coaster base with whip stitch or mattress stitch so it curves slightly upward.
- Attach wings on each side of the body panel—angle them forward so they look like they’re “holding” the mug.
- Add eyes (safety eyes or embroidery).
- Sew on the beak centered beneath the eyes.
- Sew on the comb at the top.
- Weave in all ends securely.
Fit check: Place your mug on the coaster. If the chicken doesn’t “hug” enough, sew the wings a bit more forward or add a small tack stitch at the sides of the body panel to bring it closer around the mug.
Beginner Tips
- Maintain even stitches: tight, consistent tension makes coasters sturdier and helps them lie flat.
- Count stitches each round: coaster circles rely on accurate increases to prevent ruffling.
- Choose the right yarn thickness: worsted cotton is excellent for coasters because it’s heat-resistant and washable. Acrylic works too, but can feel softer/less structured.
- Block if needed: if the coaster curls, lightly steam (for acrylic) or wet-block (for cotton) and dry flat.
Customization Ideas
- Make different animal mug coasters: swap the chicken details for a cat, frog, bear, or duck (same coaster base, different face parts).
- Change yarn colors: make pastel chickens for spring, or farmhouse neutrals (cream/ tan) for year-round kitchen decor.
- Turn it into a full mug cozy: extend the “body edge” into a longer band and add a button closure around the mug.
- Add embroidery details: little eyelashes, rosy cheeks, or stitched feather lines on wings for extra personality.
Conclusion
This Crochet Chicken Mug Coaster Pattern is the perfect mix of cute and practical: it protects surfaces, adds a little handmade joy to coffee breaks, and makes a fast, memorable gift. If you’re looking for a beginner-friendly crochet mug hugger or cute crochet coaster idea, this chicken is a must-try—especially in fun colors.