Free Crochet Christmas Kitty Fairy Light Garland Holiday Amigurumi Ideas
Turn plain fairy lights into purr-lit magic with crochet kitty covers sweet, beginner-friendly, and irresistibly giftable for cozy mantels, twinkling trees, and cat-loving hearts all season long.
Free Crochet Christmas Kitty Fairy Light Garland Holiday Amigurumi Ideas brings cozy sparkle to your décor with adorable cat head covers that slide onto battery-powered LEDs. Designed for beginners, this quick, stash-friendly project uses basic stitches, minimal sewing, and easy sizing so your kitties glow beautifully on mantels, windows, and trees. Moreover, the modular pattern lets you mix colors, add tiny hats or scarves, and customize every bulb for a magical, pet-loving vibe. Consequently, you’ll craft a charming, giftable garland that twinkles softly through the entire festive season.
Uses
- Dress up mantels, shelves, and windows with a warm, cat-themed glow.
- Personalize Christmas trees or kids’ rooms with safe, battery-LED décor.
- Create quick, handmade gifts or party backdrops for pet lovers.

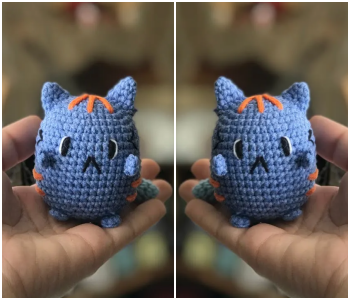
Free Crochet Christmas Kitty Fairy Light Garland – Holiday Amigurumi Ideas
Warm up your holiday décor with this Free Crochet Christmas Kitty Fairy Light Garland—an adorable, beginner-ready amigurumi idea that slides neatly over battery-powered LEDs for a soft, festive glow. Moreover, this quick project turns simple lights into charming cat faces, perfect for mantels, windows, shelves, and trees. Consequently, you’ll enjoy a relaxing make that’s stash-friendly, customizable, and wonderfully giftable for cat lovers.
Level of Difficulty
Beginner. Specifically, you’ll use basic stitches (magic ring, single crochet, increase, invisible decrease) and simple shaping with minimal sewing. Therefore, even first-time amigurumi makers can succeed confidently.
Finished Size and Sizing Tips
- Typically, each kitty head (with DK cotton and a 2.5 mm hook) measures about 4.5–5 cm wide and 4–4.5 cm tall, excluding ears.
- For a snug light fit, the internal sleeve works over 6 stitches and fits most 3–5 mm micro LED bulbs. However, if your bulbs are larger, increase the sleeve to 8 stitches. Conversely, if they’re smaller, tighten the tension or drop your hook size.
- For scaling, switch to sport/fingering yarn with a 2.0–2.25 mm hook for mini kitties; alternatively, use worsted cotton with a 3.25–3.75 mm hook and add one extra increase round before shaping for chubbier heads.
Materials (Exact Measurements)
- DK (8-ply) cotton yarn:
- Main kitty color(s): 6 g per head
- Accent color for inner ears/scarf/hat: 1–2 g per head
- Embroidery black/pink (nose/whiskers): 0.5 g
- Crochet hook: 2.5 mm (US B/1–C/2) for a firm amigurumi fabric
- Safety eyes: 6 mm (or embroider eyes for child-safe décor)
- Fiberfill stuffing: 2–3 g per head
- Battery-powered micro LED fairy lights (cool or warm white), 2–3 m length:
- 20 LEDs over 2 m (10 cm spacing) or 30 LEDs over 3 m (10 cm spacing)
- Bulb head diameter typically 3–5 mm
- Tapestry needle, stitch marker, scissors
- Optional: 6 mm ribbon (10–12 cm per kitty) for scarves; 8 mm jingle bells; tiny felt circles for eye backing; a tiny dab of fabric glue for knots (avoid wires)
Note: For safety, always use battery-powered LED lights. Furthermore, do not use mains-powered or incandescent lights inside yarn covers.
Special Features
- Slide-on bulb sleeve for a secure, removable fit
- Quick triangle ears with minimal sewing
- Modular design so you can match any LED string length
- Stash-friendly color play for festive variety
Abbreviations (US Terms)
- MR: magic ring
- sc: single crochet
- inc: increase (2 sc in the same stitch)
- dec: invisible decrease
- sl st: slip stitch
- sts: stitches
- R#: round number
Step-by-Step Instructions (One Kitty Head)
Estimated total time per kitty: 28–40 minutes, depending on pace and accessories.
1) Quick Fit Check (3–4 minutes)
- Firstly, chain 6 and join to form a ring; then sc around for 3 rounds to create a tiny tube.
- Next, test the tube over one LED bulb. If it feels tight, plan for an 8-stitch sleeve; if it feels loose, reduce hook size or tension. Consequently, you’ll avoid rework when making multiples.
2) Crochet the Kitty Head Dome (12–15 minutes)
- R1: MR, 6 sc (6).
- R2: inc around (12).
- R3: (sc, inc) x6 (18).
- R4: (2 sc, inc) x6 (24).
- R5: (3 sc, inc) x6 (30).
- R6–R7: sc around (30).
Additionally, keep your tension snug so the fabric looks smooth and the glow diffuses evenly. As a result, the shape stays round and polished.
3) Add Face Details (3–4 minutes)
- Carefully insert safety eyes between R5 and R6, spaced 5–6 sts apart; optionally back them with felt circles for stability.
- Then, embroider a tiny triangle nose one round below the eyes and add short whiskers. Alternatively, stitch sleepy eyes for a softer, nursery-friendly look. Consequently, your kitties gain instant personality.
4) Shape, Stuff, and Form the LED Sleeve (8–10 minutes)
- R8: (3 sc, dec) x6 (24).
- R9: (2 sc, dec) x6 (18).
- Lightly stuff the head; meanwhile, avoid overfilling so the light can pass through.
- R10: (sc, dec) x6 (12).
- R11: dec around (6).
- Without fastening off, continue to the sleeve:
- R12–R15: sc around (6) for 4 rounds, forming a 1.5–2 cm tube. If your bulbs are longer, add one more round; if shorter, reduce by one.
Finally, fasten off and weave the tail inside the tube so the opening remains clear.
- R12–R15: sc around (6) for 4 rounds, forming a 1.5–2 cm tube. If your bulbs are longer, add one more round; if shorter, reduce by one.
5) Crochet the Ears (6–8 minutes for pair)
- Make 2 ears in the main color:
- Ear R1: MR, 3 sc (3).
- R2: inc in each st (6).
- R3: (sc, inc) x3 (9). Fasten off with a 10–12 cm tail.
- Optionally, create inner ears: MR, 3 sc in contrast; sl st to close; then sew to the main ear.
Afterward, pin and sew ears symmetrically between R2 and R4. Therefore, your kitty silhouette reads clearly from every angle.
6) Optional Accessories (4–6 minutes each kitty)
- Mini scarf: With contrast yarn, ch 24–28; then sl st across to thicken; finally, tie gently around the neck area.
- Santa hat: MR, 3 sc; next round (sc, inc) x2 (6); next round sc around; then repeat increases every other round until 12 sts; add a tiny pom; and sew slightly tilted.
Alternatively, add micro bows or bells for extra sparkle. Importantly, keep accessories lightweight so light transmission stays bright.
7) Slide Onto Lights and Space Evenly (2–3 minutes per kitty)
- Carefully slide the sleeve over a single LED bulb until the bulb rests inside the stuffing. If it resists, gently twist rather than forcing.
- Next, space kitties along the wire to match LED spacing (often 10 cm). Consequently, a 2 m string with 20 LEDs can hold 20 kitty heads, or you can alternate with crochet stars or pom-poms.
Common Mistakes (and How to Avoid Them)
- Using non-LED or mains-powered lights: For safety, use only battery LEDs; otherwise, heat and electrical risks increase.
- Sleeve fit issues: If the sleeve is tight, increase to 8 sts; if loose, drop hook size. Therefore, always complete the quick fit check first.
- Overstuffing: Too much fiberfill blocks light; instead, use minimal stuffing and fluff it evenly.
- Visible gaps: If stuffing peeks out, tighten tension or switch to a 2.25 mm hook. Similarly, check for even stitch counts each round.
- Crooked ears: Before sewing, pin both ears and count stitches from the center; consequently, placement stays symmetrical.
- Unsecured eyes: Press washers firmly; however, for child-safe décor, embroider eyes instead.
Variations to Try
- Classic Christmas trio: Alternate red, green, and white kitties for instant holiday vibes.
- Gingerbread kitty: Choose tan yarn and embroider white “icing” swirls for playful detail.
- Tuxedo cat: Work a black head with a white muzzle patch and a tiny red bow for contrast.
- Sparkle strand: Hold a fine metallic filament with your main yarn; consequently, the garland shimmers beautifully.
- Mixed garland: Alternate kitty heads with crochet trees, stars, or gifts while reusing the same sleeve concept.
- Jumbo plush look: Use velvet or chenille yarn with a 4.0 mm hook; then add one more increase round (to 36 sts) before working even.
Tutor Suggestions (Beginner Coaching)
- Firstly, batch tasks: make all domes, then add faces, then ears; consequently, your speed and consistency improve.
- Secondly, move a locking stitch marker each round and count out loud on increase/decrease rows; as a result, stitch counts stay accurate.
- Thirdly, practice invisible decreases on a small swatch; therefore, your spheres remain smooth.
- Additionally, keep tools in a tray so assembly flows without interruption.
- Finally, test-fit your first kitty on the lights before making the rest; accordingly, adjust sleeve size early.
Finishing Tips and Care
- Weave ends in two directions to lock them securely, and trim inside the head. Consequently, the backs look neat and durable.
- Avoid permanent glue on the wire insulation; instead, if needed, add the tiniest dab of fabric glue to the sleeve edge only.
- Store the garland loosely coiled; afterward, fluff the ears and accessories with your fingers.
- Spot clean only; importantly, do not submerge, since electronics are inside.
- If gifting, include a simple care note: “Battery LED lights only; do not use with mains-powered strings.”
SEO-Friendly Wrap-Up and Resource
Ultimately, this Free Crochet Christmas Kitty Fairy Light Garland blends beginner simplicity with festive charm, resulting in a glowing strand of cat-inspired joy. In short, with clear steps, precise measurements, and transition-optimized guidance, your holiday amigurumi will shine brightly, look cohesive, and read beautifully every twinkle, every stitch, every time.