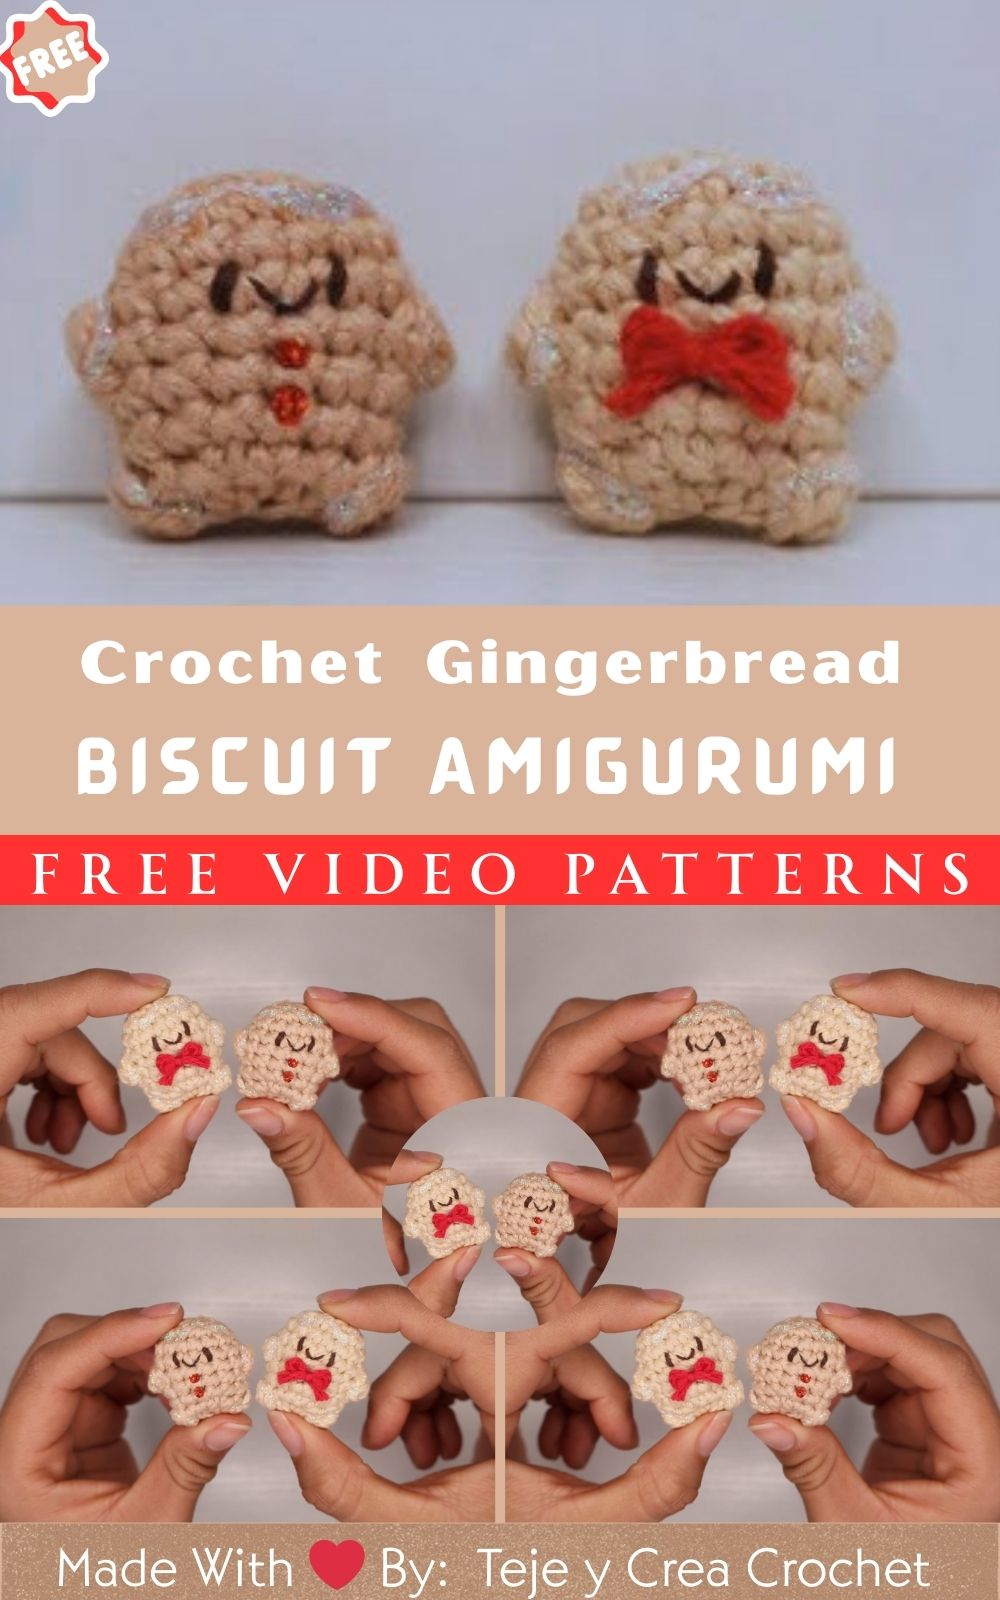
Flawless Crochet Stuffed Gingerbread Biscuit Amigurumi Pattern
Discover the Flawless Crochet Stuffed Gingerbread Biscuit Amigurumi Pattern, handmade charm, beginner-friendly steps, quick finish, and gift-ready results perfect for holidays, stockings, craft fairs, or cozy decor.
Fresh from your crochet “oven,” the Flawless Stuffed Gingerbread Biscuit is a beginner-friendly make that combines classic cookie vibes with plush amigurumi squish. First, you’ll breeze through simple rounds and almost no sewing. Next, switch in small scraps for color accents without fuss. Finally, add icing details and a tiny smile for a charming finish.
Because the piece is petite, it stitches up fast, ideal for last-minute ornaments, garlands, gift toppers, and stocking fillers. Clip it to a bag or keys for a market-ready charm, and enjoy polished results in a single cozy session.
Flawless Crochet Stuffed Gingerbread Biscuit Amigurumi Pattern
To begin, bring a dash of holiday comfort to every day with this Flawless Crochet Stuffed Gingerbread Biscuit Amigurumi Pattern. From the first stitch, the shape feels simple, the stitches stay friendly, and the finished biscuit looks delightfully plump with neat “icing” details. Moreover, beginners can enjoy straightforward rounds and easy assembly, while seasoned makers will appreciate the quick pace and polished look. In addition, the biscuit works beautifully as an ornament, a keychain charm, a gift topper, or a cozy desk buddy. Finally, soft cotton yarn creates crisp stitch definition that highlights the icing, and the compact size makes it perfect for gifts and craft fairs.
Materials Required
- Yarn: 100% cotton DK (Category 3) for firm, tidy stitches
- Gingerbread Brown (main): 20 g (≈ 45–50 m / 49–55 yd)
- Icing White: 5 g (≈ 12–15 m / 13–16 yd)
- Accent Red or Green (buttons/bow, optional): 2 g (≈ 5–6 m / 5–7 yd)
- Hook: 2.75 mm (C-2). If tension is tight, use 3.0 mm instead.
- Stuffing: 8–12 g high-quality polyester fiberfill (or cotton scraps for a natural option)
- Safety eyes: 6 mm (pair), or embroider eyes if preferred
- Embroidery thread/floss: black or dark brown for smile; pink for cheeks (optional)
- Stitch markers: 1–2 removable markers
- Tapestry needle: blunt tip, medium eye
- Scissors: sharp tips for clean trimming
- Optional accessories:
- Keychain hardware: 25 mm split ring + 30–35 mm lobster clasp
- Jump ring: 8–10 mm for attaching the strap
- Ribbon or twine: 10–12 cm for a tiny bow
- A tiny muslin scrap for a scented insert (clove/lavender), optional
Skill Level
Beginner / Easy. First, expect basic stitches. Next, enjoy simple increases and decreases. Finally, finish with minimal shaping and gentle assembly.
Making Time (Overview)
Overall, plan approximately 1.5–2.5 hours total, depending on experience and embellishments.
- Body panels + join: 45–60 minutes
- Icing details and buttons: 15–25 minutes
- Face + assembly: 15–25 minutes
- Accessories (bow/keychain/hanging loop): 5–10 minutes
Step-by-Step Instructions
To start, place a removable marker in the first stitch of each round. Stitches used: MR (magic ring), ch (chain), sl st (slip stitch), sc (single crochet), inc (increase: 2 sc in one stitch), dec (decrease: sc2tog or invisible decrease), BLO/FLO (back/front loop only). Work in continuous rounds unless noted.
First, make two matching cookie panels for the classic biscuit look. Next, add the icing and facial details to the front panel. Then, join the panels together and stuff. Finally, close the seam neatly for a bakery-fresh finish.
Body
A plump, round biscuit is made with two brown panels.
- Front Cookie Panel (30–35 minutes)
- R1: MR, 6 sc (6)
- R2: inc around (12)
- R3: (sc, inc) around (18)
- R4: (2 sc, inc) around (24)
- R5: (3 sc, inc) around (30)
- R6: (4 sc, inc) around (36)
- R7: (5 sc, inc) around (42)
Optional for a slightly larger biscuit: R8: (6 sc, inc) around (48).
Tip: Meanwhile, keep a steady, firm tension. Because cotton shows stitches clearly, consistency creates a smooth cookie face.
- Back Cookie Panel (20–25 minutes)
Next, make the second panel the same as the front (stop at the same round count: 42 or 48).
Optional texture ridge: On the last round of the back panel, work in BLO to create a slight lip. Consequently, the panels sit together neatly when joined. - Join and Shape the Biscuit (15–25 minutes, done later during assembly)
After adding icing and face to the front panel (see sections below), placethe panels wrong sides together. Then, using brown yarn, sc through both layers around to close, stuffing as the seam approaches the last third. Finally, finish with a round of crab stitch (reverse sc) or simple sl sts for a tidy edge. The stuffing should be firm but not stretch the fabric.
Making time for Body: 45–60 minutes total (panels), plus 15–25 minutes to join and stuff.
Additional Parts
Simple add-ons bring the biscuit to life. Accordingly, choose a few or include them all for extra charm.
- Icing Drizzle (10–15 minutes)
Option A: Surface Crochet- With white yarn, surface-crochet a gentle wavy line across the front panel after R6 or R7. As you work, keep the hook relaxed so the line sits snugly without puckering.
Option B: Sewn Chain - Alternatively, ch 38–45 to match the biscuit’s width. Then, pin the chain into soft waves and sew down with small stitches.
Tip: For a classic gingerbread style, place the icing near the top third and the bottom third; this leaves space for eyes and a smile.
- With white yarn, surface-crochet a gentle wavy line across the front panel after R6 or R7. As you work, keep the hook relaxed so the line sits snugly without puckering.
- Icing Buttons (5–10 minutes)
Option A: Tiny Circles- MR, 6 sc; sl st to close; FO, leaving a tail to sew. Then, make 1–3 in red or green.
Option B: French Knots - Instead, use embroidery floss to add 1–3 neat knots spaced vertically down the center.
- MR, 6 sc; sl st to close; FO, leaving a tail to sew. Then, make 1–3 in red or green.
- Hanging Loop (3–5 minutes)
- With brown or white yarn, ch 14; sl st in back bumps to create a sturdy strap. FO with a 10–12 cm tail.
- Next, sew to the top of the biscuit (centered). For keychains, thread onto a jump ring before sewing for a cleaner finish.
- Optional Cream “Filling” Ring (10–12 minutes)
For a sandwich-cookie look, add a slim white ring between panels.- With white yarn, MR, 6 sc (6); increase each round evenly until the stitch count matches the final count of one cookie panel (42 or 48).
- Then, place the ring between the two brown panels and join all layers with brown sc through all three layers. As a result, this creates a playful cream edge.
Add making time for each part: listed above.
Accessories / Details (if applicable)
- Tiny Bow (5 minutes): First, tie a 10–12 cm ribbon piece into a bow; then stitch it near one corner of the icing or above one eye.
- Keychain Hardware (3–5 minutes): Next, attach a jump ring to the strap, then a split ring and clasp. Finally, reinforce the strap with multiple passes of yarn for daily use.
Add making time: 5–10 minutes total, depending on choices.
Face & Assembly
Friendly expressions transform the biscuit into a cheerful keepsake.
- Eye Placement: For a 42-stitch panel, place 6 mm safety eyes between R5–R6, about 6–7 stitches apart. For a 48-stitch panel, place between R6–R7, about 7–8 stitches apart. Before locking, check spacing.
- Smile: Then, with embroidery floss, stitch a gentle curve centered between the eyes. A small V-shaped stitch at each end adds a sweet grin.
- Cheeks: Afterwards, lightly stitch pink thread dots or add tiny blush circles using a small bit of soft yarn, secured with discreet stitches.
- Join Panels: Next, align front and back with right sides facing out. Insert the safety eyes’ washers, then pin layers to prevent twisting.
- Seam: After that, with brown yarn, sc through both layers around. Stuff evenly as the seam nears closed, shaping the biscuit into a soft, plump circle.
- Edge Finish: Finally, for a bakery-style look, add one round of crab stitch (reverse sc) around the perimeter after seaming. This creates a subtle, crimped cookie edge.
Beginner-friendly tips:
- First, keep tails long for sewing, this reduces the number of joins.
- Next, stuff in small tufts for an even shape. Avoid large clumps that create bumps.
- Finally, hide knots and ends inside the biscuit, pulling slightly to sink them in.
Special Features
- Cozy Texture: Cotton yarn gives crisp stitches that mimic the fine crumb of a real biscuit; furthermore, optional crab-stitch edging adds a gentle crimp.
- Charming Expression: Safety eyes and a soft embroidered smile create a friendly face that photographs beautifully for shop listings and gift notes.
- Custom Icing: Surface crochet or sewn chains let the icing sit naturally on the fabric without bulk; consequently, the detail looks clean and refined.
- Gift-Ready Size: Small enough to hang on a tree or bag, yet plump enough to feel substantial in hand.
- Optional Cream Ring: In addition, a playful twist that looks like a classic sandwich cookie, especially cute in photos and gift boxes.
Sizing Tips
- With DK cotton and a 2.75 mm hook, the biscuit measures approximately:
- Diameter: 7.5–9 cm (3–3.5 in), depending on the final round used (42 vs. 48 sts)
- Thickness: 2–3 cm (0.8–1.2 in), based on stuffing level
- To size up:
- Use worsted-weight cotton (Category 4) with a 3.5–4.0 mm hook; then add one more round of increases if needed.
- To size down:
- Use sport weight cotton (Category 2) with a 2.25–2.5 mm hook; in that case, stop at the 42-stitch round for a mini version.
- Gauge (not critical, but helpful):
- 6 sc x 6 rows ≈ 2 cm x 2 cm (0.8 in x 0.8 in) with DK cotton and a 2.75 mm hook.
- Even Tension: Therefore, tighter stitches keep stuffing invisible and maintain a clean cookie edge.
Finishing Tips for ( Crochet Gingerbread Amigurumi)
- Seam Consistency: Work stitches at a steady pace so the seam doesn’t pinch or wave. If the edge tightens, relax the yarn slightly.
- End Management: Then, weave ends in several directions inside the biscuit for durability, especially if used as a keychain.
- Shape Polishing: Next, after closing, gently roll the biscuit between palms to settle stuffing. Pinch the edges lightly to define the round shape.
- Clean Icing Lines: Meanwhile, when sewing chains, use tiny whip stitches and match the color so the thread disappears.
- Hardware Security: Finally, if adding a keychain, stitch through multiple biscuit stitches—not just surface loops to anchor the strap.
Common Mistakes to Avoid
- First, a loose Magic Ring: A ring that won’t close leaves a gap. Tug the tail firmly after the first round and secure with a locking knot if needed.
- Second, skipping increases: Miscounting increases causes ripples or cones. Use a stitch marker at the start of each round and count every few rounds.
- Third, overstuffing: Too much stuffing can distort the circle. The biscuit should feel springy, not rigid.
- Also, uneven icing: Pulling the chain too tight creates puckers. Pin the chain first, then sew with light tension.
- Finally, eye placement regrets: Always audition eye positions with pins before adding washers. Adjust until the expression feels balanced.
Variations & Customization Ideas
- Classic Gingerbread: Brown cookie with white icing swirls and red/green button dots.
- Chocolate Cookie: Deep cocoa brown yarn with pastel icing, lavender, mint, or blush pink.
- Sugar Sprinkles: Add tiny French knots in multiple colors or a light scatter of seed beads (for display-only items).
- Holiday Ornament: Add a long loop and stitch a flat felt tag on the back with a date or name.
- Sandwich Biscuit: Use the optional cream ring for a layered look; for extra “filled” drama, make the white ring slightly wider.
- Heart or Star Shape: Alternatively, follow the same panel concept using a heart or star increase pattern; keep the icing flowy.
- Bite Mark Edge: For whimsy, on the front panel, replace 6–8 stitches with a small half-circle indentation (dec evenly across a small arc) and outline with a lighter shade to suggest a “bite.”
- Scented Keepsake: If desired, tuck a tiny muslin scrap with a drop of clove or cinnamon deep inside the stuffing. Avoid oils for baby toys.
- Friendly Faces: Choose wide-spaced eyes for a sweet look, closer eyes for a chibi feel, or embroidered sleepy eyes with curved lashes.
Tutor Suggestions for ( Crochet Gingerbread Amigurumi)
- Count Comfortably: First, place a marker in the first stitch of each round and move it up as you go. This keeps rounds on track and reduces frogging.
- Practice Increases: Next, remember the sequence (X sc, inc) repeated around is the backbone of round amigurumi shapes. Saying the count aloud helps maintain rhythm.
- Surface Crochet Basics: Meanwhile, insert the hook under the top loops of the fabric (not through holes) and pull the working yarn through, one small step at a time, for a smooth icing trail.
- Safe for Littles: If making for babies or toddlers, skip safety eyes and embroider features using strong thread, securing ends firmly.
- Gentle Blocking: Likewise, if the icing line looks wobbly, lightly steam from a distance and nudge into place with fingers. Never iron acrylic; cotton handles light steam well.
- Strong Joins: Additionally, when making a keychain, reinforce the strap with several passes through the biscuit, knotting inside before weaving the tail.
- Calm Tempo: Finally, take short breaks to keep your hands relaxed. Because cotton has less stretch and feels firmer, a relaxed grip keeps stitches even and joints happy.
- Photo Ready: For best results, use natural light to show off the icing texture. Place the biscuit on a wooden board or a simple napkin for cozy, bakery-inspired photos.
Step-by-Step Recap (Quick View)
- First, make two round brown panels (stop at 42 or 48 stitches).
- Next, add icing and face to the front panel before joining.
- Then, join panels with sc through both layers; stuff gradually.
- Finally, finish with crab stitch or a tidy sl st edge.
- As a last step, add buttons, bow, and hanging loop or keychain hardware.
Why This Biscuit Wins Hearts for ( Crochet Gingerbread Amigurumi)
- Friendly Stitches: Straightforward rounds and easy increases make success likely on the first try.
- Low Yardage: Meanwhile, the project is perfect for using leftovers while delivering a professional look.
- Versatile Finish: Ornament, keychain, gift topper, or display—one pattern fits many uses.
- Handmade Personality: Moreover, each biscuit has a unique smile and icing swirl, creating a one-of-a-kind charm.
Body Shaping Notes (For Curious Makers)
- If the circle begins to ruffle slightly, reduce stuffing and check stitch counts; with a touch of patience, slight blocking smooths it out.
- Conversely, if it caves inward, add a touch more stuffing and massage the shape to even the dome.
Care & Durability for ( Crochet Gingerbread Amigurumi)
- For maintenance, spot clean with mild soap and cool water. Press gently with a towel and air-dry flat.
- In addition, check the hardware occasionally if used as a keychain. Replace jump rings at the first sign of wear.
- Finally, store away from direct sunlight to keep colors rich and icing bright.
In the end, enjoy the gentle rhythm of stitches and the cozy reward at the finish: a soft, smiling gingerbread biscuit that looks adorable in the hand and even better when gifted. Altogether, this amigurumi pattern is an inviting place to start for beginners and a soothing, quick win for experienced crocheters, comfortable, charming, and sweetly festive, no matter the season.