Prosperous Crochet Snooker Ball Keychain Amgurumi Pattern
Crochet quick, Crochet Snooker Ball Keychain Amigurumi for good luck! This easy pattern uses small yarn scraps, simple rounds, and bold colors. Make balls 1–15, add a key ring, and gift, sell, or show off.
Make lucky, sporty keychains in no time. The Prosperous Crochet Snooker Ball Keychain Amigurumi Pattern is beginner- and scrap-friendly, using simple rounds and easy color changes to create balls 1–15 with clean numbers and tidy shaping. 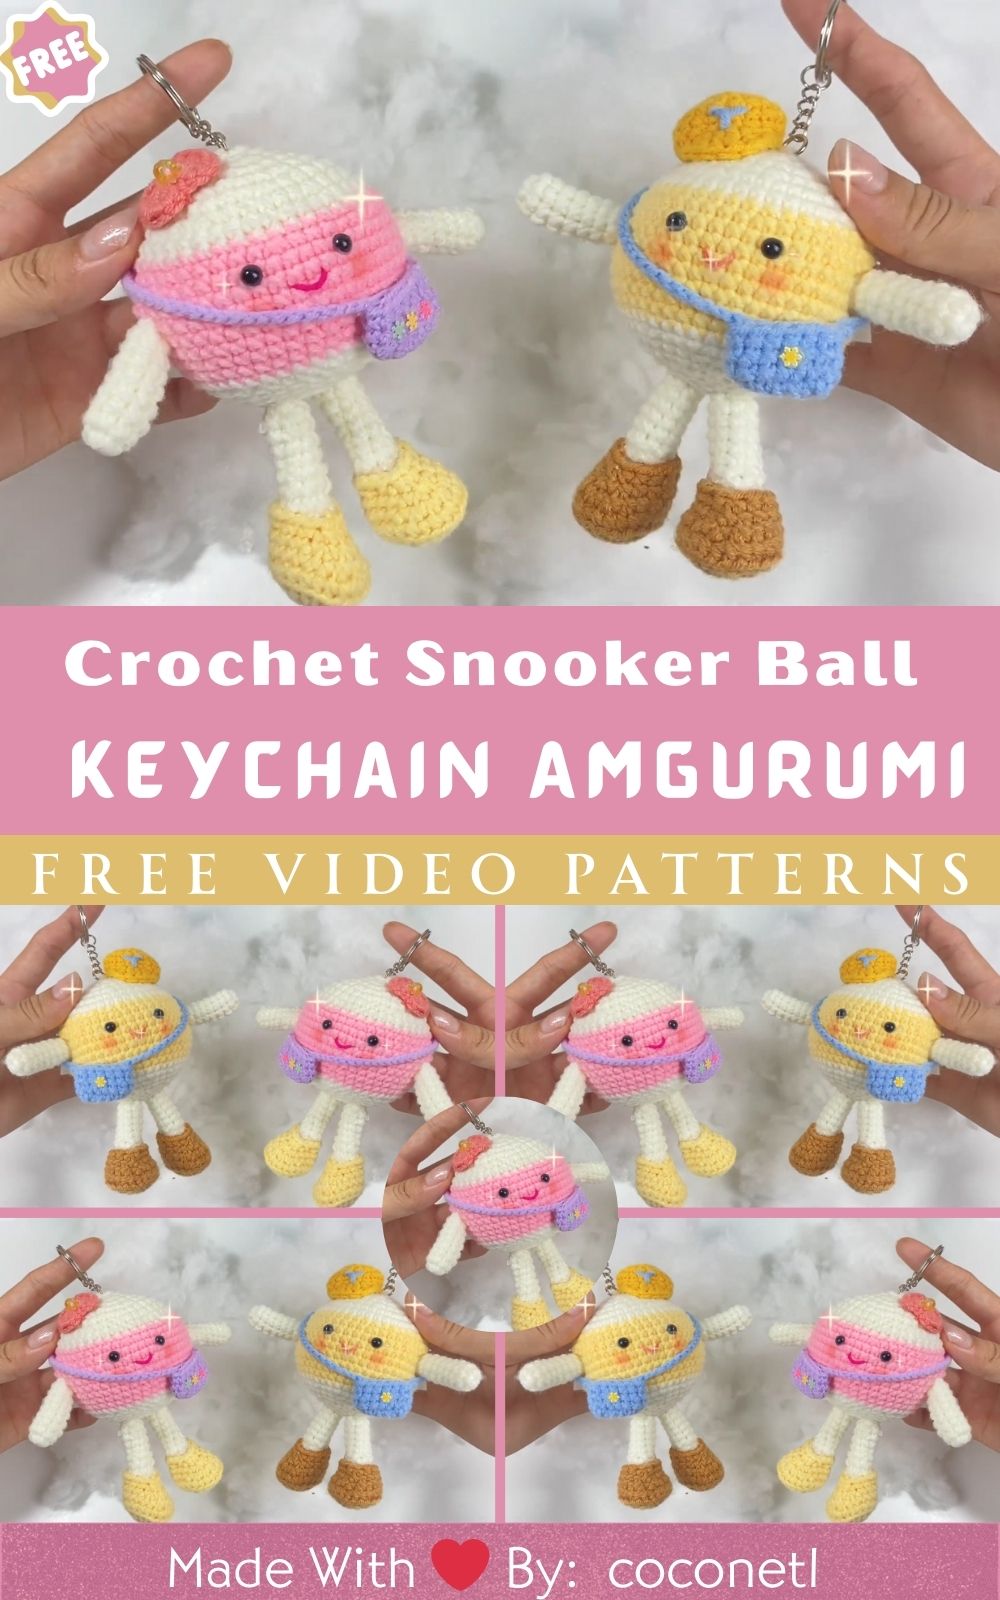
Source: Pattern
Finish with a key ring or clip for instant bag flair. Clear steps, minimal sewing, and quick repeats make it great for batching and custom orders. Personalize colors and numbers for teams, birthdays, or favorite racks.
Uses:
- Good luck, bag char,m or zipper pull
- Quick personalized gifts, party favors, or prizes
- Fast market sellers or add-on upsells
Prosperous Crochet Snooker Ball Keychain Amigurumi Pattern
Firstly, if you want a beginner-friendly project that is fast, fun, and customizable, this snooker ball keychain is perfect. Secondly, because the pattern uses simple stitches and small amounts of yarn, it works up quickly while still looking polished. Thirdly, as you choose colors for pool balls 1 through 15, classic snooker shades, or team themes, you can personalize every detail. Moreover, since each mini ball feels like a tiny good luck token, your makes will feel both personal and prosperous. Additionally, if you prefer a visual refresher on basics like magic ring, increases, and color changes, you can consult the linked technique video for extra support.
Furthermore, for those who like shorthand, x equals single crochet and v equals increase, so following along becomes even simpler. Consequently, beginners and experienced makers alike can enjoy a smooth, satisfying crafting session.
Skill Level
Firstly, this project is beginner-friendly. Secondly, if you are comfortable with single crochet and a magic ring, you are completely ready. Moreover, because the entire pattern is worked in continuous rounds, the final sphere looks smooth and seamless.
Finished Size
Firstly, the finished ball measures approximately 4.5 to 5 cm across when made with DK or worsted cotton and a small hook. Secondly, since size depends on hook, yarn, and tension, you can easily adjust using the sizing tips below. Finally, for mini or jumbo versions, you can simply swap yarn weights and tweak the increase rounds.
Estimated Total Time
Firstly, plan for about 35 to 60 minutes per keychain, depending on your speed and embellishments. Secondly, if you batch your steps, you can reduce the total time for multiple keychains. Finally, as your hands memorize the rounds, your pace will naturally increase.
Abbreviations and Terms
- Firstly, MR: magic ring
- Secondly, sc: single crochet
- Thirdly, inc: increase, 2 sc in the same stitch
- Additionally, dec: invisible decrease, sc two stitches together through front loops
- Moreover, sl st: slip stitch
- Furthermore, ch: chain
- Also, FLO or BLO: front loop only or back loop only
- Next, st, sts: stitch, stitches
- Finally, FO: fasten off
Additionally, for shorthand readers, x equals sc and v equals inc, so pattern notes remain concise and clear.
Materials with Exact Measurements
- Yarn
- Firstly, DK or Light Worsted cotton, Size 3: 10 to 15 m main color, 2 to 3 m white for stripe or patch, and 1 m black for embroidery per ball
- Secondly, Worsted cotton, Size 4: 12 to 18 m main color, 3 m white, and 1 to 2 m black per ball
- Moreover, choose cotton for durability and crisp stitch definition
- Hooks
- Firstly, 3.0 mm for DK cotton
- Secondly, 3.25 to 3.5 mm for Worsted cotton, depending on your tension
- Stuffing
- Firstly, polyester fiberfill, 4 to 6 g per ball
- Keychain hardware
- Firstly, a 25 mm split ring
- Secondly, a 20 to 25 mm short keychain chain
- Thirdly, an 8 mm jump ring
- Finally, an optional 14 to 18 mm lobster clasp
- Notions
- Firstly, a tapestry needle and a small embroidery needle
- Secondly, a stitch marker and scissors
- Thirdly, optional white and black felt scraps, about 5 by 5 cm, for the number patch
- Additionally, an optional clear drying fabric glue
- Furthermore, optional Fray Check or clear nail polish for felt edges
- Finally, an optional thin nylon cord or strong thread, 15 to 20 cm, to reinforce the hanging loop
Gauge and Sizing Tips
Firstly, aim for a tight amigurumi fabric with no gaps. Secondly, after Round 5 using DK and a 3.0 mm hook, your flat circle should measure about 3.4 to 3.6 cm across. Thirdly, if your circle is larger, choose a smaller hook, and if it is smaller, relax your tension slightly. Additionally, for a mini charm of about 3 to 3.5 cm, switch to sport-weight yarn and a 2.5 to 2.75 mm hook. Finally, for a larger bag charm of 6 to 7 cm, use bulky yarn with a 4 to 5 mm hook and add an extra increase round.
Color Planning Suggestions
Firstly, for pool balls 1 to 8, choose solid colors with a crisp white number patch. Secondly, for pool balls 9 to 15, plan a base color with a white stripe in the middle rounds, plus a white number patch. Thirdly, for a snooker set, choose red, yellow, green, brown, blue, pink, and black without numbers. Additionally, for a prosperity theme, add green and gold accents or attach a small coin charm under the jump ring. Finally, for team spirit, coordinate shades with favorite jerseys for easy gifting.
Before You Start
Firstly, work in continuous rounds and do not join unless noted. Secondly, place a stitch marker in the first stitch of each round to track your progress. Thirdly, keep tension snug so stuffing stays hidden and the surface remains smooth. Additionally, weave in ends as you go when changing colors, since this keeps the inside tidy. Finally, gather hardware in advance so finishing feels quick and satisfying.
Step-by-Step Instructions: Neckline, Body, and Finishing
Firstly, because this project forms a sphere, the neckline refers to the top area where the hanging loop anchors and the number patch aligns. Secondly, this structure keeps the steps intuitive and beginner-friendly. Finally, each stage includes time estimates so you can plan your session.
Neckline Section: Loop Anchor and Patch Prep
- Prepare the Hidden Hanging Loop Anchor
Time: 2 to 3 minutes- Firstly, cut a 15 to 20 cm length of matching yarn or thin nylon cord.
- Secondly, plan to thread it through the top stitches just before you begin the final decreases.
- Thirdly, tie a snug double knot inside and leave a 0.5 to 1 cm loop outside for the jump ring.
- Finally, secure the tails so the loop cannot pull free during daily use.
- Plan the Number Patch
Time: 1 to 2 minutes- Firstly, decide whether you will crochet a tiny white circle, cut a felt circle, or draw a circle with a fabric pen.
- Secondly, for pool-style numbers, pick the color and digit now, and for snooker-style solids, plan a clean surface or a tiny white spot.
- Finally, choose a 1.5 to 2.0 cm white circle for a 4.5 to 5 cm ball, since smaller balls look better with proportionally smaller patches.
Body Section: Crochet the Sphere
Firstly, follow the solid version for snooker balls or switch to the stripe steps for pool balls 9 through 15. Secondly, because the increases and decreases are symmetrical, the sphere forms evenly. Finally, remember that x equals sc and v equals inc if you prefer shorthand.
- Start the Sphere
Time: 6 to 8 minutes- Firstly, R1: MR, 6 sc into the ring, then tighten firmly.
- Secondly, R2: inc around to 12 sts.
- Thirdly, R3: repeat pattern of sc, inc around to 18 sts.
- Finally, close the magic ring completely so the top stays tight and tidy.
- Grow to Maximum Width
Time: 7 to 9 minutes- Firstly, R4: 2 sc, inc, repeat around to 24 sts.
- Secondly, R5: 3 sc, inc, repeat around to 30 sts.
- Thirdly, R6: 4 sc, inc, repeat around to 36 sts.
- Finally, if you want a slightly larger ball, add R7 as 5 sc, inc around to 42 sts, then add one plain round before decreasing.
- Midsection Rounds for Solid Snooker Ball
Time: 8 to 10 minutes- Firstly, R7 to R10: sc around, 36 sts each round.
- Secondly, count stitches at the end of each round, sothe shape stays even.
- Finally, rotate the piece in your hand occasionally to maintain consistency.
- Midsection with Stripe for Pool Balls 9 through 15
Time: 10 to 12 minutes- Firstly, R7: sc around in main color, 36 sts.
- Secondly, R8 to R9: change to white, sc around, 36 sts per round for a clean stripe.
- Thirdly, R10: change back to main color, sc around, 36 sts.
- Finally, create a jogless change by finishing the last yarn over of the previous stitch with the new color, then pull the tails inside.
- Insert and Secure the Hidden Loop at the Neckline
Time: 2 to 3 minutes- Firstly, before you start decreasing, thread the prepared yarn or cord through a top center stitch.
- Secondly, tie a secure double knot inside the ball and leave a neat external loop.
- Finally, if you prefer hardware, you may add a tiny screw eye later, although a yarn loop remains softer and kid-friendly.
- Begin the Taper
Time: 6 to 8 minutes- Firstly, R11: 4 sc, dec, repeat around to 30 sts.
- Secondly, R12: 3 sc, dec, repeat around to 24 sts.
- Thirdly, use invisible decreases through the front loops to keep the surface smooth.
- Finally, check stitch counts so the taper remains symmetrical.
- Stuff and Shape
Time: 2 to 3 minutes- Firstly, after R12, add small pinches of stuffing evenly.
- Secondly, press the ball gently between your palms to round it.
- Finally, maintain firm filling without overstretching stitches, and remove a little stuffing if gaps appear.
- Close the Sphere
Time: 6 to 8 minutes- Firstly, R13: 2 sc, dec, repeat around to 18 sts.
- Secondly, R14: sc, dec, repeat around to 12 sts.
- Thirdly, R15: dec around to 6 sts, then FO with a long tail.
- Finally, weave through the FLO of the remaining 6 sts, cinch closed, and roll the ball between your hands for a smooth finish.
- Optional Size Up Path
- Firstly, if you increased to 42 sts earlier, add one plain round at 42 sts.
- Secondly, decrease as follows: 5 sc, dec around to 36, then 4 sc, dec to 30, then 3 sc, dec to 24.
- Thirdly, stuff at this point to set the shape.
- Finally, continue with 2 sc, dec to 18, then sc, dec to 12, then dec to 6, and close.
Finishing Section: Patch, Number, Hardware, and Final Shaping
- Make the White Number Patch
Time: 3 to 4 minutes- Firstly, crochet option: MR, 6 sc, sl st to first sc, FO, and tighten.
- Secondly, for a larger patch, add R2 with inc around to 12, then sl st and FO.
- Thirdly, felt option: cut a clean circle of 1.5 to 2.0 cm and use a coin as a guide.
- Finally, paint option: paint a centered white circle with fabric paint and let it dry completely.
- Add the Number
Time: 6 to 10 minutes- Firstly, embroidery method: outline the digit with backstitch, then fill with short satin stitches.
- Secondly, felt method: cut a tiny black felt number, about 0.9 to 1.1 cm tall, then glueit to the patch.
- Thirdly, marker method: draw with a fine tip fabric pen, outline first, then fill carefully.
- Finally, place the patch opposite the hanging loop so the number faces forward on your keys.
- Attach the Keychain Hardware
Time: 4 to 6 minutes- Firstly, open the 8 mm jump ring by twisting sideways with two pliers.
- Secondly, slide it through the yarn or cord loop and add the short chain and split ring, plus an optional lobster clasp.
- Thirdly, twist the jump ring closed so it meets cleanly.
- Finally, add a tiny dab of clear glue at the loop knot for extra security.
- Final Steam and Shape
Time: 2 to 3 minutes- Firstly, hover the steam lightly over the surface to relax any kinks.
- Secondly, shape with your fingers while the fabric is warm.
- Thirdly, avoid direct iron contact to protect the yarn.
- Finally, weave in any remaining tails neatly and admire the smooth silhouette.
Basic Tips for Success
- Firstly, use cotton or a cotton blend since it resists fuzz and holds shape.
- Secondly, keep tension snug, and choose a slightly smaller hook than the label suggests.
- Thirdly, mark the first stitch of every round and move the marker as you go.
- Additionally, use invisible decreases for clean shaping.
- Moreover, hide stripe jogs by changing colors on the last yarn over.
- Finally, align the patch opposite the loop so the ball hangs straight and reads clearly.
Common Mistakes and How to Fix Them
- Loose gauge and visible stuffing
- Firstly, downsize your hook or tighten your tension.
- Secondly, select cotton yarn for better structure.
- Finally, check your gauge after Round 5 to correct early.
- Overstuffing that distorts the sphere
- Firstly, add fiberfill in small pinches rather than big clumps.
- Secondly, stop and check the silhouette often.
- Finally, roll the ball between your hands to redistribute the fill.
- Lumpy decreases or visible bumps
- Firstly, use invisible decreases through FLO.
- Secondly, keep movements gentle and consistent.
- Finally, steam lightly to settle stitches if needed.
- Messy color changes on the stripe
- Firstly, finish the last yarn over with the new color for a jogless change.
- Secondly, weave tails immediately so they do not peek out.
- Finally, tug gently on tails to level the stripe.
- Off-center number patch
- Firstly, pin the patch and check alignment relative to the loop.
- Secondly, mark placement with a removable pen.
- Finally, sew with small, even stitches for a crisp finish.
- Weak hanging loop
- Firstly, anchor a yarn or nylon cord loop before closing.
- Secondly, tie a double knot inside and trim carefully.
- Finally, seal the knot with a tiny dab of clear glue.
Variations You Will Love
- Full pool set
- Firstly, create balls 1 through 15, using solids for 1 to 8 and stripes for 9 to 15.
- Secondly, arrange them on a mini tray for a fun display.
- Finally, gift sets to teammates for a coordinated look.
- Snooker set
- Firstly, make red, yellow, green, brown, blue, pink, and black with no numbers.
- Secondly, add a single white spot if you want a stylized touch.
- Finally, pair with a green felt base for a table vibe.
- Classic eight ball
- Firstly, crochet a black ball with a white patch and a bold 8.
- Secondly, keep the finish glossy by using high-twist cotton.
- Finally, choose metallic hardware for a sleek contrast.
- Prosperity accents
- Firstly, add green and gold details or hang a tiny coin charm.
- Secondly, embroider tiny stars beside the patch for sparkle.
- Finally, include a mini note reading Pocket size luck for wins on and off the table.
- Size tweaks
- Firstly, for mini charms, use sport-weight yarn, a 2.5 to 2.75 mm hook, and stop at 30 or 36 sts before decreasing.
- Secondly, for jumbo bag charms, use worsted or bulky yarn, a 4 to 5 mm hook, and increase to 42 or 48 sts.
- Finally, adjust the patch diameter so the proportions stay balanced.
- Texture touches
- Firstly, work one round in BLO near the midsection for a subtle ridge.
- Secondly, add surface slip stitches to suggest panel seams.
- Finally, experiment with speckled cottons for a playful look.
- Personalized letters
- Firstly, replace numbers with initials or team abbreviations.
- Secondly, choose bold felt letters for high contrast.
- Finally, position letters opposite the loop for perfect orientation.
Beginner Friendly Quick Reference Pattern
- Solid ball version
- Firstly, R1: MR 6
- Secondly, R2: increase around to 12
- Thirdly, R3: sc, inc around to 18
- Additionally, R4: 2 sc, inc around to 24
- Moreover, R5: 3 sc, inc around to 30
- Next, R6: 4 sc, inc around to 36
- Then, R7 to R10: sc around, 36 each
- Afterwards, insert a loop anchor
- Subsequently, R11: 4 sc, dec around to 30
- Next, R12: 3 sc, dec around to 24
- Then, stuff firmly
- Afterwards, R13: 2 sc, dec around to 18
- Next, R14: sc, dec around to 12
- Finally, R15: dec around to 6, close
- Striped ball version
- Firstly, work as above through R7 in the main color
- Secondly, R8 to R9: change to white, sc around 36 each
- Thirdly, R10: change back to main color, sc 36
- Finally, continue with the loop anchor, decreases, stuffing, and close
Care and Durability
Firstly, spot clean with mild soap and cool water, then pat dry immediately. Secondly, avoid machine washing once the metal hardware is attached. Thirdly, keep your keychain away from velcro and rough zippers to prevent fuzzing. Additionally, for child-friendly gifts, use an anchored yarn loop without metal parts and sew the patch very securely. Finally, store your keychain away from direct sunlight to preserve bright colors.
Why This Pattern Works for Beginners
Firstly, the stitch pattern is consistent and easy to memorize. Secondly, the shaping uses simple increases and straightforward decreases. Thirdly, each step is short, so progress feels quick and encouraging. Additionally, the pattern adapts to different sizes and styles without complex math. Finally, the finishing steps are simple yet polished, which builds confidence for future amigurumi projects.
Troubleshooting Quick Guide
- The sphere looks hexagonal
- Firstly, steam lightly and roll the ball between your palms.
- Secondly, add a small pinch of stuffing under each visible edge.
- Finally, smooth the surface with gentle circular motions.
- Stripe looks slanted
- Firstly, confirm that you worked two full white rounds for balls 9 through 15.
- Secondly, use the jogless change method to level the stripe.
- Finally, check stitch counts to correct drift.
- Patch edges fray
- Firstly, use high-quality felt with dense fibers.
- Secondly, seal edges with a tiny dab of Fray Check.
- Finally, consider crocheting the patch for maximum durability.
Time Saving Batch Plan for Markets
Firstly, crochet five balls to R10 first, 30 to 45 minutes total. Secondly, add loop anchors, work decreases, and close all five, 30 to 40 minutes total. Thirdly, prepare patches and numbers together, 20 to 30 minutes total. Additionally, attach hardware last, 15 to 20 minutes total. Finally, because you are grouping similar tasks, your speed and consistency will improve noticeably.
Closing Encouragement For
Firstly, celebrate your finish, because you just turned simple stitches into a polished, sporty charm. Secondly, enjoy experimenting with color sets, patch styles, and hardware choices to make each keychain feel unique. Thirdly, share a set with friends or teammates for a coordinated look. Additionally, try a mini or jumbo version to match different bags and keys. Finally, clip on your Prosperous Crochet Snooker Ball Keychain, smile at the smooth, round finish, and look forward to your next quick make.