Amazing Crochet Heart Melt Kitten Basket Storage Pattern
Fall in love with this Amazing Crochet Heart Melt Kitten Basket Storage Pattern cute, sturdy, and beginner-friendly, perfect for toys, yarn, and clutter-free cozy corners.
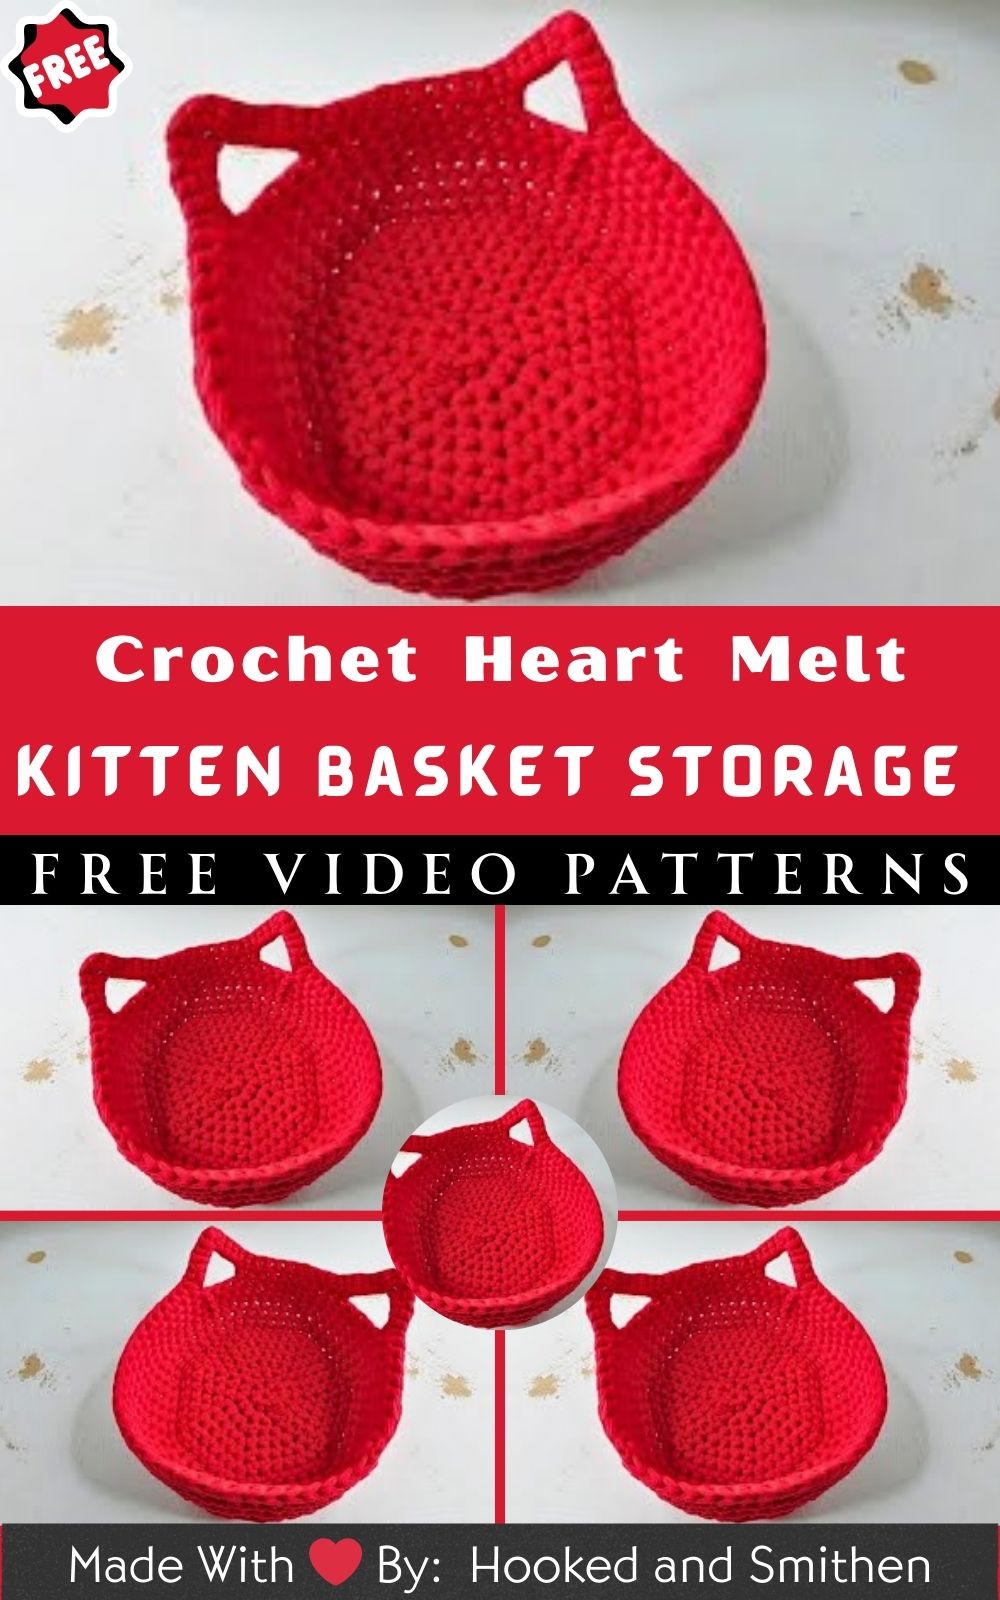
Turn clutter into cuddles with the Amazing Crochet Heart Melt Kitten Basket Storage Pattern. This charming design pairs a sweet kitty silhouette with heart-inspired details and sturdy structure, perfect for beginners using chunky yarn and simple stitches. The basket works up quickly, stands on its own, and adds cozy personality to nurseries, craft rooms, or entryways.
Customize size and colors to match your decor, then fill it with everyday essentials. Giftable, durable, and irresistibly cute, it turns storage into decor in an afternoon.
Uses:
- Stashing yarn, hooks, and craft tools
- Organizing baby toys, diapers, and books
- Holding pet treats, leashes, and grooming supplies
Amazing Crochet Heart Melt Kitten Basket Storage Pattern
If you love cute storage that works hard, then you’ll adore this Amazing Crochet Heart Melt Kitten Basket Storage Pattern. Because it is built entirely with single crochet in joined rounds, it’s wonderfully beginner-friendly. Moreover, you can choose a softer, flexible look with one strand and a 3.5 mm hook or, alternatively, go sturdier by holding two strands together with a 4.0 mm hook. As a result, you’ll quickly create a sweet little basket that looks kitten-cute on desks, dressers, and nursery shelves.
Before we dive in, note this: while the instructions below are detailed, they were designed to be easy to read, smoothly paced, and packed with helpful transitions. Consequently, you can crochet confidently from start to finish without second-guessing a step.
What You’ll Need (With Exact Sizes and Counts)
- Yarn:
- Single-strand option: smooth worsted-weight (category #4) cotton or cotton blend for shape, 1–2 balls depending on height.
- Two-strand option: hold two strands of the same yarn together for extra structure.
- Note: Yardage varies by yarn and desired height; therefore, keep an extra ball on hand if you plan to make your basket taller.
- Hook:
- 3.5 mm hook (for single-strand version; softer walls)
- 4.0 mm hook (for two-strand version; sturdier walls)
- Stitch markers: 3 total (2 for handle centers, 1 for the first stitch of each round)
- Tapestry (yarn) needle for weaving ends
- Scissors
- Measuring tape (to check base diameter and height as you go)
- Optional: thin plastic canvas, felt circle, or cardboard insert for the base (cut to fit after the base is finished)
Because the pattern uses simple stitches and standard tools, you can start immediately with materials you likely already have. Additionally, you can substitute acrylic yarn if desired; however, cotton usually yields crisper walls.
Skill Level and Format
- Skill level: Absolute beginner to confident beginner
- Construction: Worked bottom-up, in joined rounds, using only single crochet (sc)
- Language: US crochet terms
Abbreviations (US Terms)
- MR = magic ring
- ch = chain
- sc = single crochet
- sl st = slip stitch
- BLO = back loop only
- st(s) = stitch(es)
Because these are common basics, you’ll quickly establish a smooth rhythm once you start. Furthermore, since every round is joined, your seam will remain tidy and easy to track.
Gauge, Structure, and Sizing Expectations
- Gauge: Flexible—aim for a dense, non-gappy fabric that stands up.
- Structure tips:
- For firmer sides, use tighter tension, a smaller hook, or hold two strands together with the 4.0 mm hook.
- For softer sides, use a single strand with the 3.5 mm hook and a relaxed, even tension.
- Sizing overview:
- Base width grows through the increasing rounds (Rounds 1–10).
- Height grows with plain sc rounds (Rounds 11–13 and beyond).
- Handle width is set by ch-7 loops and reinforced in Round 15.
Because yarns and tensions differ, your finished dimensions will vary slightly. Nevertheless, by following the round counts below, you’ll match the overall proportions shown in the tutoria
Project Timeline at a Glance
- Step 1: Flat Base (Rounds 1–7): 20–35 minutes
- Step 2: Turn Up the Walls (Rounds 8–9): 10–20 minutes
- Step 3: Build Height (Rounds 10–13): 25–45 minutes
- Step 4: Set Handles (Round 14): 8–12 minutes
- Step 5: Shape Handles and Finish (Round 15 + fastening off): 10–15 minutes
- Step 6: Final Finishing and Shaping: 5–10 minutes
Total estimated time: 1.5–3 hours, depending on yarn, hook, and your personal pace. Because crocheters work at different speeds, consider these helpful planning windows rather than strict lim
Step-by-Step Instructions
Important joining note: At the end of each round, join with a sl st to the first sc of that round. Additionally, the initial ch 1 at the start of a round does not count as a stitch.
1: Crochet the Flat Base (Rounds 1–7)
Estimated time: 20–35 minutes
- Round 1: Make a MR, ch 1 (does not count), then work 7 sc into the ring. Pull the ring snug, and join to the first sc with a sl st. (7 sts)
Because the magic ring centers the base neatly, give the tail a firm tug to close the hole completely. - Round 2: Ch 1, 2 sc in each st around. Join the first sc. (14 sts)
Additionally, place a marker in that first sc so you never mistake the join gap for a stitch. - Round 3: Ch 1, [1 sc in next st, 2 sc in next st] around. Join. (21 sts)
Moreover, flatten the circle with your palm occasionally; it should lie flat without ruffles or cupping. - Round 4: Ch 1, [1 sc in next 2 sts, 2 sc in next st] around. Join. (28 sts)
Consequently, your base grows evenly as you add one more plain sc between increases each round. - Round 5: Ch 1, [1 sc in next 3 sts, 2 sc in next st] around. Join. (35 sts)
Furthermore, count as you go; evenly spaced increases prevent distortion later. - Round 6: Ch 1, [1 sc in next 4 sts, 2 sc in next st] around. Join. (46 sts as per the tutorial)
Although a textbook increase might land on 42 here, the tutorial’s count moves to 46 and still works beautifully. Therefore, continue with confidence. - Round 7: Ch 1, [1 sc in next 5 sts, 2 sc in next st] around. Join into the BACK LOOP of the first sc with a sl st. (49 sts)
Because you join the BLO here, you create a crisp turning ridge that helps the walls stand up.
2: Turn Up the Walls (Rounds 8–9)
Estimated time: 10–20 minutes
- Round 8: Ch 1, sc into the same spot as the join, then 1 sc in the BLO of each st around. Join through both loops. (49 sts)
Meanwhile, keep your tension firm; this first wall round sets your structure. - Round 9: Ch 1, sc in each st around (through both loops). Join. (49 sts)
Moreover, after this round, the basket should show a tidy edge where the base meets the sides.
3: Build Height and Add a Gentle Flare (Rounds 10–13)
Estimated time: 25–45 minutes
- Round 10: Ch 1, 1 sc in the same st as the join and in the next 5 sts (6 sc total), then [2 sc in next st, 1 sc in next 6 sts] repeat around. Join. (56 sts)
Because this is the final increase, it gives the basket a touch more room. - Rounds 11–13: Ch 1, sc in each st around. Join each round. (56 sts per round)
Additionally, you can add more plain rounds here if you want a taller basket. Conversely, stop sooner for a shallow tray style.
4: Set the Handles (Round 14)
Estimated time: 8–12 minutes
- Round 14: Ch 1, sc in the next 10 sts (including the space where you joined). Then ch 7 (keep chains relaxed), and place a marker in the 4th chain. Next, skip 3 sts from the previous round and sc in the next 10 sts. Again, ch 7, mark the 4th chain, skip 3 sts, and sc across the remaining sts (you’ll work about 30 sc to finish the round). Join the first sc.
Because you mark the middle chain of each handle loop, you’ll center the handle curve perfectly in the next round.
5: Shape Handles and Finish the Rim (Round 15)
Estimated time: 10–15 minutes
- Round 15: Ch 1, sc in the next 10 sts. Into the first ch-7 loop, work 4 sc, then remove the marker and place 3 sc directly into that marked (4th) chain, then add 4 more sc into the same ch-7 loop. Next, sc into the next 10 sts. In the second ch-7 loop, repeat the same sequence: 4 sc in the loop, 3 sc into the marked chain, and 4 sc into the loop. Finally, sc into each remaining st to the end of the round (about 30 sc). Join and fasten off.
For a clean, nearly invisible finish, weave the tail through both loops of the first sc and into the back loop of the last sc before securing. Consequently, your rim looks smooth and polished.
Step 6: Final Finishing
Estimated time: 5–10 minutes
- Weave in all ends with a tapestry needle.
- Shape the basket by gently tugging the handles into arches and smoothing the sides. If needed, lightly steam-block (hover, don’t press) or stuff with towels overnight to set the silhouette.
- Additionally, if you want extra rigidity, insert a thin base circle cut to size after the basket is complete.
Beginner Success Tips (Short, Practical, and Reliable)
- Place a marker in the first sc of every round. Because joined rounds can be confusing, the marker ensures you never work into the join gap accidentally.
- Keep chains relaxed. Because tight chains are hard to crochet into, slightly loose ch-7 loops make Round 15 a breeze.
- Count often, especially during increasing rounds. Consequently, your base remains flat, and your stitch counts match the tutorial’s flow.
- Use BLO with intention. The BLO joins at Round 7, and the BLO stitches on Round 8createse the neat turning ridge; therefore, follow those placements carefully.
- Adjust firmness with the hook and strands. For sturdier sides, either hold two strands together or size down your hook; for softer sides, use one strand and relaxed tension.
- Measure as you go. Because yarns vary, check base diameter and wall height with your tape measure to hit your personal size goals.
Common Mistakes (And How to Fix Them Quickly)
- Adding an extra stitch at the join:
- Problem: Working into the joint gap makes the base ripple.
- Fix: Always identify the first real sc (use a marker) and join to that stitch only.
- Base ruffling or cupping:
- Problem: Too many increases = ruffles; too few = cupping.
- Fix: Flatten after every round; adjust tension slightly. If needed, redo the last increase round more evenly.
- Tight handle chains:
- Problem: Stiff, tight ch-7 loops are tricky to fill on Round 15.
- Fix: Loosen your chain slightly; as a result, the loops accept stitches smoothly and look graceful.
- Miscounting skipped stitches on Round 14:
- Problem: Skipping more or fewer than 3 stitches beneath the ch-7 throwsthe handles off-center.
- Fix: Count aloud and use markers to flag the three stitches to skip.
- Forgetting to mark the 4th chain:
- Problem: Without the middle-chain marker, you may not center the 3 sc cluster.
- Fix: Insert the marker immediately as you chain; consequently, Round 15 finishes perfectly.
- Loose magic ring:
- Problem: The center hole reopens over time.
- Fix: Tug the ring closed and secure the tail with a tiny knot before weaving it in.
Sizing Tips and Customization For (Crochet Basket Pattern)
- To make the basket wider:
- Continue the increase logic past Round 10: add one more plain sc between increases each round (for example, [1 sc in next 7 sts, 2 sc] around, then [1 sc in next 8 sts, 2 sc], and so on). Because increases are evenly spaced, the base remains flat.
- To make the basket taller:
- Add more plain sc rounds after Round 10 (as you did in Rounds 11–13). Additionally, check the height with your tape measure until you reach your ideal storage capacity.
- To adjust handle width:
- For wider handles, chain 8–10 in Round 14, still skipping 3 stitches beneath. Then, on Round 15, add an extra sc or two in each handle loop to fill the curve evenly. Consequently, your handles stay proportional and comfy.
- To move the handle placement:
- If you prefer higher handles, work one or two extra plain rounds before Round 14. Conversely, for low-profile handles, place them right at your preferred height.
- To increase structure:
- Hold two strands together with a 4.0 mm hook, or add a base insert. Furthermore, cotton yarn typically produces sturdier walls than very soft acrylics.
Helpful FAQs (Because Beginners Ask Great Questions)
- Can I use a different hook size?
- Yes. However, smaller hooks create denser fabric and firmer walls; larger hooks create softer, looser sides. Consequently, adjust to match your preferred structure.
- What yarn works best?
- Smooth, non-fuzzy yarns show stitches clearly. Cotton or cotton blends give crisp structure; alternatively, acrylic works well for a softer, lighter basket.
- Do I have to use a magic ring?
- Not necessarily. If you prefer, chain 3–4, join into a ring, and crochet Round 1 into that ring. Nevertheless, the magic ring closes tighter and looks cleaner.
- How do I keep the seam neat?
- Always join the first sc and avoid the join gap. Moreover, using an invisible join at the end creates a tidy finish.
- Can I wash the basket?
- Usually, yes—check your yarn label. Cotton can be spot-cleaned or gently washed; acrylic can often be machine-washed on delicate. Therefore, shape and air-dry to maintain crisp edges.
Variations You’ll Love For (Crochet Basket Pattern)
- Double-strand sturdiness:
- Hold two strands of the same yarn with a 4.0 mm hook. As a result, your basket stands tall even when filled.
- Color-block sides:
- Change colors at the back join on any plain round (11–13 and beyond). Additionally, narrow stripes add a playful, kitten-chic look.
- Heart accent or kitten face:
- After finishing, embroider a tiny heart nose, stitch on whiskers, or surface-crochet a small heart motif on the front. Consequently, your basket looks custom and gift-ready.
- Taller tote:
- Add several extra plain rounds before the handle setup. Then chain 10–12 for the handles and reinforce as described. Therefore, you’ll get a petite tote for light items.
- Oval or rectangular footprint:
- Start with a chain foundation, and work increases at each end to form an oval base, then follow the same wall and handle logic. Although the counts differ, the concept remains identical.
- Structured base insert:
- Trace the finished base onto plastic canvas, felt, or covered cardboard. Then, drop it inside for added stability,y especially useful if you plan to store heavier items.
Round-by-Round Stitch Summary (Quick Reference)
- R1: 7 sts
- R2: 14 sts
- R3: 21 sts
- R4: 28 sts
- R5: 35 sts
- R6: 46 sts (per the tutorial)
- R7: 49 sts; join in BLO for a crisp ridge
- R8: 49 sts; sc in BLO around, join through both loops
- R9: 49 sts
- R10: 56 sts (final increase)
- R11–R13: 56 sts each (plain rounds; add more for extra height)
- R14: Handle setup—ch 7 twice, skip 3 beneath each, mark the 4th chain
- R15: Handle shaping—4 sc in loop, 3 sc in marked chain, 4 sc in loop (repeat for both handles), then sc to end; fasten off
Because these counts mirror the tutorial you watched, you’ll stay perfectly in sync from start to finish
Care, Blocking, and Longevity
- Weave ends securely and trim neatly. Then, if your yarn allows, lightly steam-block to sharpen edges. However, avoid pressing the iron directly onto acrylic as it can melt or “kill” the fibers.
- To refresh the shape later, stuff the basket with towels overnight. Consequently, the sides regain their curve, and the handles perk back up.
Why You’ll Love Making This Basket For (Crochet Basket Pattern)
- It’s just single crochet: Therefore, you can relax into the rhythm, even as a brand-new crocheter.
- It’s quick and customizable: Consequently, you can whip up gifts or a matching set in an afternoon.
- It’s cute and practical: Moreover, the kitten-basket charm brings personality to everyday storage.
Final Encouragement For (Crochet Basket Pattern)
With clear counts, smooth transitions, and beginner-friendly steps, this Amazing Crochet Heart Melt Kitten Basket Storage Pattern transforms simple stitches into adorable storage. As you crochet the flat base, turn up the walls, and shape the handles, you’ll see a tidy, sturdy basket appear round by round. Furthermore, after you make one, you’ll likely want an entireset oft one for yarn, one for toys, and one for those daily grab-and-go essentials. Happy crocheting and happy organizing.