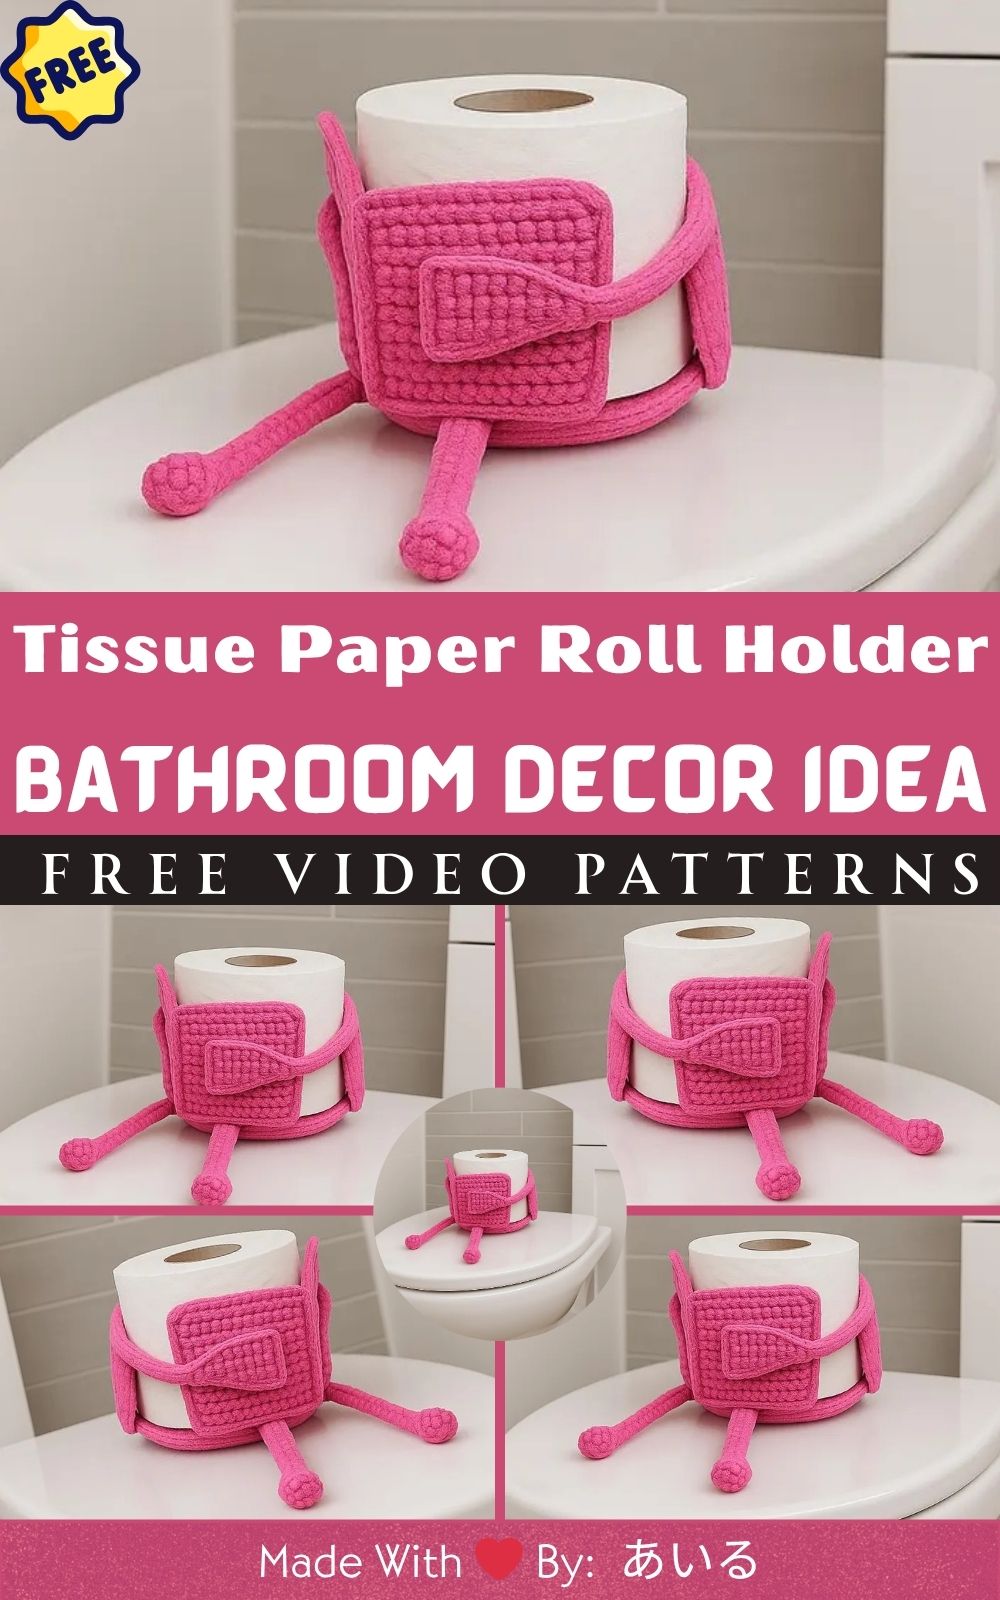
Crochet Tissue Paper Roll Holder Pattern – Cute & Practical Bathroom Decor Idea
There’s something magical about how a few skeins of yarn can transform a plain corner of the house into a cozy, personalized nook. Bathrooms, especially, are easy to overlook when it comes to décor but a small handmade touch makes them feel warm and inviting. That’s exactly why I fell in love with this crochet tissue paper roll holder: it’s tidy, pretty, and surprisingly fun to make.
This project balances function and cuteness. It keeps your spare rolls neat, off the counter, and right where you need them all while adding a soft, homey texture to your space. I love how the gentle stitches and simple lines blend with almost any bathroom style, from minimalist to cottage chic.
When I first crocheted this roll holder, I didn’t expect it to look so elegant! It started as a practical idea to organize my tissue rolls and ended up becoming one of my favorite bathroom crafts. Every time I walk in, I catch myself smiling at how neat and stylish everything looks now.
Ready to make one for yourself (or as a charming gift)? Grab your yarn and hook let’s crochet a pretty and practical tissue roll holder together!
Why You’ll Love This Pattern
-
Beginner-friendly design straightforward stitches, relaxing rhythm.
-
Quick and practical project finish in an afternoon.
-
Perfect for home organization keeps spare rolls tidy and handy.
-
Uses minimal yarn a great stash-buster.
-
Adds handmade charm to any bathroom.
-
Customizable choose colors, textures, and embellishments.
-
Great housewarming gift useful, pretty, and unique.
-
Eco-friendly reusable décor washable and long-lasting.
-
Style + function it looks good and works beautifully.
-
Makes cleaning and restocking fun again yes, really!
Materials & Tools
-
Yarn: Medium-weight cotton (Category 3–4). Cotton holds shape, is durable, and can handle light washing.
-
Hook: 3.5–4 mm (adjust to your yarn and tension).
-
Support (optional): Plastic curtain ring, acrylic ring, or upcycled cardboard roll for structure at the hanging point.
-
Accessories (optional): Buttons, ribbons, wooden beads, or leather tabs.
-
Notions: Yarn needle, scissors, stitch markers, measuring tape.
Pro Tip: Cotton yarn works best because it keeps edges crisp, resists stretching, and dries quickly after a gentle wash.
Sizing & Fit (Guidelines)
Standard toilet paper rolls are approx. 10–11 cm (4–4.3 in) wide with a circumference of 31–32 cm (12–12.5 in). We’ll crochet a panel that wraps around the roll with a slight overlap. You can make a single-roll holder or a stacked version that holds 2–3 rolls vertically.
-
Width of panel (flat): 33-34 cm (13–13.5 in) to allow overlap.
-
Height per roll: 11-12 cm (4.3-4.7 in). For 2 rolls, aim for 24-25 cm; for 3 rolls, 36-37 cm.
Measure your preferred brand to tweak the fit tiny adjustments make a polished finish.
Stitch Glossary (US Terms)
-
ch – chain
-
sc – single crochet
-
hdc – half double crochet
-
sl st – slip stitch
-
sc blo – single crochet in back loop only (adds subtle rib & structure)
If you’re a brand-new crocheter, stick to single crochet for a firm, supportive fabric. If you want a little flexibility and drape, try hdc.
Crochet Pattern – Step by Step
We’ll build this in modular parts so you can adjust length, style, and capacity easily.
1) Base Panel (Core Body)
Goal: A sturdy rectangle that wraps neatly around one (or more) toilet rolls.
-
Foundation Chain:
-
Chain a length equal to your desired panel width (the wrap).
-
For a single roll: ch to 33–34 cm. Note the stitch count for even edges (e.g., ch 60 with 4 mm hook and medium cotton).
-
-
Row 1:
-
Sc in 2nd ch from hook and in each ch across. Turn.
-
-
Row 2–(height):
-
Ch 1, sc blo across; turn.
-
Repeat until the height equals one roll (about 11–12 cm).
-
For a multi-roll holder, continue to a 2-roll or 3-roll height.
-
-
Last Row:
-
Work a standard sc row (through both loops) to stabilize the top edge. Fasten off and weave in tails.
-
Why sc blo? It produces a subtle rib that looks chic, resists sagging, and makes the fabric slightly more elastic while keeping structure.
2) Front Closure Band (Minimalist Wrap)
We’ll add a slim band that closes the panel neatly in front.
-
Attach yarn at the lower right corner of your panel.
-
Ch 8–10, then sc in 2nd ch from hook and back to the base; sl st to the next stitch on the panel. Turn.
-
Work sc across the band for 2–3 rows.
-
Create a buttonhole (optional): ch 2 (skip 2 sts), continue sc, turn; next row sc across including 2 sc in the ch-2 space.
-
Continue until band length matches the panel height. Fasten off.
Alternative: Skip the buttonhole and use a ribbon tie or wooden toggle for a rustic look.
3) Back Hanging Tabs / Loops
You’ll need sturdy loops to hang the holder on a hook, towel rod, or adhesive wall peg.
Single Central Loop
-
Attach yarn at the top back edge, approximately centered.
-
Ch 18–24 (depending on your hook/peg size).
-
Sl st to the panel 3–4 sts away to form a loop. Turn.
-
Row 1–3: Work sc around the loop covering chains for a thick strap, sl st to secure. Fasten off.
Two-Strap Option (Extra Support)
Make two narrower straps at each top corner:
-
Ch 10–14, sc back, turn.
-
Repeat 3–5 rows.
-
Sew ends down as neat tabs for a modern, belt-loop look.
Optional Structure: Thread a plastic/acrylic ring through the loop before final securing to keep the opening perfectly round.
4) Top Flap (Optional)
A decorative flap that partially covers the top roll looks polished and prevents dust.
-
Attach yarn at the upper front edge.
-
Row 1: Ch 1, sc evenly across the top front width (not the full wrap). Turn.
-
Row 2–6: Ch 1, sc across for 5–6 rows (or until desired flap length).
-
Edging (optional):
-
Picot edging: (sc, ch 3, sl st in same st) repeat across.
-
Shell edging: (sk 1, 5 dc in next st, sk 1, sc in next) repeat.
-
Add a button or ribbon tie to keep the flap closed if you like a tidy front.
5) Assembly & Final Fit
-
Wrap Test: Place the panel around one roll and check overlap. You want a snug closure without squeezing the roll.
-
Mark Closures: Pin the front band alignment and mark button placement.
-
Sew Button(s): Use sturdy thread or matching yarn.
-
Add Loops/Hanger: Ensure your loop(s) are even and centered so the holder hangs straight.
-
Optional Pockets: For a 2–3 roll design, sew a horizontal bar of sc inside (like a shelf) to keep rolls from slipping, or simply keep the panel tighter with an extra front band.
Pro Tips for a Polished Finish
-
Use single crochet for firmness; it resists stretching and keeps rolls from sagging.
-
Adjust the height depending on how many rolls you want to hold.
-
Reinforce edges: Work a single crochet border around the entire panel for crisp sides.
-
Keep stitches tight: Especially at the closure band and hanging loops.
-
Block lightly: Steam or wet-block to square the panel before adding hardware.
-
Discreet weaving: Weave tails along the inside back where they won’t show.
Creative Uses for Your Crochet Roll Holder
-
Bathroom organizer: Hang it on a wall hook or cabinet side for instant tidiness.
-
Gift holder: Roll small towels, bath salts, or sheet masks inside and present as a spa-themed gift.
-
Kitchen/craft room helper: Store paper towel rolls, parchment paper, or even skeins of yarn!
-
Coordinated set: Match with soap covers, baskets, or a bath mat for a complete handmade look.
-
Craft fairs & Etsy: A bestseller — pair with a matching washcloth set.
-
Labels & color themes: Neutral for modern homes, or soft pastels for cottage vibes.
Customization Ideas
-
Minimalist neutrals: Cream, taupe, or charcoal for a sleek look.
-
Floral appliqués: Crocheted daisies or leaves stitched to the flap.
-
Beachy shells: Sew small (fake) shells along the edge for a coastal bathroom.
-
Seasonal versions:
-
Christmas red/green with a tiny holly applique
-
Spring pastels with lace edging
-
Boho macramé vibes using cotton cord and tassels
-
-
Color blocking: Two-tone panels or gradient yarns for trendy dimension.
-
Personalized monogram: Embroider initials on the front band or flap.
Finishing & Assembly Tips
-
Block first to keep everything straight and even.
-
Double-stitch loops: Reinforce hanging points; they bear the weight.
-
Easy access: Test that rolls slide in/out smoothly.
-
Removable rolls: Use decorative buttons or ties on the front band for quick refills.
-
Optional lining: Add a thin cotton fabric lining for a luxe finish and extra support.
-
Hang and admire: Step back and enjoy that fresh, handmade accent!
Care & Maintenance
-
Wash: Hand wash or gentle machine wash (delicates bag) in cold water.
-
Dry: Lay flat to dry; reshape while damp.
-
Avoid: Bleach and harsh detergents.
-
Store: Flat or loosely rolled to maintain shape.
-
Freshen: Light linen or lavender spray keeps it smelling clean.
Troubleshooting & FAQs (Quick Wins)
Why is my holder sagging?
Use a smaller hook or switch to single crochet. Cotton yarn helps a lot. Reinforce with a sc border.
My closure gapes open. What now?
Add a second button or a ribbon tie for more control. Ensure the front band is long enough.
Hangs crooked on the wall — help!
Center your back loop(s) and make sure both sides have equal stitch counts. Two small tabs can hang straighter than one large loop.
Can I make it for jumbo rolls?
Yes just increase the panel height by 1-2 cm and widen the wrap by a few stitches.
Is acrylic okay?
It works, but cotton is sturdier and holds shape better in a humid bathroom.
Pattern Recap (Cheat Sheet)
-
Panel: Ch to 33–34 cm width → sc across; work sc blo rows to 11–12 cm height per roll.
-
Front band: Narrow strip with optional buttonhole; run the full height of the panel.
-
Hanging loops: One centered loop or two small corner tabs; reinforce with extra rows.
-
Top flap (optional): 5–6 rows of sc + picot/shell edging; add button or tie if you want it to close.
-
Finish: Border in sc for clean edges, sew buttons, block lightly, and hang.
Final Thoughts
A simple roll of yarn can transform even the most ordinary bathroom corner into something beautiful. Every stitch in this project adds warmth, personality, and a touch of handmade love to your home. I still smile every time I see how tidy (and pretty!) my extra rolls look — it’s such a satisfying handmade bathroom idea.
If you make this pattern, tag your photos with #MyCrochetHome on Instagram or Pinterest I’d love to see your clever color combos, ribbons, and embellishments. Your creativity always inspires me!
Happy crocheting and may your home always be filled with handmade love!