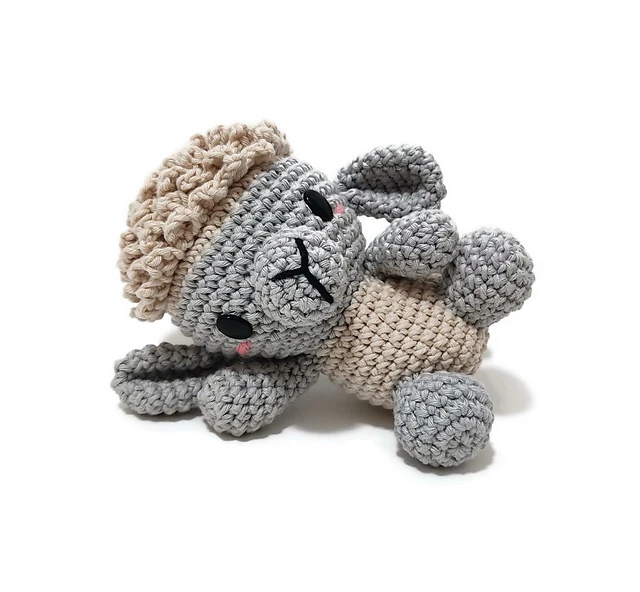
Free Crochet Bunny Cord Holder Amigurumi Pattern Tutorial
Creating adorable and functional items is always a rewarding endeavor. One such project that perfectly marries cuteness with practicality is the crochet bunny cord holder. This delightful accessory not only helps keep cords organized but also adds a touch of whimsy to any space. Whether one is an experienced crocheter or a beginner looking for a fun project, this amigurumi pattern is a wonderful choice. This blog post provides a comprehensive tutorial on making a crochet bunny cord holder, complete with a materials list, step-by-step instructions, and helpful tips to ensure success.
Meta Description
Learn how to create a charming crochet bunny cord holder with this free amigurumi pattern tutorial. Perfect for organizing cables, this project is both adorable and functional. Get detailed instructions, a comprehensive materials list, and helpful tips to ensure your crochet success.
Materials
For creating the crochet bunny cord holder, gather the following materials:
-
Yarn: Choose a soft, durable yarn in your preferred color for the bunny
-
Crochet Hook: Select a size that matches the yarn weight
-
Polyester Stuffing: To fill the bunny and give it shape
-
Yarn Needle: For sewing and weaving in ends
-
Scissors: For cutting yarn
-
Safety Eyes: To create the bunny’s eyes, or use embroidery if preferred
-
Stitch Marker: To keep track of rounds
-
Optional: Small amount of contrasting yarn for details like a nose or inner ears
Making the Bunny Cord Holder
Creating the bunny cord holder involves a series of steps that will transform simple yarn into an adorable and functional amigurumi piece. Follow this guide to craft your own bunny cord holder:
Step 1: Create the Bunny’s Body
Begin by crocheting the main body of the bunny. This involves working in continuous rounds to form a cylindrical shape. Start with a magic ring and follow the pattern to increase stitches, forming the base. Continue crocheting until the desired height is achieved, ensuring the piece is symmetrical and even.
Step 2: Form the Bunny’s Ears
The ears are crafted separately and then attached to the body. Work in rows to create the elongated ear shape, using increases and decreases to achieve a natural curve. Once completed, sew the ears securely onto the top of the bunny’s head, ensuring they are evenly spaced.
Step 3: Add Facial Features
For the bunny’s face, use safety eyes or embroidery to create expressive eyes. Then, use a contrasting yarn to stitch a small nose and mouth. These features bring the bunny to life, adding personality and charm.
Step 4: Assemble the Cord Holder Feature
To incorporate the cord holder functionality, crochet a small loop at the back of the bunny. This loop will hold cords neatly in place. Ensure the loop is tight enough to secure cables but loose enough to easily insert and remove them.
Step 5: Final Touches
Stuff the bunny’s body with polyester filling, adjusting as needed to maintain its shape. Use a yarn needle to close any openings and weave in all loose ends. Double-check that all features are securely attached and make any necessary adjustments to achieve a polished look.