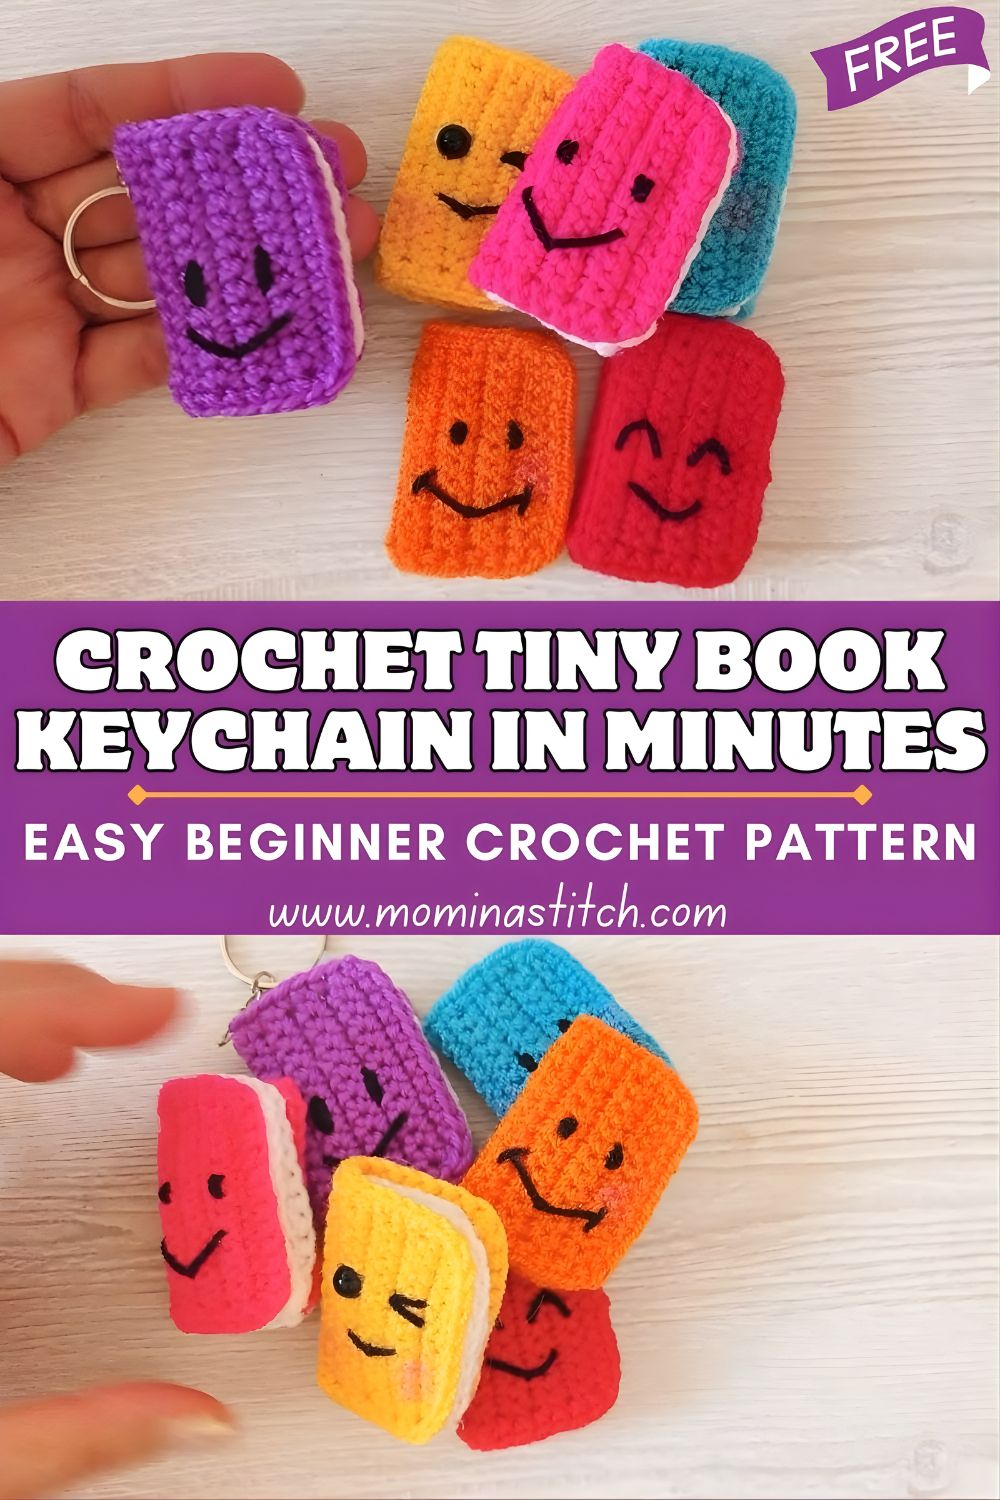
Crochet Tiny Book Keychain in Minutes – Easy Beginner Crochet Pattern
If you love small, satisfying projects, this Crochet Tiny Book Keychain will steal your heart. It’s a tiny crochet book you can make quickly, customise easily, and clip onto your keys or bag for instant cuteness.
A crochet book keychain is exactly what it sounds like: a miniature, soft little book made from yarn, finished with a loop so it can hang from a keyring or clasp. It has that adorable “book cover” look, plus a contrasting side that mimics pages, so even though it’s tiny, it reads as a real book at a glance.
This is a perfect beginner crochet pattern because it’s built from simple shapes. You’re basically making two small rectangles (front and back covers), then adding a thin strip for the spine/pages and joining everything neatly. No complicated shaping, no tricky counting for rounds—just calm, straightforward rows.
One of the biggest reasons I love tiny projects like this is the quick practice they offer. You can try a new yarn, test your tension, or get comfortable with straight edges without committing to a big item. And when you’re done? You’ve made something useful.
Ways to use this little cutie:
- A keychain (obviously—and it’s surprisingly giftable)
- A bag charm for backpacks, totes, and purses
- A gift topper (tie it onto a wrapped present instead of a bow)
- A handmade mini present for book lovers, students, teachers, and friends
Miniature crochet items are popular for a reason: they’re fast, they’re collectable, and they make people smile. This one is especially fun because you can change the “cover” colours and make it look like a tiny journal, a storybook, or even a cheerful little textbook.
Materials Needed
You don’t need much for this easy crochet keychain—which is part of the charm.
- Yarn in 2 or more colours
- Covecolouror (front/back)
- “Pagecolour (cream/white looks adorable)
- Crochet hook (size depends on your yarn and the firmness you want)
- Scissors
- Yarn needle (for sewing and weaving ends)
- Stuffing (optional—just a pinch if you want it puffy)
- Stitch marker (optional, helpful for keeping track)
- Keyring or lobster clasp
- Black yarn or embroidery thread (optional, for a cute face)
Note: Yarn weight and hook size can vary. For keychains, I like slightly tighter stitches; they hold their shape, don’t look floppy.
Crochet Abbreviations and Basic Stitches
Here are the simple terms you’ll see in this crochet keychain tutorial:
- ch (chain): the starting links of your project
- sc (single crochet): a basic short stitch that makes a firm fabric
- inc (increase): work 2 sc into the same stitch (adds width)
- dec (decrease): combine two stitches into one (not always needed here)
- sl st (slip stitch): used to join or move yarn without adding height
- st / sts (stitch/stitches): shorthand for counting your work
If you can chain and single crochet, you can absolutely make this tiny book.
Finished Look and Design Overview
Your finished tiny crochet book will look like a miniature rectangular book with clear “parts”:
- A neat front cover rectangle
- A matching back cover rectangle
- A contrasting side strip that creates the page effect (like stacked pages)
- A small top loop so you can attach a keyring or clasp
- Optional: a sweet smiley face embroidered on the front cover (simple eyes + curved smile)
The final vibe is soft, colourful, and a little squishy—like a tiny plush book that belongs on your keys.
Step-by-Step Crochet Pattern (Beginner-Friendly)
This pattern is written to be simple and adjustable. You can change the size by adding chains (for width) or rows (for height).
Pattern Size Notes (Before You Start)
The example below makes a small book that fits nicely as a keychain. Aim for a rectangle roughly 1.5–2 in wide and 2–2.5 in tall, but don’t stress—tiny projects are forgiving.
Step 1: Crochet the Front Cover
CoverColour A)
- Foundation: ch 9 (this gives you a small book width; adjust if you want it wider).
- Row 1: sc in 2nd ch from hook and across. (8 sc)
- Rows 2–10: ch 1, turn, sc across. (8 sc each row)
Fasten off and leave a short tail for weaving.
Beginner tip: To keep edges neat, always place your last sc right into the last stitch of the row (it’s easy to skip!).
Step 2: Crochet the Back Cover
Repeat Step 1 exactly so both rectangles match.
You should now have two identical cover panels.
Step 3: Create the Book Spine and Page Effect
PagColourlColourolor B)
You have two easy options. Choose what feels simplest:
Option A (Separate Strip – easiesvisualisealize)
- ch 5
- Row 1: sc in 2nd ch from hook and across (4 sc)
- Rows 2–10: ch 1, turn, sc across (4 sc)
This strip becomes the “page block” that sits between the covers.
Option B (No separate strip)
Skip the strip and just single-crochet-join the covers together using Colour B around the edges. This gives a subtle page outline, but Option A looks more “book-like.”
For the clearest page effect, I recommend Option A.
Step 4: Join the Pieces
Now we’ll assemble the tiny book.
- Lay the back cover down (right side facing out).
- Place the page strip along one long edge (this will be the “spine/pages” side).
- Place the front cover on top (right side facing out).
You’re making a little sandwich: cover + pages + cover.
Joining method (clean and beginner-friendly):
- With Colourr B (page colourr), attach the yarn to a corner.
- sc through all layers around the outer edge to seam it together.
- Work 3 sc in each corner to help it turn nicely (this prevents curling).
Optional stuffing:
Before you close the last side completely, add a tiny pinch of stuffing. Not too much—just enough to make it softly padded.
Step 5: Shape the Mini Book
Once it’s closed, gently pinch and straighten the corners so it looks like a tidy little rectangle.
If you added stuffing, use your fingers to nudge it evenly so the book looks soft but structured, not lumpy.
Want a slightly rounded “plush book” look? Add a touch more stuffing near the centre and keep the corners lightly shaped.
Step 6: Add the Top Loop
You can crochet a loop or sew one on—both work.
Crocheted loop (simple and sturdy):
- Attach yarn at the top edge near the “spine” side.
- ch 12–18 (depending on how big you want the loop).
- sl st back into the same spot to form a loop.
- For extra strength, you can sc around the loop or slip stitch along it.
Then slide on your keyring or attach a lobster clasp before tightening everything down.
Step 7: Embroider the Face (Optional but adorable)
Using black yarn or embroidery thread:
- Eyes: make two small straight stitches or tiny knots, spaced evenly.
- Smile: stitch a gentle curved line underneath.
Placement tip: Put the face slightly above the centre of the front cover (not too low). It looks more balanced and “cute” that way.
If faces make you nervous, skip it on your first try. A plain cover still looks like a tiny book, and it’s honestly just as charming.
Step 8: Final Finishing
- Weave in all ends neatly on the inside or along the seams.
- Straighten the edges with your fingers.
- Check the loop and keyring connection—give it a gentle tug.
- If needed, lightly reshape the book and flatten it under your palm for a few seconds.
And that’s it—you’ve made a crochet book keychain!
Pattern Notes
- Stitch counts can vary depending on your yarn, hook, and tension—and that’s okay.
- Even tension is the secret to crisp, pretty rectangles.
- For a firmer keychain, use a slightly smaller hook than your yarn label suggests.
- If you’re brand new, make a plain version first, then add the smiley face on your second one.
Beginner Tips
A few tiny habits make a big difference with small projects:
- Count stitches at the end of each row (especially Row 1 and Row 2).
- Use a stitch marker in the first stitch of the row if you tend to lose track.
- Don’t crochet too loosely—loose stitches make the “pages” look messy and the shape floppy.
- Keep the two cover panels the same size for easier assembly.
- When seaming, go slowly and keep your stitches evenly spaced for a cleaner edge.
Customisation Ideas
This is where the fun really begins. Your tiny crochet book can have a whole personality.
- Try pastels for a cute journal vibe or bright colours for a playful storybook look
- Add initials with embroidery (tiny monograms are so cute on book covers)
- Stitch a small heart or star on the front
- Make themed versions:
- “School book” (primary colours)
- “Notebook/journal” (neutral cover + elastic-style stitch line)
- “Fairy tale book” (gold detailing with yarn)
- Change the expression: wink, blush cheeks, sleepy eyes
- Turn it into a bag charm by using a bigger clasp and a longer loop
- Make matching sets as gifts—two or three tiny books together look adorable in a small box
Why This Project Is Great for Beginners
This easy crochet keychain is beginner gold because:
- It’s small, quick, and satisfying (you can finish in minutes once you get the hang of it).
- It practices the basics—chains, single crochet, neat rows, and simple joining.
- It builds confidence fast because you get a “finished object” without weeks of work.
- It’s useful, cute, and genuinely giftable—people love mini handmade things.
Conclusion
If you’ve been wanting a quick win, this crochet book keychain is it. It’s tiny, cheerful, and simple enough for a relaxed evening project—plus you can make a whole little “library” in different colours once you’ve done one.