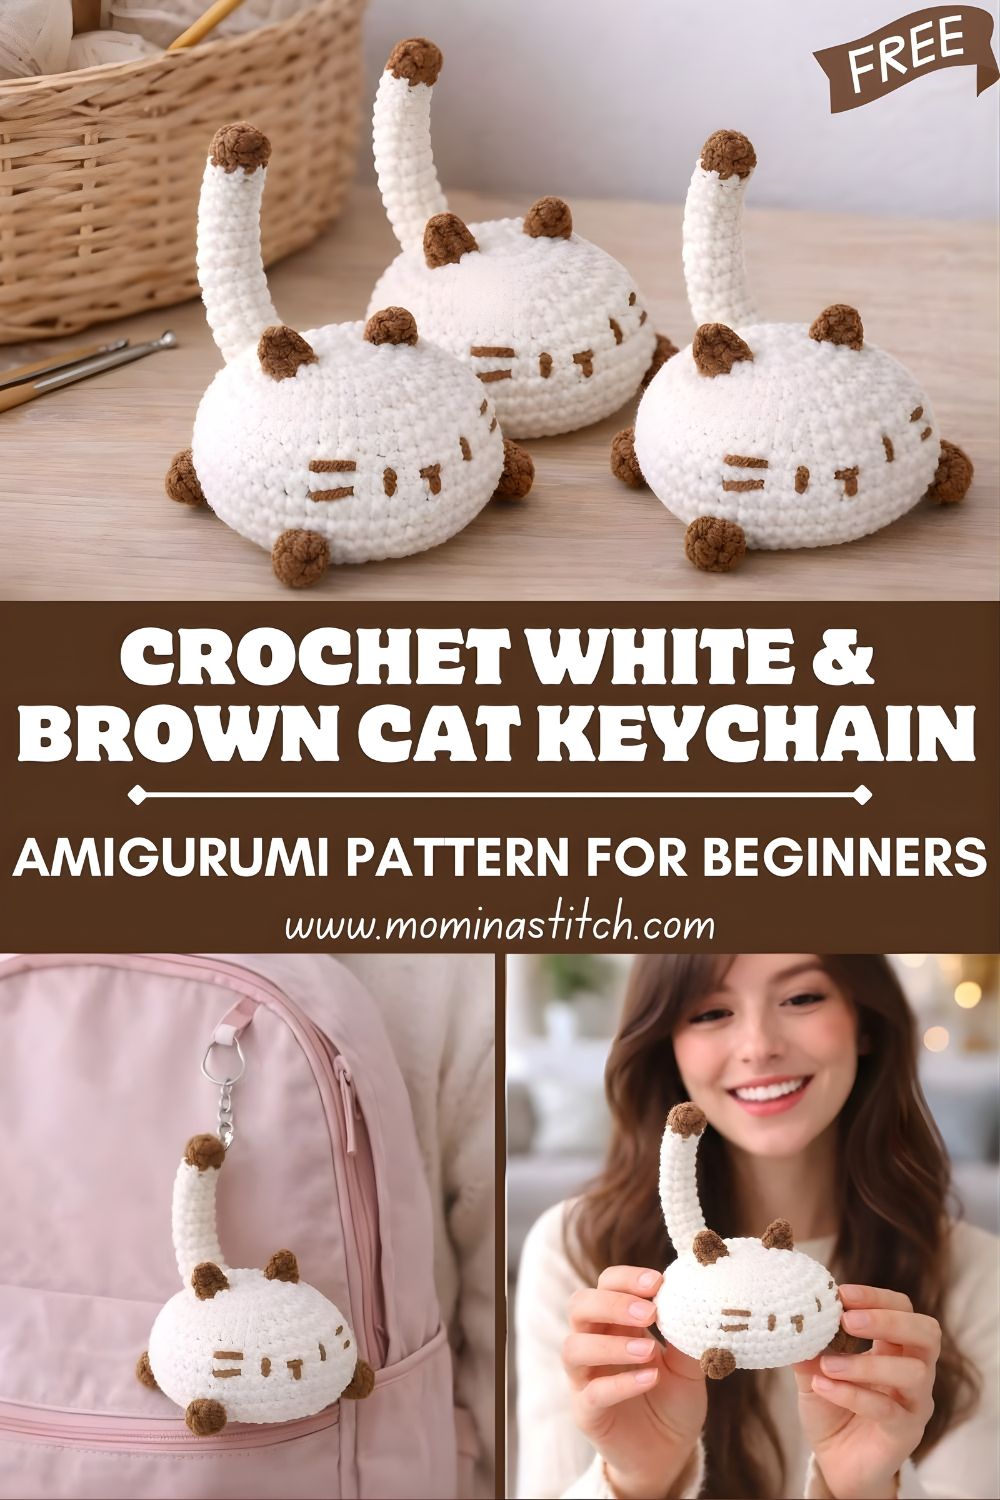
Crochet White & Brown Cat Keychain Amigurumi Pattern for Beginners
This Crochet White & Brown Cat Keychain is tiny, adorable, and so satisfying to finish—especially with the sweet white yarn and brown details from the tutorial. If you’re looking for a quick amigurumi cat pattern or a fun DIY crochet keychain gift, this one is perfect.
Amigurumi is the craft of crocheting small stuffed toys using yarn and basic stitches (mostly single crochet). These little projects are popular because they’re portable, beginner-friendly, and you get that “cute result” fast, no big blanket commitment required.
It’s also easy to see why crochet keychains are having a moment. They’re small enough to make with scrap yarn, they’re practical (clip them to keys, bags, backpacks, pencil cases), and they make the sweetest handmade gifts. A tiny cat is especially giftable—who doesn’t love a cute kitty charm?
This amigurumi Crochet White & Brown Cat Keychain is great for beginners because the shapes are simple: a long skinny tail made with single crochet, and a rounded body worked in the round with clear increases and decreases. In the tutorial, you’ll learn how to crochet a neat tail with a contrasting brown tip, shape a smooth cat body, add texture with small bobbles, and finish everything with basic assembly. It’s a quick,k handmade project that looks impressive without being complicated.
Materials Needed
- Cotton yarn (white & brown): Cotton gives crisp stitches and holds shape well—great for keychains that get handled a lot. White is the main cat color; brown is used for the tail tip and details.
- 2.5 mm crochet hook: A smaller hook helps keep stitches tight so stuffing doesn’t show. (This matches the tutorial.)
- Fiberfill stuffing: Just a small amount to make the body plush and rounded.
- Yarn needle: For sewing on ears, weaving in ends, and attaching the keychain ring securely.
- Stitch marker: Helps you track rounds and stitch counts, especially if you switch between joined rounds and shaping.
- Scissors: For clean yarn cuts when changing colors and finishing.
- Safety eyes or embroidery thread: Safety eyes give a polished look; embroidery is a safer choice for young kids.
- Keychain ring (or lobster clasp): Turns your finished cat into a real keychain or bag charm.
Crochet Abbreviations (US Terms)
- MR – Magic Ring (adjustable loop to start crocheting in the round)
- SC – Single Crochet
- INC – Increase (2 SC in the same stitch)
- DEC – Decrease (2 stitches crocheted together; invisible decrease recommended)
- SL ST – Slip Stitch (used to join rounds neatly in this tutorial)
- CH – Chain
- ST – Stitch
Finished Size
Finished Size: Approx. 5–6 cm (about 2 inches) for the cat body (not counting the keychain hardware), depending on your yarn tightness and hook size.
Skill Level
Beginner Friendly.
You only need basic stitches—single crochet, increases, decreases, chains, and slip stitches. The bobble texture is optional but fun, and the tutorial shows where it goes.
Step-by-Step Crochet Cat Keychain Pattern
Construction overview: You’ll crochet the tail first, then crochet the body, and attach the tail during the body round (as shown in the tutorial). Finish by adding ears and facial details.
Part A: Tail (Brown tip + White tail)
The tutorial tail is made in joined rounds: each round begins with CH 1 and ends with SL ST.
Tail – Rnd 1 (Brown):
- MR, 6 SC into the ring, SL ST to close. Pulthe l ring tight. [6]
Tail – Rnd 2 (Brown):
- CH 1, 6 SC, SL ST. [6]
This creates the brown tail-tip detail.
Change color to White (for a neat change, finish the last stitch with the new color and snug it).
Tail – Rnds 3–19 (White):
- For each round: CH 1, 6 SC, SL ST. [6]
Fasten off (FO), leaving a tail for attaching if needed.
Beginner tip: A skinny tube looks best with tight stitches. If your tail feels “holey,” go down to a 2.0 mm hook or tighten tension slightly.
Part B: Body (White)
The body is also worked in joined rounds (CH 1 at start, SL ST to close). Stitch counts below follow the tutorial’s shaping.
Body – Rnd 1:
- MR, 8 SC, SL ST to close. [8]
- CH 1, INC in each stitch around (8 increases), SL ST. [16]
- CH 1, (1 SC, 1 INC) repeat 8 times, SL ST. [24]
- CH 1, (1 INC, 2 SC) repeat 8 times, SL ST. [32]
- CH 1, (3 SC, 1 INC) repeat 8 times, SL ST. [40]
- CH 1, 40 SC, SL ST. [40]
- CH 1, (9 SC, 1 INC) repeat 4 times, SL ST. [44]
- CH 1, 44 SC, SL ST. [44]
- CH 1, (5 SC, 1 INC) repeat 4 times, SL ST. [48]
- CH 1, 48 SC, SL ST. [48]
Attach tail in this round: Fold the tail in half and stitch it onto the body as you go, centered on the back/bottom area. (You can also sew it afterward, but attaching during the round is extra secure.)
Beginner tip: Use stitch markers to mark where you want the tail to sit before you crochet Round 10. It helps you keep it centered.
Body Texture Round (Bobbles)
The tutorial adds bobbles for cute texture details.
- CH 1, crochet the following sequence, then SL ST to close:
- 2 SC
- 5 SC
- Bobble (4-stitch bobble)
- 11 SC
- Bobble (4-stitch bobble) x3
- 4 SC
(Keep bobbles tight so they pop.)
Beginner tip: If bobbles are new to you, practice one on scrap yarn first. The key is to pull up loops evenly and finish with a snug closing yarn-over.
Shaping the Top (Decreasing)
Now the body narrows to close.
- CH 1, 5 SC, 2 DEC, then repeat (8 SC, 2 DEC) 3 times, finish with 3 SC, SL ST.
- CH 1, 4 SC, 2 DEC, then repeat (6 SC, 2 DEC) 3 times, finish with 2 SC, SL ST.
- CH 1, 3 SC, 2 DEC, then repeat (4 SC, 2 DEC) 3 times, finish with 1 SC, SL ST.
- Repeat (2 SC, 2 DEC) 4 times, SL ST.
- CH 1, 8 DEC, SL ST.
FO and close the opening neatly.
Stuffing tip: Start stuffing once the body is about 2/3 complete (around the time you begin decreasing). Stufffirml,y but not so much that stitches stretch.
Making the Ears
In the video scrape, the ears are sewn on at the end (the ear-making itself isn’t spelled out), so here’s a beginner-friendly ear pattern that matches a small cat keychain.
Tiny Cat Ears (Make 2, White)
Rnd 1: MR, 3 SC, SL ST to close. [3]
Rnd 2: CH 1, (INC, SC) around, SL ST. [5]
FO leaving a long tail for sewing.
Attaching the Ears
- Place ears on top of the head area, evenly spaced.
- Sew each ear down with small stitches, shaping a tiny triangle as you sew.
Beginner tip: Pin ears in place (or use stitch markers) before sewing. Step back and check symmetry—tiny shifts change the look a lot.
Making the Tail (Alternative Curved Tail Option)
If you prefer a slightly curved tail (instead of the tube tail from the tutorial), you can do this simple chain tail:
- With brown yarn, CH 8–10
- SC in 2nd CH from hook and SC across
- FO leaving a tail to sew on
Tip: This version is faster, but the tutorial’s tube tail is sturdier and more “plush.”
Facial Details
Because this is a keychain, simple facial details look best.
Eyes
- Safety eyes: Place between the upper rounds of the body (front center). Secure backs firmly before final stuffing.
- Embroidered eyes: Use black embroidery thread. Make small vertical stitches or tiny “U” shaped sleepy eyes.
Nose
- With brown embroidery thread, stitch a tiny triangle or a small “V” nose.
Whiskers
- Use brown thread and stitch 2–3 short lines on each side of the face.
Beginner tip: Do facial embroidery after stuffing so the shape doesn’t change later.
Assembly Instructions
- Stuff the body: Add fiberfill gradually, shaping with your fingers so it’s evenly rounded.
- Sew ears: Attach both ears to the top of the head area. Knot securely and hide ends inside.
- Attach tail (if not attached in Round 10): Sew the folded tail to the back and reinforce with extra passes of yarn.
- Add facial details: Insert safety eyes or embroider eyes, then add nose and whiskers.
- Add a keychain ring:
- Threathe d yarn through the top of the head/body, pull it through the ring, and knot securely.
- For extra strength, stitch through the top several times, then weave the yarn tail inside.
Shaping tip: After assembly, gently roll the cat between your palms to smooth the stuffing and even out the shape.
Beginner Tips
- Use stitch markers so you don’t lose your place—especially with joined rounds.
- Keep tension even for a smooth keychain that won’t show stuffing.
- Stuff lightly at first, then adjust—it’s easier to add more than to remove.
- Neat color changes matter (especially the brown tail tip). Change yarn in the last yarn-over of the previous stitch.
- Secure yarn ends properly: Keychains get tugged, so weave ends through multiple stitches.
- Count stitches often: Amigurumi shaping depends on consistent stitch counts.
Customization Ideas
- Different yarn colors: Make a gray cat, orange tabby, black cat, or calico-inspired color blocks.
- Add blush cheeks: A little pink embroidery or blush powder (decor only) makes it extra cute.
- Add a bow: Crochet a tiny bow and sew it near one ear.
- Turn it into a bag charm: Use worsted yarn + a 3–3.5 mm hook to make a bigger plush charm.
- Add stripes or spots: Use surface crochet or simple embroidered lines.
Why This Crochet Project Is Perfect
This crochet cat keychain is a winner because it’s:
- a quick 1–2 hour project, once you know the basics,
- a perfect scrap-yarn pattern (especially for the brown details)
- a great handmade gift that’s cute, useful, and easy to personalize
- small enough to crochet anywhere—great “on-the-go” amigurumi
Conclusion
If you’ve been wanting a quick amigurumi win, this crochet cat keychain is such a fun one to try. The simple stitches, small size, and cute brown details make it beginner-friendly—and the finished kitty is practically begging to be clipped onto a bag. Grab your white and brown yarn, take it round by round, and enjoy making your own tiny cat buddy!