Crochet Pan Dorobou Bread Thief Pen Holder Desk Organizer Pattern
Make a cute crochet pen holder with this Pan Dorobou Crochet Pan Dorobou Bread Thief inspired amigurumi! Learn how to crochet an amigurumi bread body with crust edges, sleepy eyes, gray arms/legs, and a carrot-tipped nose. Perfect crochet desk organizer and cute crochet pattern for gifts and workspace décor.
What makes this project extra charming is the contrast between the soft cream bread center and the brown crust border, plus the simple facial features: droopy, sleepy eyes, and a long nose with an orange carrot-like tip. It’s the kind of amigurumi that looks adorable even if your stitches aren’t perfect,t so it’s forgiving and satisfying for newer makers.
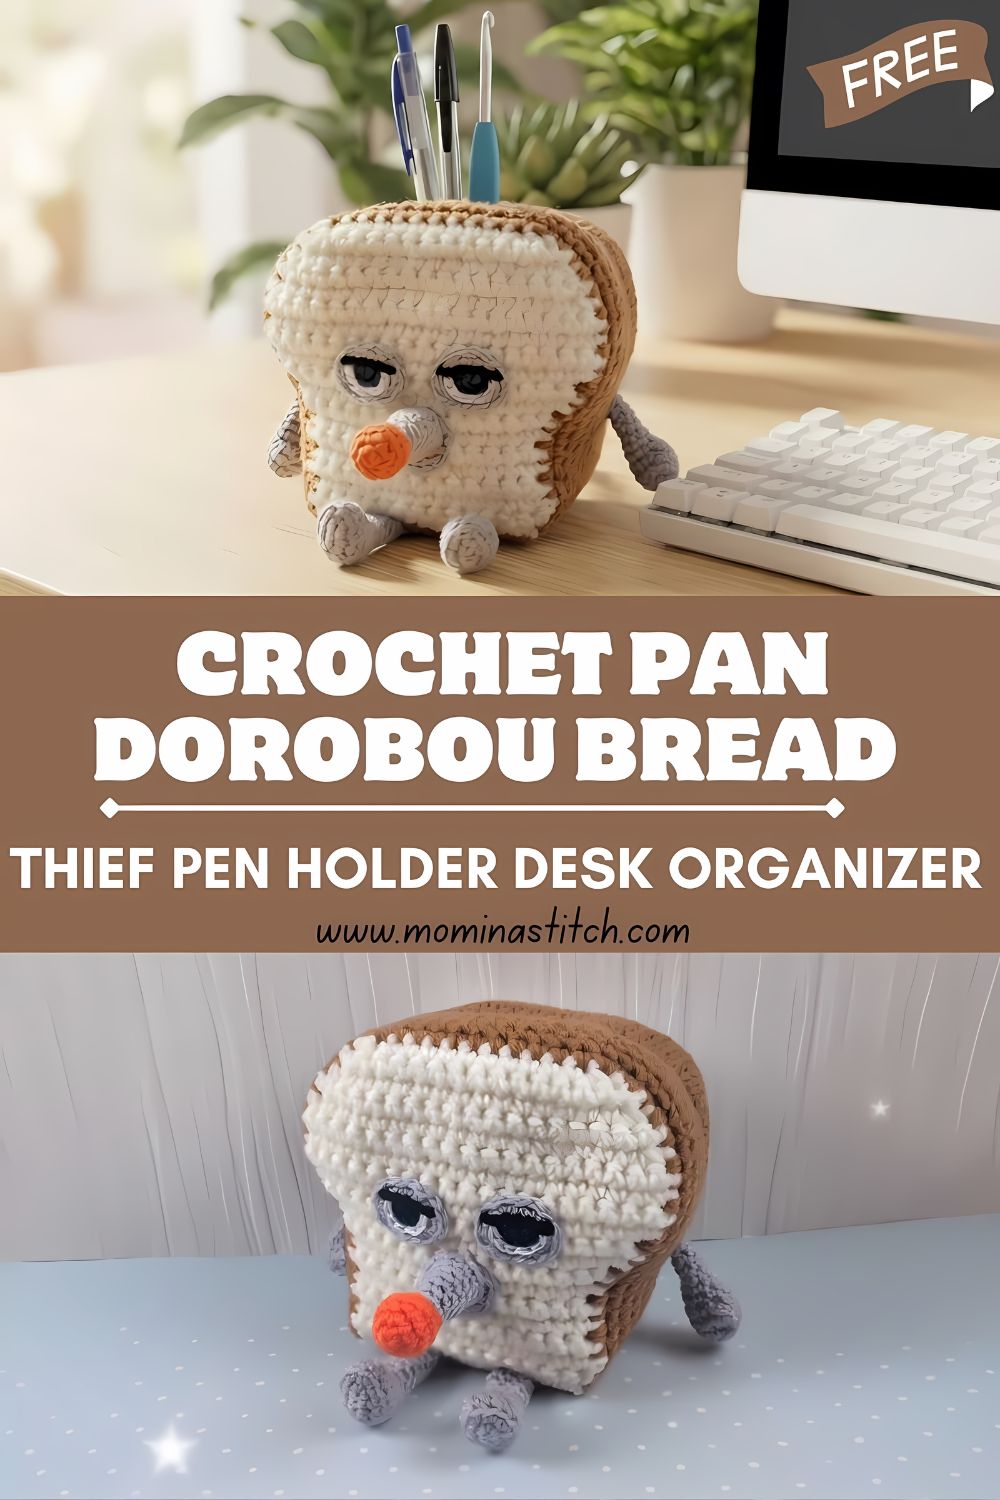
Skill-wise, this pattern is best for advanced beginners to intermediate crocheters. You’ll practice working in rows (for the bread panels), working in the round (for small parts like arms/legs/nose), and joining pieces neatly to create a clean hollow interior for pens. If you’ve made a basic amigurumi before, you’ll be totally comfortable here—and if you’re newer, you’ll learn a lot of useful construction techniques.
5) Materials Needed
Yarn Color: Cream/off-white
- te (bread center)
- Brown (crust edge)
- Gray (arms and legs)
- Orange (nosetip/carrot tip)
- Optional: a small amount of black (for embroidered eye lines if not using safety eyes)
Tools & Notions
- Crochet hook: 2.75 mm–3.5 mm (use a smaller hook for tighter stitches)
- Stuffing (fiberfill)
- Yarn needle (tapestry needle)
- Safety eyes or embroidery thread/yarn (for sleepy eyes)
- Scissors
- Stitch marker
- Optional (recommended for stability):
- Plastic canvas circle, felt circle, or cardboard disk (to reinforce the base)
- A small pouch of poly pellets (weight in the bottom)
6) Crochet Abbreviations
- MR – magic ring
- sc – single crochet
- inc – increase (2 sc in same stitch)
- dec – decrease (sc2tog or invisible decrease)
- sl st – slip stitch
- ch – chain
- st/sts – stitch/stitches
- BLO – back loop only
- FLO – front loop only
- RS/WS – right side / wrong side
7) Step-by-Step Crochet Pattern
Pattern Notes (Read First)
- This pattern is written to match the described look: square bread slice, crust edge, hollow pen-holder center, gray arms/legs, and the long nose with orange tip.
- The bread body is built from two square panels (front and back) plus a side strip to create depth.
- The interior opening stays open at the top, forming the pen holder.
- Stitch counts can be adjusted easily—if you want a wider pen holder, add stitches to your squares and length to your side strip.
SECTION A — Bread Body (Cream + Brown Crust)
A1) Front Bread Panel (Cream center with Brown crust)
We’ll crochet the panel in rows using cream, then add a brown crust border.
With cream yarn:
- Ch 21 (adjust width by adding/removing chains).
- Row 1: sc in 2nd ch from hook and across (20 sc). ch 1, turn.
- Rows 2–20: sc across (20). ch 1, turn.
Fasten off cream.
This makes a square-ish panel. If your tension is tight and it looks slightly rectangular, add or remove a row to make it more square.
Crust Border (Brown):
Join brown in any corner.
- Round 1 (border): sc evenly around the panel, working 3 sc in each corner to keep it flat (no curling). sl st to join.
- Round 2 (optional thicker crust): sc around again, placing (sc, ch 1, sc) in each corner or 3 sc in each corner. sl st to join.
Fasten off, weave in ends.
Tip: Your border stitches should be even along the sides. If the edge ruffles, use fewer stitches; if it pulls tight, use more.
A2) Back Bread Panel
Repeat A1 to create a second matching panel (cream square + brown crust border).
Do not fasten off the brown border on the second panel if you prefer to join with crochet; otherwise, leave a long tail for sewing.
A3) Side Strip (Creates the Pen Holder Depth)
This strip connects the front and back panels and forms the “bread thickness.”
With brown yarn (crust look), ch 9 (this creates the depth; adjust for taller pen holder).
- Row 1: sc in 2nd ch from hook and across (8 sc). ch 1, turn.
- Rows 2–64: sc across (8 sc). ch 1, turn.
How long should it be?
It should wrap around three sides + the bottom of the bread (leaving the top open). The exact number of rows depends on your panel size and tension. The easiest method:
- Pin/tape the strip around the sides and bottom of one panel to check fit, then add/remove rows.
Fasten off, leaving a long tail for sewing.
A4) Assemble Bread Body (Hollow Pen Holder Construction)
- Place front and back panels with wrong sides facing inward (right sides facing out).
- Position the side strip around the edges of the front panel:
- Start at the top-left corner, go down the left side, across the bottom, and up the right side, ending at the top-right corner.
- Do not attach across the top edge—this is your pen opening.
- Join methods (choose one):
- Sewing method: whip stitch the strip to the front panel, then whip stitch the strip to the back panel.
- Crochet join method: sc through both layers along edges (gives a chunky seam).
- Base reinforcement (recommended):
Before closing the last part of the bottom seam:- Insert a plastic canvas/felt/cardboard disk at the bottom inside.
- Optional: add a small pouch of poly pellets in the base for weight (so it won’t tip).
- Turn right side out if needed, and test with pens.
At this stage, you should have a soft bread “sleeve” with an open top and a stable bottom.
SECTION B — Arms (Gray)
Make 2.
Round 1: MR, 6 sc (6)
Round 2: (sc, inc) x3 (9)
Rounds 3–8: sc around (9)
Lightly stuff (optional) or leave unstuffed for floppy arms.
Flatten opening and closing with 4–5 sc through both layers.
Fasten off, leave a tail for sewing.
SECTION C — Legs (Gray)
Make 2.
Round 1: MR, 6 sc (6)
Round 2: inc x6 (12)
Round 3: sc around (12)
Lightly stuff.
Flatten and close with 6 sc through both layers.
Fasten off, leave a tail.
For smaller “nubby” legs, stop after Round 2 and close.
SECTION D — Nose (Long Tube) + Orange Tip
D1) Nose Tube (Gray or Cream—match your reference)
Use gray to match the described look.
Round 1: MR, 6 sc (6)
Round 2: (sc, inc) x3 (9)
Rounds 3–14: sc around (9) (12 rounds; make longer if you want a sillier nose)
Lightly stuff—just enough so it holds shape.
D2) Orange Tip (Carrot-like)
Change to orange.
Rounds 15–17: sc around (9)
Optional tapered “carrot” point:
- Round 18: (sc, dec) x3 (6)
- Round 19: sc around (6)
Fasten off, leaving a tail. Add a bit more stuffing before closing if needed. Close the tip neatly and weave in.
SECTION E — Eyes (Sleepy style)
Pan Dorobou’s sleepy eyes look best embroidered.
Embroidered Sleepy Eyes (recommended)
- Use black embroidery thread or thin black yarn.
- Mark the eye placement on the cream center of the front panel—slightly above the middle.
- Stitch two curved lines like relaxed eyelids (think sideways “U” shapes or gentle arcs).
- Add tiny short “lash” stitches at the outer ends if you want extra character.
If Using Safety Eyes
If you prefer safety eyes, choose small ones (6–8 mm) and place them with a slight downward angle, then add an embroidered eyelid line above to create the sleepy expression.
SECTION F — Assembly
1) Attach the Nose
- Center the nose on the front panel, slightly below the eyes.
- Sew around the base securely.
- If the nose droops, add a few hidden anchoring stitches upward into the bread body.
2) Attach Arms
- Sew arms to the left and right sides of the bread, roughly mid-height.
- Angle them slightly forward as if hugging the air (cute “sneaky thief” vibe).
3) Attach Legs
- Sew legs near the bottom front edge, spaced evenly.
- Test standing stability; adjust if it tips forward.
4) Final Face Check
- Embroider/adjust eyes last if you want perfect placement in relation to the nose.
- Weave all ends inside and trim.
8) Finishing Touches (Stability + Shape)
To make sure your crochet pen holder works well on a desk:
- Add base weight: A small pouch of poly pellets or a few coins sealed inside fabric at the bottom helps prevent tipping.
- Reinforce the bottom: Plastic canvas is perfect because it bends slightly but holds shape.
- Shape the corners: Gently tug the crust corners outward and press the sides into a neat bread slice silhouette.
- Keep the opening round: If the top edge collapses inward, you can add a final round of sc around the opening to firm it up.
Optional upgrade: crochet a neat rim around the opening with brown yarn (sc evenly around, sl st to join) for a finished “crust top” look.
9) Tips for Beginners
- Use tight tension (or a smaller hook) so pens don’t snag in loose stitches.
- Count rows on the side strip and test-fit as you go—this prevents puckering when joining.
- Pin before sewing arms/legs/nose so the expression looks balanced.
- Weave in ends securely—desk items get handled more than shelf plushies.
- Practice embroidery on scrap yarn first to get the sleepy eye curve you like.
10) Variations
- Different bread colors: Toasted tan, milk bread white, or even matcha green bread.
- Make it a desk organizer: Widen the body and create two compartments by sewing a divider panel inside.
- Turn it into a plush toy: Sew the top closed and stuff fully—no hollow center.
- Add accessories: A tiny crochet butter pat, jam smear embroidery, or a little “thief mask” band.
- Change the nose tip: Make it strawberry red, yellow (corn!), or omit the tip for a simpler look.
11) Conclusion
This Pan Dorobou (Bread Thief) pen holder is the perfect blend of cute and practical—an amigurumi bread character that actually helps keep your desk tidy. With simple shapes, beginner-friendly construction, and lots of room for customization, it’s a satisfying weekend project that makes an adorable gift for students, office workers, and anyone who loves character crochet. If you make one, try a new bread color or add a little desk-themed accessory to make it truly yours!