Crochet Calcifer Keychain Magical Howl’s Moving Castle Fire Spirit
This crochet Calcifer keychain pattern teaches you how to make an adorable fire spirit using amigurumi crochet, simple shaping, and easy finishing. Anime-inspired and movie-inspired amigurumi character keychains, kawaii crochet, and handmade fan crafts are popular because they’re quick to make, instantly recognizable, and perfect for gifting or collecting.
A crochet Calcifer keychain is a fun way to bring a beloved character to life with amigurumi crochet, the technique of making small stuffed figures by working tight stitches in the round. Amigurumi typically uses basic stitches, single crochet, increases, and decreases to build 3D shapes like spheres, cones, and rounded bodies. That makes it approachable for beginners, while still offering lots of creative options for color changes, facial expressions, and accessories.
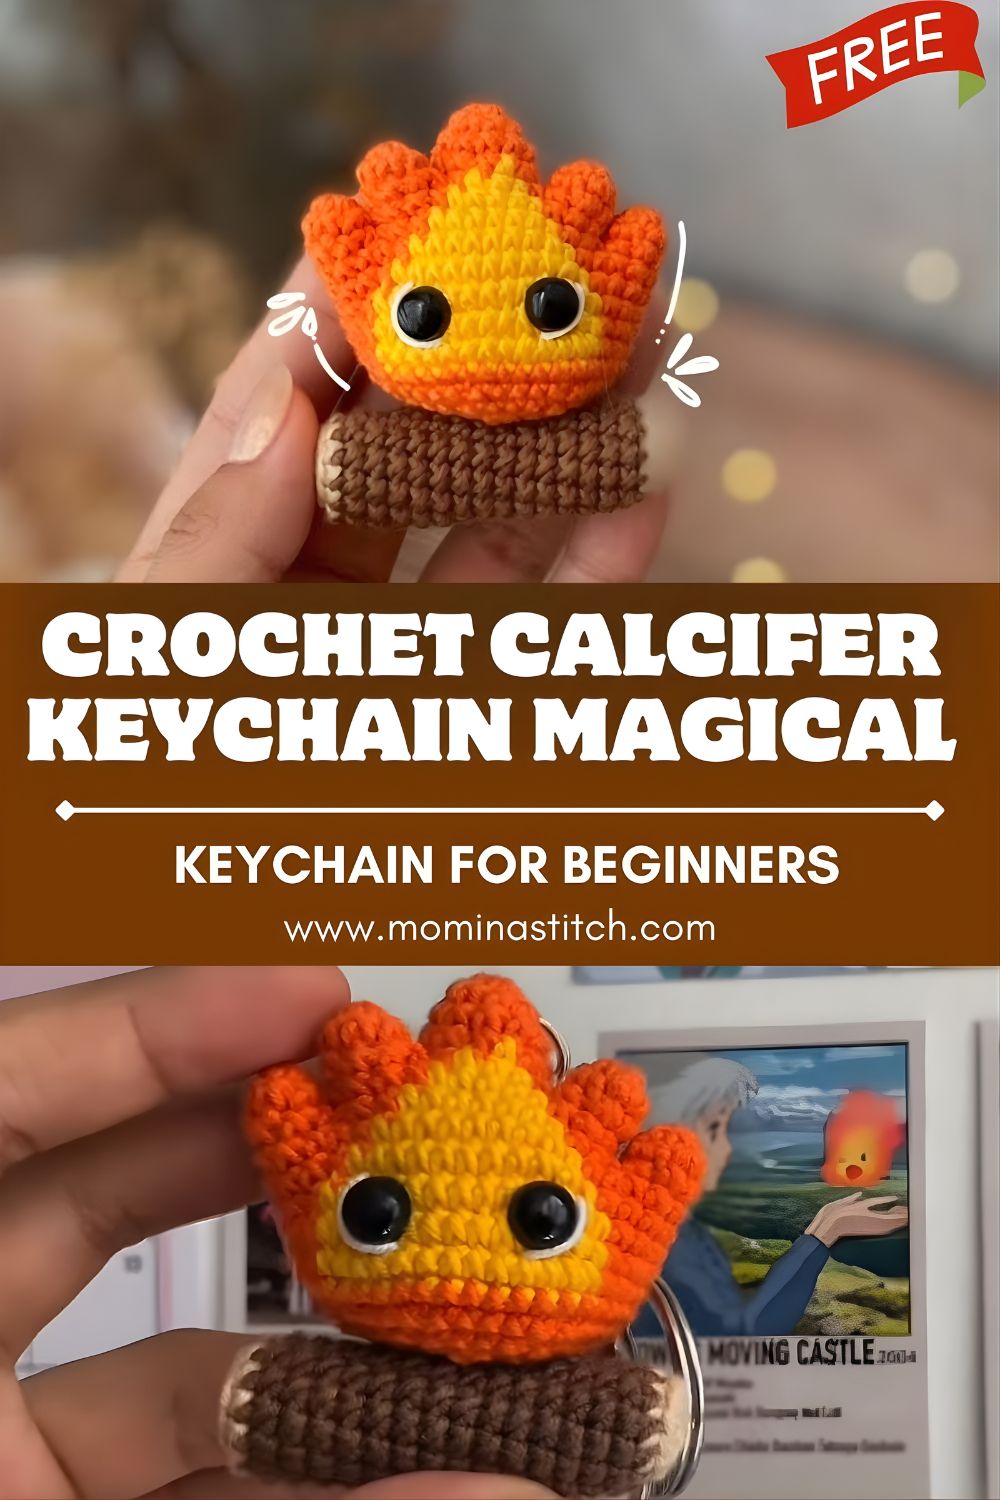
Characters like Calcifer from Howl’s Moving Castle are especially enjoyable amigurumi projects because the design is simple but expressive: a rounded flame body, playful flame points, and a cute face. For fans of Studio Ghibli-inspired crafts, this kind of crochet character is a satisfying weekend project and a great introduction to shaping and detail work. Since it’s made as a keychain, the finished plush is small, portable, and practical—attach it to keys, backpacks, lanyards, or a pencil case for a magical handmade touch.
Materials Needed
- Red yarn
- Orange yarn
- Yellow yarn
- Black yarn for face details
- Crochet hook (2.5–3.5 mm)
- Safety eyes or black embroidery thread
- Polyester stuffing
- Yarn needle
- Stitch marker
- Scissors
- Keychain ring
Crochet Abbreviations
- MR – Magic Ring
- sc – single crochet
- inc – increase
- dec – decrease
- sl st – slip stitch
- ch – chain
Skill Level
Beginner to intermediate.
Step-by-Step Crochet Calcifer Pattern
Body / Flame Shape
Work in continuous rounds (spiral). Use a stitch marker in the first stitch of each round.
Round 1: MR, 6 sc (6)
Round 2: inc in each stitch (12)
Round 3: (1 sc, inc) repeat (18)
Round 4: (2 sc, inc) repeat (24)
Round 5–8: sc around (24)
Round 9: (2 sc, dec) repeat (18)
Round 10: (1 sc, dec) repeat (12)
Round 11: dec around (6)
Stuff the body while crocheting.
- Begin stuffing after Round 8, when the body is at its widest.
- Add small pieces of stuffing and push them outward to keep the flame round and smooth.
- Before Round 11 gets too tight, do a final stuffing adjustment so the body stays plump.
Finish off, close the opening by weaving the yarn tail through the last stitches and pulling tight. Weave in ends.
Color tip (optional for a flame look):
- Use yellow for the lower/inner area, orange for the middle, and red near the top—or swap colors to match the YouTube tutorial’s look.
Flame Points
Create cute flame spikes at the top using chains and slip stitches.
Simple flame-point method:
- Attach yarn at the top center of the body (or use the working yarn if you ended near the top).
- Flame point 1: ch 4, then sl st back down into the next stitch to anchor.
- Flame point 2: ch 3, sl st to anchor.
- Flame point 3: ch 4–5, sl st to anchor.
- Repeat around the top to create 4–6 points, varying chain lengths for a natural flame shape.
For sharper points, you can return down the chain with sl st (or sc) before anchoring, depending on the look you want.
Face Details
- Attach safety eyes
- Place eyes on the front of the body, centered and evenly spaced.
- Insert before the final closing if you prefer internal access.
- For child-safe versions, embroider eyes with black thread instead.
- Embroider the mouth and eyebrows using black yarn
- Stitch a small curved mouth (or a straight line with tiny corners).
- Add short angled stitches above the eyes for expressive eyebrows.
- Keep embroidery tight and neat; secure ends inside.
Keychain Loop
Create a secure loop so Calcifer can hang from a ring.
- Attach yarn at the top of the flame (between flame points or centered).
- ch 10–15 (adjust length to fit your keychain ring).
- sl st back into the same anchor stitch to form a loop.
- Reinforce: sew around the base of the loop with a yarn tail or stitch through the anchor area again.
Slide the metal keychain ring onto the loop and close it securely.
Assembly Instructions
- Shape the flame points
- After making points, gently pinch and arrange them so they flare upward.
- If needed, tack down the base of a point with a small stitch to keep spacing even.
- Add stuffing evenly
- Push stuffing to the outer edges to avoid lumps.
- Keep the front slightly fuller where the face sits so the expression looks centered.
- Attach the keychain ring.g
- Use a strong loop and reinforce stitches at the top—keychains get pulled often.
- Tug-test the loop before adding the ring to make sure it’s secure.
Tips for Beginners
- Use tight stitches for amigurumi so stuffing doesn’t show through (a slightly smaller hook helps).
- Use a stitch marker to track rounds and prevent accidental extra increases or decreases.
- Stuff gradually for a neat shape—small amounts added often look smoother than stuffing all at once.
Customization Ideas
- Make a mini Calcifer bag charm by adding a clasp clip instead of a split ring.
- Add a small crochet log base (simple brown oval), so Calcifer looks like he’s sitting on wood.
- Use glow-style yarn colors for a flame effect or blend reds/oranges/yellows for extra dimension.
Conclusion
This crochet Calcifer keychain is a magical, playful amigurumi project that’s beginner-friendly and perfect for fans of Howl’s Moving Castle-inspired crafts. With simple rounds, easy flame points, and cute embroidered details, you’ll have a pocket-sized fire spirit ready to brighten up your keys or bag.