Outstanding Cute Crochet Citrus Orange Amigurumi Pattern
Craft a sunny fruit friend with the Outstanding Crochet Citrus Orange Amigurumi Pattern. Beginner-friendly stitches and clear steps highlight true handmade charm. Make a bright orange plush or keychain gift-worthy, scrap-friendly, and perfect for quick, joyful crochet sessions.
Meet the Outstanding Crochet Citrus Orange Amigurumi Pattern, a bright, beginner-friendly make packed with handmade charm. Worked in simple rounds with minimal sewing, it’s quick, scrap-yarn friendly, and satisfyingly squishy. 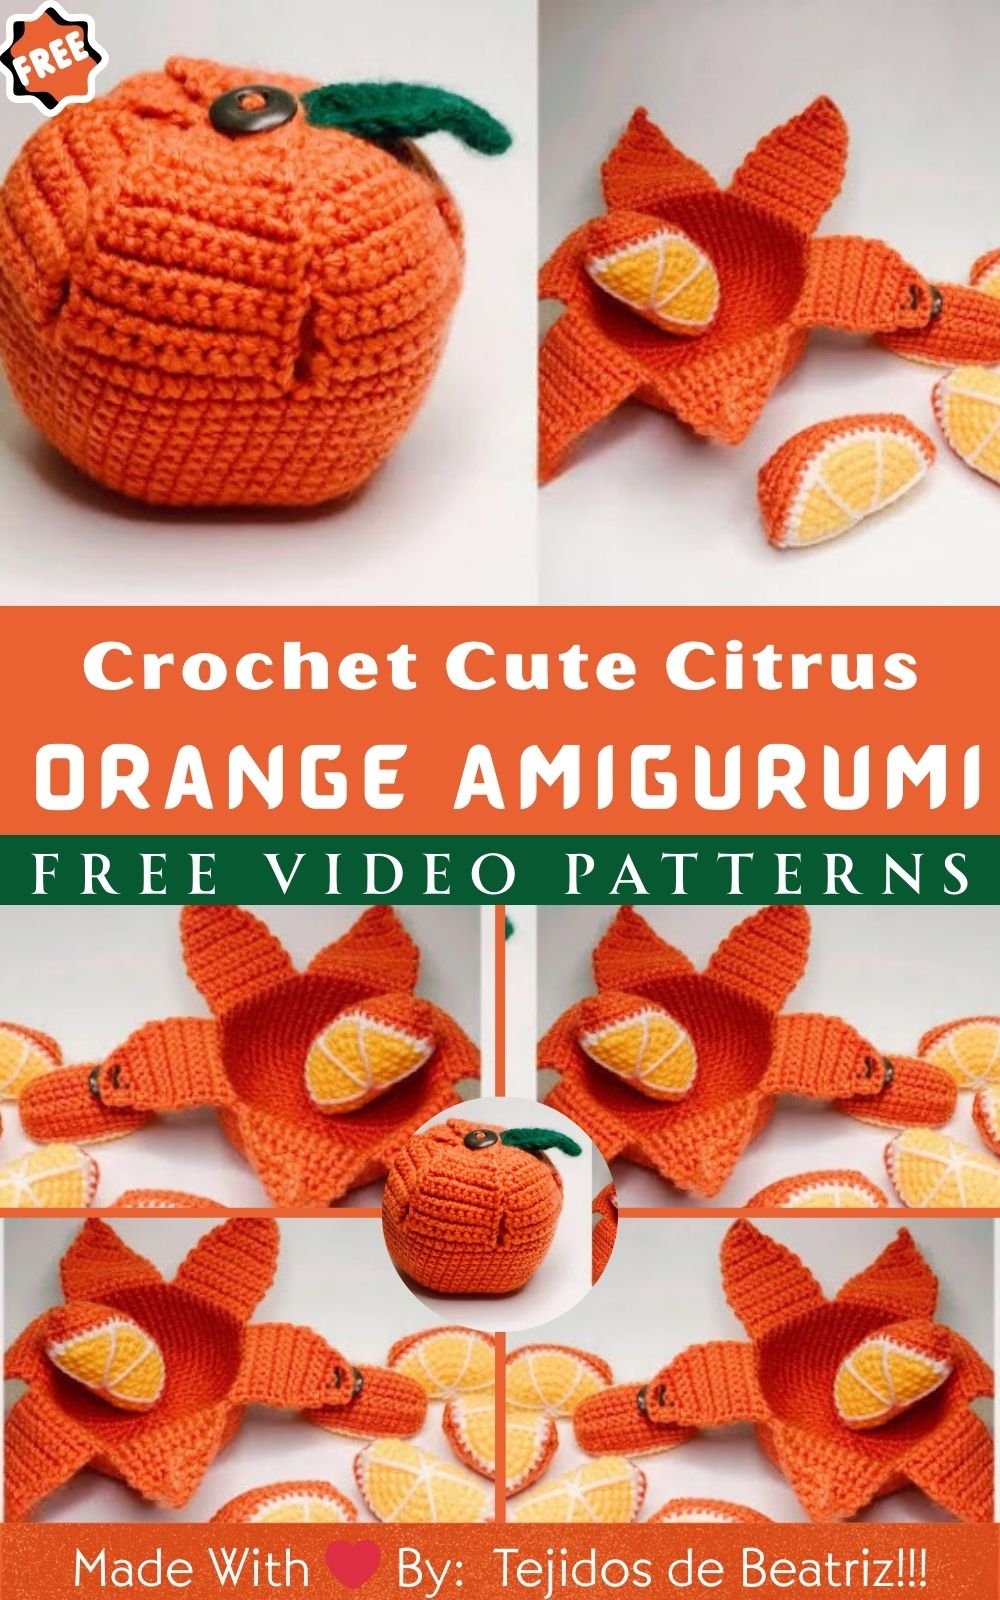
Source: Pattern
Clear steps and easy embroidery keep the process relaxing, while crisp citrus details add irresistible personality. Moreover, the compact size finishes fast, so you’ll enjoy instant wins and repeat-worthy results. Use it as a cheerful keychain or bag charm, a sweet desk buddy, or a giftable plush for kids and citrus lovers alike.
Outstanding Crochet Cute Citrus Orange Amigurumi Pattern
Materials Needed
- Yarn:
- Main: 25–30 g orange DK/light worsted (Category 3) cotton or cotton–acrylic blend
- Contrast: 2–3 g white for pith detail and 3–4 g green for leaf and stem
- Optional blush: a few inches of pink or peach embroidery thread or fine yarn
- Hook:
- 3.0 mm for a snug fabric (consider 2.5–2.75 mm if stitches run loose; 3.25 mm if stitches run tight)
- Safety eyes:
- 8 mm pair (use 6 mm for a smaller orange; 10 mm for a bigger plush)
- Stuffing:
- 20–30 g polyester fiberfill (or wool roving), springy and clean
- Stitch markers:
- 1–2 locking markers for tracking rounds and eye placement
- Yarn/tapestry needle:
- Blunt tip for sewing parts and embroidering details
- Scissors:
- Small and sharp for precise trimming
- Keychain hardware (optional):
- 25 mm split ring plus 8–10 mm jump ring
- Optional extras:
- Tiny button (8–10 mm) for a decorative stem accent
- 15–20 cm floral wire for a posable leaf (tape wire tips for safety)
- Fabric glue or Fray Check to secure knots, if desired
Finished size (with DK yarn and 3.0 mm hook): approximately 7–8 cm (2.75–3.25 in) across
Skill Level
This amigurumi uses single crochet in continuous rounds, gentle increases and decreases, and light embroidery; therefore, it suits complete beginners who want a quick, confidence-building win. Additionally, the minimal sewing and clear checkpoints make the process smooth from start to finish. As a result, the orange works up quickly yet still looks polished and gift-ready.
Making Time (Overview)
- Orange body: 1.5–2 hours
- Leaf and stem: 15–25 minutes
- Face details and assembly: 15–25 minutes
- Optional mini slice: 30–40 minutes
Altogether, the basic orange typically takes 2–3 hours, while the optional extras may extend the total to 3–3.5 hours. Consequently, it fits perfectly into an evening craft session or an easy weekend project.
Step-by-Step Instructions
Before starting
- First, work in continuous rounds (spiral) unless a round is specifically joined.
- Next, place a stitch marker in the first stitch of each round to avoid losing count.
- Also, keep tension snug so stuffing does not peek through the stitches.
- Finally, use an invisible decrease (inv dec) for smooth shaping on taper rounds.
Abbreviations (US terms)
- MR: magic ring
- ch: chain
- sc: single crochet
- inc: increase (2 sc in one stitch)
- dec: decrease (inv dec recommended)
- sl st: slip stitch
- BLO: back loop only
Body (Orange)
- Grow the citrus base (about 25–30 minutes)
- Round 1: 6 sc in MR (6)
- Round 2: inc around (12)
- Round 3: (sc, inc) repeat 6 times (18)
- Round 4: (2 sc, inc) repeat 6 times (24)
- Round 5: (3 sc, inc) repeat 6 times (30)
- Round 6: (4 sc, inc) repeat 6 times (36)
- Round 7: (5 sc, inc) repeat 6 times (42)
- Round 8: (6 sc, inc) repeat 6 times (48)
To keep growth smooth, gently roll the shaping between palms every couple of rounds; meanwhile, adjust hand tension so the fabric stays dense and even. If a faint hexagon appears, lightly massage the edges to round the silhouette. Additionally, placing the stitch marker consistently at the first stitch prevents drifting and maintains symmetry.
- Shape the middle and place the face (about 25–30 minutes)
- Rounds 9–14: sc around (48 per round, 6 rounds total)
At this point, the orange forms a tidy sphere. Next, add facial features:
- Eyes: insert 8 mm safety eyes between Rounds 11 and 12, approximately 7–8 stitches apart. Alternatively, test spacing with pins before committing to backings.
- Optional “pith” detail: with white yarn, surface slip stitch a short curved line beneath each eye, or stitch a small 5–6 stitch arc between them for a bright citrus hint. Additionally, keep these accents subtle so the face remains the focal point.
- Taper and close (about 30 minutes)
- Round 15: (6 sc, dec) repeat 6 times (42)
- Round 16: (5 sc, dec) repeat 6 times (36)
- Round 17: (4 sc, dec) repeat 6 times (30)
- Round 18: (3 sc, dec) repeat 6 times (24)
- Begin stuffing gradually. Moreover, layer fiberfill in small tufts for a smooth finish.
- Round 19: (2 sc, dec) repeat 6 times (18)
- Round 20: (sc, dec) repeat 6 times (12)
- Round 21: dec around (6)
Then, fasten off and leave a short tail. Afterward, weave the yarn tail through the front loops of the remaining stitches and pull tight to close the opening. Finally, hide the end inside the body and shape the sphere with fingertips for a crisp, plump finish.
Face & Assembly
- Embroidered smile and blush
- First, mark the smile’s start and end with pins to keep it centered.
- Smile: with black or dark brown yarn/floss, bring the needle up 1–2 stitches below the center between the eyes. Then, create a tiny “U” curve spanning 3–4 stitches. For added charm, place a tiny chevron stitch at each corner to lift the expression.
- Blush: add one or two tiny pink stitches under each eye. Alternatively, lightly brush on pastel chalk and seal with a touch of clear fabric medium. As always, keep embellishments secure and child-safe.
- Leaf and stem (quick win)
- Leaf (make 1):
- With green, ch 10.
- Row 1 (down one side): sc in 2nd ch from hook; sc in next; hdc in next; dc in next 3; hdc in next; sc in next; 3 sc in last ch to pivot.
- Row 1 (up the other side): sc; hdc; dc in next 3; hdc; sc; sl st to the first sc; fasten off, leaving a long tail for sewing.
- Optionally, cut a wire slightly shorter than the leaf and tape both ends; then whip stitch it to the back vein for a posable leaf.
- Tiny stem nub:
- With green, make 5 sc in MR; pull tight, sl st to close, and fasten off, leaving a tail for sewing. Alternatively, roll a short green yarn scrap into a little nub and stitch it down.
- Sewing:
- First, sew the stem at the top center with small, secure stitches.
- Next, angle the leaf slightly to one side for personality and stitch along the base vein.
- Finally, tug gently on the tails to seat the parts before weaving them in.
- Keychain option
- For a sturdy attachment, pass a jump ring under several stem stitches. Then, connect a split ring to the jump ring. Additionally, keep hardware away from small children; safety remains the top priority.
Beginner-friendly tips
- Instead of tying knots on the surface, thread tails into the body and weave them firmly. Moreover, this technique hides ends and prevents unraveling.
- Always add safety eye backings before closing the body; otherwise, reopening the sphere is tedious.
- When sewing the leaf, pinch its base slightly; as a result, the curve looks lively and natural.
Optional Mini Citrus Slice (Beginner version; flat-fold method)
Slice front
- With yellow:
- Round 1: 6 sc in MR (6)
- Round 2: inc around (12)
- Round 3: (sc, inc) repeat 6 times (18)
- Round 4: (2 sc, inc) repeat 6 times (24)
- Round 5: (3 sc, inc) repeat 6 times (30). Fasten off.
Slice back (rind)
- With white:
- Round 1: 6 sc in MR (6)
- Round 2: inc around (12)
- Switch to orange:
- Round 3: (sc, inc) repeat 6 times (18)
- Round 4: (2 sc, inc) repeat 6 times (24)
- Round 5: (3 sc, inc) repeat 6 times (30). Fasten off, leaving a long tail.
Assembly
- First, embroider 6 thin white lines fromthe center to the edge on the yellow disc to hint at citrus segments.
- Next, place the yellow and the rind disc wrong sides together. Then, whip stitch halfway around, lightly stuff, and fold into a neat wedge.
- Finally, complete the seam, shape with hands, and trim any fuzzy ends. Consequently, the slice becomes a charming photo prop or play accessory.
Special Features
- Expressive personality: a tiny smile, glossy safety eyes, and a jaunty leaf combine to create an irresistibly cute friend. Additionally, the optional blush adds gentle warmth without overpowering the design.
- Clean citrus nods: subtle pith stitching and a tidy stem evoke a real orange; meanwhile, the smooth sphere keeps the project beginner-friendly.
- Quick make, big impact: the compact size delivers fast finishes; moreover, it uses minimal yarn, making it ideal for scrap-busting and last-minute gifts.
- Desk-friendly shape: a balanced sphere sits nicely on flat surfaces; as a result, this orange doubles as a cheerful desk buddy or shelf accent.
Sizing Tips
- Hook and yarn weight:
- Sport (Category 2) with a 2.5–2.75 mm hook yields a petite orange around 5.5–6.5 cm wide; consequently, 6 mm eyes fit best.
- DK (Category 3) with a 3.0 mm hook produces a classic 7–8 cm size; thus, 8 mm eyes look proportional.
- Worsted (Category 4) with a 3.5–4.0 mm hook creates a chunky 9–11 cm plush; therefore, 9–10 mm eyes balance nicely.
- Tension and coverage:
- If stuffing shows through, simply drop your hook by 0.25–0.5 mm. Conversely, if the fabric feels stiff or puckered, move up a size or relax the grip.
- Leaf scaling:
- For smaller oranges, reduce the foundation chain to 8 and trim the dc ladder proportionally.
- For larger versions, chain 12–14 and extend the dc section to keep the leaf in scale.
- Proportion cues:
- As a rule of thumb, place eyes along the upper-middle third of the sphere; additionally, keep them spaced 7–9 stitches apart for most sizes.
Finishing Tips
- Round transitions:
- Before fastening off at the crown, pull the final stitch a touch taller; then sl st into the next stitch. Consequently, the top looks smooth under the stem.
- Clean decreases:
- Use invisible decreases on closing rounds; as a result, little “star” dents virtually disappear.
- Stuffing method:
- Add fiberfill in thin layers; meanwhile, press gently to distribute evenly and avoid lumps. Then, add a final pinch under the crown to keep the top firm.
- Gentle blocking:
- Hover steam over cotton or cotton blends to relax tight spots; however, avoid direct contact with acrylic fibers, which can melt or shine.
- Leaf control:
- If the tip flips up more than preferred, tack a single tiny stitch near the tip. Alternatively, run a slip stitch spine down the center for a crisp vein.
- Hardware security:
- When making a keychain, sew through the stem area twice; moreover, consider a hidden thread pass through the body to anchor the ring even more securely.
Common Mistakes to Avoid for (Crochet Orange Amigurumi Pattern)
- Hook too large:
- Gaps appear, and stuffing peeks out. Instead, go down one hook size and keep tension steady; consequently, the fabric becomes dense and sturdy.
- Skipping the marker:
- Without marking the first stitch, the counts drift. Therefore, always mark the first stitch of the round and move the marker up consistently.
- Eye placement mishaps:
- Eyes set too high or too low can change the mood dramatically. Hence, test with pins, step back, and adjust before locking washers.
- Overstuffing:
- Rock-hard stuffing can distort closing rounds. Alternatively, aim for springy fullness: firm enough to hold shape yet still squeezable.
- Surface knots:
- Visible knots catch the eye and may loosen. Instead, weave tails inward and secure them with back-and-forth passes.
- Floppy leaf:
- Too little structure leads to droop. Therefore, add a central slip stitch vein, insert a light wire, or use a slightly smaller hook for the leaf.
Variations & Customization Ideas for (Crochet Orange Amigurumi Pattern)
- Citrus rainbow:
- Tangerine: choose a coral-leaning orange; then add a slightly longer leaf for a lively silhouette.
- Blood orange: embroider a soft maroon blush between segments; additionally, swap the smile for a tiny “O” mouth for a surprised look.
- Lemon or lime: switch body color to sunny yellow or zesty green; meanwhile, keep the white pith detail for a fresh, high-contrast pop.
- Expressions:
- Wink: replace one safety eye with a stitched “V”; then add a tiny eyelash stitch for flair.
- Kawaii shine: embroider a tiny white dot on each eye; consequently, the face reads extra bright.
- Sleepy: stitch curved lines for closed eyes and add a small “3” mouth; alternatively, angle the leaf downward for a cozy vibe.
- Texture play:
- Add one midsection round in BLO for a gentle rind texture; furthermore, a very light surface slip-stitch swirl hints at peel patterning.
- Use heathered or speckled yarns; as a result, the surface gains subtle depth.
- Wearables and accessories:
- Keychain or bag charm: pair with a mini name tag or initial button; moreover, match the split ring to the eye color for cohesion.
- Garland: string several minis on twine with leaves pointing in alternating directions; consequently, the banner feels lively and balanced.
- Scented version: tuck a drop of citrus essential oil on a tiny fabric scrap inside; however, seal the scrap and use sparingly for safety.
- Seasonal themes:
- Holiday: add a tiny bow, snowflake, or holly cluster; similarly, a metallic thread outline makes the leaf festive.
- Spring picnic: embroider mini daisies near the stem; alternatively, attach a gingham ribbon loop for a playful touch.
- Play set:
- Make 2–3 slices using the flat-fold method; then store them in a small drawstring pouch that echoes the leaf color. Additionally, label the pouch with a cute citrus tag for gifting.
Tutor Suggestions for (Crochet Orange Amigurumi Pattern)
- Count with cadence:
- On increase and decrease rounds, count out loud or tap a rhythm; consequently, the repeats stay consistent. Alternatively, tick boxes on a sticky note for each repeat.
- Pause for placement:
- At the first step, test eye positions in several spots; meanwhile, snap a quick photo to compare options. Often, a one-stitch shift changes the mood from bashful to bubbly.
- Ease your grip:
- Keep stitches snug yet not strangled. If hands tense up, briefly stretch fingers and roll shoulders; afterward, the hook will glide more smoothly.
- Invisible decrease refresher:
- Insert the hook through the front loops of the next two stitches together, pull up a loop, yarn over, and pull through both loops on the hook. Therefore, the decrease blends into the fabric without bumps.
- Shape as you go:
- Between rounds, cup the sphere and rotate while pressing gently; as a result, stuffing distributes evenly and lumps diminish.
- Sew with longer tails:
- For the leaf, a generous tail makes anchoring easier. Additionally, add two small stitches along the center vein to lock the angle.
- Practice embroidery:
- Try a smile on a small swatch first; then markthe start and end with pins on the orange. Consequently, the final expression lands exactly where intended.
- Batch-making boost:
- When creating multiples, crochet all leaves first, then bodies, then faces. In turn, muscle memory builds, and finishing speeds up noticeably.
- Gifting idea:
- Nestle the orange in a cupcake liner inside a small box; then add the optional mini slice for extra charm. Finally, tie with baker’s twine and citrus-colored tag.
In the end, this Outstanding Crochet Cute Citrus Orange Amigurumi Pattern blends simple stitches with charming details, so beginners enjoy a friendly, step-by-step journey while experienced makers appreciate speedy, repeatable results. Moreover, the plump body, perky leaf, and expressive face add sunshine to shelves, backpacks, and gift baskets alike. Finally, gather a small ball of orange yarn, set a stitch marker, and let cheerful citrus magic grow round by round.